Introduction
Welcome to the world of computer memory! Whether you’re a tech enthusiast or a casual user, knowing how much RAM (Random Access Memory) your computer has can be a crucial piece of information. RAM plays a vital role in the overall performance and efficiency of your system. It affects the speed at which your applications run, the multitasking capabilities, and the overall user experience. Therefore, it’s important to be able to find out the amount of RAM your computer has.
In this article, we will guide you through the process of checking the amount of RAM on different operating systems, including Windows, Mac, and Linux. We will also explore various tools and methods you can use to gather this information. Let’s dive in!
Note that the steps mentioned in this article may vary slightly depending on the version of the operating system you are using. However, the general concepts and tools remain the same, so you should be able to find the information you need regardless of your specific setup.
Now, let’s explore the different methods you can use to find out how much RAM your computer has on Windows, Mac, and Linux systems.
Checking RAM on Windows
Windows provides several ways to check the amount of RAM on your computer. Here are a few methods you can use:
Using System Information Tools
One of the easiest ways to check your computer’s RAM on Windows is by using the built-in System Information tool. Here’s how:
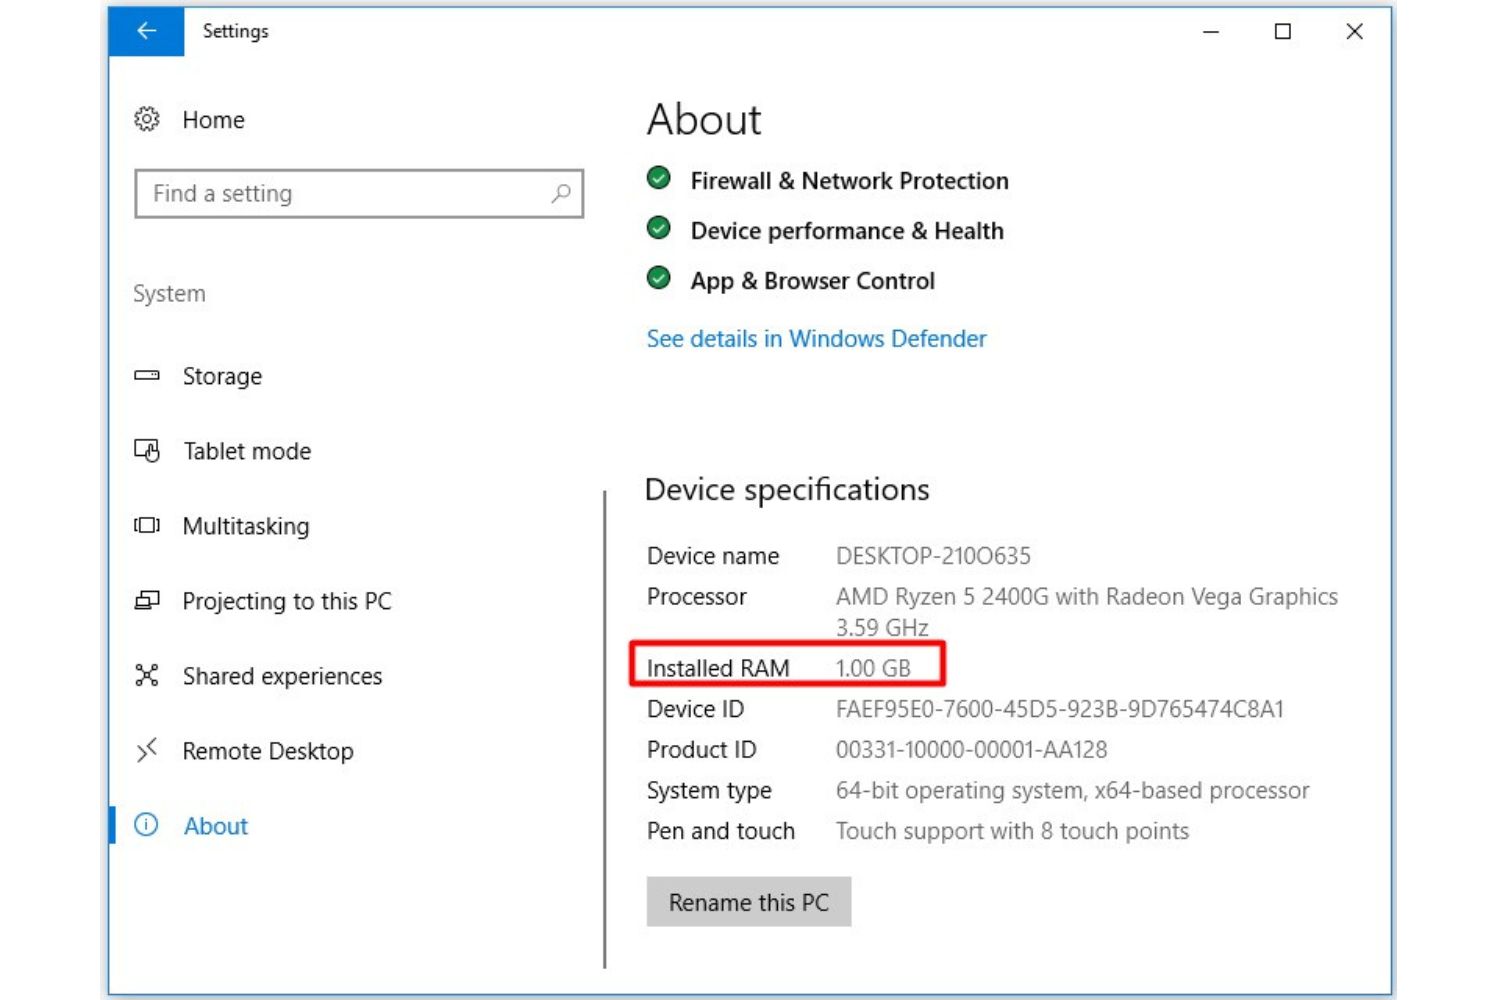
- Press the Windows key on your keyboard and type “System Information” in the search bar.
- Click on the “System Information” app from the search results.
- In the System Information window, you’ll find detailed information about your computer’s hardware and software. Look for the “Installed Physical Memory (RAM)” section to see the amount of RAM installed on your system.
Checking RAM through Command Prompt
Another method is to use the Command Prompt to find out your computer’s RAM. Here’s what you need to do:
- Press the Windows key + R on your keyboard to open the Run dialog box. Type “cmd” and press Enter to open the Command Prompt.
- In the Command Prompt window, type “wmic MEMORYCHIP get Capacity” and press Enter.
- You’ll see a list of numbers representing the RAM capacities of each memory chip installed on your computer.
- Add up the numbers to get the total amount of RAM on your system.
Checking RAM through Task Manager
If you prefer a more visual approach, you can also check the amount of RAM using the Task Manager. Here’s how:
- Right-click on the taskbar and select “Task Manager” from the context menu.
- In the Task Manager window, click on the “Performance” tab.
- At the bottom, you’ll see a section called “Physical Memory (RAM).” The number displayed represents the total amount of RAM installed on your computer.
By using these methods, you can easily check the amount of RAM your Windows computer has. Now, let’s move on to checking RAM on Mac systems.
Checking RAM on Mac
If you’re using a Mac, finding out the amount of RAM installed on your system is a straightforward process. Here are a couple of methods you can use:
Using About This Mac
The easiest way to check your Mac’s RAM is by using the “About This Mac” feature. Here’s how to do it:
- Click on the Apple menu in the top-left corner of your screen and select “About This Mac.”
- In the window that appears, click on the “Memory” tab.
- You’ll find the total amount of installed memory displayed in gigabytes (GB) next to “Memory.”
Using System Profiler
Another method to check your Mac’s RAM is by using the System Profiler utility. Here’s what you need to do:
- Click on the Apple menu and select “About This Mac.”
- In the window that appears, click on the “System Report” button.
- The System Profiler will open, displaying detailed information about your Mac’s hardware. Navigate to the “Hardware” section in the sidebar and click on “Memory.”
- You’ll see the total amount of installed memory listed under “Size.”
By following these methods, you can quickly determine the amount of RAM on your Mac. Now, let’s explore how to check RAM on Linux systems.
Checking RAM on Linux
In the Linux world, there are various ways to check the amount of RAM on your system. Here are a couple of methods commonly used:
Using Terminal Commands
Linux users can utilize terminal commands to gather information about their computer’s RAM. Here’s how:
- Open the terminal by pressing Ctrl+Alt+T or searching for “Terminal” in the applications menu.
- Type the command “free -h” and hit Enter.
- You will see an output displaying the total, used, and available memory, including the RAM, in human-readable format.
Using System Monitor
Many Linux distributions also offer graphical tools like the System Monitor to check hardware information, including RAM. Here’s what you can do:
- Launch the System Monitor by searching for it in the applications menu or open it from the system settings.
- In the System Monitor window, navigate to the “Resources” or “Memory” tab.
- You’ll find information about your computer’s RAM usage, including the total amount of memory installed.
These methods offer a convenient way to check your Linux system’s RAM. Now let’s move on to exploring the use of system information tools on different operating systems.
Using System Information Tools
Regardless of the operating system you’re using, many system information tools can provide detailed information about your computer’s hardware, including the amount of RAM. Here are a few commonly used tools:
Speccy
Speccy is a popular system information tool for Windows. It offers a detailed overview of your computer’s hardware components, including RAM. You can download the program from the official website and install it on your Windows computer. Once installed, open Speccy, and it will display information about your RAM’s capacity and other hardware details.
About This Mac
For Mac users, the built-in “About This Mac” feature, as mentioned earlier, also provides comprehensive hardware information, including the amount of RAM installed. It’s a convenient and readily available tool that comes preinstalled on all Mac systems.
Hardinfo
Linux users can rely on tools like Hardinfo to gather system information, including RAM details. Hardinfo is an open-source software that provides an in-depth analysis of your hardware components. You can install it from the software repository of your Linux distribution, and once installed, it will offer a comprehensive overview of your system’s specifications, including RAM capacity.
By utilizing these system information tools, you can obtain detailed insights into your computer’s hardware, including the amount of RAM. However, if you prefer a more direct approach, you can also check the RAM through the command prompt or task manager on Windows, or by using the “About This Mac” feature on macOS.
Checking RAM through Command Prompt
If you are using a Windows operating system, you can also check the amount of RAM installed on your computer through the Command Prompt. Here’s how to do it:
- Press the Windows key + R on your keyboard to open the Run dialog box.
- Type “cmd” in the text field and press Enter to open the Command Prompt.
- In the Command Prompt window, type the command “wmic MEMORYCHIP get Capacity” and press Enter.
- You will see a list of numbers representing the capacity of each memory chip installed on your computer.
- Add up the numbers to calculate the total amount of RAM installed on your system.
This method retrieves the information directly from the system’s Memory Chip and displays it in bytes. It allows you to get a detailed overview of the capacity of each memory module installed in your computer.
It’s important to note that the capacity displayed by this method is in bytes, which may not be very user-friendly for some. However, you can easily convert bytes to gigabytes by dividing the result by 1,073,741,824. This will give you the total amount of RAM in gigabytes (GB).
The Command Prompt method provides a quick and efficient way to check your computer’s RAM information without the need for any additional software or tools. It is particularly useful when you want to retrieve detailed information about each memory chip installed in your system.
Now that you know how to check the RAM through the Command Prompt, let’s explore another method using the Task Manager.
Checking RAM through Task Manager
If you’re using a Windows operating system, an alternative method to check the amount of RAM installed on your computer is through the Task Manager. Here’s how to do it:
- Right-click on the taskbar and select “Task Manager” from the context menu.
- In the Task Manager window, click on the “Performance” tab.
- At the bottom of the window, you’ll find a section labeled “Physical Memory (RAM).” The number displayed represents the total amount of RAM installed on your computer.
The Task Manager provides a user-friendly and visual representation of your computer’s performance, including memory usage. Checking the RAM through the Task Manager allows you to quickly determine the total amount of RAM at a glance.
In addition to the total memory, the Task Manager also provides real-time information on how much of your RAM is currently being utilized by different processes and applications. It gives you insights into memory usage and helps identify if there are any memory-intensive tasks running that might impact your system’s performance.
Keep in mind that the Task Manager’s functionality may vary slightly depending on the version of Windows you are using. However, the “Performance” tab and the memory information section should be available in most versions, allowing you to easily check your computer’s RAM.
By using the Task Manager, you can monitor your system’s memory usage in real-time and get a better understanding of how your computer is utilizing its RAM resources.
Now that we have explored methods to check the RAM on Windows systems, let’s summarize the key points we discussed.
Conclusion
Knowing how much RAM your computer has is essential for understanding its performance capabilities and optimizing its usage. Whether you’re using a Windows, Mac, or Linux operating system, there are various methods you can use to check the amount of RAM on your system.
On Windows, you can use system information tools like the built-in System Information tool or third-party applications like Speccy to gather detailed information about your computer’s hardware, including RAM. Additionally, you can use the Command Prompt or Task Manager to quickly check the amount of RAM installed.
Mac users can rely on the “About This Mac” feature or utilize the System Profiler tool to access information about their system’s RAM. These tools provide a convenient way to obtain the total amount of RAM on your Mac.
For Linux users, terminal commands like “free -h” or graphical tools like System Monitor or Hardinfo can be used to check the amount of RAM on your system. These tools offer insights into memory usage and overall hardware specifications.
It’s important to note that the steps and tools mentioned in this article may slightly vary depending on the version of the operating system you are using. However, with the general concepts and tools provided, you should be able to find the information you need.
By regularly checking your computer’s RAM, you can ensure that it meets the requirements of the applications you use and make informed decisions about upgrading or optimizing your system’s performance. Having the right amount of RAM is crucial for seamless multitasking, running resource-intensive applications, and enhancing overall user experience.
So, take a moment to explore the methods mentioned in this article and find out how much RAM your computer has. Understanding your system’s capabilities will empower you to make informed decisions and get the most out of your computing experience.