Introduction
Welcome to this guide on how to find RAM in Device Manager. If you’re a computer enthusiast or someone who wants to know more about the hardware components of your device, understanding how to locate the RAM in Device Manager can be quite useful. In this article, we’ll explain what RAM is, what Device Manager is, and why it’s important to find RAM information in Device Manager.
RAM, which stands for Random Access Memory, is an essential component of any computer system. It is responsible for temporarily storing data that the CPU (Central Processing Unit) needs to access quickly. In simple terms, RAM acts as a bridge between the CPU and your storage device (hard drive or solid-state drive), allowing for faster data retrieval and smoother performance.
Device Manager, on the other hand, is a built-in tool in both Windows and macOS operating systems that provides a comprehensive view of the hardware devices connected to your computer. It allows users to manage, monitor, and troubleshoot various hardware components, including RAM. By accessing Device Manager, you can obtain detailed information about the installed RAM, such as its capacity, speed, and manufacturer.
But why is it important to find RAM information in Device Manager? Well, knowing the specifics of your computer’s RAM can be helpful in several ways. It can aid in system diagnostics, determining if your device meets the requirements for certain software applications or games, and even in upgrading or replacing the RAM modules for better performance.
In the next sections, we will guide you on how to open Device Manager on both Windows and macOS systems. We’ll also provide step-by-step instructions on locating the RAM information within Device Manager. So, whether you’re a tech-savvy individual or a casual user, let’s dive into the process of finding RAM in Device Manager on your computer.
What is RAM?
RAM, short for Random Access Memory, is a vital component of any computer system. It plays a critical role in determining the overall performance and speed of your device. RAM acts as a temporary storage space for the data and instructions that your computer’s CPU (Central Processing Unit) needs to access quickly.
Unlike your computer’s long-term storage devices, such as the hard drive or solid-state drive (SSD), RAM provides faster data access and retrieval. It allows the CPU to quickly retrieve and manipulate data, leading to smoother multitasking, faster program execution, and improved overall system responsiveness.
The primary function of RAM is to hold data that the CPU actively uses during its operations. When you open a program or load a file, the required data is temporarily transferred from the storage device to the RAM. This enables the CPU to access the data much faster than if it had to read it directly from the hard drive or SSD.
RAM is considered volatile memory, which means that its contents are cleared when the computer is powered off or restarted. This is why it is often referred to as “temporary memory.” Any unsaved data or programs that were running in RAM will be lost when the computer shuts down.
The capacity of RAM is measured in gigabytes (GB). The more RAM your computer has, the more data it can store and access quickly. This is especially important when running memory-intensive applications, such as video editing software or modern video games that require a significant amount of memory to operate smoothly.
The speed at which RAM operates is measured in megahertz (MHz) or gigahertz (GHz). Higher-speed RAM modules can transfer data more quickly, resulting in improved performance. However, it’s important to note that the speed of RAM is limited by the motherboard and CPU’s compatibility and specifications.
It’s worth mentioning that RAM and storage are two different components in your computer. While RAM provides temporary storage for data that the CPU actively uses, the hard drive or SSD serves as a permanent storage solution for your files, programs, and operating system.
Now that we have a basic understanding of what RAM is and its role in your computer’s performance, let’s delve into how you can locate the RAM information in Device Manager on both Windows and macOS systems.
What is Device Manager?
Device Manager is a built-in tool in both Windows and macOS operating systems that allows users to manage and monitor the hardware devices connected to their computers. It provides a comprehensive view of the devices, drivers, and their status, making it a valuable tool for troubleshooting and managing hardware-related issues.
In Windows, you can access Device Manager by typing “Device Manager” in the search bar or by right-clicking on the Start button and selecting the “Device Manager” option from the context menu. In macOS, Device Manager is called “System Information,” which can be found by clicking on the Apple menu, selecting “About This Mac,” and then clicking on the “System Report” button.
Once you open Device Manager, you’ll see a hierarchical list of hardware devices categorized into different sections such as Display Adapters, Network Adapters, Sound, video, and game controllers, etc. Each device is represented by its name, and you can expand the categories to view the individual devices under each section.
Device Manager provides various pieces of information about each device, including its name, manufacturer, driver version, status, and resource usage. It also allows you to update device drivers, enable or disable devices, uninstall devices, and perform other device management tasks.
One of the key benefits of using Device Manager is troubleshooting hardware-related issues. If a device is not working properly or has an exclamation mark or question mark next to it, it indicates a problem. In such cases, you can use Device Manager to update the device driver, roll back to previous driver versions, or uninstall and reinstall the device to resolve the issue.
Finding RAM information in Device Manager is particularly useful when diagnosing RAM-related issues or upgrading your computer’s memory. Device Manager provides detailed information about your installed RAM modules, including the manufacturer, capacity, speed, and other specifications. This allows you to verify if your computer meets the system requirements of specific software applications or games, as well as determine the compatibility of additional RAM modules for upgrading your system’s memory capacity.
Now that you know what Device Manager is and its significance in managing and troubleshooting hardware devices, let’s explore the process of finding RAM information within Device Manager on both Windows and macOS systems.
Why do you need to find RAM in Device Manager?
Understanding how to find RAM information in Device Manager can be beneficial for several reasons. Whether you’re a computer enthusiast, a system administrator, or a casual user, having access to detailed RAM information can help in various scenarios.
One of the main reasons for finding RAM in Device Manager is system diagnostics. If your computer is experiencing performance issues, knowing the specific details of your installed RAM can help identify potential causes. Device Manager provides information about the capacity, speed, and other specifications of your RAM modules, allowing you to determine if they meet recommended requirements for certain applications or games.
In addition, finding RAM information in Device Manager is crucial when considering a RAM upgrade. By knowing the current RAM configuration and its limitations, you can make an informed decision about whether you need to add more RAM to your computer. Device Manager provides details about the number of RAM slots available, the maximum supported capacity, and other crucial information for upgrading or replacing the RAM modules.
Device Manager also plays a role in determining the compatibility of additional RAM modules for upgrading your system. By accessing the RAM information, you can verify if the new RAM modules you plan to purchase align with the supported specifications of your motherboard and existing RAM. This ensures that the upgrade process goes smoothly and avoids incompatible hardware issues.
Moreover, finding RAM information in Device Manager can help you troubleshoot hardware-related issues. If you suspect that the RAM might be causing problems, checking its details in Device Manager can provide valuable insights. You can identify whether the RAM is properly recognized, if any errors or conflicts are detected, or if the RAM modules are operating at their optimal speed.
Lastly, having access to RAM information in Device Manager can assist in overall system maintenance and management. It allows you to keep track of the hardware components, monitor resource usage, and make informed decisions about system upgrades or optimizations.
By finding RAM information in Device Manager, you gain a deeper understanding of your computer’s memory configuration, its capabilities, and potential limitations. This knowledge empowers you to troubleshoot issues, make informed upgrade decisions, and optimize your system’s performance. Now, let’s dive into the process of opening and accessing Device Manager on both Windows and macOS systems.
How to Open Device Manager
Opening Device Manager is the first step in finding RAM information on your computer. The process may vary slightly between Windows and macOS systems. Let’s explore how to open Device Manager on both operating systems:
Opening Device Manager on Windows:
- Press the Windows key on your keyboard or click on the Start button in the bottom-left corner of your screen.
- Type “Device Manager” in the search bar.
- From the search results, click on the “Device Manager” option.
- Alternatively, you can right-click on the Start button and select “Device Manager” from the context menu.
Device Manager will open, displaying a categorized list of hardware devices connected to your Windows computer.
Opening Device Manager on macOS:
- Click on the Apple menu icon in the top-left corner of your screen.
- Select “About This Mac” from the drop-down menu.
- In the window that opens, click on the “System Report” button.
- The System Information window will appear, providing detailed information about your Mac’s hardware.
- Click on the “Hardware” category in the left sidebar.
- Under the “Hardware” category, click on “Device Tree”.
The Device Manager equivalent, known as “System Information”, will open, showing a hierarchical list of hardware devices connected to your Mac.
Now that you know how to open Device Manager on both Windows and macOS, let’s proceed to the next sections where we will guide you on how to locate RAM information within Device Manager on these systems.
Locating RAM in Device Manager on Windows
Once you have opened Device Manager on your Windows computer, locating the RAM information is a straightforward process. Follow the steps below:
- In the Device Manager window, look for the “Computer” or “System” category, which is usually at the top of the list.
- Click on the arrow next to the category to expand it and reveal the subcategories.
- Under the “Computer” or “System” category, you should see an entry labeled “Memory controllers.” Click on it to expand.
- Within the “Memory controllers” category, you will find the RAM modules installed in your computer.
- Right-click on one of the RAM modules, and choose “Properties” from the context menu.
- A window will open, displaying detailed information about the selected RAM module, such as its capacity, manufacturer, speed, and other specifications.
- Repeat the previous step for each RAM module listed under the “Memory controllers” category to gather information about each module.
By following these steps, you can easily locate the RAM information in Device Manager on your Windows system. This information will be useful for diagnosing memory-related issues, checking compatibility for software applications or games, or planning a RAM upgrade.
Now that you have learned how to find RAM information within Device Manager on Windows, let’s move on to the next section where we will guide you on how to locate RAM in Device Manager on macOS.
Locating RAM in Device Manager on macOS
Locating the RAM information in Device Manager, known as “System Information,” on macOS is a simple process. Follow the steps below:
- Click on the Apple menu icon in the top-left corner of your screen.
- Select “About This Mac” from the drop-down menu.
- In the window that opens, click on the “System Report” button.
- The System Information window will appear, providing detailed information about your Mac’s hardware.
- Click on the “Memory” category in the left sidebar.
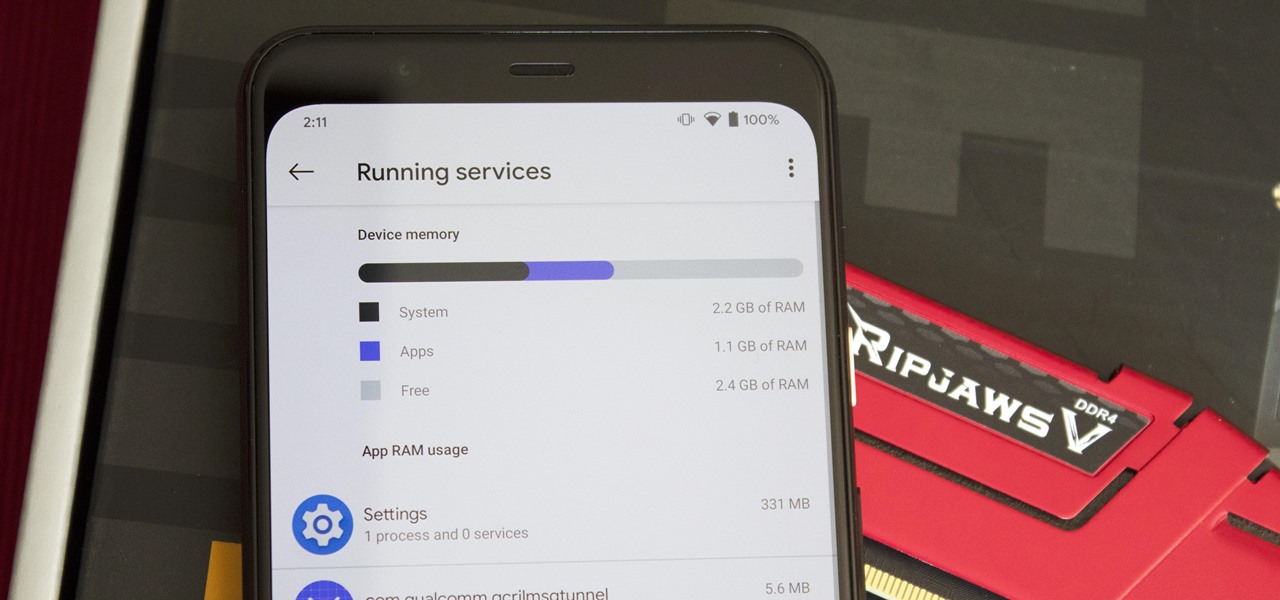
Within the “Memory” category, you will see information about your Mac’s RAM modules, including the total installed capacity, the number of RAM slots, and the speed of the RAM.
The System Information also provides additional details about the individual RAM modules, such as the part number, manufacturer, serial number, and more. You can expand each RAM entry to view its specific information.
By following these steps, you can easily locate the RAM information in Device Manager, or System Information, on your macOS computer. This information is helpful for system diagnostics, determining compatibility, or planning a RAM upgrade.
Now that you know how to find RAM information within Device Manager on both Windows and macOS, you can effectively manage and optimize the memory resources of your computer.
Troubleshooting Common Issues when Finding RAM in Device Manager
While finding RAM information in Device Manager is usually a straightforward process, there can be instances where you encounter certain issues or difficulties. Here are some common issues and troubleshooting steps to help you overcome them:
1. Missing or Inaccurate RAM Information:
If you find that the RAM information in Device Manager is missing or inaccurate, it could be due to outdated device drivers or other system-related issues. To troubleshoot this problem:
- Update Device Drivers: Visit the website of your computer’s manufacturer or the RAM manufacturer’s website to download and install the latest device drivers for your system. This can ensure that Device Manager displays accurate and up-to-date RAM information.
- Restart the System: Sometimes, simply restarting your computer can resolve issues with missing or inaccurate RAM information in Device Manager. It helps refresh the system and reload any necessary drivers.
2. Unrecognized RAM Modules:
If Device Manager does not recognize the installed RAM modules or displays a generic description, you can try the following troubleshooting steps:
- Re-seat the RAM Modules: Turn off your computer, open the case, and carefully re-seat the RAM modules. Ensure that they are properly inserted into the RAM slots. Sometimes, improper installation can cause recognition issues.
- Check Compatibility: Verify that the RAM modules are compatible with your motherboard and operating system. Refer to the manufacturer’s specifications and documentation or consult with a computer technician if needed.
- Update BIOS: If the BIOS (Basic Input/Output System) is outdated, it can lead to compatibility issues and unrecognized RAM modules. Check the manufacturer’s website for BIOS updates and follow their instructions to update your system’s BIOS.
3. RAM Slot or Module Failure:
If you suspect a RAM slot or module failure, you can perform the following troubleshooting steps:
- Test Individual Modules: Remove all but one RAM module and test each module individually. This helps identify if a specific module or RAM slot is causing the issue. If one module fails or exhibits issues while others perform fine, it may indicate a faulty module.
- Swap RAM Modules: Switch the position of the RAM modules in their respective slots. This helps determine if the issue is specific to a particular slot. If the problem follows the module to a different slot, it suggests a faulty RAM module.
- Seek Professional Assistance: If troubleshooting steps do not resolve the issue, it may be best to consult with a computer technician or the manufacturer’s support for further guidance and possible repair or replacement.
By troubleshooting these common issues, you can overcome obstacles in finding RAM information in Device Manager and ensure the accurate detection and functioning of your computer’s memory modules.
With the troubleshooting strategies provided, you can now effectively navigate and address any challenges that may arise while attempting to locate RAM in Device Manager.
Conclusion
Understanding how to find RAM information in Device Manager is a valuable skill for anyone interested in computer hardware or troubleshooting. RAM plays a crucial role in your computer’s performance, and Device Manager provides essential details about the installed RAM modules.
In this guide, we discussed what RAM is and its significance in computer systems. We also explored what Device Manager is and why it is essential for managing and troubleshooting hardware devices. Moreover, we highlighted the importance of finding RAM information in Device Manager for system diagnostics, compatibility checks, and RAM upgrades.
We provided step-by-step instructions on opening Device Manager on both Windows and macOS systems. Additionally, we walked you through the process of locating RAM information within Device Manager on each operating system, ensuring you can easily access the necessary details about your computer’s memory configuration.
Furthermore, we covered common issues that you may encounter when finding RAM information in Device Manager and provided troubleshooting tips to address them effectively.
By following the steps and troubleshooting strategies outlined in this guide, you can confidently manage, diagnose, and optimize your computer’s RAM configuration.
Remember, finding RAM information in Device Manager is just the starting point. Continuously monitoring and updating your computer’s hardware components, including the RAM, can help ensure optimal performance and a smooth computing experience.
Now that you are equipped with the knowledge and know-how of finding RAM information in Device Manager, you are ready to explore the depths of your computer’s memory configuration and unleash its full potential.