Why Knowing Your RAM is Important
RAM, or Random Access Memory, is a critical component of your computer’s hardware. It plays a vital role in the overall performance of your system, as it is responsible for the temporary storage and quick access of data that your computer needs to perform tasks.
Knowing how much RAM you have is important for several reasons. Firstly, it helps you understand the capabilities of your computer. Different software and applications have specific memory requirements, and if your computer lacks sufficient RAM, it can lead to slow performance, lag, and even crashes. By knowing your current RAM capacity, you can determine if you need to upgrade to meet the demands of resource-intensive tasks.
Secondly, understanding your RAM capacity can help you optimize your workflow. If you regularly use memory-intensive applications such as video editing or gaming software, having ample RAM ensures smooth and efficient multitasking. It allows you to run multiple programs simultaneously without experiencing slowdowns or system freezes.
Furthermore, knowing your RAM size can aid in diagnosing performance issues. If you notice your computer is running sluggishly or experiencing frequent freezes, checking your RAM usage can help identify if excessive memory consumption is the culprit. In such cases, you can take steps to close unnecessary processes or upgrade your RAM if needed.
Additionally, having knowledge of your RAM capacity can inform your decisions when it comes to upgrading or purchasing computer hardware. If you plan to install a new software or upgrade your operating system, understanding your current RAM size ensures compatibility and helps you make informed choices regarding hardware improvements.
Overall, knowing how much RAM you have is crucial for optimizing your computer’s performance, preventing slowdowns, and managing resource-heavy tasks effectively. With this information at hand, you can take proactive steps to ensure your system operates at its best and meets your computing needs.
Checking RAM on Windows
If you are using a Windows operating system, there are several methods you can use to check your RAM capacity.
One of the easiest ways to check your RAM on Windows is through the Task Manager. To access it, simply right-click on the taskbar and select “Task Manager” from the menu. In the Task Manager window, go to the “Performance” tab. Here you’ll find a variety of information about your computer’s performance, including the total amount of RAM installed.
Another method is to use the System Information tool. To access this, press the Windows key + R to open the Run dialog box, then type “msinfo32” and press Enter. The System Information window will open, providing detailed information about various aspects of your computer, including the installed RAM size.
If you prefer using the command line, you can utilize the Command Prompt. Simply open the Command Prompt by typing “cmd” in the search bar, then enter the following command: “wmic memorychip get capacity”. This will display the total capacity of your installed RAM.
In addition to these methods, there are also third-party software applications available that provide detailed information about your computer’s hardware, including your RAM capacity. These tools often offer more extensive monitoring and diagnostic capabilities, allowing you to delve deeper into your system’s performance.
Checking your RAM on Windows is a simple process that can provide valuable insights into your computer’s capabilities. Knowing your RAM size helps you understand its limitations, optimize performance, and make informed decisions regarding hardware upgrades if necessary.
Checking RAM on Mac
If you are a Mac user, there are several methods you can use to check your RAM capacity.
One of the easiest ways to check your RAM on a Mac is by using the Activity Monitor. To access it, go to the “Applications” folder, then open the “Utilities” folder, and double-click on “Activity Monitor”. In the Activity Monitor window, select the “Memory” tab, and you will find information about your installed RAM, including its size and usage.
Another method is to use the Terminal. To open the Terminal, go to the “Applications” folder, then open the “Utilities” folder, and double-click on “Terminal”. In the Terminal window, enter the command “sysctl -n hw.memsize” and press Enter. This will display the total installed RAM in bytes.
If you prefer a graphical interface, you can use the System Profiler. To access it, click on the Apple menu in the top-left corner of the screen, then select “About This Mac”. In the “Overview” tab, click on the “System Report” button. In the System Information window, navigate to “Hardware” and select “Memory”. Here you will find detailed information about your installed RAM.
For more detailed information and monitoring capabilities, you can also use third-party software applications specifically designed for Mac systems. These tools often provide real-time monitoring of your computer’s performance, including RAM usage, and can offer additional features to optimize your system’s performance.
Checking your RAM on a Mac is essential for understanding your computer’s capabilities and optimizing its performance. By knowing your RAM size, you can determine if you have sufficient memory for resource-intensive tasks and make informed decisions about upgrading your hardware if needed.
Checking RAM on Linux
Linux users have a few different methods to check their RAM capacity and usage.
One way to check your RAM on Linux is by using the Terminal. Open a Terminal window by pressing Ctrl + Alt + T or searching for “Terminal” in the application launcher. Once in the Terminal, enter the command “free -h” and press Enter. This will display information about your system’s memory, including the total installed RAM, as well as the amount used and available.
Another method is to use the System Monitor. Many Linux distributions come with a built-in system monitoring tool that provides detailed information about system resources, including RAM usage. You can usually find it in the system settings or by searching for “System Monitor” in the application launcher.
If you prefer a command-line interface, you can use the “top” command to check your RAM. Open a Terminal window and type “top” to launch the command. In the top interface, you’ll see various system statistics, including information about your RAM, such as total memory, used memory, and free memory.
There are also third-party applications available for Linux that provide more extensive monitoring and management of your system’s resources, including RAM. Tools like “htop” and “glances” offer advanced features and a more user-friendly interface for checking and monitoring your RAM usage.
Understanding your RAM capacity and usage on Linux is crucial for managing system resources efficiently and optimizing performance. By monitoring your RAM, you can identify potential memory bottlenecks, ensure you have sufficient memory for resource-intensive tasks, and make informed decisions about upgrades or optimizations if necessary.
Checking RAM on Chromebook
Checking the RAM on a Chromebook is a straightforward process that can be done using the built-in Chrome OS settings.
To check your RAM on a Chromebook, start by clicking on the system tray in the bottom-right corner of the screen. Then, click on the gear icon to open the settings menu. In the settings menu, scroll down and click on the “About Chrome OS” option.
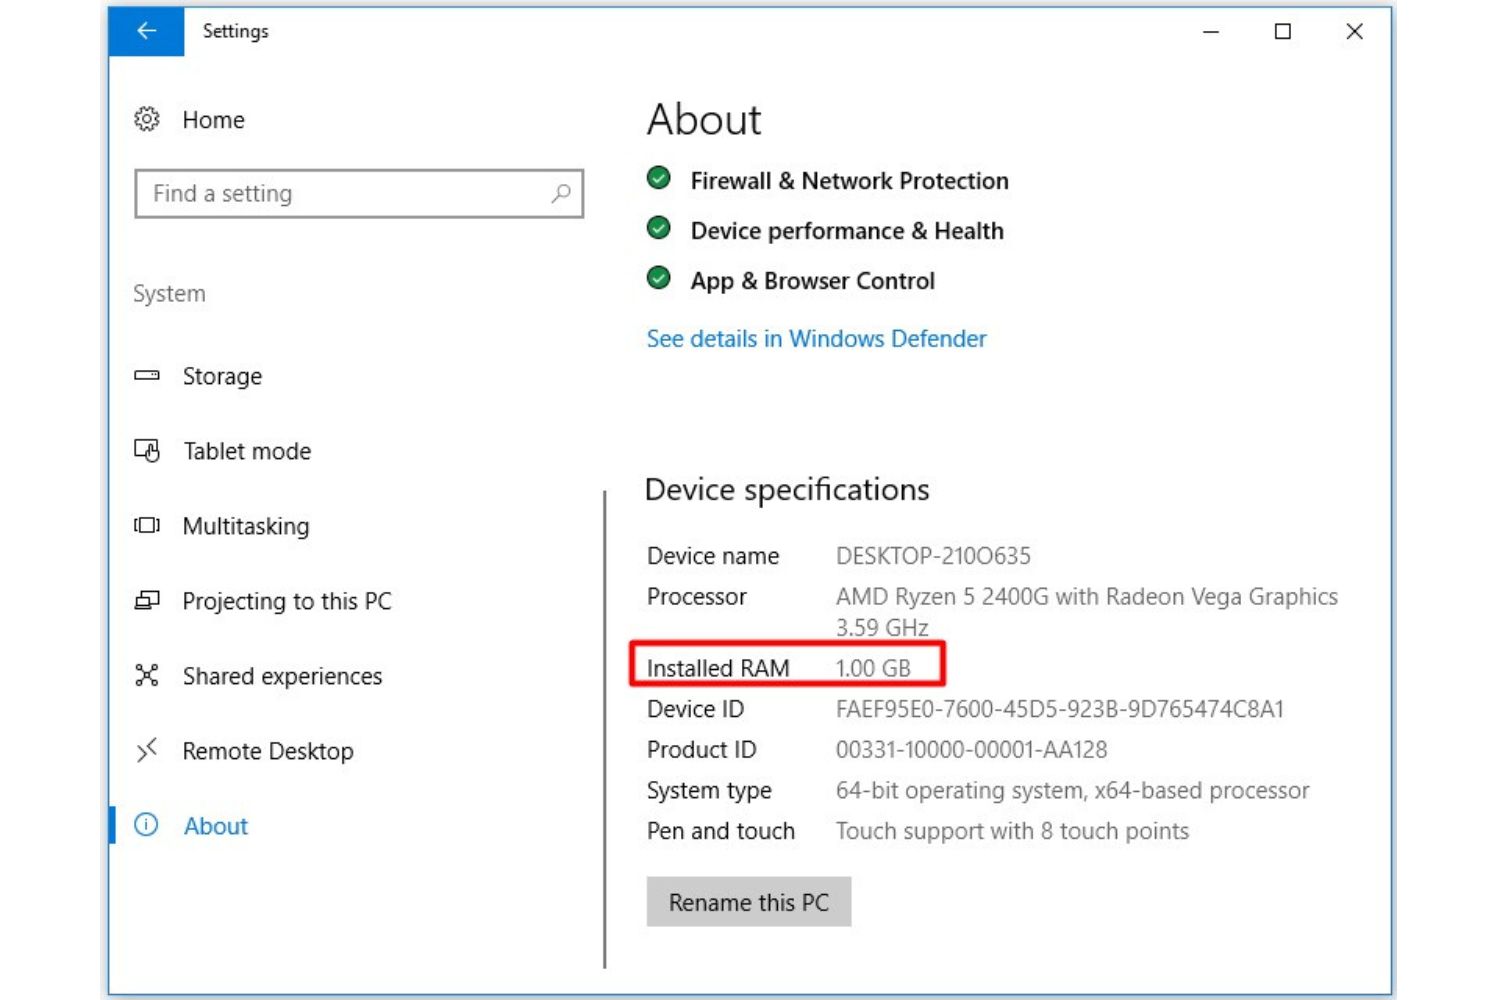
In the “About Chrome OS” section, you will find information about your Chromebook’s hardware and software. Look for the “Device RAM” or “Total Memory” field, which will provide you with the total amount of RAM installed on your device.
Keep in mind that on Chromebooks, the amount of RAM may vary depending on the specific model or configuration you have. Some Chromebooks come with 2GB or 4GB of RAM, while others have 8GB or more for improved performance.
While Chromebooks are designed to be lightweight and efficient, knowing your RAM capacity can help you determine if your device has enough memory to handle your workload. If you frequently use multiple tabs or run memory-intensive applications, having more RAM can improve performance and prevent slowdowns or crashes.
It is worth noting that unlike traditional desktop operating systems, Chrome OS manages RAM differently. Chromebooks utilize a technique called “tab discarding” to optimize memory usage by suspending unused tabs and freeing up RAM for active tasks. This means that even with lower RAM capacities, Chromebooks can still offer smooth performance for everyday tasks.
Checking the RAM on your Chromebook is a valuable step in understanding your device’s capabilities. Whether you need to determine if an upgrade is necessary or simply want to ensure smooth multitasking, knowing your RAM size helps you make informed decisions for optimal performance on your Chromebook.
Finding RAM using Task Manager (Windows)
Task Manager is a built-in utility in Windows that provides information on system performance, processes, and resource usage, including RAM. You can use Task Manager to find information about your RAM capacity in a few simple steps.
To access Task Manager, right-click on the taskbar at the bottom of your screen, then select “Task Manager” from the context menu that appears.
Once the Task Manager window is open, click on the “Performance” tab at the top. In the left-hand column, you’ll see various performance metrics, including CPU, memory, disk usage, and more.
Under the “Memory” section, you’ll find information about your current memory usage, including the amount of RAM being used. To see the total RAM capacity, look for the “Physical Memory” section, which displays the total physical memory installed on your computer.
By default, Task Manager shows memory usage in a graphical format, but you can also switch to a numerical representation. To do this, right-click on the graph in the “Memory” section, then click on “View” and select “Numeric”.
Task Manager also provides additional details such as the speed of the RAM, the form factor, and the number of slots occupied. You can find this information in the “Slots used” and “Speed” sections, respectively.
Knowing how to find your RAM capacity using Task Manager is beneficial for understanding your computer’s memory usage and determining if you have sufficient RAM for your needs. If you find that your RAM usage is consistently high or close to maximum capacity, it may be worth considering upgrading your RAM to improve system performance.
Task Manager is a handy tool that provides valuable information about your system’s performance, including your RAM capacity. Using it to check your RAM usage and capacity is an important step in optimizing your computer’s performance and ensuring smooth multitasking.
Finding RAM using System Information (Windows)
The System Information tool in Windows provides a comprehensive overview of your computer’s hardware and software, including information about your RAM.
To access System Information, you can follow a few simple steps:
- Press the Windows key + R to open the Run dialog box.
- Type “msinfo32” into the dialog box and press Enter.
- The System Information window will open, displaying various categories of system information.
- In the left-hand pane, navigate to “Hardware Resources” and click on “Memory”.
In the “Memory” section, you will find detailed information about your installed RAM, including the total amount of RAM and the number of slots in use. The System Information tool provides detailed information about each RAM slot, such as the form factor, speed, and manufacturer details.
If you want to find a summary of your computer’s RAM without delving into the detailed information, you can check the “Total Physical Memory” field displayed in the “System Summary” section at the top of the System Information window.
Using System Information to find your RAM details is helpful in understanding your computer’s memory capacity and specifications. Knowing this information can be valuable when deciding whether to upgrade your RAM to meet the demands of resource-intensive applications or multitasking.
Additionally, System Information also provides information about other hardware components and software settings, making it a useful tool for troubleshooting and diagnosing system issues.
By utilizing the System Information tool, you gain insights into your computer’s RAM configuration and capacity. This knowledge can aid in optimizing your system’s performance, ensuring efficient multitasking, and making informed decisions about hardware upgrades if necessary.
Finding RAM using Command Prompt (Windows)
If you prefer using the command-line interface, you can use the Command Prompt in Windows to find information about your RAM.
Follow these steps to find your RAM details using Command Prompt:
- Press the Windows key + R to open the Run dialog box.
- Type “cmd” and press Enter to open the Command Prompt.
- In the Command Prompt window, type the command “wmic memorychip get capacity” and press Enter.
After executing the command, you’ll see a list of values representing the capacity (in bytes) of each memory chip installed on your system, along with the total installed RAM capacity.
Another useful command is “wmic memorychip list”, which provides more detailed information about your RAM, such as the manufacturer, part number, serial number, and other specifications.
The Command Prompt method allows for a quick and straightforward way to retrieve information about your RAM. Whether you need to check your RAM capacity or gather more details about your memory modules, the Command Prompt provides valuable insights.
This method is particularly useful for advanced users who prefer the command-line interface or those troubleshooting their systems.
By using the Command Prompt to find information about your RAM, you have direct access to the data without the need to navigate through graphical user interfaces. This can be helpful when automating tasks, scripting, or diagnosing hardware issues.
Utilizing the Command Prompt to find information about your RAM provides a convenient and efficient way to access and retrieve crucial details about your computer’s memory configuration.
Finding RAM using Activity Monitor (Mac)
If you are using a Mac, you can use the built-in Activity Monitor to find information about your RAM capacity and usage.
Follow these steps to access the Activity Monitor and check your RAM:
- Click on the magnifying glass icon in the top-right corner of the screen to open Spotlight Search.
- Type “Activity Monitor” in the search bar and press Enter.
- The Activity Monitor window will open, displaying a list of processes and system resources.
- Click on the “Memory” tab at the top of the Activity Monitor window.
In the Memory tab, you will find detailed information about your Mac’s memory usage, including the amount of RAM being used and graphically represented as a colored bar.
Additionally, you can find the total amount of installed RAM (physical memory) in the bottom section of the Activity Monitor window, under the “Physical Memory” heading.
Activity Monitor also provides details about various memory-related statistics, such as Page ins/outs, Swap Used, and Compressed Memory. These statistics give you insights into how your Mac is managing memory resources.
Knowing your RAM capacity and usage using Activity Monitor can help you identify if your Mac has sufficient memory for your tasks. If you notice consistently high memory usage or frequent slowdowns, you may want to consider upgrading your RAM for improved performance.
Activity Monitor is a powerful tool that allows you to monitor and manage system resources on your Mac. Apart from checking RAM, it provides insights into CPU usage, energy impact, disk usage, and network activity. This makes it a comprehensive utility for troubleshooting and optimizing your Mac’s performance.
By utilizing Activity Monitor to find information about your RAM, you gain a better understanding of your system’s memory usage and can make more informed decisions about resource management and hardware upgrades if necessary.
Finding RAM using Terminal (Mac)
Mac users who prefer the command-line interface can find information about their RAM using the Terminal application. Terminal provides direct access to system commands and can be used to retrieve detailed information about your Mac’s memory.
Follow these steps to find your RAM details using Terminal:
- Click on the magnifying glass icon in the top-right corner of the screen to open Spotlight Search.
- Type “Terminal” in the search bar and press Enter.
- The Terminal window will open, displaying a command-line interface.
- Type the command “sysctl -n hw.memsize” and press Enter.
After executing the command, Terminal will display the total installed RAM in bytes. This gives you a precise measurement of your Mac’s physical memory capacity.
If you prefer a more readable representation of the RAM capacity, you can convert the byte value to a more familiar unit, such as kilobytes (KB), megabytes (MB), or gigabytes (GB). For example, to display the total RAM in gigabytes, you can use the command “sysctl -n hw.memsize | awk ‘{print $0/1073741824 “GB”}'”.
Using Terminal to find information about your RAM is particularly useful for advanced users who are comfortable with the command-line interface or those who need to automate tasks or gather system information programmatically.
In addition to retrieving total RAM capacity, Terminal provides access to other memory-related information. For example, you can use commands like “sysctl vm.swapusage” to get details about swap usage or “vm_stat” to gather statistics about the virtual memory system.
By using Terminal to find information about your RAM, you have direct access to data without the need to navigate through graphical user interfaces. This can be helpful for troubleshooting, scripting, or performing advanced system management tasks.
Understanding your RAM capacity using Terminal allows you to gauge your Mac’s memory resources and make informed decisions about optimizing performance or considering hardware upgrades if necessary.
Finding RAM using System Profiler (Mac)
Mac users can find detailed information about their RAM, including capacity and specifications, using the System Profiler tool. System Profiler provides a comprehensive overview of your Mac’s hardware and software configuration.
Here are the steps to find your RAM details using System Profiler:
- Click on the Apple menu in the top-left corner of the screen.
- Select “About This Mac” from the dropdown menu.
- In the “Overview” tab, click on the “System Report” button.
The System Information window will open, displaying a detailed report of various aspects of your Mac’s configuration. In the left-hand column, locate and click on the “Memory” option under the “Hardware” section.
In the “Memory” section, you will find information about your installed RAM, including the total memory capacity, type of RAM modules, speed, and other specifications. Additionally, you can view the number of physical RAM slots and the number of slots in use.
System Profiler provides a comprehensive view of your Mac’s RAM configuration, allowing you to understand the capabilities of your system for resource-intensive tasks and determine if an upgrade is needed.
Aside from checking RAM details, System Profiler offers extensive information about other hardware components, software settings, and system resources. It assists in troubleshooting hardware issues, verifying compatibility with software requirements, and obtaining detailed system specifications.
Furthermore, you can access System Profiler from the command line using the “system_profiler” command. This allows you to gather information about your Mac’s RAM configuration using scripts or automation tools.
By using System Profiler to find information about your RAM, you gain insights into your Mac’s memory capacity and specifications. This knowledge is beneficial in optimizing performance, making informed decisions about upgrades, and ensuring your system meets the demands of resource-intensive tasks.
Finding RAM using the Terminal (Linux)
In Linux, you can easily find information about your RAM using the Terminal. The Terminal provides a command-line interface that allows you to access various system commands and retrieve detailed information about your system’s memory.
To find your RAM details using the Terminal, follow these steps:
- Open the Terminal by clicking on the Terminal application or using the keyboard shortcut.
- In the Terminal, type the command “free -h” and press Enter.
After executing the command, you will see a breakdown of your system’s memory usage. The output will include information about the total installed RAM and how it is being utilized by different components of your system.
Specifically, you will find details such as:
- Total memory: This is the total amount of RAM installed on your system, displayed in human-readable format (e.g., 4.0G for 4 gigabytes).
- Used memory: This represents the portion of RAM currently in use by your system.
- Free memory: This indicates the amount of RAM that is currently available and not being used.
- Shared memory: This refers to the amount of shared memory used by different processes.
- Buffer/cache memory: This represents the portion of RAM used for disk caching and improving system performance.
Knowing your RAM details through the Terminal helps you understand the available resources on your Linux system. Additionally, this information allows you to assess whether you have sufficient memory for resource-intensive tasks or if an upgrade is necessary to improve system performance.
The Terminal provides a robust and efficient way to access and manage system resources in Linux. Being familiar with using the Terminal to find RAM details not only gives you more control over your system’s memory but also serves as a foundation for exploring other powerful system management tasks through command-line tools.
By using the Terminal to find information about your RAM, you gain insights into your Linux system’s memory usage and can make informed decisions about resource management and hardware upgrades if necessary.
Finding RAM using the System Monitor (Linux)
In Linux, the System Monitor provides a graphical interface that allows you to monitor and manage system resources, including your RAM. The System Monitor provides real-time information about your system’s memory usage, making it easy to find details about your RAM capacity and usage.
To find your RAM details using the System Monitor, follow these steps:
- Open the System Monitor by searching for “System Monitor” in your application launcher or by opening a terminal and typing “gnome-system-monitor”.
- In the System Monitor window, click on the “Resources” or “Memory” tab.
In the “Memory” tab, you will find information about your system’s memory usage and the total installed RAM. The System Monitor displays details such as:
- Total: This represents the total amount of RAM installed on your system.
- Used: This indicates the amount of RAM currently in use by your system.
- Free: This shows the available amount of RAM that is not being used.
- Shared: This refers to the portion of memory shared between different processes.
- Cache: This represents the amount of memory used for disk caching purposes.
You can also see the memory usage graphically represented, which provides a visual representation of how your system is utilizing its memory resources.
Understanding your RAM details through the System Monitor is beneficial for managing system resources, identifying potential bottlenecks, and optimizing performance. With this information, you can determine if you need to free up memory, close unnecessary applications, or consider upgrading your RAM to meet the demands of resource-intensive tasks.
The System Monitor is just one of the many useful tools available in Linux for monitoring and managing system resources. By becoming familiar with the System Monitor, you gain insight into your system’s memory usage and are empowered to take appropriate actions to ensure smooth and efficient performance.
Using the System Monitor to find details about your RAM provides a user-friendly interface and ease of access, making it an effective tool for monitoring and managing memory resources on your Linux system.
Finding RAM using the Top Command (Linux)
In Linux, the top command is a powerful tool that provides a real-time, dynamic overview of system resource usage, including RAM. It allows you to see detailed information about memory usage and various processes running on your system.
To find your RAM details using the top command, follow these steps:
- Open a Terminal window by searching for “Terminal” in the application launcher or using the keyboard shortcut.
- In the Terminal, type the following command and press Enter:
top
Once executed, top will display an interactive interface showing an overview of system resource usage, with the most CPU-intensive processes listed at the top.
To view memory-related information, press the Shift+e keys simultaneously. This command will sort processes by memory usage, showing the most memory-intensive processes at the top.
At the top of the interface, you will find information about your system’s overall memory usage. This includes details such as the total installed RAM, the amount of RAM used, free memory, and various memory-related statistics.
Additionally, top provides a breakdown of memory usage by individual processes, including their memory consumption in both absolute and percentage values.
Using the top command allows you to monitor memory usage and identify potential memory-hungry processes or bottlenecks. By observing the memory usage of active processes, you can make informed decisions about resource management, such as terminating unnecessary processes to free up memory or adjusting system configurations.
Top is a powerful tool often used by advanced Linux users, system administrators, and developers for monitoring system performance and troubleshooting. It provides real-time insights into your system’s memory usage, enabling you to optimize performance and ensure efficient memory allocation.
By utilizing the top command to find information about your RAM, you gain a deeper understanding of your Linux system’s memory utilization. This knowledge empowers you to manage system resources effectively, optimize performance, and make informed decisions regarding memory upgrades if necessary.
Finding RAM on a Chromebook
Chromebooks are lightweight and efficient devices that utilize the Chrome OS operating system. While Chromebooks generally have lower RAM capacities compared to traditional laptops, it is still valuable to know your device’s RAM to understand its limitations and optimize performance.
To find information about your RAM on a Chromebook, follow these steps:
- Click on the system tray in the bottom-right corner of the screen, where the time and date are displayed.
- Click on the gear icon to open the settings menu.
- In the settings menu, scroll down and click on “About Chrome OS”.
- In the “About Chrome OS” section, you will see information about your Chromebook’s hardware and software.
- Look for the “Device RAM” or “Total Memory” field, which will display the total amount of RAM installed on your Chromebook.
It is important to note that Chromebooks typically come with lower RAM capacities than traditional laptops, with models ranging from 2GB to 8GB or more. While this may seem limited compared to other devices, Chromebooks are designed to be efficient and rely heavily on cloud-based applications.
Understanding your Chromebook’s RAM capacity is crucial for managing system resources effectively. With lower RAM, it is essential to avoid running too many applications simultaneously or having an excessive number of open browser tabs. By monitoring your RAM usage and keeping it within a reasonable limit, you can ensure smooth performance and prevent slowdowns.
Additionally, Chrome OS employs a technique known as “tab discarding” to optimize memory usage. This means that Chrome OS may suspend inactive tabs to free up system resources, allowing for better performance even with lower RAM capacities.
While the available RAM on a Chromebook may be limited compared to other devices, the efficient design and cloud-based nature of Chrome OS enable Chromebooks to provide a fast and responsive user experience. By understanding your Chromebook’s RAM capacity, you can ensure optimal performance and effectively manage system resources to suit your computing needs.
Checking RAM on Android
Checking the RAM on an Android device is a useful way to monitor memory usage and ensure optimal performance. There are a few different methods you can use to check your device’s RAM.
Method 1: Settings Menu:
- Open the Settings app on your Android device.
- Scroll down and tap on “About phone” or “About device”.
- Look for the “Memory” or “Memory & storage” option.
- In this section, you will find information about your device’s RAM, including the total RAM capacity, memory usage, and available memory.
Method 2: Task Manager:
- Tap on the Recent Apps button (usually a square-shaped icon) on your device’s navigation bar.
- Swipe up or down to view the list of recent apps.
- Look for the “App info” or “Manage apps” option (sometimes indicated by an “i” or “info” icon).
- Tap on the app info or manage apps option to access the task manager.
- In the task manager, you will find information about your device’s RAM usage, including the total RAM capacity and the amount of RAM used by each app.
Method 3: Third-party Apps:
There are also numerous third-party apps available on the Google Play Store that provide detailed information about your device’s RAM. These apps often offer additional features such as memory optimization, storage cleaning, and real-time monitoring of memory usage.
Checking your device’s RAM on Android can help you identify if you have sufficient memory for resource-intensive tasks, avoid performance issues caused by excessive RAM usage, and optimize your device’s overall performance.
By regularly monitoring your device’s RAM, you can ensure that memory resources are efficiently utilized and take appropriate steps to manage background processes and memory-hungry apps. This way, you can maintain a smooth and responsive Android experience.
Final Thoughts
Knowing how to check your RAM capacity and monitor memory usage is essential for optimizing the performance of your computer or device. Whether you are using Windows, Mac, Linux, or a Chromebook, understanding your RAM details allows you to make informed decisions about resource management, identify potential bottlenecks, and ensure smooth multitasking.
Checking RAM on Windows can be done easily through the Task Manager or System Information tool, providing you with valuable insights into memory usage and system performance.
Mac users can find information about their RAM using various methods such as the Activity Monitor, Terminal, or System Profiler. These tools offer a comprehensive overview of memory usage and specifications.
Linux users have several options for checking their RAM, including the Terminal, System Monitor, and various command-line tools. Utilizing these tools allows for efficient management of system resources.
On a Chromebook, finding your RAM capacity is straightforward through the settings menu. With the lightweight nature of Chrome OS, understanding your RAM helps in managing system resources effectively.
Additionally, checking RAM on Android devices can be done through the settings menu or task manager, ensuring optimal performance and efficient memory utilization.
Remember, monitoring and managing your RAM allows you to optimize performance, prevent slowdowns, and ensure that your system or device meets the demands of resource-intensive tasks.
Furthermore, understanding your RAM capacity aids in making informed decisions about hardware upgrades, software compatibility, and resource allocation.
By regularly checking your RAM capacity and monitoring memory usage, you can ensure that your system operates smoothly, efficiently, and meets your computing needs.