Introduction
Welcome to this guide on how to add RAM to your Dell computer. If you’ve noticed that your computer is running slow or struggling to handle multiple tasks, adding more RAM (Random Access Memory) can significantly improve its performance. RAM is a critical component that allows your computer to quickly access and process data, and upgrading it can provide a noticeable boost in speed and multitasking capabilities.
Adding RAM to your Dell computer is a relatively simple and cost-effective upgrade that can be done by following a few easy steps. Whether you’re a tech-savvy enthusiast or a beginner, this guide will walk you through the process, ensuring a smooth and successful RAM installation.
Before we dive into the step-by-step instructions, it’s important to note that adding RAM to your Dell computer is a safe procedure. However, as with any hardware modification, it’s essential to handle your computer and its components with care to avoid any damage. If you’re unsure or uncomfortable performing the upgrade yourself, it’s always a good idea to seek professional assistance.
In this guide, we’ll cover the necessary steps to determine the type and amount of RAM your Dell computer supports, purchasing compatible RAM modules, preparing for the installation, and actually installing the new RAM. We’ll also touch on troubleshooting tips to address any potential issues that may arise during the process.
By the end of this guide, you’ll have the knowledge and confidence to add RAM to your Dell computer, improving its performance and ensuring a smoother computing experience. So, let’s get started on upgrading your computer and unleashing its full potential!
Why should you add RAM to your Dell computer?
Adding more RAM to your Dell computer can have a significant impact on its overall performance and speed. RAM serves as the temporary storage space for your computer to quickly access and manipulate data while you’re using various applications and programs. Here are several compelling reasons why you should consider adding RAM to your Dell computer:
- Improved multitasking capabilities: If you frequently find yourself running multiple programs simultaneously, you may notice that your computer starts to slow down or lag. By increasing the amount of RAM, your Dell computer will be able to handle more tasks simultaneously without experiencing performance issues.
- Faster program execution: Running memory-intensive applications such as video editing software, graphic design programs, or virtual machines can be resource-intensive for your computer. Extra RAM allows these applications to access more data directly, resulting in smoother performance and faster execution times.
- Better gaming experience: Gamers often require a high-performance computer to handle the demands of modern games. Adding more RAM to your Dell computer can enhance the gaming experience by reducing lag and improving frame rates, allowing for a more immersive and enjoyable gameplay session.
- Efficient web browsing: Modern web browsers have become increasingly resource-intensive, especially when opening multiple tabs or running web applications. Additional RAM enables smoother web browsing by providing more space for caching and storing web page data, ensuring a responsive and fluid browsing experience.
- Future-proofing your computer: As technology evolves, software and applications become more demanding in terms of memory requirements. By adding more RAM to your Dell computer now, you can prepare it for future updates and ensure that it remains capable of handling the latest software releases.
By adding RAM to your Dell computer, you’ll be able to unlock its full potential and optimize its performance. Whether you’re a casual computer user, professional, gamer, or creative professional, upgrading your RAM can provide tangible benefits and enhance your overall computing experience.
Determine the type and amount of RAM your Dell computer supports
Before you can proceed with adding RAM to your Dell computer, it’s essential to determine the type and amount of RAM that your computer supports. This information will ensure that you purchase compatible RAM modules and avoid any compatibility issues. Here’s how you can find out the specifications of your computer’s RAM:
- Check the documentation: If you have the documentation that came with your Dell computer, it often includes details about the type and maximum capacity of RAM that your computer supports. Look for any references to memory specifications, or consult the user manual or online documentation provided by Dell.
- Use the system information tool: Windows operating systems have a built-in system information tool that provides detailed information about your computer’s hardware. To access it, press the Windows key + R to open the Run dialog box, then type “msinfo32” and hit Enter. In the System Information window that opens, navigate to the “System Summary” section and look for the “Installed Physical Memory (RAM)” field. This will display the current amount of installed RAM. Make a note of this information for reference.
- Visit Dell’s support website: Dell’s official support website is a valuable resource for finding detailed information about your computer’s specifications. Visit the support website (www.dell.com/support), enter the service tag or model number of your Dell computer, and navigate to the support page for your specific model. Look for sections or documents related to memory or system specifications to find the type and maximum capacity of RAM supported by your Dell computer.
- Use third-party system information tools: If you prefer using third-party software, there are various system information tools available that can provide detailed hardware specifications. Programs such as CPU-Z or Speccy can give you information about your computer’s RAM type, clock speed, and maximum capacity. Download and install the tool of your choice, then run it to gather the necessary information.
By following these steps, you’ll be able to determine the type and amount of RAM that your Dell computer supports. Armed with this knowledge, you’ll be ready to purchase compatible RAM modules and proceed with the installation process in the next steps.
Purchase the compatible RAM for your Dell computer
Once you have determined the type and amount of RAM that your Dell computer supports, it’s time to purchase compatible RAM modules. Here are a few steps to ensure that you choose the right RAM for your computer:
- Check the RAM specifications: Refer to the information you gathered in the previous section to identify the specific RAM type, speed, and maximum capacity that your Dell computer supports. Ensure that the RAM you choose matches these specifications to guarantee compatibility.
- Research reputable vendors: Look for reputable computer hardware vendors or online retailers that specialize in computer components. Read customer reviews and ratings to ensure that you are purchasing from a trustworthy source.
- Consider your budget: RAM prices can vary depending on the brand, capacity, and speed. Determine your budget and choose RAM modules that offer a good balance between performance and cost.
- Choose the right capacity: Consider your computing needs and how you plan to use your Dell computer. If you use resource-intensive software or engage in activities like gaming or video editing, opting for higher RAM capacities, such as 16GB or 32GB, can provide a significant performance boost. However, if you primarily use your computer for basic tasks like web browsing and document editing, 8GB of RAM should be sufficient.
- Double-check compatibility: Before making the purchase, double-check the compatibility of the RAM modules with your Dell computer. Review the specifications of the RAM modules and compare them with the information you gathered about your computer’s RAM requirements. Look for any potential compatibility issues such as voltage mismatch or physical dimensions.
- Make the purchase: Once you have selected the compatible RAM modules, proceed to add them to your cart and complete the purchase. Ensure that you provide accurate delivery information and choose a shipping method that suits your needs.
Purchasing the right RAM for your Dell computer is crucial to ensure a smooth and successful RAM upgrade. By following these steps and taking the time to research and choose compatible RAM modules, you’ll be one step closer to enhancing the performance of your Dell computer.
Preparing for the RAM installation
Before you begin installing the new RAM modules into your Dell computer, there are a few important steps to take to ensure a smooth and trouble-free installation process. These preparation steps will help you avoid common issues and ensure that the RAM upgrade is successful:
- Power off your computer: Before working on any internal components, it’s crucial to power off your Dell computer and unplug it from the power source. This will help prevent any electrical mishaps and keep you safe during the installation process.
- Ground yourself: Static electricity can damage computer components, so it’s important to ground yourself before handling any internal parts. Make sure to touch a grounded metal object to discharge any static electricity buildup before proceeding.
- Gather the necessary tools: Ensure that you have all the tools necessary for the RAM installation, such as a small Phillips screwdriver if required to open the computer’s casing. Having the tools readily available will make the process more convenient.
- Create a clean and organized workspace: Find a clear, well-lit area to work in, preferably on a grounded surface such as a wooden table or an anti-static mat. Remove any unnecessary objects from the workspace to prevent any accidental damage or interference.
- Review the computer’s manual: If you’re unfamiliar with opening your Dell computer’s casing, consult the user manual or online documentation specific to your model. Familiarize yourself with the steps involved in opening the computer, locating the RAM slots, and removing the existing RAM modules.
- Take necessary precautions: As you prepare for the installation, be careful not to touch any exposed circuitry or components inside the computer. Handle the RAM modules only by their edges to avoid any damage from oil or static electricity buildup on your fingers.
- Backup your data: While adding RAM is generally safe, it’s always a good idea to back up your important data before making any hardware changes. This extra precaution will give you peace of mind in case anything unexpected happens during the installation process.
By following these preparation steps, you’ll ensure that you’re well-prepared and ready to begin the RAM installation process smoothly and safely. Taking the time to gather the necessary tools, reviewing the manual, and creating a clean workspace will help minimize potential issues and ensure a successful RAM upgrade for your Dell computer.
Open up your Dell computer and locate the RAM slots
Now that you’ve prepared for the RAM installation, it’s time to open up your Dell computer and locate the RAM slots where the new RAM modules will be inserted. Follow these step-by-step instructions to find the RAM slots:
- Power off and unplug your computer: Ensure that your Dell computer is powered off and unplugged from the power source. This is crucial for your safety and to prevent any electrical damage.
- Remove the computer’s casing: Depending on your Dell computer model, removing the casing can vary. In most cases, you’ll need to unscrew the screws located at the back or side of the computer’s case. Check the computer’s manual or online documentation for specific instructions on how to open the case for your particular model.
- Ground yourself: Before touching any internal components, it’s important to ground yourself to discharge any static electricity. Touch a grounded metal object or use an anti-static wristband to prevent any damage to the sensitive computer parts.
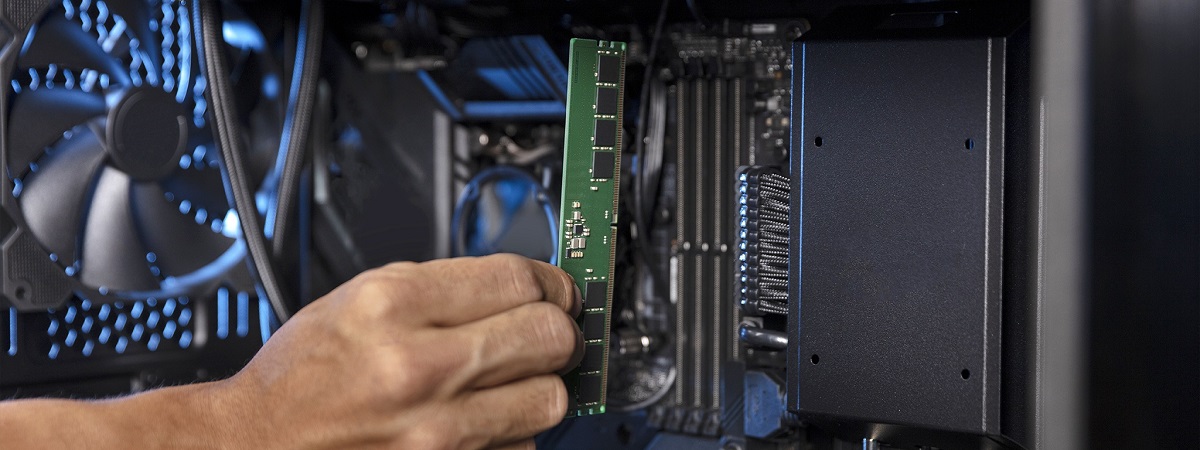
- Locate the RAM slots: Look for the existing RAM modules and the RAM slots on the motherboard. The RAM slots are typically long, thin, and usually have clips or tabs on each side to hold the RAM modules in place. They are often located near the CPU or towards one side of the motherboard.
- Take note of the existing RAM: Before removing anything, take note of the existing RAM modules’ orientation, position, and any other relevant details such as their size or capacity. This information will be helpful during the installation process.
- Prepare for RAM module removal: If there are any clips or tabs securing the existing RAM modules, gently push them outwards to release the modules. Once released, carefully hold the module by its edges and slowly pull it straight out of the slot. Be cautious not to force or twist the module during removal.
- Inspect the RAM slots: Take a moment to inspect the RAM slots for any signs of dirt, debris, or damage. If necessary, use a can of compressed air and gently blow away any dust or particles from the slots.
By following these steps, you’ll be able to open your Dell computer’s casing, locate the RAM slots, and prepare for the RAM installation. Remember to take your time and handle the internal components with care to avoid any accidental damage. In the next section, we will cover how to remove and replace the existing RAM modules.
Remove and replace the existing RAM modules
Now that you have located the RAM slots in your Dell computer, it’s time to remove the existing RAM modules and prepare them for replacement with the new ones. Follow these step-by-step instructions to safely remove and replace the existing RAM modules:
- Ensure that your computer is powered off and unplugged: Before proceeding, make sure that your Dell computer is powered off and disconnected from the power source. This is important for your safety and to prevent any damage to the internal components.
- Ground yourself: Remember to ground yourself by either touching a grounded metal object or wearing an anti-static wristband to discharge any static electricity.
- Remove the existing RAM modules: Identify the clips or tabs that secure the existing RAM modules in place. Gently push them outwards to release the modules. Once released, carefully hold the module by its edges and firmly but gently pull it straight out of the slot. Repeat this process for all the existing RAM modules.
- Handle the RAM modules with care: Hold the new RAM modules by their edges, avoiding touching the gold contacts or other sensitive areas. Align the notches on the bottom of the module with the slot on the motherboard.
- Insert the new RAM modules: With the notches aligned, angle the new RAM module slightly and insert it into the slot. Apply even, firm pressure until the module is fully seated in the slot. You might hear a clicking sound when it locks into place. Repeat this step for all the new RAM modules.
- Check the seating: After installing the new RAM modules, gently push down on them to ensure that they are securely seated in the slots. The clips or tabs should automatically lock them in place.
- Double-check the orientation: Confirm that the orientation of the new RAM modules matches that of the existing modules you removed. The notch on the RAM module should align with the slot on the motherboard.
- Replace the computer’s casing: Once you have successfully installed the new RAM modules, carefully reattach the computer’s casing. Make sure to screw it back in securely, following the instructions specific to your Dell computer model.
By following these steps, you will be able to safely remove the existing RAM modules from your Dell computer and replace them with the new ones. Take your time and handle the modules and computer components with care to avoid any damage. In the next section, we will cover the process of installing the new RAM modules into your Dell computer.
Installing the new RAM modules
With the existing RAM modules removed from your Dell computer, it’s time to install the new RAM modules. Follow these step-by-step instructions to ensure a successful installation:
- Ensure that your computer is powered off and unplugged: Before beginning the installation process, make sure your Dell computer is powered off and disconnected from the power source to ensure your safety.
- Ground yourself: Remember to ground yourself by either touching a grounded metal object or wearing an anti-static wristband to discharge any static electricity.
- Handle the new RAM modules with care: Hold the new RAM modules by their edges, avoiding touching the gold contacts or other sensitive areas. Keeping them safe from static electricity and physical damage is crucial.
- Align the notches on the RAM modules: Take note of the notches on the bottom of the RAM modules. These notches should align with the slot on the motherboard to ensure proper installation. Orient the modules accordingly.
- Insert the new RAM modules: Angle the new RAM module slightly and insert it into the slot on the motherboard. Apply even, firm pressure until the module is fully seated in the slot. You may hear a clicking sound when it locks into place. Repeat this process for each new RAM module.
- Check the seating and locking: After inserting the new RAM modules, gently push down on them to ensure they are securely seated in the slots. The clips or tabs should automatically lock the modules in place, ensuring a secure connection.
- Double-check the orientation: Confirm that the orientation of the new RAM modules matches that of the existing modules you removed. The notch on the RAM module should align with the slot on the motherboard.
- Replace the computer’s casing: After successfully installing the new RAM modules, carefully reattach the computer’s casing, ensuring that it is securely fastened. Follow the specific instructions for your Dell computer model to properly replace the casing.
By following these steps, you will be able to install the new RAM modules into your Dell computer. Remember to take your time and handle the modules with care to avoid any damage. Once you have completed this step, you’re ready to move on to closing up your Dell computer and testing the RAM upgrade in the next section.
Closing up your Dell computer and testing the RAM upgrade
After successfully installing the new RAM modules into your Dell computer, it’s time to close up the computer’s casing and test the RAM upgrade for optimal performance. Follow these steps to safely close up your Dell computer and ensure that the new RAM is functioning correctly:
- Attach the computer’s casing: Carefully align the computer’s casing back into place and secure it with the screws that were removed earlier. Make sure to tighten the screws firmly, but avoid overtightening to prevent any damage to the casing.
- Reconnect the necessary cables and peripherals: Ensure that all cables and peripherals that were unplugged during the installation process, such as the power cable, monitor cable, keyboard, and mouse, are securely connected to the appropriate ports on your Dell computer.
- Power on your computer: Plug your Dell computer back into the power source and press the power button to turn it on. Wait for the computer to boot up and log in to your operating system as usual.
- Check the new RAM capacity: Once your computer has booted up, go to the System Information or Task Manager (depending on your operating system) to verify that your Dell computer recognizes the new RAM capacity. It should display the total amount of RAM installed, including the newly added RAM modules.
- Test computer performance: Use your computer as you normally would and observe its performance. Open multiple applications, run memory-intensive tasks, or engage in activities that previously caused slowdowns. If you notice improved speed and responsiveness, the RAM upgrade has been successful.
- Monitor for stability: Keep an eye on your computer’s performance over the next few days to ensure stability. If you experience any unusual or recurring issues, such as crashes or freezes, it’s worth double-checking the RAM installation and troubleshooting if needed.
By following these steps, you will be able to close up your Dell computer after installing the new RAM modules and test the RAM upgrade for improved performance. Enjoy the enhanced multitasking capabilities and faster program execution that the additional RAM provides!
Troubleshooting tips for RAM installation
While adding RAM to your Dell computer is typically a straightforward process, issues can occasionally arise. If you encounter any problems during or after the RAM installation, here are some troubleshooting tips to help you identify and resolve the issue:
- Check the RAM compatibility: Double-check that the RAM modules you purchased are compatible with your Dell computer. Ensure that they match the specifications outlined in the computer’s documentation and that they are correctly seated in the RAM slots.
- Reinstall the RAM modules: Remove the new RAM modules and reinsert them into the RAM slots, ensuring they are firmly seated and locked in place. Sometimes a loose connection can cause issues, and reinstalling the RAM can resolve the problem.
- Ensure proper voltage: Verify that the voltage of the new RAM modules matches the specifications of your Dell computer. Mismatched voltage can cause instability or failure to boot. Refer to your computer’s documentation for the required voltage.
- Perform a BIOS update: Check if there are any available BIOS updates for your Dell computer. Sometimes, updating the BIOS can resolve compatibility issues between the motherboard and RAM modules.
- Test individual RAM modules: If you installed multiple RAM modules, test each module individually by removing the rest and testing them individually in each RAM slot. This will help identify if any one module is causing the issue.
- Reset the CMOS: Resetting the CMOS (Complementary Metal-Oxide-Semiconductor) can help resolve various hardware-related issues. Consult your computer’s manual or online documentation for instructions on how to reset the CMOS.
- Seek professional help: If you have attempted troubleshooting and are still experiencing issues, it may be best to seek professional assistance. Certified technicians can diagnose and help resolve any complex hardware issues that may be causing the problem.
Remember to exercise caution and handle computer components with care during troubleshooting. If all else fails, it’s best to consult a professional to avoid further complications or damage to your Dell computer.
Conclusion
Congratulations! You have successfully learned how to add RAM to your Dell computer. By following the steps outlined in this guide, you can enhance your computer’s performance, improve multitasking capabilities, and enjoy faster program execution. Adding more RAM to your Dell computer is a cost-effective upgrade that offers significant benefits for both casual users and professionals.
Throughout the process, you have learned how to determine the type and amount of RAM your Dell computer supports. You have also gained knowledge on purchasing compatible RAM modules and preparing for the RAM installation. Opening up your computer, locating the RAM slots, removing and replacing the existing RAM modules, and installing the new ones have also been covered in detail.
After closing up your Dell computer and testing the RAM upgrade, you can now enjoy an improved computing experience with enhanced speed and responsiveness. Remember to monitor your computer’s performance over time to ensure stability and address any potential issues that may arise.
If you encountered any troubleshooting issues during the RAM installation, the troubleshooting tips provided in this guide can help you identify and resolve the problem. However, if you are still experiencing difficulties, it is recommended to seek professional assistance to ensure a proper resolution.
Adding RAM to your Dell computer is a valuable investment that allows you to optimize your computer’s performance and keep up with the demands of modern applications and software. With your newfound knowledge, you can confidently upgrade your Dell computer’s RAM and enjoy a smoother and more efficient computing experience.