Introduction
Uninstalling Google Chrome from your MacBook may seem like a straightforward task, but it involves more than just dragging the application to the Trash. Whether you're switching to a different browser, troubleshooting issues, or simply looking to free up space on your device, properly removing Chrome requires a series of steps to ensure a clean uninstallation. In this guide, we'll walk you through the process of uninstalling Chrome from your MacBook, covering each step in detail to help you navigate the process seamlessly.
As you embark on this uninstallation journey, it's essential to understand that removing Chrome involves more than just deleting the application itself. Chrome's presence extends beyond its main executable file, with associated preferences, cache, and potentially lingering files in other directories. By following the steps outlined in this guide, you'll not only remove the visible aspects of Chrome but also address the underlying components that could impact your MacBook's performance and storage.
Uninstalling Chrome may be necessary for various reasons. Perhaps you've decided to explore alternative browsers, or you're troubleshooting issues related to Chrome's performance. Regardless of the motive, it's crucial to approach the uninstallation process systematically to ensure that all remnants of Chrome are effectively removed from your MacBook. This comprehensive approach will help you avoid potential conflicts and ensure a clean slate for any future installations or system optimizations.
By the end of this guide, you'll have a clear understanding of the steps required to uninstall Chrome from your MacBook, empowering you to manage your applications effectively and maintain a clutter-free, optimized system. So, let's dive into the process and learn how to bid farewell to Chrome from your MacBook, step by step.
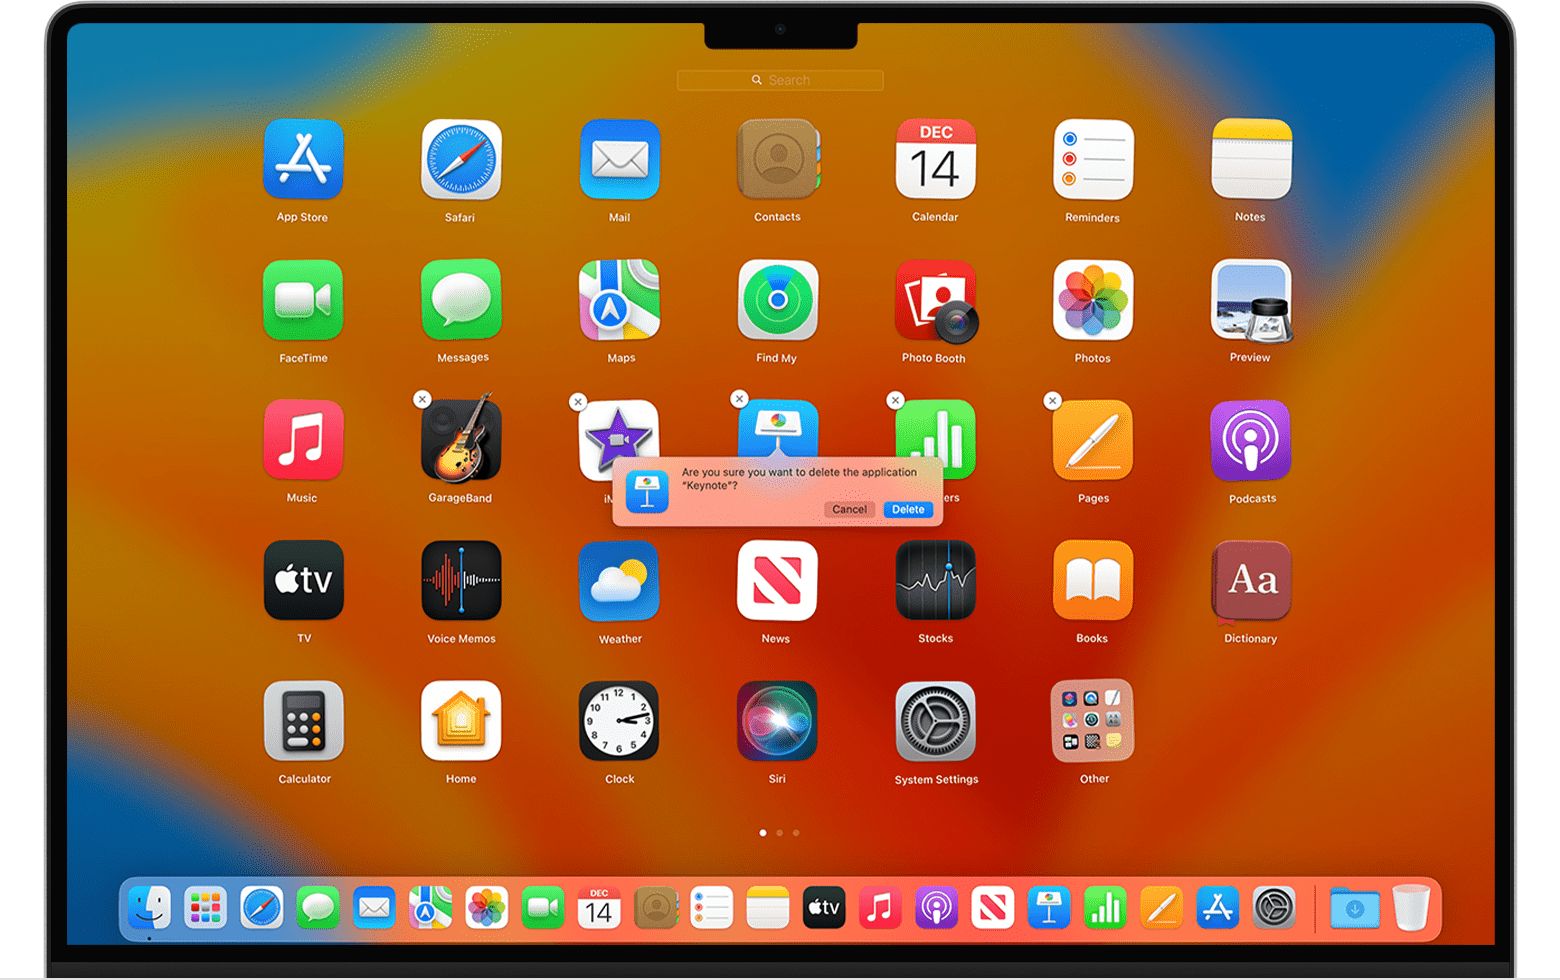
Step 1: Close all Chrome windows
Before initiating the uninstallation process for Google Chrome on your MacBook, it's crucial to ensure that all active Chrome windows are closed. This step is essential to prevent any potential conflicts or interruptions during the uninstallation process. By closing all Chrome windows, you'll create a clean slate for the subsequent steps, allowing for a seamless and uninterrupted removal of the application.
To close Chrome windows, follow these simple steps:
-
Navigate to Chrome: If you have multiple applications or windows open on your MacBook, locate the Chrome browser window among the active applications. You can identify the Chrome window by its distinctive interface and tab layout.
-
Close Individual Windows: Within the Chrome browser, ensure that all tabs and windows are closed. If you have multiple Chrome windows open, proceed to close each window individually by clicking the "X" icon in the top-right corner of the window.
-
Quit Chrome: After closing all individual Chrome windows, proceed to quit the Chrome application entirely. To do this, navigate to the top-left corner of your screen, click on "Chrome" in the menu bar, and select "Quit Google Chrome" from the dropdown menu. Alternatively, you can use the keyboard shortcut "Command + Q" to quit Chrome.
By following these steps, you'll effectively close all Chrome windows and ensure that the application is no longer running on your MacBook. This preparatory action sets the stage for the subsequent steps in the uninstallation process, allowing for a focused and uninterrupted removal of Google Chrome from your device.
Ensuring that all Chrome windows are closed is a fundamental initial step in the uninstallation process, as it minimizes the likelihood of any active processes interfering with the subsequent removal steps. With this essential preparatory action completed, you're now ready to proceed to the next phase of uninstalling Chrome from your MacBook.
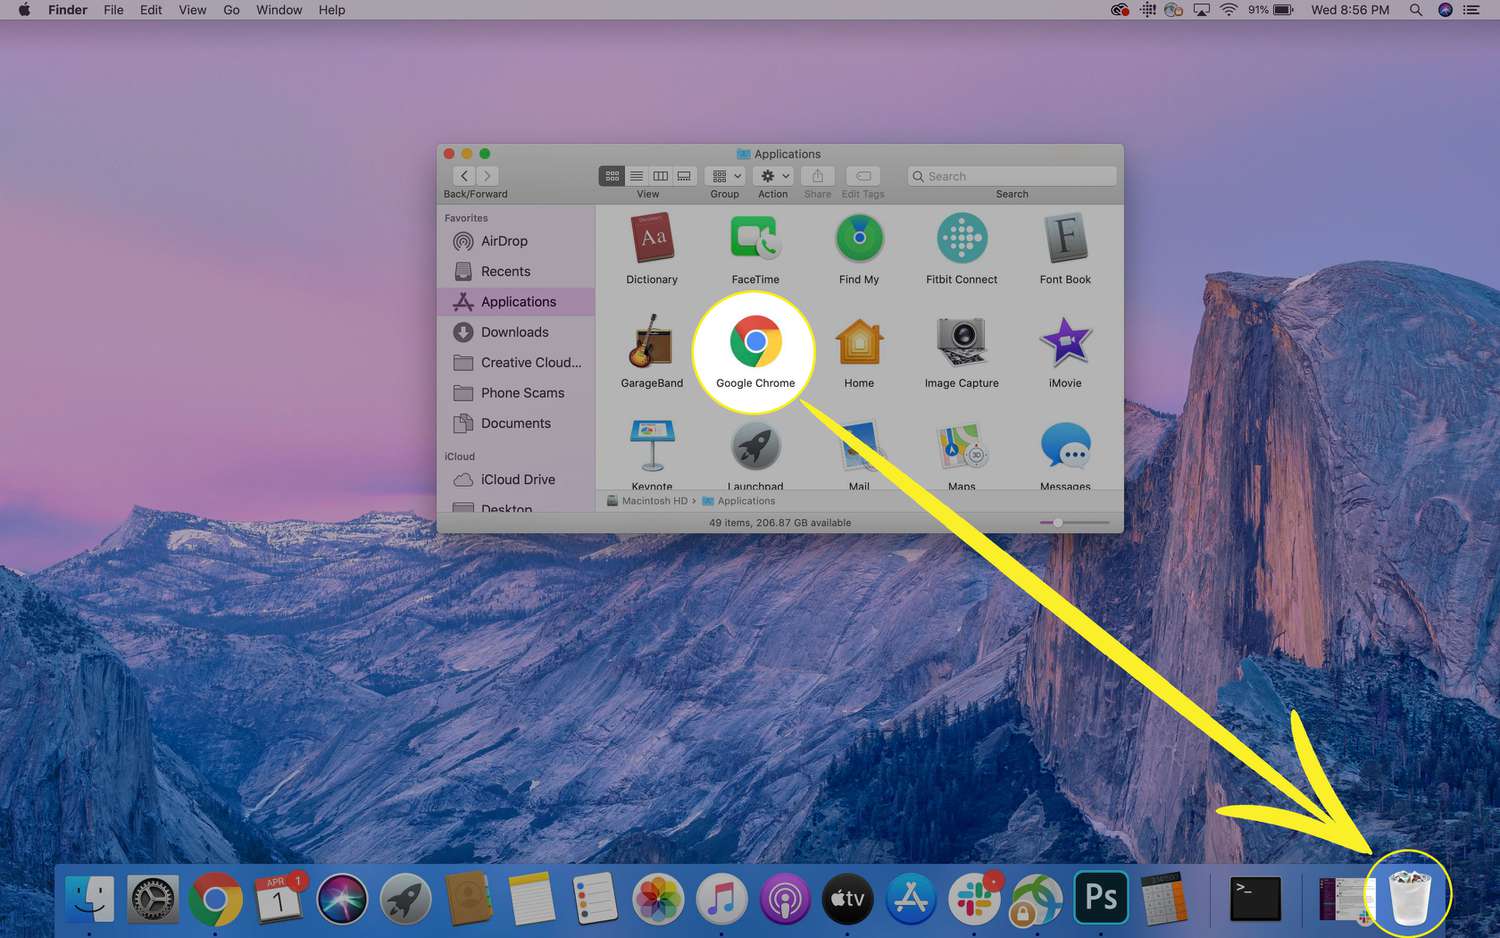
Step 2: Drag Chrome to the Trash
With all Chrome windows closed, you're now ready to proceed with the next step in uninstalling Google Chrome from your MacBook. This step involves removing the Chrome application itself by dragging it to the Trash, a seemingly simple action that initiates the uninstallation process.
To drag Chrome to the Trash, follow these straightforward steps:
-
Locate the Chrome Application: Navigate to the "Applications" folder on your MacBook. You can access this folder by clicking on the "Finder" icon in the Dock, selecting "Applications" from the sidebar, and then locating the "Google Chrome" application icon. Alternatively, you can use the "Go" menu at the top of your screen and choose "Applications" to access the folder.
-
Drag Chrome to the Trash: Once you've located the "Google Chrome" application icon, click and hold the icon to initiate the dragging action. While holding the icon, drag it across your screen and drop it into the Trash, which is typically located in the Dock at the bottom of the screen. Alternatively, you can open a Finder window, navigate to the "Applications" folder, and drag the Chrome application directly to the Trash in the sidebar.
-
Enter Administrator Password (if prompted): Depending on your MacBook's settings, you may be prompted to enter your administrator password to authorize the removal of the Chrome application. If prompted, enter your password to proceed with moving Chrome to the Trash.
By dragging Chrome to the Trash, you've effectively removed the main application from its current location on your MacBook. However, it's important to note that this action alone does not fully uninstall Chrome, as there are additional steps to address associated components and ensure a thorough removal of the browser.
While dragging Chrome to the Trash removes the primary application, it's essential to proceed with the subsequent steps to address related preferences, cache, and potential remnants that may impact your MacBook's performance and storage. This comprehensive approach ensures that all aspects of Chrome are effectively uninstalled, setting the stage for a clean slate and optimal system management.
With Chrome now residing in the Trash, you're ready to progress to the next steps in the uninstallation process, continuing the journey toward a complete removal of Chrome from your MacBook.
Step 3: Remove Chrome from the Dock
As you continue the process of uninstalling Google Chrome from your MacBook, it's essential to address the presence of the Chrome icon in the Dock. While dragging the Chrome application to the Trash removes the main executable file, the icon may still linger in the Dock, providing quick access to an application that is no longer fully installed on your device. Removing the Chrome icon from the Dock not only ensures a clean and accurate representation of your installed applications but also prevents any inadvertent attempts to launch Chrome after its removal.
To remove the Chrome icon from the Dock, follow these straightforward steps:
-
Locate the Chrome Icon: Scan the Dock for the Google Chrome icon, which is typically represented by a blue, red, yellow, and green circular design. The icon serves as a shortcut for accessing the Chrome application directly from the Dock.
-
Drag the Chrome Icon Off the Dock: Click and hold the Chrome icon in the Dock to initiate the dragging action. While holding the icon, drag it away from the Dock and release it anywhere on the desktop. This action effectively removes the Chrome icon from the Dock, indicating that the application is no longer accessible directly from this location.
By removing the Chrome icon from the Dock, you're aligning the Dock's contents with the current state of your installed applications, reflecting the accurate status of Google Chrome's presence on your MacBook. This simple yet crucial step contributes to a streamlined and organized Dock, ensuring that only actively installed applications are readily accessible from this prominent area of your user interface.
With the Chrome icon successfully removed from the Dock, you've addressed another visible aspect of the application's presence on your MacBook, further aligning your system with the ongoing uninstallation process. This action, combined with the previous steps, contributes to a comprehensive and thorough removal of Google Chrome, setting the stage for a clean and optimized system.
As you proceed with the uninstallation process, the next steps will delve into addressing Chrome's preferences, cache, and potential remnants, ensuring a meticulous and complete removal of the browser from your MacBook. Let's continue the journey toward a seamless and effective uninstallation of Google Chrome, step by step.
Step 4: Delete Chrome preferences and cache
As you progress through the uninstallation process of Google Chrome from your MacBook, it's essential to address the associated preferences and cache that may linger even after removing the main application. Deleting Chrome's preferences and cache ensures a thorough removal of the browser's residual data, contributing to a clean and optimized system.
To delete Chrome preferences and cache, follow these detailed steps:
-
Access Library Folder: In the Finder, click on the "Go" menu at the top of the screen while holding down the "Option" key. Select "Library" from the dropdown menu to access the Library folder.
-
Navigate to Application Support: Within the Library folder, locate and open the "Application Support" directory. Here, you'll find various folders related to installed applications, including Google Chrome.
-
Delete Chrome Preferences: Within the "Application Support" folder, locate the "Google" folder and delete it. This folder contains Chrome's preferences and related data. Deleting this folder ensures the removal of Chrome's user-specific settings and configurations.
-
Clear Chrome Cache: Navigate back to the Library folder and access the "Caches" directory. Look for the "com.google.Chrome" folder and delete it. This action removes Chrome's cache data, including temporary files and website data stored by the browser.
By deleting Chrome's preferences and cache, you're addressing the residual data associated with the browser, ensuring a comprehensive removal from your MacBook. This meticulous approach contributes to a clutter-free system and prevents any lingering preferences or cache from impacting your device's performance.
With Chrome's preferences and cache effectively deleted, you've taken a critical step toward a thorough uninstallation of the browser, setting the stage for an optimized and well-maintained MacBook. As you proceed to the final step, you'll complete the uninstallation process and ensure that all remnants of Chrome are effectively removed from your device.
Continuing the journey toward a seamless and effective uninstallation of Google Chrome, the next step will guide you through the process of emptying the Trash, marking the culmination of the comprehensive uninstallation process. Let's proceed with the final step to complete the removal of Chrome from your MacBook.
Step 5: Empty the Trash
The final step in the comprehensive uninstallation of Google Chrome from your MacBook involves emptying the Trash. While you've successfully removed the main Chrome application and addressed associated preferences and cache, the remnants of the application reside in the Trash, awaiting permanent deletion. Emptying the Trash ensures the complete removal of all Chrome-related files, freeing up storage space and finalizing the uninstallation process.
To empty the Trash and complete the removal of Chrome from your MacBook, follow these straightforward steps:
-
Open the Trash: Locate the Trash icon in the Dock at the bottom of your screen and click on it to open the Trash folder. Alternatively, you can access the Trash by opening a Finder window and selecting "Trash" from the sidebar.
-
Empty the Trash: Within the Trash folder, click on the "Empty" button located in the top-right corner of the window. This action permanently deletes all the files and folders contained in the Trash, including the Google Chrome application and its associated components.
-
Confirm Deletion: When prompted, confirm the deletion by clicking on "Empty Trash" in the dialog box. This finalizes the removal of all Chrome-related items, ensuring that they are permanently erased from your MacBook.
By emptying the Trash, you're completing the uninstallation process and ensuring that all remnants of Google Chrome are effectively removed from your device. This final step contributes to a clutter-free and optimized system, freeing up storage space and aligning your MacBook with the desired state following the removal of Chrome.
With the Trash now emptied, you've successfully completed the uninstallation of Google Chrome from your MacBook, achieving a thorough and meticulous removal of the browser and its associated components. Your MacBook is now primed for any future installations or system optimizations, with Chrome no longer impacting its performance or storage.
As you conclude this uninstallation journey, you've gained valuable insights into the systematic process of removing applications from your MacBook, empowering you to manage your applications effectively and maintain a well-organized and optimized system.
Conclusion
Congratulations! By following the comprehensive uninstallation process outlined in this guide, you have successfully removed Google Chrome from your MacBook, ensuring a thorough and meticulous elimination of the browser and its associated components. As you reflect on this journey, it's important to recognize the significance of each step in the uninstallation process and the collective impact they have on your MacBook's performance and storage.
The systematic approach to uninstalling Chrome, from closing all active windows to emptying the Trash, has empowered you to manage your applications effectively and maintain a clutter-free, optimized system. By addressing not only the main application but also its preferences, cache, and lingering remnants, you've ensured a clean slate for any future installations or system optimizations.
Beyond the immediate impact on your MacBook, this experience has provided valuable insights into the intricacies of application management and the importance of thorough uninstallation. As you navigate your digital environment, these insights will serve you well, enabling you to approach application removal with confidence and precision.
Furthermore, the process of uninstalling Chrome from your MacBook has underscored the significance of system maintenance and optimization. By systematically removing an application and its associated components, you've taken proactive steps to uphold the performance and integrity of your device, setting a precedent for ongoing system management.
As you move forward, the knowledge and skills gained from this uninstallation journey will continue to serve you, whether you're exploring new applications, troubleshooting issues, or optimizing your MacBook's performance. By embracing a systematic and thorough approach to application management, you're poised to maintain a well-organized and optimized digital environment, enhancing your overall user experience.
In closing, the successful uninstallation of Google Chrome from your MacBook marks a significant achievement, reflecting your commitment to effective system management and optimization. With Chrome no longer impacting your device, you're now equipped to explore new possibilities, optimize your system, and embrace a clutter-free digital experience.
As you embark on future endeavors, may the insights gained from this journey continue to guide you, empowering you to navigate your digital landscape with confidence and proficiency. Cheers to a well-managed and optimized MacBook, ready for the next chapter in your digital adventures!