Introduction
So, you've decided to bid farewell to Google Chrome on your MacBook. Whether it's to make room for a different browser or to troubleshoot issues, uninstalling Google Chrome is a straightforward process. By following a few simple steps, you can ensure that the application and its associated files are completely removed from your device.
Uninstalling Google Chrome from your MacBook involves more than just dragging the application icon to the Trash. To ensure a thorough removal, it's essential to delete the browser, its preferences, and support files. This comprehensive approach helps prevent any residual data from occupying valuable storage space and potentially causing conflicts with other applications.
In this guide, we'll walk you through the step-by-step process of deleting Google Chrome from your MacBook. By the end of this tutorial, you'll have a clear understanding of how to effectively remove the browser and its associated files, leaving your MacBook free of any remnants of Google Chrome.
Now, let's dive into the process of bidding adieu to Google Chrome from your MacBook.
Step 1: Close Google Chrome
Before you begin the process of uninstalling Google Chrome from your MacBook, it's crucial to ensure that the browser is completely closed. This step is essential to prevent any potential conflicts or interruptions during the uninstallation process. Here's how to close Google Chrome:
-
Quit Google Chrome: If Google Chrome is currently open, navigate to the top-left corner of your screen and click on "Chrome" in the menu bar. From the dropdown menu, select "Quit Google Chrome." Alternatively, you can use the keyboard shortcut "Command + Q" to swiftly exit the browser.
-
Check for Background Processes: Even after quitting the application, Google Chrome may still have background processes running. To ensure that the browser is fully closed, press "Command + Option + Esc" to open the "Force Quit Applications" window. From the list of applications, select Google Chrome and click "Force Quit" to terminate any lingering processes.
-
Verify Closure: To confirm that Google Chrome is no longer running, you can check the Dock at the bottom of your screen. If the Google Chrome icon is no longer present, it indicates that the browser has been successfully closed.
By following these steps, you can be certain that Google Chrome is completely shut down, setting the stage for a smooth and uninterrupted uninstallation process. With Google Chrome closed, you're now ready to proceed to the next step of uninstalling the browser from your MacBook.
Step 2: Uninstall Google Chrome
Now that Google Chrome is closed, you can proceed with the uninstallation process. Removing Google Chrome from your MacBook involves more than just dragging the application to the Trash. To ensure a thorough removal, follow these steps:
-
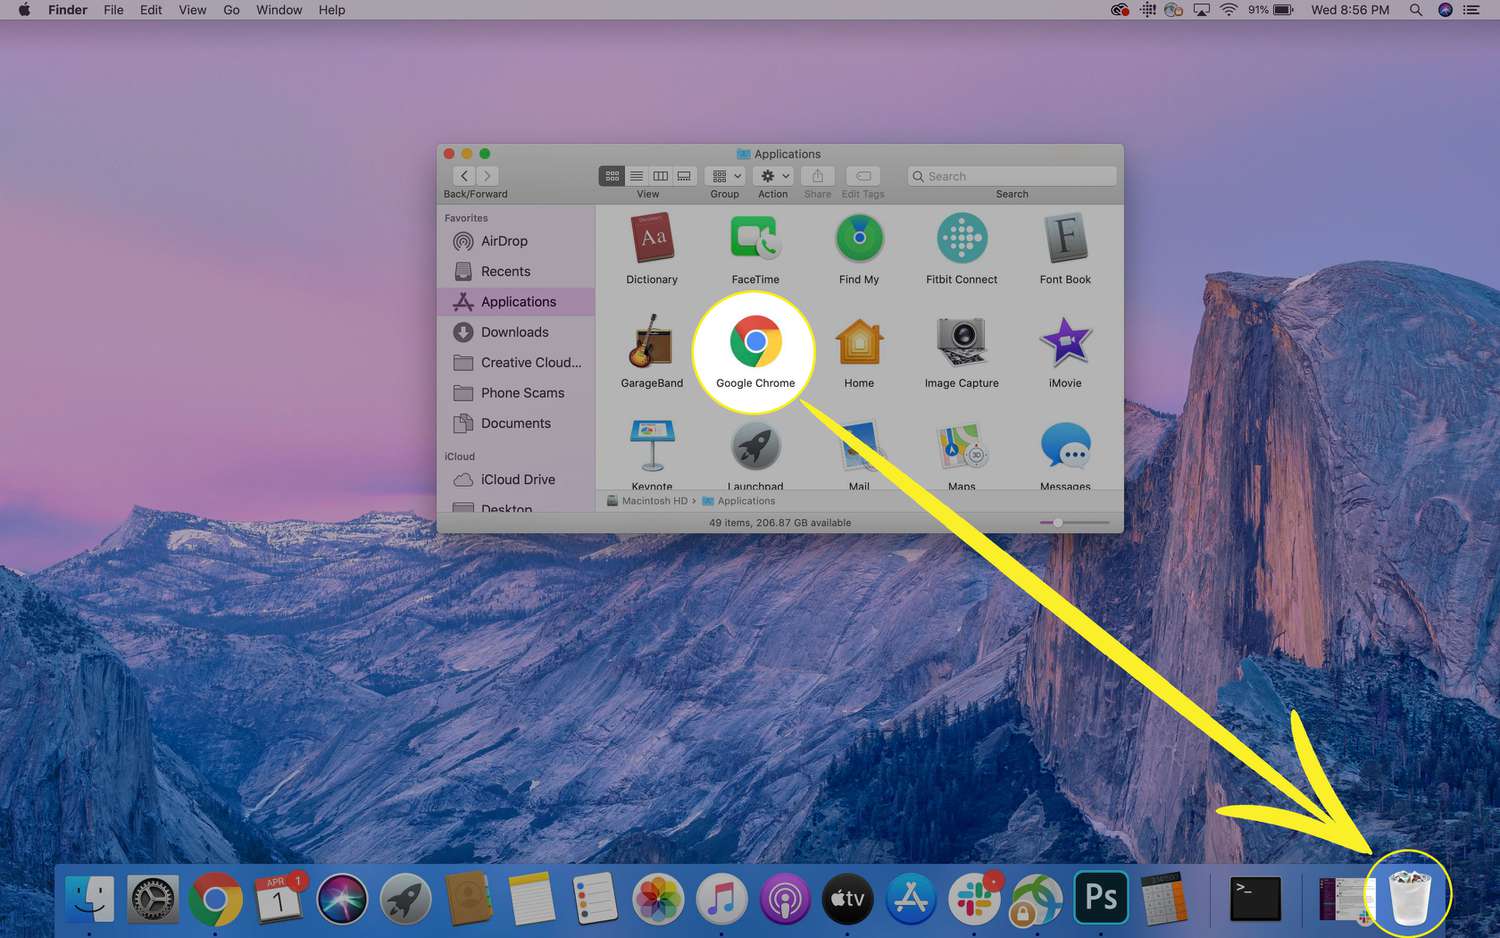
Locate Google Chrome: Open a Finder window and navigate to the "Applications" folder. You can access the "Applications" folder by clicking on "Go" in the menu bar and selecting "Applications." Alternatively, you can access it through the sidebar in a Finder window.
-
Drag Google Chrome to the Trash: Once you've located Google Chrome in the "Applications" folder, simply drag the Google Chrome icon to the Trash icon in the Dock. Alternatively, you can right-click on the Google Chrome icon and select "Move to Trash" from the dropdown menu.
-
Enter Administrator Password: When prompted, you may need to enter your administrator password to authorize the removal of Google Chrome. This step ensures that only authorized users can uninstall applications from the system.
By following these steps, you can effectively uninstall Google Chrome from your MacBook. However, the process doesn't end here. To ensure a complete removal of Google Chrome and its associated files, proceed to the next step.
With Google Chrome successfully uninstalled from your MacBook, you're now ready to move on to the next crucial step: removing Google Chrome preferences and support files. This step is essential to clear out any residual data left behind by the browser, ensuring a thorough and comprehensive removal process. Let's proceed to the next step to complete the uninstallation of Google Chrome from your MacBook.
Step 3: Remove Google Chrome Preferences and Support Files
After uninstalling Google Chrome from your MacBook, it's essential to address the preferences and support files associated with the browser. These files, which are stored in various directories on your system, can accumulate over time and occupy valuable storage space. Additionally, removing these files helps prevent any potential conflicts or issues that may arise from residual data left behind by the browser.
To effectively remove Google Chrome preferences and support files from your MacBook, follow these steps:
-
Open Finder: Launch Finder by clicking on the Finder icon in the Dock or by selecting "Finder" from the menu bar.
-
Navigate to Library: In the Finder window, click on "Go" in the menu bar and then press and hold the "Option" key. While holding the "Option" key, the "Library" option will appear in the dropdown menu. Click on "Library" to access the Library folder.
-
Locate Google Chrome Files: Within the Library folder, navigate to the following directories to find Google Chrome preferences and support files:
- ~/Library/Application Support/Google/Chrome
- ~/Library/Caches/Google/Chrome
- ~/Library/Preferences/com.google.Chrome.plist
-
Delete Google Chrome Files: Once you've located the aforementioned directories, delete the following items:
- The "Google" folder within ~/Library/Application Support
- The "Chrome" folder within ~/Library/Caches/Google
- The com.google.Chrome.plist file within ~/Library/Preferences
-
Empty Trash: After deleting the Google Chrome preferences and support files, ensure that you empty the Trash to permanently remove these items from your system.
By following these steps, you can effectively remove Google Chrome preferences and support files from your MacBook, ensuring a thorough and comprehensive uninstallation of the browser. With these files successfully deleted, your MacBook will be free of any remnants of Google Chrome, optimizing storage space and minimizing the potential for conflicts with other applications.
With Google Chrome and its associated files now completely removed from your MacBook, you've successfully completed the uninstallation process. Your MacBook is now ready for a fresh start, whether you're installing a different browser or troubleshooting issues that led to the decision to delete Google Chrome.
Step 4: Empty Trash
After completing the uninstallation of Google Chrome and removing its associated preferences and support files, the final crucial step is to empty the Trash on your MacBook. When you move items to the Trash, they are not immediately deleted from your system. Instead, they are stored in the Trash, occupying storage space until the Trash is emptied. Therefore, it's essential to empty the Trash to permanently remove the discarded items, including the components of Google Chrome that you've uninstalled.
Here's how to empty the Trash on your MacBook:
-
Open the Trash: Locate the Trash icon on your Dock and double-click on it to open the Trash window. Alternatively, you can right-click on the Trash icon and select "Open" from the dropdown menu.
-
Review Trash Contents: Before emptying the Trash, it's a good practice to review its contents to ensure that you don't have any essential files or documents that were inadvertently placed in the Trash. This quick review can help prevent the accidental deletion of important items.
-
Empty Trash: Once you've confirmed that the items in the Trash are no longer needed, you can proceed to empty the Trash. To do this, click on "Empty" in the top-right corner of the Trash window. A confirmation dialog will appear, asking if you're sure you want to permanently delete the items. Click on "Empty Trash" to proceed with the deletion.
-
Enter Administrator Password: In some cases, you may be prompted to enter your administrator password to authorize the permanent deletion of the items in the Trash. This additional security measure ensures that only authorized users can permanently remove items from the Trash.
By emptying the Trash, you effectively remove the discarded components of Google Chrome, including the application itself, its preferences, and support files, from your MacBook. This final step ensures that your system is free of any remnants of Google Chrome, optimizing storage space and completing the comprehensive uninstallation process.
With the Trash emptied, you've successfully concluded the process of deleting Google Chrome from your MacBook. Your system is now ready for a fresh start, whether you're installing a different browser or addressing any issues that led to the decision to uninstall Google Chrome.
Conclusion
Congratulations! You've successfully navigated through the process of deleting Google Chrome from your MacBook. By following the comprehensive steps outlined in this guide, you've ensured a thorough and complete removal of the browser and its associated files from your system.
Uninstalling Google Chrome goes beyond simply removing the application icon from the Applications folder. It involves closing the browser, uninstalling the application, deleting preferences and support files, and finally, emptying the Trash. This meticulous approach guarantees that your MacBook is free of any remnants of Google Chrome, optimizing storage space and minimizing the potential for conflicts with other applications.
By closing Google Chrome before uninstalling it, you've prevented any potential interruptions during the removal process. Additionally, by deleting the application, preferences, and support files, you've cleared out any residual data left behind by the browser, ensuring a clean slate for your MacBook.
As a result of this thorough uninstallation process, your MacBook is now ready for a fresh start. Whether you're planning to install a different browser or troubleshoot issues that led to the decision to delete Google Chrome, your system is primed for the next steps.
It's important to note that the steps outlined in this guide are designed to provide a comprehensive and effective approach to uninstalling Google Chrome from your MacBook. By following these steps, you've not only freed up valuable storage space but also minimized the potential for conflicts and issues related to residual data from the browser.
Should you decide to install Google Chrome again in the future, you can do so with the confidence that your system is free of any remnants from the previous installation. This clean slate ensures a fresh and seamless experience with the browser.
With Google Chrome successfully removed from your MacBook, you've taken a proactive step in managing your system's resources and ensuring a smooth computing experience. Whether it's for optimization, troubleshooting, or personal preference, the ability to effectively uninstall applications is a valuable skill in maintaining a well-maintained and organized system.
Now that you've completed the process of deleting Google Chrome from your MacBook, you can proceed with your next computing endeavors, knowing that your system is free of any traces of the browser. Whether it's exploring new applications, optimizing your workflow, or simply enjoying a clutter-free environment, your MacBook is primed for whatever comes next.