Introduction
Are you ready to embark on a journey into the world of Chrome OS? Whether you're a tech enthusiast, a developer, or simply curious about this innovative operating system, you've come to the right place. In this comprehensive guide, you'll learn how to download Chrome OS on a USB drive, allowing you to experience its seamless functionality and user-friendly interface on any compatible device.
Chrome OS, developed by Google, is renowned for its simplicity, security, and speed. It's designed to provide a streamlined computing experience, making it an ideal choice for both casual users and professionals. By creating a bootable USB drive with Chrome OS, you can explore its features without the need to install it on your primary device. This allows for a risk-free and convenient way to test the operating system's capabilities and determine if it aligns with your preferences and requirements.
Throughout this guide, you'll be taken through a series of steps, each carefully crafted to ensure a smooth and successful process. From checking system requirements to installing Chrome OS on your USB drive, you'll gain valuable insights into the intricacies of this versatile operating system. By the end of this journey, you'll be equipped with the knowledge and tools to harness the power of Chrome OS on the go.
So, without further ado, let's dive into the exciting world of Chrome OS and unleash its potential by creating a portable and functional USB drive that brings this innovative operating system to life. Get ready to experience the seamless integration of Google's ecosystem and the unparalleled convenience of Chrome OS, all within the confines of a compact USB drive. Let's embark on this adventure together and unlock the possibilities that Chrome OS has to offer.
Step 1: Check System Requirements
Before delving into the process of downloading and installing Chrome OS on a USB drive, it's crucial to ensure that your system meets the necessary requirements. This preliminary step is essential for a seamless and successful experience with Chrome OS on your USB drive.
Compatibility Check
First and foremost, verify that the device on which you intend to run Chrome OS from the USB drive is compatible with the operating system. Chrome OS is designed to function optimally on a wide range of devices, including laptops, desktops, and certain tablets. Ensure that your device meets the compatibility criteria specified by Google for running Chrome OS.
Storage Capacity
Next, assess the available storage capacity on the USB drive. Chrome OS requires a certain amount of space to operate efficiently. It's recommended to use a USB drive with a capacity of at least 16 GB to accommodate the operating system and any additional files or applications you may wish to install.
Internet Connection
A stable internet connection is essential for downloading the necessary files and creating a bootable USB drive. Ensure that you have access to a reliable internet connection throughout the process to prevent interruptions and ensure the successful acquisition of Chrome OS.
Device Performance
Consider the performance capabilities of the device on which you plan to use the Chrome OS USB drive. While Chrome OS is known for its lightweight nature, it's important to ensure that the device's hardware specifications, such as processor speed and RAM, align with the recommended requirements for a smooth and responsive user experience.
BIOS Settings
Check the BIOS settings of the target device to ensure that it supports booting from a USB drive. This step is crucial for initiating the installation process and ensuring that the device recognizes the Chrome OS USB drive as a bootable option.
By meticulously evaluating these system requirements, you can lay a solid foundation for the subsequent steps in the process. Once you've confirmed that your system meets these criteria, you'll be well-prepared to proceed with confidence, knowing that your device is fully equipped to embrace the power of Chrome OS on a portable USB drive.
Step 2: Download Chrome OS
Now that you've ensured that your system meets the necessary requirements, it's time to embark on the next crucial step: downloading Chrome OS. Google provides a convenient and straightforward method for obtaining the official Chrome OS image, allowing you to prepare for the subsequent stages of creating a bootable USB drive.
Access the Chrome OS Image
To initiate the download process, navigate to the official Chrome OS website or the designated source specified by Google. Here, you'll find the official Chrome OS image, which is typically available in the form of a compressed file, such as a ZIP or ISO file. Ensure that you obtain the image from a reputable and trusted source to guarantee its authenticity and integrity.
Select the Correct Image
When selecting the Chrome OS image for download, it's essential to verify that it corresponds to the specific version and build that aligns with your preferences and intended usage. Google often provides different versions of Chrome OS, each tailored to distinct device categories and usage scenarios. Select the appropriate image that best suits your requirements, whether it's for general usage, development purposes, or specialized hardware compatibility.
Choose the Download Location
Upon identifying the desired Chrome OS image, choose a suitable download location on your local system. Select a location with ample available storage space to accommodate the downloaded image. This step is crucial, as it ensures that the Chrome OS image is readily accessible for the subsequent phase of creating a bootable USB drive.
Initiate the Download
With the image selected and the download location determined, initiate the download process. Depending on the size of the Chrome OS image and the speed of your internet connection, the download duration may vary. Exercise patience during this phase, and ensure that the download progresses uninterrupted to obtain the complete Chrome OS image without any corruption or data loss.
Verify the Integrity
After the download is complete, it's prudent to verify the integrity of the Chrome OS image to confirm that it hasn't been compromised during the download process. Utilize checksum verification tools or methods recommended by Google to ensure that the downloaded image matches the original file's checksum. This validation step adds an extra layer of security and ensures that the Chrome OS image is free from any alterations or errors.
By meticulously following these steps, you can successfully download the official Chrome OS image, setting the stage for the subsequent phases of creating a bootable USB drive. With the Chrome OS image securely in your possession, you're one step closer to experiencing the seamless functionality and user-friendly interface of Chrome OS on a portable USB drive.
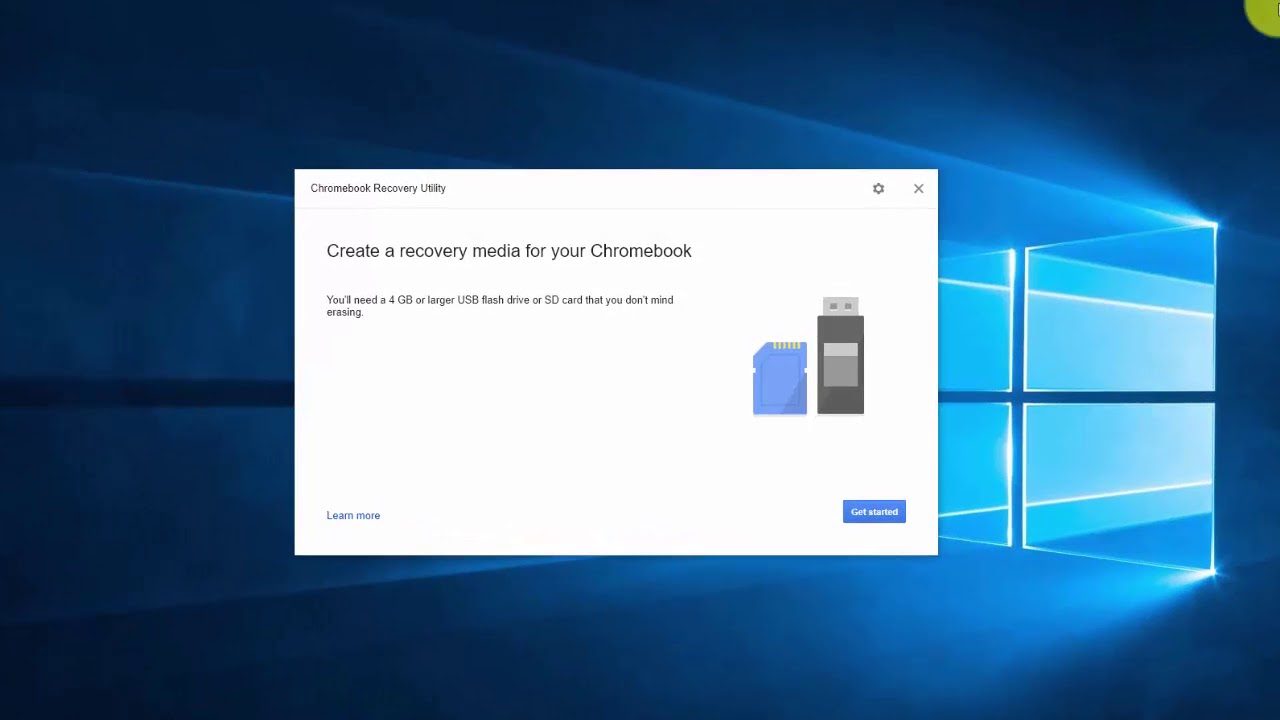
Step 3: Create Bootable USB Drive
With the official Chrome OS image securely downloaded, the next pivotal step is to create a bootable USB drive that will serve as the vessel for Chrome OS. This process involves transferring the Chrome OS image onto the USB drive in a manner that enables the device to boot directly from the drive, initiating the Chrome OS installation process. Here's a detailed walkthrough of the steps involved in creating a bootable USB drive for Chrome OS:
-
Select a Reliable Tool: Begin by selecting a reliable and user-friendly tool for creating a bootable USB drive. Several software applications, such as Rufus, Etcher, and Chromebook Recovery Utility, are well-suited for this purpose. Choose a tool that aligns with your operating system and offers a straightforward interface for creating bootable drives.
-
Insert the USB Drive: Insert the USB drive into an available USB port on your computer. Ensure that the drive is recognized by the system and is devoid of any critical data, as the creation process will involve formatting the drive, resulting in the loss of existing data.
-
Launch the Tool: Open the selected tool for creating bootable drives and navigate to the option for selecting the Chrome OS image. Locate the downloaded Chrome OS image and proceed to load it into the tool, ensuring that the correct image is selected to avoid any discrepancies during the creation process.
-
Configure Settings: Depending on the chosen tool, configure the settings to align with the requirements for creating a bootable Chrome OS USB drive. This may involve specifying the target USB drive, adjusting partition settings, and verifying the write settings to ensure a seamless and error-free creation process.
-
Initiate the Creation Process: Once the settings are configured, initiate the creation process within the selected tool. This action will prompt the tool to transfer the Chrome OS image onto the USB drive, creating a bootable environment that enables the device to recognize and boot from the USB drive.
-
Validation and Ejection: After the creation process is complete, validate the integrity of the bootable USB drive to ensure that the Chrome OS image has been successfully transferred. Once validated, safely eject the USB drive from the computer in preparation for the next phase of installing Chrome OS on the USB drive.
By meticulously following these steps, you can successfully create a bootable USB drive for Chrome OS, setting the stage for the final phase of installing the operating system on the USB drive. With the bootable USB drive at your disposal, you're primed to unlock the potential of Chrome OS on a portable and versatile platform, ready to explore its seamless functionality and user-friendly interface on a diverse range of compatible devices.
Step 4: Install Chrome OS on USB
With the bootable USB drive prepared, the final step involves installing Chrome OS onto the USB drive, transforming it into a portable platform for experiencing the seamless functionality and user-friendly interface of Chrome OS. This process enables you to harness the power of Chrome OS on a diverse range of compatible devices, without the need for a permanent installation. Here's a detailed walkthrough of the steps involved in installing Chrome OS on the USB drive:
-
Boot from the USB Drive: Begin by inserting the bootable USB drive into the target device. Restart or power on the device and access the boot menu or BIOS settings to prioritize booting from the USB drive. This step ensures that the device initiates the installation process from the Chrome OS USB drive rather than the internal storage.
-
Initiate the Installation: Upon successfully booting from the USB drive, the device will initiate the Chrome OS installation process. Follow the on-screen prompts and instructions to navigate through the installation wizard. This typically involves selecting the installation destination, agreeing to the terms and conditions, and configuring initial settings for Chrome OS.
-
Installation Progress: Allow the installation process to proceed uninterrupted, as the device transfers the necessary files and components from the USB drive to facilitate the installation of Chrome OS. Depending on the device's performance and the USB drive's read speed, the installation duration may vary. Exercise patience during this phase to ensure a successful installation.
-
Configuration and Setup: Once the installation is complete, the device will prompt you to configure and set up Chrome OS. This includes personalizing user preferences, connecting to a network, and signing in with your Google account to access the full suite of Chrome OS features and services.
-
Verification and Testing: After the initial setup, take the time to verify the successful installation of Chrome OS on the USB drive. Explore the interface, test essential functionalities, and ensure that the operating system operates seamlessly from the USB drive. This step allows you to confirm that Chrome OS is fully functional and ready for use on the portable USB platform.
By meticulously following these steps, you can successfully install Chrome OS on the USB drive, unlocking the potential of this innovative operating system in a portable and versatile format. With Chrome OS seamlessly integrated into the USB drive, you're poised to explore its features, applications, and ecosystem on a diverse array of compatible devices, all from the convenience of a compact and portable platform.
Conclusion
Congratulations on successfully creating a bootable USB drive with Chrome OS, a feat that opens the door to a world of possibilities and convenience. By following the comprehensive steps outlined in this guide, you've equipped yourself with a portable platform that encapsulates the seamless functionality and user-friendly interface of Chrome OS. This achievement marks the beginning of a journey filled with exploration, productivity, and innovation, all made possible by the versatility of Chrome OS on a USB drive.
With Chrome OS at your fingertips, accessible from a compact and portable USB drive, you're empowered to experience the benefits of this innovative operating system across a diverse range of compatible devices. Whether you're on the go, exploring new computing environments, or seeking a risk-free method to test Chrome OS, the USB drive serves as your gateway to a world of possibilities.
The journey doesn't end with the installation of Chrome OS on the USB drive; it's just the beginning. Embrace the flexibility and mobility that this setup offers, allowing you to seamlessly transition between devices while retaining the familiarity and functionality of Chrome OS. Explore the ecosystem of applications, services, and features that Chrome OS has to offer, all within the confines of a portable and versatile platform.
Furthermore, the experience gained from creating a bootable USB drive with Chrome OS extends beyond the immediate benefits. It represents a deeper understanding of the intricacies of operating system installation, bootable media creation, and the potential for transforming everyday devices into powerful computing platforms.
As you embark on this journey with Chrome OS on a USB drive, remember that the possibilities are boundless. Whether you're a tech enthusiast, a developer, or a casual user seeking a flexible computing solution, Chrome OS on a USB drive offers a gateway to a world of innovation and productivity.
So, take the next step, explore new horizons, and unleash the full potential of Chrome OS on your portable USB drive. Embrace the freedom, convenience, and versatility that this setup affords, and let Chrome OS redefine your computing experience in ways that transcend traditional boundaries.
The journey continues, and with Chrome OS on a USB drive, you're primed to embrace the future of computing, one portable platform at a time.