Introduction
Welcome to the world of Chrome OS—an operating system built for simplicity, speed, and security. While Chrome OS offers a wide range of applications through the Chrome Web Store, one popular app that has been missing is iTunes. Fortunately, with a few simple steps, you can now download iTunes and enjoy your favorite music, movies, and more on your Chromebook using the Linux (Beta) feature.
Before we dive into the process, it’s important to note that enabling Linux (Beta) on Chrome OS is required to run iTunes. This feature allows you to run Linux applications alongside your Chrome OS apps, giving you access to a wider variety of software.
In this guide, we will walk you through the step-by-step process of downloading iTunes on Chrome OS, so you can sync your Apple devices and enjoy your media library right from your Chromebook. Whether you’re a music enthusiast or a movie lover, having iTunes on Chrome OS opens up a whole new world of entertainment.
Step 1: Enable Linux (Beta) on Chrome OS
The first step in downloading iTunes on Chrome OS is to enable the Linux (Beta) feature on your device. Follow these instructions to enable Linux on your Chromebook:
- Click on the time in the bottom-right corner of your screen to open the system menu.
- Select the gear icon to open the Settings menu.
- In the Settings menu, scroll down and click on “Advanced” to expand the options.
- Under the “Linux (Beta)” section, click on “Turn on.”
- Follow the on-screen prompts to set up Linux on your Chromebook.
Enabling Linux (Beta) may take a few minutes, as Chrome OS will download and install the necessary components. Once the setup is complete, you will have access to a Linux terminal on your Chromebook.
It’s worth noting that enabling Linux (Beta) may vary slightly depending on the Chrome OS version you are using. If you encounter any issues or need further assistance, refer to the official Chrome OS support documentation for detailed instructions tailored to your specific device model and software version.
Once you have successfully enabled Linux (Beta) on your Chromebook, you are ready to proceed to the next step: installing Wine. Let’s move on to Step 2 to continue the process.
Step 2: Install Wine
In order to run Windows applications, like iTunes, on Chrome OS, we need to install Wine. Wine is a compatibility layer that allows you to run Windows software on Linux-based systems, such as Chrome OS.
Follow these steps to install Wine on your Chromebook:
-
- Open the Linux terminal by pressing “Ctrl + Alt + T” on your keyboard.
- Type the following command and press Enter to update the package manager:
sudo apt update
-
- Once the update is complete, run the following command to install Wine:
sudo apt-get install wine
- During the installation process, you may be prompted to confirm the installation and enter your Linux user password.
- After the installation is finished, you will have Wine installed on your Chromebook.
With Wine installed, your Chromebook is now equipped to run Windows applications and we can proceed to the next step: downloading the iTunes installer. Continue to Step 3 to learn how to download the iTunes installer file.
Step 3: Download iTunes Installer
Now that Wine is installed on your Chromebook, it’s time to download the iTunes installer. Here’s how you can do it:
- Open a web browser on your Chromebook and go to the official Apple website.
- Navigate to the iTunes download page.
- Click on the “Download” button to start the download process.
- Choose the Windows version of iTunes since we will be using Wine to run it on Chrome OS.
- Once the download is complete, you will have the iTunes installer file (.exe) saved on your Chromebook.
It’s important to download the Windows version of iTunes as Chrome OS uses the Linux environment provided by Wine to run Windows applications. This allows us to leverage Wine’s compatibility layer to execute iTunes on your Chromebook.
With the iTunes installer file ready, we can now proceed to the next step: installing iTunes on Chrome OS. Let’s move on to Step 4 to learn how to install iTunes using Wine.
Step 4: Install iTunes on Chrome OS
Now that you have the iTunes installer file downloaded, it’s time to install iTunes on your Chromebook using Wine. Follow these steps:
-
- Open the Linux terminal on your Chromebook by pressing “Ctrl + Alt + T” on your keyboard.
- Navigate to the directory where you downloaded the iTunes installer file. You can use the “cd” command to change directories.
- Type the following command to start the installation process:
wine iTunesInstaller.exe
- Wine will begin the installation wizard, and you can proceed through the installation prompts.
- Follow the on-screen instructions to complete the installation of iTunes on your Chromebook.
It’s important to note that the installation process may take some time depending on the speed of your Chromebook and the size of the iTunes installation files. Be patient and let the process run until it is completed.
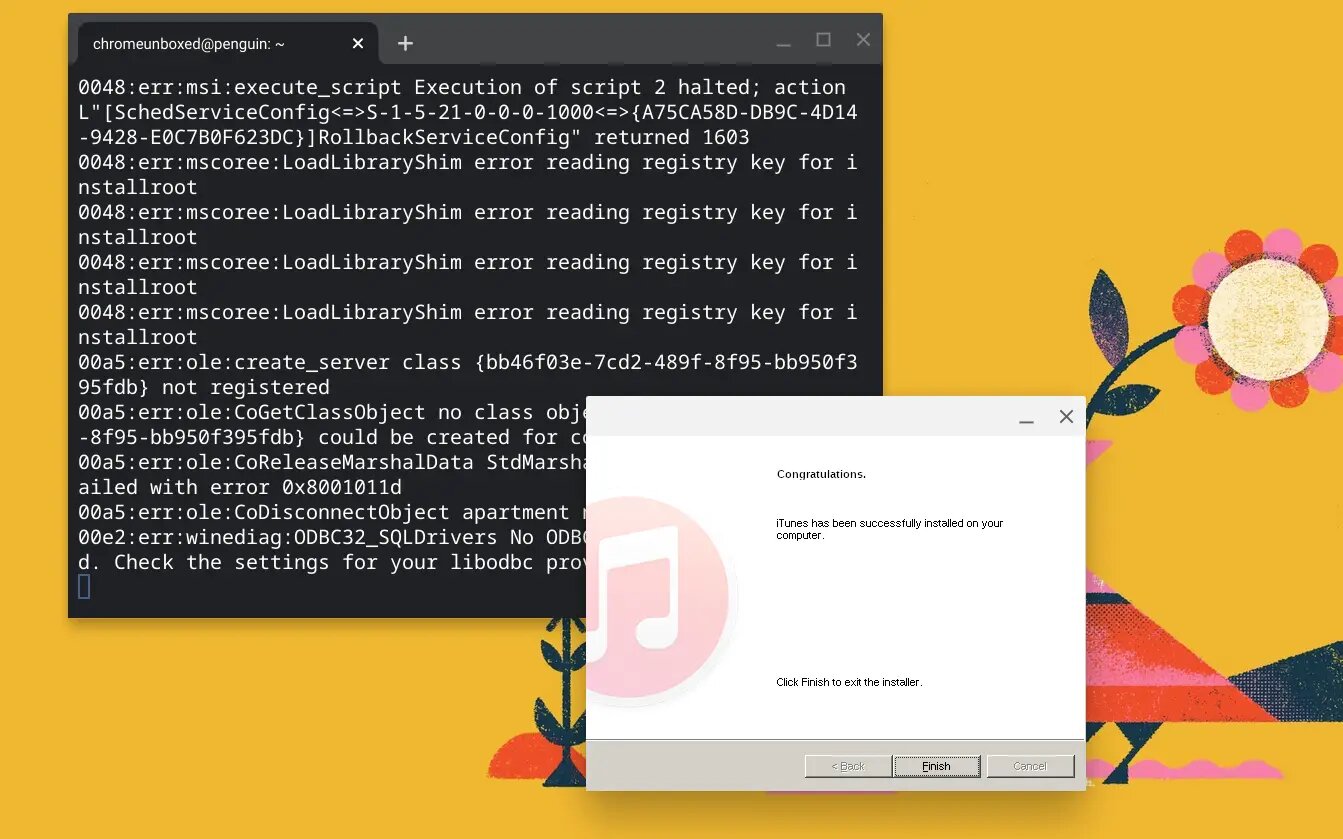
Once the installation is finished, you will have iTunes successfully installed on your Chromebook. Now, you’re just a few steps away from enjoying your music library and other media on iTunes.
Continue to the next step to learn how to configure iTunes for Chrome OS.
Step 5: Configure iTunes for Chrome OS
After successfully installing iTunes on your Chromebook, it’s time to configure it to work seamlessly with Chrome OS. Follow these steps to configure iTunes:
-
- Open the Linux terminal on your Chromebook by pressing “Ctrl + Alt + T” on your keyboard.
- Type the following command to launch iTunes:
wine iTunes.exe
- iTunes will launch within the Wine environment. You may be prompted to go through some initial setup steps, such as agreeing to the terms and conditions.
- Once you have completed the setup process, you can begin using iTunes on your Chromebook.
- Connect your Apple device to your Chromebook using a USB cable.
- iTunes should recognize your device and allow you to sync your music, movies, and other media content.
It’s worth noting that not all features of iTunes may be fully supported on Chrome OS. Some functionalities, such as Apple Music and iTunes Store, may have limitations or may not work at all. However, you can still enjoy local media playback and manage your device through iTunes on your Chromebook.
With iTunes successfully installed and configured on your Chromebook, you can now enjoy all the features and convenience that iTunes offers. Now you can sync your music, create playlists, and enjoy your favorite media on the go.
That concludes the step-by-step guide on how to download iTunes on Chrome OS. We hope this guide has helped you in getting iTunes up and running on your Chromebook. If you encounter any difficulties or have any questions, refer to the official documentation or seek assistance from the Chrome OS support community.
Happy listening!
Conclusion
Congratulations! You have successfully downloaded and installed iTunes on your Chrome OS device. By enabling Linux (Beta) on Chrome OS, installing Wine, and following the steps outlined in this guide, you can now enjoy accessing and managing your music, movies, and more on your Chromebook.
While the process of downloading iTunes on Chrome OS may require a few extra steps compared to other operating systems, the ability to run iTunes on Chromebook opens up new possibilities for Apple users. You can now sync your Apple devices, organize your media library, and enjoy iTunes features and functionalities right from your Chromebook.
It’s important to keep in mind that running iTunes on Chrome OS using Wine may have certain limitations. Some features, such as Apple Music and iTunes Store, may not be fully functional or available. However, for local media playback and device management, iTunes on Chrome OS provides a convenient solution.
We hope this guide has been helpful in assisting you with downloading and configuring iTunes on Chrome OS. If you encounter any difficulties or have any questions, don’t hesitate to seek assistance from the Chrome OS support community or consult the official documentation.
Now that you have iTunes up and running on your Chromebook, sit back, relax, and enjoy your favorite music and media on-the-go. Happy listening!