Introduction
Chrome OS is a versatile operating system known for its simplicity, security, and speed. While it offers a wide range of applications through the Chrome Web Store and Google Play Store, some users may find themselves in need of software that isn't readily available for Chrome OS. One such popular software is iTunes, which is widely used for managing and playing media files, as well as syncing iOS devices.
However, iTunes is not natively supported on Chrome OS, as it is designed for Windows and macOS. Nevertheless, with the help of some clever workarounds, it is possible to run iTunes on a Chromebook. In this guide, we will walk you through the steps to download and install iTunes on your Chrome OS device.
Whether you're a music enthusiast, a podcast aficionado, or someone who relies on iTunes for device management, this guide will enable you to enjoy the benefits of iTunes on your Chromebook. By following the steps outlined in this article, you can expand the functionality of your Chrome OS device and seamlessly integrate iTunes into your digital lifestyle.
Let's dive into the process of setting up iTunes on Chrome OS, allowing you to access your favorite media and manage your iOS devices without the need for a Windows or macOS computer.
Step 1: Check Chrome OS Version
Before embarking on the journey to install iTunes on your Chrome OS device, it's crucial to ensure that your Chromebook is running a compatible version of Chrome OS. As the compatibility of certain applications and features can vary based on the Chrome OS version, this initial step is essential to determine the feasibility of running iTunes on your device.
To check your Chrome OS version, follow these simple steps:
-
Open Settings: Click on the system tray located in the bottom-right corner of the screen. Next, click on the gear-shaped icon to access the Settings menu.
-
Navigate to "About Chrome OS": Within the Settings menu, scroll down and select "About Chrome OS" from the sidebar. This option provides detailed information about the current version of Chrome OS installed on your device.
-
Check the Version: Once you're in the "About Chrome OS" section, the current version of Chrome OS will be displayed. It's important to verify that your Chromebook is running a version that supports the installation of Linux applications, as this will be crucial for running iTunes through a compatibility layer.
-
Ensure Linux (Beta) Support: If your Chrome OS version does not support Linux applications, you may need to update to a compatible version or enable Linux (Beta) support if it's not already activated.
By following these steps, you can confirm whether your Chromebook is running a compatible version of Chrome OS for installing iTunes. If your current version does not support Linux applications, you may need to update to a compatible version or enable Linux (Beta) support to proceed with the installation process.
Ensuring that your Chrome OS version is compatible with the subsequent steps is a fundamental aspect of preparing your device for the installation of iTunes. Once you have verified the compatibility of your Chromebook's operating system, you can proceed to the next step with confidence, knowing that your device is ready to run iTunes through the Linux compatibility layer.
Step 2: Enable Linux (Beta) on Chrome OS
Enabling Linux (Beta) on Chrome OS is a pivotal step in the process of installing iTunes, as it provides the necessary environment to run Linux applications, including Wine, which is essential for running Windows software on Chrome OS. By activating Linux (Beta), users can access a wide array of applications that were previously unavailable on Chromebooks, expanding the capabilities of their devices.
To enable Linux (Beta) on your Chrome OS device, follow these steps:
-
Access Settings: Begin by clicking on the system tray in the bottom-right corner of the screen. From there, select the gear-shaped icon to access the Settings menu.
-
Navigate to "Linux (Beta)": Within the Settings menu, locate and click on the "Linux (Beta)" option in the sidebar. This will initiate the setup process for enabling Linux support on your Chromebook.
-
Click "Turn On": Upon selecting the "Linux (Beta)" option, you will be prompted to turn on the Linux (Beta) feature. Click on the "Turn On" button to initiate the installation of the Linux environment on your Chrome OS device.
-
Follow Setup Instructions: A series of setup instructions will appear on the screen, guiding you through the process of configuring the Linux environment. Follow the on-screen prompts to complete the setup, which includes specifying the storage allocation for the Linux container.
-
Wait for Installation: Once the setup process is initiated, the system will proceed to install the Linux environment on your Chromebook. This may take a few minutes, so it's important to allow the installation to complete without interruption.
-
Access Linux Terminal: After the installation is finished, you will have access to the Linux terminal, where you can execute commands and install Linux applications, including Wine, which will be instrumental in running iTunes on your Chrome OS device.
Enabling Linux (Beta) on Chrome OS opens up a world of possibilities, allowing users to harness the power of Linux applications and utilities on their Chromebooks. By following these steps, you can seamlessly integrate the Linux environment into your Chrome OS device, paving the way for the installation of iTunes and other software that was previously inaccessible on Chromebooks.
With Linux (Beta) activated, your Chromebook is now equipped to handle a broader range of applications, providing a more versatile computing experience. This sets the stage for the subsequent steps in the process of installing iTunes on Chrome OS, bringing you closer to enjoying the full functionality of iTunes on your Chromebook.
Step 3: Install Wine on Chrome OS
With Linux (Beta) enabled on your Chrome OS device, the next crucial step in the process of installing iTunes is to set up Wine, a compatibility layer that allows Windows applications to run on Linux-based systems. Wine serves as a bridge between the Windows software ecosystem and the Linux environment, enabling users to seamlessly execute Windows applications, including iTunes, on their Chromebooks.
To install Wine on Chrome OS and prepare the environment for running iTunes, follow these detailed steps:
-
Open the Linux Terminal: Access the Linux terminal on your Chromebook, which becomes available after enabling Linux (Beta) in the previous step. The terminal serves as the command-line interface for interacting with the Linux environment on your Chrome OS device.
-
Update Package Lists: Before proceeding with the installation of Wine, it's essential to ensure that the package lists are up to date. Execute the following command in the Linux terminal to update the package lists:
sudo apt update
-
Install Wine: Once the package lists are updated, proceed to install Wine by entering the following command in the Linux terminal:
sudo apt install wine
-
Follow Installation Prompts: After initiating the installation command, the system will prompt you to confirm the installation of Wine. Follow the on-screen prompts to proceed with the installation process. You may be required to authorize the installation by entering your user password.
-
Wait for Installation to Complete: The system will now proceed to install Wine on your Chromebook. This process may take some time, depending on your device's specifications and internet connection speed. It's important to allow the installation to complete without interruption.
-
Verify Wine Installation: Once the installation is finished, you can verify the successful installation of Wine by checking its version. Enter the following command in the Linux terminal to confirm the installed version of Wine:
wine –version
By following these steps, you can successfully install Wine on your Chrome OS device, paving the way for running Windows applications, including iTunes, within the Linux environment. With Wine set up, your Chromebook is now equipped to handle Windows software, expanding the range of applications that can be utilized on your Chrome OS device.
The installation of Wine represents a pivotal milestone in the process of preparing your Chromebook for running iTunes, bringing you closer to seamlessly integrating iTunes into your Chrome OS environment. With Wine in place, you are now ready to proceed to the next step, which involves downloading iTunes for Windows and initiating the installation process on your Chromebook.
Step 4: Download iTunes for Windows
Now that Wine is successfully installed on your Chrome OS device, the next step is to obtain the iTunes installation package designed for Windows. Since iTunes is not natively compatible with Chrome OS, we will leverage Wine to create a Windows environment within the Linux subsystem, allowing us to run the Windows version of iTunes seamlessly.
To download iTunes for Windows and prepare for the installation on your Chromebook, follow these steps:
-
Open a Web Browser: Launch the web browser within the Chrome OS environment on your Chromebook.
-
Navigate to the Official iTunes Download Page: Enter the official iTunes download page URL in the address bar of your web browser. You can access the official iTunes download page by visiting https://www.apple.com/itunes/download/.
-
Select the Windows Version: On the official iTunes download page, locate the option to download iTunes for Windows. Ensure that you are downloading the Windows version of iTunes, as this is the version that will be compatible with the Wine environment on your Chromebook.
-
Initiate the Download: Click on the download link or button to initiate the download of the iTunes installation package for Windows. The download process may vary based on your web browser and settings, but it typically involves saving the installation file to a designated location on your Chromebook.
-
Wait for the Download to Complete: Depending on your internet connection speed, the download process may take some time. It's important to allow the download to complete without interruption to ensure that the iTunes installation package is obtained successfully.
By following these steps, you can acquire the iTunes installation package designed for Windows, setting the stage for the subsequent step, which involves initiating the installation of iTunes within the Windows environment created by Wine on your Chrome OS device.
With the iTunes installation package in hand, you are now ready to proceed to the final step, where you will install iTunes within the Windows environment facilitated by Wine, bringing the full functionality of iTunes to your Chromebook.
Step 5: Install iTunes on Chrome OS
With the Windows version of iTunes downloaded and the Wine compatibility layer set up on your Chrome OS device, you are now ready to proceed with the installation of iTunes. The following steps will guide you through the process of installing iTunes within the Windows environment created by Wine, allowing you to seamlessly access and utilize the full suite of features offered by iTunes on your Chromebook.
-
Locate the iTunes Installation Package: Navigate to the directory where the iTunes installation package was downloaded. Typically, the downloaded file is located in the "Downloads" folder within the Chrome OS file system. Locate the iTunes installation package, which is usually a file with a ".exe" extension.
-
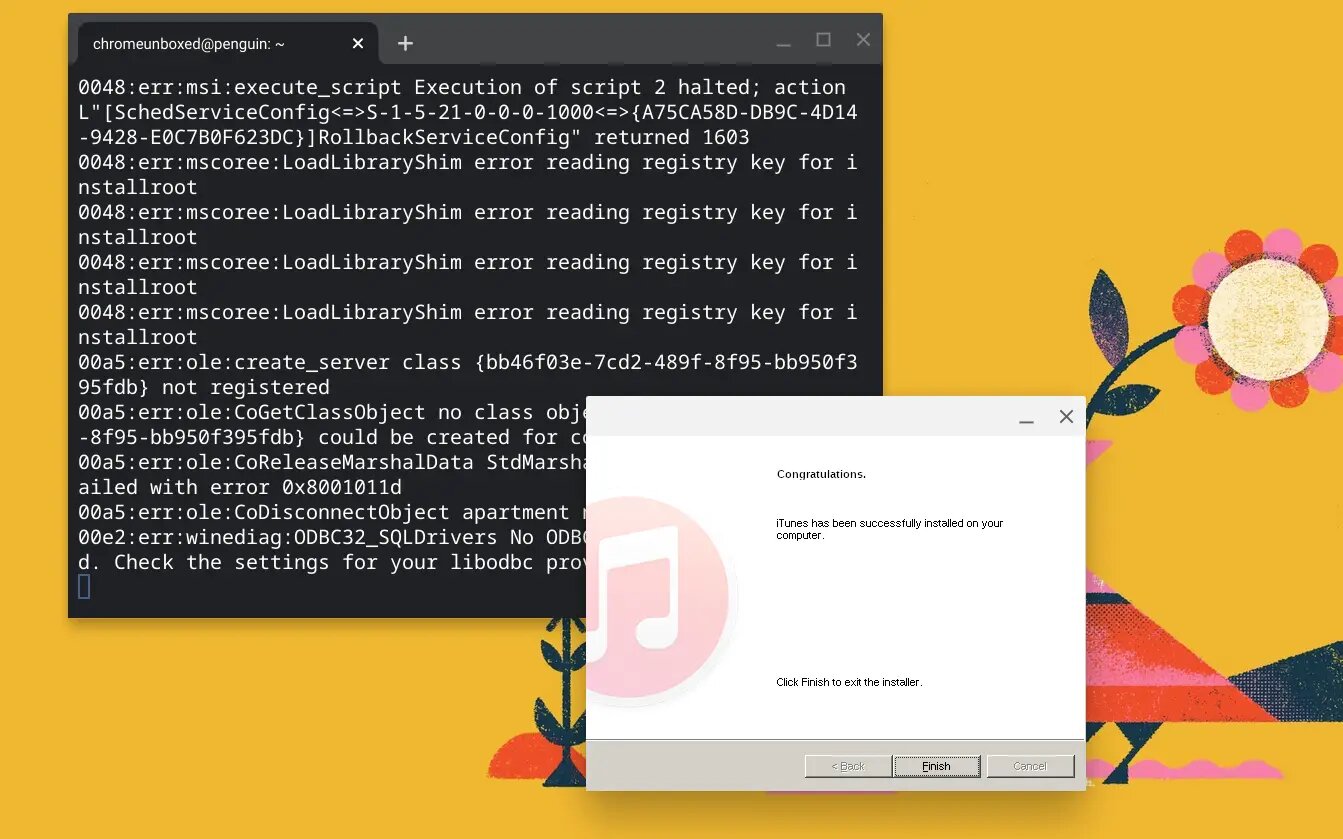
Initiate the Installation: Right-click on the iTunes installation package file and select "Open with Wine Windows Program Loader" from the context menu. This action will launch the iTunes installer within the Windows environment facilitated by Wine on your Chromebook.
-
Follow the Installation Wizard: The iTunes installation wizard will appear on the screen, guiding you through the installation process. Follow the prompts provided by the installation wizard to proceed with the installation of iTunes. You will be able to specify the installation directory and select additional components as per your preferences.
-
Complete the Installation: Once you have configured the installation settings, proceed with the installation of iTunes by following the prompts within the installation wizard. The system will proceed to install iTunes within the Windows environment created by Wine on your Chromebook.
-
Launch iTunes: After the installation is complete, you can launch iTunes by locating it within the installed applications or by searching for it in the application launcher. Upon launching iTunes, you will have access to its full range of features, including music playback, media management, and iOS device synchronization.
By following these steps, you can successfully install iTunes within the Windows environment facilitated by Wine on your Chrome OS device. This enables you to harness the complete functionality of iTunes, seamlessly integrating it into your Chromebook's ecosystem. Whether you're managing your music library, enjoying podcasts, or syncing your iOS devices, the installation of iTunes on Chrome OS opens up a world of possibilities, enhancing the versatility of your Chromebook.
With iTunes now installed and readily accessible on your Chromebook, you can enjoy the seamless integration of iTunes into your digital lifestyle, all within the familiar Chrome OS environment.
Conclusion
In conclusion, the process of downloading and installing iTunes on Chrome OS involves a series of strategic steps that leverage the capabilities of Linux (Beta) and Wine to create a Windows environment within the Chromebook ecosystem. By following the outlined steps, users can successfully integrate iTunes into their Chrome OS devices, expanding the range of available applications and enhancing the overall functionality of their Chromebooks.
The journey begins with a crucial check of the Chrome OS version to ensure compatibility with Linux applications, setting the foundation for the subsequent steps. Enabling Linux (Beta) on Chrome OS unlocks a wealth of possibilities, allowing users to access a broader spectrum of applications and utilities, including the essential Wine compatibility layer.
The installation of Wine represents a pivotal milestone, bridging the gap between the Windows software ecosystem and the Chrome OS environment. With Wine in place, users can seamlessly execute Windows applications, paving the way for the successful installation of iTunes within the Windows environment facilitated by Wine.
Obtaining the Windows version of iTunes and initiating the installation process within the Wine environment brings the full suite of iTunes features to the Chromebook, enabling users to manage their media libraries, enjoy music and podcasts, and synchronize iOS devices seamlessly.
By embracing the steps outlined in this guide, Chrome OS users can transcend the limitations of native application availability, bringing the renowned functionality of iTunes to their Chromebooks. This not only enhances the entertainment and media management capabilities of Chrome OS devices but also exemplifies the adaptability and versatility of the Chromebook ecosystem.
The successful installation of iTunes on Chrome OS underscores the potential for expanding the application landscape on Chromebooks, empowering users to tailor their devices to suit their diverse digital needs. As the Chrome OS platform continues to evolve, the integration of Windows applications through Linux (Beta) and Wine exemplifies the adaptability and innovation inherent in the Chromebook experience.
In essence, the journey to install iTunes on Chrome OS showcases the ingenuity and resourcefulness of leveraging cross-platform compatibility to enrich the user experience. It exemplifies the seamless convergence of diverse software ecosystems, ultimately enhancing the capabilities of Chrome OS devices and broadening the horizons of digital possibilities for users.