Introduction
Google Chrome is one of the most popular web browsers, known for its user-friendly interface and powerful features. However, as with any browser, there may be times when you want to remove certain sites from your browsing history or block specific sites from being accessed. Whether you're looking to maintain your privacy, improve your browsing experience, or restrict access to certain content, Chrome offers several methods to help you achieve these goals on your Android device.
In this article, we will explore three effective methods for managing the sites you visit on Chrome for Android. By following these methods, you can gain greater control over your browsing history and site access, ultimately enhancing your overall browsing experience. Whether you're a parent seeking to protect your children from inappropriate content, a professional aiming to maintain a clean browsing history, or an individual looking to optimize your browsing habits, these methods will empower you to tailor your Chrome experience to your specific needs.
Now, let's delve into the step-by-step instructions for each method, equipping you with the knowledge and tools to remove sites from your Chrome history, block unwanted sites, and optimize your data usage with Chrome's Data Saver feature. Whether you're a seasoned Chrome user or just getting started, these methods are designed to be accessible and straightforward, allowing you to take full advantage of Chrome's capabilities on your Android device. Let's get started!
Method 1: Removing Sites from Chrome History
When it comes to managing your browsing history on Chrome for Android, removing specific sites from your history is a straightforward and effective way to maintain privacy and declutter your browsing record. Whether you've visited a site accidentally, or simply wish to keep your browsing history tidy, Chrome provides a simple method to remove individual sites from your history.
Here's how to remove sites from your Chrome history on Android:
-
Open Chrome: Launch the Chrome app on your Android device.
-
Access History: Tap the three-dot menu icon in the top-right corner of the browser window. From the menu that appears, select "History."
-
Select Site: In the History tab, you will see a list of sites you've visited. Scroll through the list and tap on the site you want to remove from your history.
-
Remove Site: Once you've selected the site, tap and hold on the entry. A menu will appear, offering you the option to "Remove from history." Tap this option to confirm the removal of the site from your browsing history.
By following these simple steps, you can effectively remove specific sites from your Chrome browsing history on your Android device. This method allows you to maintain a clean and organized browsing history, ensuring that only the sites you wish to keep are retained in your browsing record.
Removing sites from your Chrome history is a quick and convenient way to manage your browsing history, providing you with greater control over the content that appears in your history log. Whether you're looking to maintain privacy, declutter your browsing record, or simply tidy up your history, this method empowers you to curate your browsing history according to your preferences.
By utilizing this method, you can ensure that your Chrome browsing history reflects your browsing habits accurately, allowing you to maintain a personalized and organized record of your online activity. With this level of control, you can optimize your browsing experience and ensure that your history remains tailored to your specific needs and preferences.
Method 2: Blocking Sites with Chrome's Site Settings
In addition to managing your browsing history, Chrome for Android offers a powerful feature that allows you to block specific sites, providing you with greater control over the content accessible through your browser. Whether you want to restrict access to certain websites for yourself or others using the device, Chrome's Site Settings enable you to effectively block sites and customize your browsing experience.
Here's a detailed guide on how to block sites using Chrome's Site Settings on your Android device:
-
Access Site Settings: Open the Chrome app on your Android device and tap the three-dot menu icon in the top-right corner of the browser window. From the menu, select "Settings" and then choose "Site settings."
-
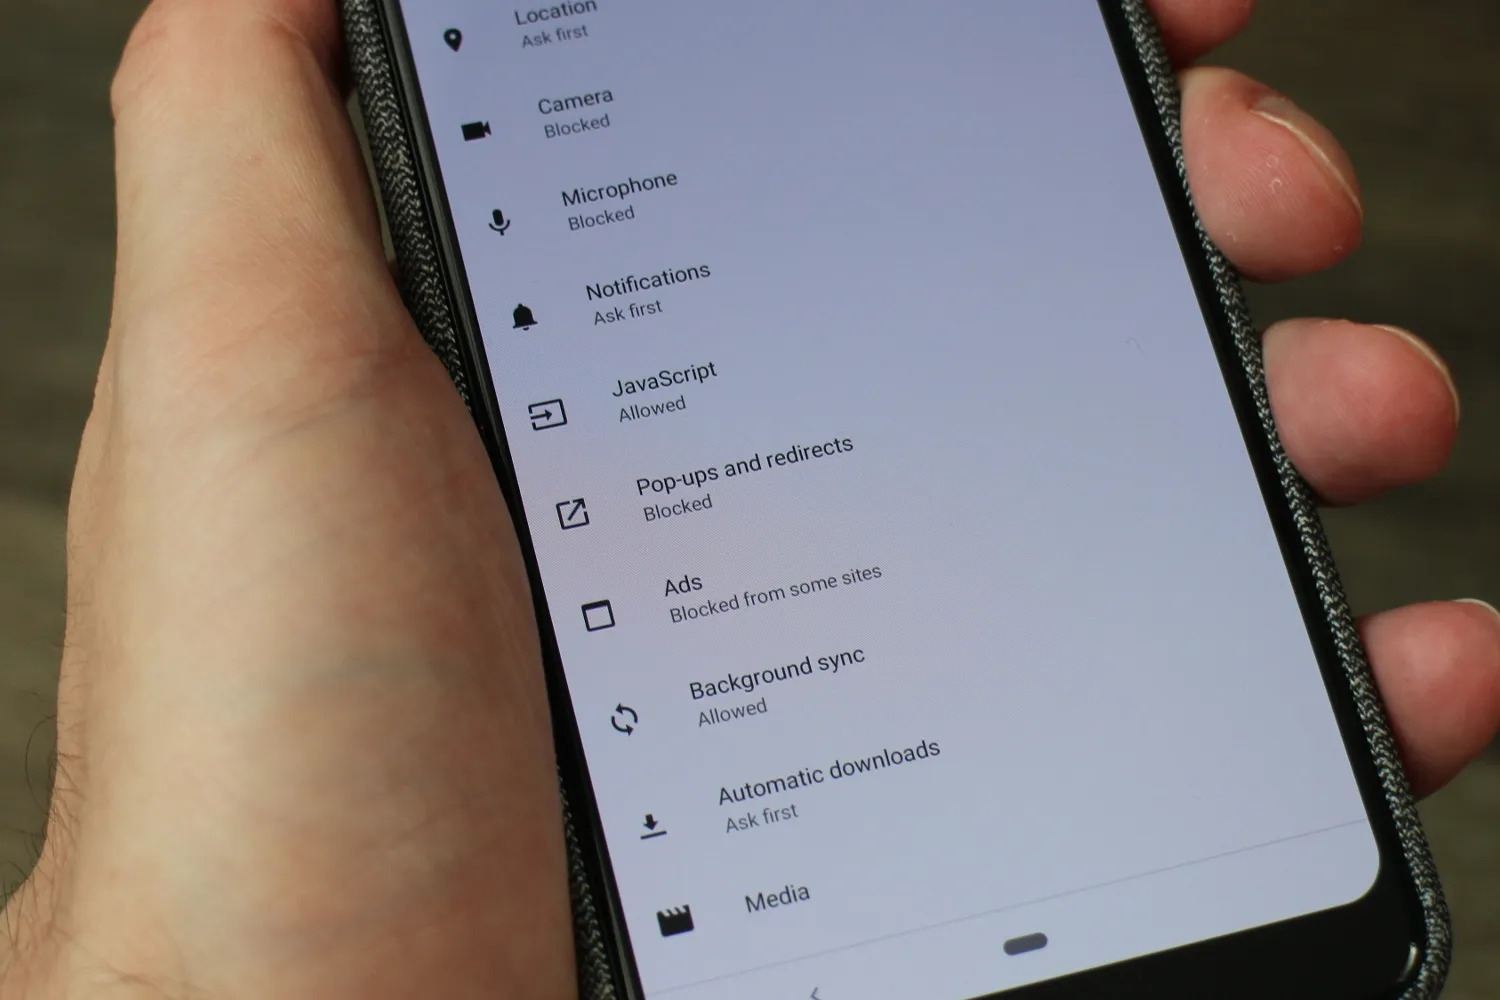
Block Specific Sites: In the Site settings menu, tap on "Blocked" under the Permissions section. Here, you can add specific sites to the block list by tapping on "Add site exception." Enter the URL of the site you want to block and tap "Add" to include it in the block list.
-
Customize Block Settings: Chrome also allows you to customize the block settings for individual sites. By tapping on a blocked site in the list, you can modify permissions such as camera access, microphone access, and notifications, providing you with granular control over the site's capabilities.
-
Manage Block List: To review and manage the list of blocked sites, simply navigate back to the Site settings menu and select "Blocked" under the Permissions section. Here, you can view the complete list of blocked sites and make any necessary adjustments.
By leveraging Chrome's Site Settings, you can effectively block specific sites, tailoring your browsing experience to align with your preferences and requirements. Whether you're looking to restrict access to certain content, enhance online safety, or customize browsing permissions, this feature empowers you to curate your browsing environment according to your specific needs.
Blocking sites with Chrome's Site Settings is a valuable tool for individuals and parents alike, offering a proactive approach to managing online content and ensuring a safer and more personalized browsing experience. With the ability to block and customize site permissions, Chrome enables users to take control of their online environment, fostering a browsing experience that reflects their unique preferences and priorities.
Method 3: Using Chrome's Data Saver Feature
In addition to managing browsing history and blocking specific sites, Chrome for Android offers a valuable feature known as Data Saver, designed to optimize data usage and enhance browsing efficiency. This feature is particularly beneficial for users seeking to conserve data, improve loading times, and navigate the web more seamlessly on their Android devices. By leveraging Chrome's Data Saver feature, users can gain greater control over their data consumption and enjoy a more streamlined browsing experience.
Here's a comprehensive guide on how to utilize Chrome's Data Saver feature on your Android device:
-
Access Data Saver Settings: Open the Chrome app on your Android device and tap the three-dot menu icon in the top-right corner of the browser window. From the menu, select "Settings" and then choose "Data Saver."
-
Enable Data Saver: In the Data Saver settings, toggle the switch to enable the feature. Once activated, Data Saver will compress web pages before loading them, reducing the amount of data used during browsing sessions.
-
Monitor Data Savings: Chrome provides a summary of the data saved through the Data Saver feature, allowing users to track their data conservation and understand the impact of this optimization on their browsing habits.
-
Customize Data Saver Settings: Users can further customize the Data Saver feature by tapping on "Settings" within the Data Saver menu. Here, they can adjust additional options such as receiving notifications about data savings and viewing a site's original version if desired.
By leveraging Chrome's Data Saver feature, users can effectively minimize data usage, accelerate page loading, and optimize their browsing experience on Android devices. This feature is particularly valuable for individuals with limited data plans, those navigating slower network connections, or anyone seeking to maximize the efficiency of their browsing sessions.
Chrome's Data Saver feature empowers users to take control of their data consumption, ensuring that they can make the most of their browsing experience while minimizing unnecessary data usage. By compressing web pages and providing insights into data savings, Chrome enables users to navigate the web more efficiently, ultimately enhancing their overall browsing experience on Android devices.
Conclusion
In conclusion, managing your browsing experience on Chrome for Android is made simple and customizable through the various methods discussed in this article. By removing specific sites from your browsing history, blocking unwanted sites using Chrome's Site Settings, and leveraging the Data Saver feature, users can tailor their browsing environment to align with their preferences and requirements.
The ability to remove sites from your Chrome history empowers users to maintain a clean and organized browsing record, ensuring that only relevant and desired sites are retained in their history log. This method provides a quick and convenient way to manage browsing history, offering greater control over the content that appears in the history log.
Furthermore, Chrome's Site Settings feature allows users to proactively block specific sites, providing a personalized and safer browsing experience. Whether it's for enhancing online safety, restricting access to certain content, or customizing browsing permissions, this feature enables users to curate their browsing environment according to their unique needs.
Additionally, the Data Saver feature in Chrome for Android offers a valuable tool for optimizing data usage and improving browsing efficiency. By compressing web pages and providing insights into data savings, users can navigate the web more efficiently, particularly beneficial for individuals with limited data plans or those navigating slower network connections.
By combining these methods, users can gain greater control over their browsing history, site access, and data consumption, ultimately enhancing their overall browsing experience on Chrome for Android. Whether it's for maintaining privacy, improving browsing efficiency, or customizing the browsing environment, these methods provide users with the tools to tailor their Chrome experience according to their specific needs and preferences.
In essence, the flexibility and user-centric design of Chrome for Android empower users to take charge of their browsing experience, ensuring that it aligns with their unique preferences and priorities. With these methods at their disposal, users can navigate the web with greater confidence, efficiency, and control, ultimately enhancing their overall browsing experience on Chrome for Android.