Introduction
When it comes to browsing the web, Google Chrome stands out as one of the most popular and user-friendly web browsers. However, as you navigate through various websites and pages, Chrome diligently keeps track of your browsing history. While this feature can be incredibly useful for revisiting previously viewed sites, it also raises privacy concerns for many users. Whether you're looking to clear your browsing history for privacy reasons or simply to declutter your digital footprint, Google Chrome provides a straightforward process to accomplish this task.
In this guide, we will walk you through the step-by-step process of deleting all browsing history on Google Chrome. By following these instructions, you can ensure that your browsing activities remain private and secure. Whether you're using Chrome on a computer or a mobile device, the process for clearing your browsing history remains consistent. So, whether you're a seasoned Chrome user or just getting started, you'll find the steps easy to follow.
Now, let's dive into the specifics of how to effectively clear your browsing history on Google Chrome. Whether you're using a Windows PC, Mac, or mobile device, you'll be able to navigate through the settings and ensure that your browsing history is cleared according to your preferences. Let's get started on this simple yet essential task to maintain your privacy and keep your browsing experience fresh and clutter-free.
Step 1: Open Google Chrome
To initiate the process of clearing your browsing history on Google Chrome, the first step is to open the browser on your device. Whether you are using a Windows PC, Mac, or mobile device, the method for launching Google Chrome remains consistent.
If you are using a Windows PC, you can open Google Chrome by clicking on the Chrome icon located on your desktop or by accessing it from the Start menu. Alternatively, you can also launch Chrome by searching for it in the Windows search bar and clicking on the Chrome app when it appears in the search results.
For Mac users, opening Google Chrome is equally straightforward. Simply locate the Chrome icon in your applications folder or on the dock, and click on it to launch the browser. If Chrome is set as your default browser, you can also open it by clicking on a web link, which will automatically launch the browser.
If you are using a mobile device such as a smartphone or tablet, accessing Google Chrome is as simple as tapping on the Chrome app icon on your home screen or in your list of installed applications. Once you tap on the Chrome icon, the browser will open, and you will be ready to proceed with the next steps to clear your browsing history.
Upon successfully opening Google Chrome, you are now ready to move on to the next step in the process of clearing your browsing history. With the browser launched and ready for use, you can proceed to access the necessary settings to manage your browsing data effectively.
By following these simple instructions to open Google Chrome on your device, you have taken the initial step towards maintaining your privacy and managing your browsing history. With the browser now open, you are well-positioned to proceed with the subsequent steps to clear your browsing history according to your preferences.
Step 2: Access the History Menu
Once Google Chrome is open on your device, the next step in clearing your browsing history is to access the History menu. This menu provides a comprehensive overview of your browsing activities, allowing you to manage and delete specific entries or clear your entire browsing history altogether.
To access the History menu, look towards the top-right corner of the Chrome window. You will notice three vertical dots arranged in a column. This icon represents the Chrome menu and is your gateway to accessing various browser settings and features. Click on these dots to reveal a dropdown menu containing a range of options for customizing your browsing experience.
Upon clicking the three-dot icon, a dropdown menu will appear, presenting a list of options for managing Chrome settings and features. Among these options, you will find "History" listed towards the bottom of the menu. Click on the "History" option to proceed to the next stage of managing your browsing history.
Upon selecting the "History" option, a new tab will open within the Chrome browser, displaying your complete browsing history. This tab provides a detailed chronological list of websites and pages you have visited, organized by date and time. From here, you can review your browsing history and proceed to clear specific entries or delete your entire browsing history based on your preferences.
Accessing the History menu is a crucial step in the process of managing your browsing history on Google Chrome. By navigating to this menu, you gain visibility and control over your browsing activities, enabling you to make informed decisions about the data you wish to retain or remove from your browsing history.
With the History menu now accessible, you are well-positioned to proceed to the subsequent steps for clearing your browsing history on Google Chrome. Whether you are looking to delete specific entries or clear your entire browsing history, the History menu serves as your central hub for managing your browsing activities effectively.
Step 3: Choose "Clear Browsing Data"
After accessing the History menu in Google Chrome, the next pivotal step in managing your browsing history is to choose the "Clear Browsing Data" option. This feature empowers you to selectively remove specific browsing data, including cookies, cached images and files, browsing history, and more, based on your preferences.
Upon opening the History tab, you will notice a panel on the left-hand side containing a list of options, including "Clear browsing data." This option is strategically positioned to facilitate easy access, allowing you to efficiently manage your browsing history and related data. Click on the "Clear browsing data" option to proceed to the next stage of refining your browsing history.
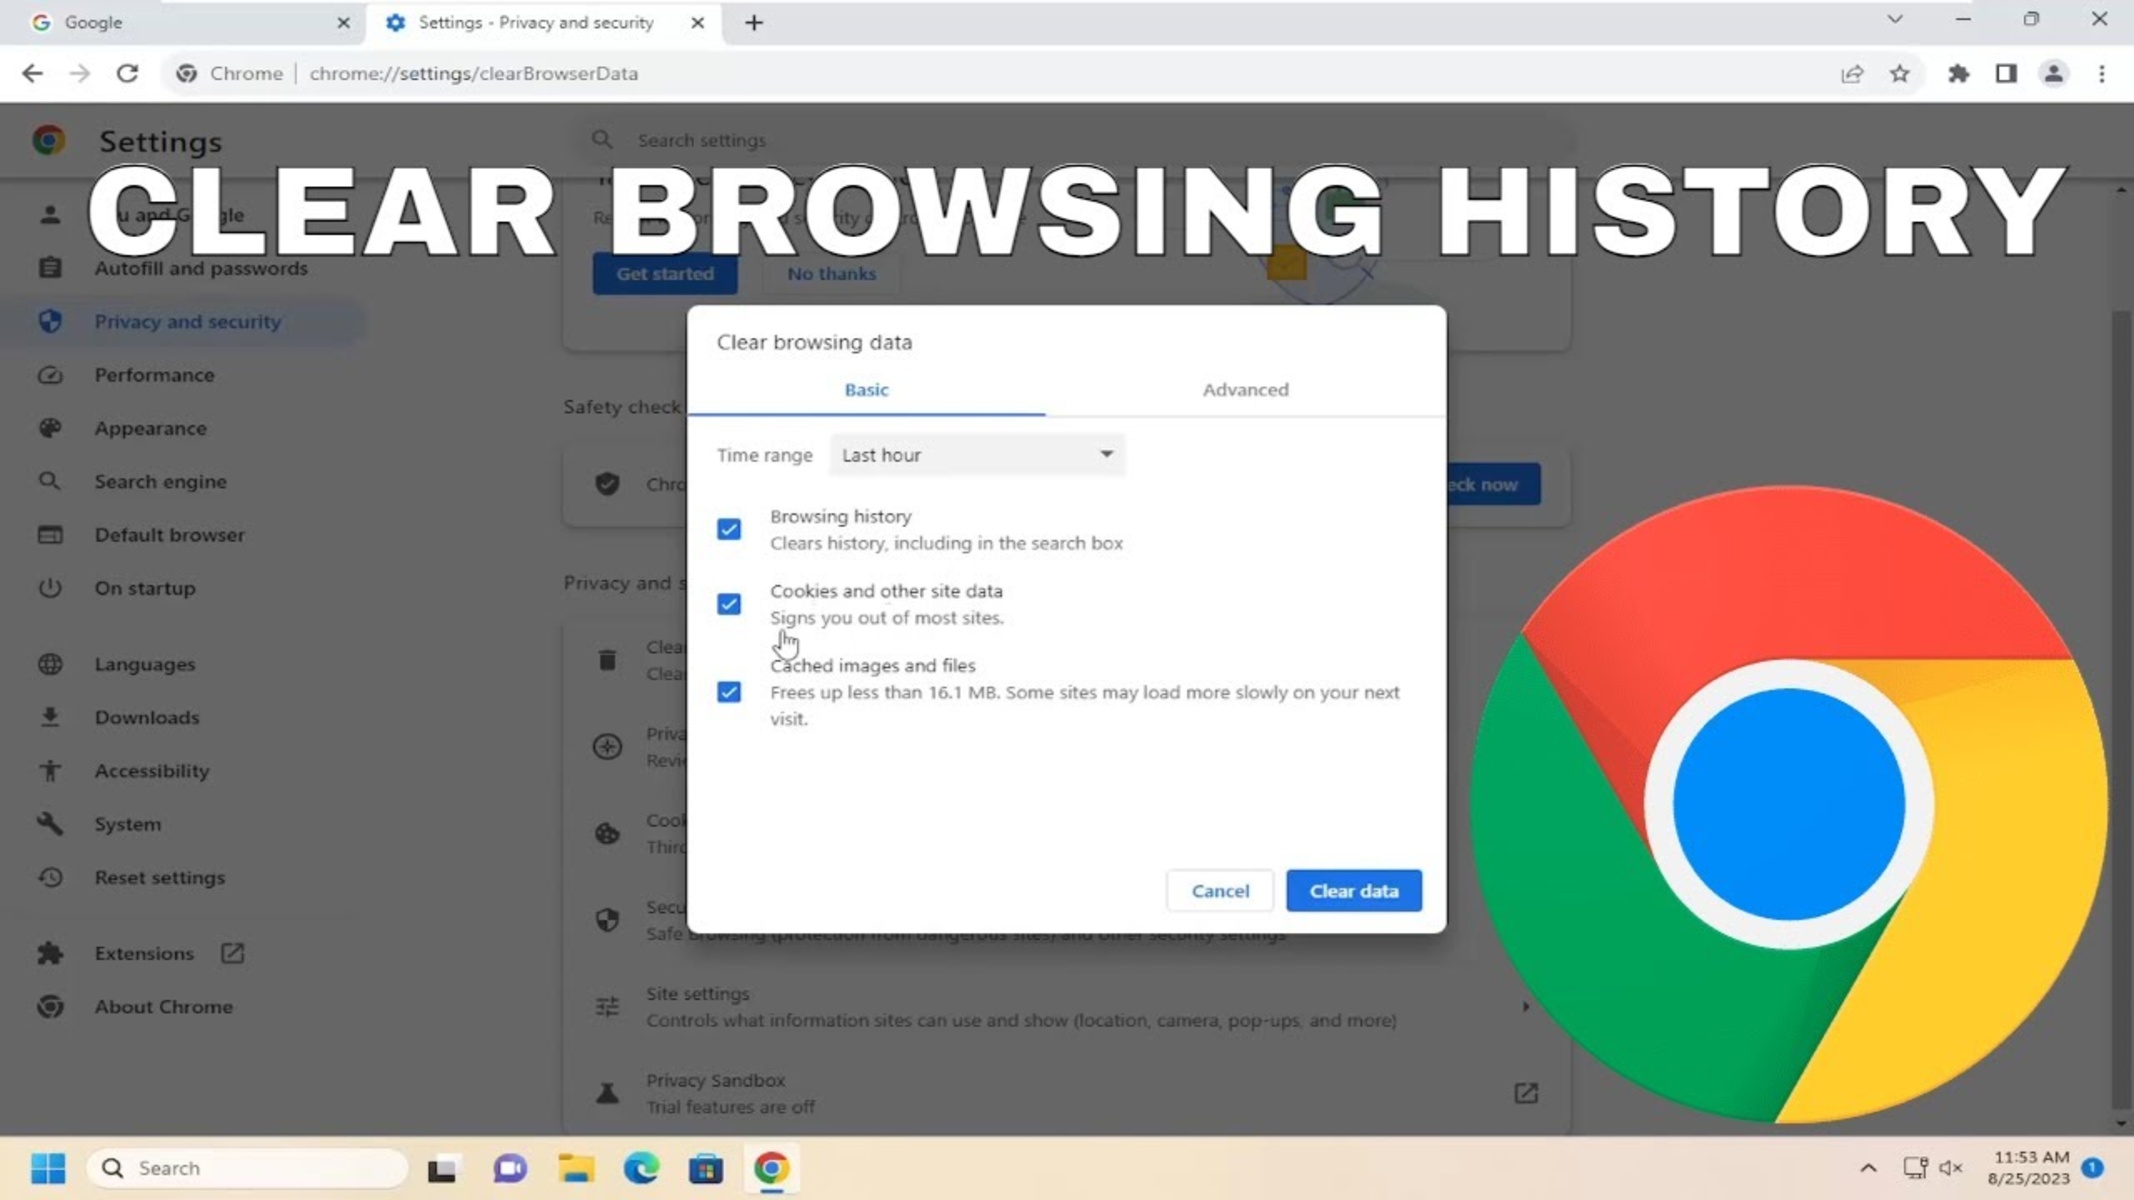
Upon selecting "Clear browsing data," a new window will appear, presenting a range of data categories that you can choose to clear. These categories include browsing history, download history, cookies and other site data, cached images and files, and more. Additionally, you have the flexibility to specify the time range for which you want to clear the browsing data, giving you precise control over the data removal process.
Furthermore, within the "Clear browsing data" window, you will find a set of checkboxes next to each data category, allowing you to customize the data clearance process according to your specific requirements. By checking or unchecking these boxes, you can tailor the data clearance to align with your privacy and browsing history management preferences.
For instance, if you wish to clear your entire browsing history, you can simply check the box next to "Browsing history." Similarly, if you want to remove cookies and cached images and files, you can select the corresponding checkboxes. This granular control empowers you to manage your browsing data with precision, ensuring that only the desired information is cleared from your browsing history.
Once you have made your selections and customized the data clearance based on your preferences, you can proceed by clicking the "Clear data" button at the bottom of the window. This action will initiate the data clearance process, removing the selected browsing data from your history and enhancing your privacy and browsing experience.
By choosing the "Clear browsing data" option in Google Chrome, you gain the ability to manage your browsing history with precision and control. This feature empowers you to tailor the data clearance process according to your specific preferences, ensuring that your browsing history remains aligned with your privacy and security requirements.
With the "Clear browsing data" step completed, you are now equipped to proceed to the subsequent stages of managing your browsing history on Google Chrome. Whether you are looking to clear specific data categories or your entire browsing history, the "Clear browsing data" feature provides the essential tools to maintain your privacy and optimize your browsing experience.
Step 4: Select the Time Range
Once you have accessed the "Clear browsing data" window in Google Chrome, the next crucial step is to select the time range for which you want to clear your browsing data. This feature provides you with the flexibility to specify the period for which you wish to remove browsing history, cookies, cached images and files, and other data from your browsing activities.
When you click on the "Clear browsing data" option, you will notice a dropdown menu at the top of the window, presenting various time range options. These options include "Last hour," "Last 24 hours," "Last 7 days," "Last 4 weeks," and "All time." Each time range corresponds to a specific duration, allowing you to choose the precise timeframe for which you want to clear your browsing data.
Selecting a time range enables you to customize the data clearance process based on your browsing habits and privacy preferences. For instance, if you wish to remove only the recent browsing history and data, you can opt for the "Last hour" or "Last 24 hours" option. This is particularly useful when you want to clear specific recent activities while retaining older browsing data.
On the other hand, if you prefer to clear a broader range of browsing data, you can choose the "Last 7 days" or "Last 4 weeks" option. This allows you to remove data accumulated over the past week or month, providing a balance between privacy management and retaining older browsing history.
Furthermore, the "All time" option offers a comprehensive approach to clearing your browsing data. By selecting this option, you can remove all browsing history, cookies, cached images and files, and other data accumulated since the inception of your Chrome usage. This thorough clearance ensures that your entire browsing history is effectively managed according to your preferences.
By selecting the time range that aligns with your privacy and browsing history management needs, you gain precise control over the data clearance process. This tailored approach allows you to maintain a clutter-free browsing history while retaining the flexibility to preserve specific activities based on the selected timeframe.
With the time range selected, you are now prepared to proceed to the next steps in the process of managing your browsing history on Google Chrome. Whether you are looking to clear specific recent activities or comprehensively manage your entire browsing history, the time range selection feature equips you with the essential tools to maintain your privacy and optimize your browsing experience.
Step 5: Check the Browsing History Options
After selecting the time range for clearing your browsing data in Google Chrome, the next pivotal step is to check the browsing history options available within the "Clear browsing data" window. This step allows you to customize the data clearance process further by specifying the types of browsing data you intend to remove, ensuring that your privacy and browsing history management align with your specific preferences.
Within the "Clear browsing data" window, you will find a set of checkboxes next to each data category, including browsing history, download history, cookies and other site data, cached images and files, and more. These checkboxes enable you to tailor the data clearance process according to your precise requirements, providing granular control over the types of data you wish to remove from your browsing history.
By checking or unchecking these boxes, you can customize the data clearance based on your privacy and browsing history management preferences. For instance, if you wish to clear your entire browsing history, you can simply check the box next to "Browsing history." Similarly, if you want to remove cookies and cached images and files, you can select the corresponding checkboxes.
This level of control empowers you to manage your browsing data with precision, ensuring that only the desired information is cleared from your browsing history. Whether you aim to remove specific types of data or comprehensively clear your browsing history, the browsing history options within the "Clear browsing data" window provide the essential tools to align your data clearance process with your privacy and security requirements.
By checking the browsing history options, you gain the ability to refine the data clearance process according to your specific preferences, ensuring that your browsing history remains aligned with your privacy and security needs. With this step completed, you are now well-equipped to proceed to the final stage of clearing your browsing history on Google Chrome, enhancing your privacy and optimizing your browsing experience.
Step 6: Click "Clear Data"
Once you have customized the time range and browsing history options within the "Clear browsing data" window in Google Chrome, the final and decisive step is to click the "Clear data" button. This action initiates the data clearance process, removing the selected browsing data from your history and enhancing your privacy and browsing experience.
By clicking the "Clear data" button, you confirm your selections and trigger the removal of the specified browsing history, cookies, cached images and files, and other data based on your preferences. This straightforward yet pivotal action ensures that your browsing history is effectively managed according to your precise requirements, aligning with your privacy and security needs.
Upon clicking "Clear data," Google Chrome will commence the data clearance process, systematically removing the selected browsing data based on the specified time range and browsing history options. You may notice a brief processing period, during which Chrome diligently executes the data clearance according to your selections.
It is important to note that once you click "Clear data," the action is irreversible, and the selected browsing data will be permanently removed from your history. Therefore, it is essential to review your selections within the "Clear browsing data" window to ensure that they align with your privacy and browsing history management preferences before proceeding with the data clearance.
After clicking "Clear data" and completing the data clearance process, you will have successfully managed and decluttered your browsing history on Google Chrome. This proactive approach not only enhances your privacy but also ensures that your browsing experience remains streamlined and optimized.
With the data clearance process concluded, you can navigate through your browsing activities with the confidence that your privacy and security preferences have been upheld. By following the step-by-step process to clear your browsing history on Google Chrome, you have taken a proactive step towards maintaining a clutter-free and secure browsing environment, empowering you to enjoy a seamless and private online experience.
Conclusion
In conclusion, the ability to delete all browsing history on Google Chrome is a fundamental aspect of maintaining privacy and optimizing the browsing experience. By following the step-by-step process outlined in this guide, users can effectively manage their browsing history, ensuring that their online activities remain private and secure.
The process begins with opening Google Chrome on the device, followed by accessing the History menu to review and manage browsing activities. Upon selecting the "Clear browsing data" option, users can specify the time range for which they want to clear their browsing data, providing granular control over the data clearance process. Additionally, the browsing history options within the "Clear browsing data" window enable users to customize the types of data they intend to remove, aligning the clearance process with their specific privacy and security preferences.
The final and decisive step involves clicking the "Clear data" button, triggering the removal of the selected browsing data based on the specified time range and browsing history options. This action ensures that the browsing history is effectively managed according to the user's precise requirements, enhancing privacy and optimizing the browsing experience.
By proactively managing and decluttering browsing history on Google Chrome, users can navigate the online landscape with confidence, knowing that their privacy and security preferences have been upheld. This approach not only fosters a clutter-free browsing environment but also empowers users to enjoy a seamless and private online experience.
In essence, the process of deleting all browsing history on Google Chrome serves as a proactive step towards maintaining privacy and security in the digital realm. By leveraging the tools and features provided within the browser, users can take control of their browsing history, ensuring that their online activities are managed according to their preferences.
Ultimately, the ability to clear browsing history on Google Chrome empowers users to maintain a private and secure online presence, fostering a sense of control and confidence as they navigate through the vast expanse of the internet.