Introduction
When you browse the web, your browser accumulates a trail of websites you've visited, searches you've conducted, and cookies from various sites. While this data can be convenient for quickly accessing your favorite sites and retrieving past searches, there are times when you might want to clear this history. Whether it's to maintain your privacy, free up storage space, or simply start with a clean slate, knowing how to delete website history on Google Chrome can be invaluable.
Google Chrome, one of the most popular web browsers, offers a straightforward process for clearing your browsing data. By following a few simple steps, you can remove your browsing history, cookies, cached images and files, and other site data. This not only helps protect your privacy but also ensures that your browser runs smoothly and efficiently.
In this guide, we'll walk you through the steps to delete your website history on Google Chrome. Whether you're using a desktop or mobile version of the browser, these steps will help you maintain control over your browsing data. So, let's dive in and learn how to keep your browsing history in check!
Step 1: Open Google Chrome
To begin the process of deleting your website history on Google Chrome, the first step is to open the browser on your device. Whether you're using a Windows PC, Mac, or mobile device, launching Google Chrome is the initial action to take.
On a Windows computer, you can open Google Chrome by clicking on the Chrome icon located on your desktop or by searching for "Google Chrome" in the Start menu and selecting it from the search results. Alternatively, if Chrome is pinned to your taskbar, you can simply click on the Chrome icon to launch the browser.
For Mac users, opening Google Chrome is as simple as clicking on the Chrome icon in the Dock or locating it in the Applications folder and launching it from there. You can also use Spotlight Search by pressing Command + Space, typing "Chrome," and hitting Enter to open the browser.
If you're using a mobile device such as a smartphone or tablet, locating the Google Chrome app icon on your home screen or in the app drawer and tapping on it will open the browser.
Once Google Chrome is launched, you're ready to proceed with the next steps to clear your browsing history and maintain control over your online privacy and data. With the browser open and ready, you can now move on to the next step in the process of deleting your website history on Google Chrome.
Opening Google Chrome is the first step in taking charge of your browsing data and ensuring that your online activities are managed according to your preferences. By following this simple yet crucial step, you're on your way to effectively managing your browsing history and maintaining a clean and secure browsing experience.
Step 2: Access the History Menu
Accessing the history menu in Google Chrome is an essential step in managing your browsing data. By navigating to the history section, you gain visibility into the websites you've visited and the searches you've conducted, allowing you to selectively delete specific entries or clear your entire browsing history.
To access the history menu, you can utilize the following methods:
Method 1: Using the Menu Icon
- Look for the three-dot menu icon located in the top-right corner of the Chrome window. This icon represents the main menu and is a gateway to various browser functions.
- Click on the menu icon to reveal a dropdown menu. From here, navigate to the "History" option, which is denoted by a clock icon. Clicking on this option will direct you to the history page, where you can view and manage your browsing history.
Method 2: Using Keyboard Shortcuts
- Alternatively, you can use a keyboard shortcut to directly access the history menu. Pressing "Ctrl + H" on a Windows PC or "Command + Y" on a Mac will instantly take you to the history page, providing quick and convenient access to your browsing history.
Upon accessing the history menu, you will be presented with a chronological list of websites you've visited, organized by date. This interface allows you to review your browsing activity and make informed decisions about which data to remove.
By accessing the history menu, you are empowered to take control of your browsing data, ensuring that your online activities are managed according to your preferences. This step sets the stage for the subsequent actions you'll take to clear your website history and maintain a clean and secure browsing experience.
Step 3: Clear Browsing Data
Clearing browsing data is a pivotal step in managing your online privacy and maintaining the efficiency of your browser. By removing accumulated data such as browsing history, cookies, cached images and files, and other site data, you can ensure a clean slate for your future browsing sessions. Google Chrome offers a straightforward process to accomplish this, allowing you to customize the data you wish to clear and the time range for which you want to clear it.
To initiate the process of clearing your browsing data, follow these steps:
-
Access the Settings Menu: Click on the three-dot menu icon in the top-right corner of the Chrome window to open the main menu. From the dropdown menu, navigate to "Settings" and click on it to access the browser settings.
-
Navigate to the Privacy and Security Section: Within the Settings page, scroll down and select "Privacy and security" from the left-hand navigation panel. This section houses various options related to managing your browsing data and privacy settings.
-
Choose the Clear Browsing Data Option: Under the "Privacy and security" section, locate and click on the "Clear browsing data" option. This action will direct you to the browsing data management interface, where you can specify the data to be cleared and the time range for which you want to clear it.
-
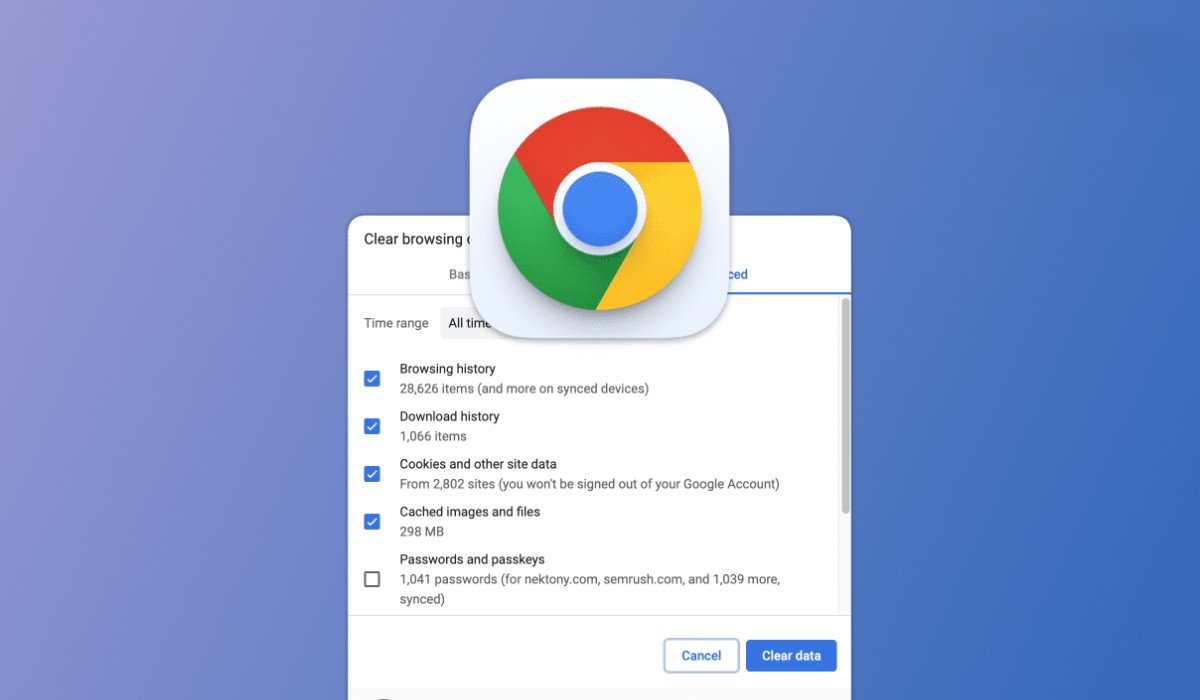
Customize the Data to Clear: Upon reaching the browsing data management interface, you will be presented with a list of data types, including browsing history, cookies and other site data, cached images and files, and more. Check the boxes next to the data types you wish to clear.
-
Select the Time Range: Next, choose the time range for which you want to clear the selected data. You can opt to clear data from the past hour, day, week, month, or all time, providing flexibility in managing your browsing history.
-
Initiate the Clearing Process: Once you have customized the data to be cleared and the time range, click on the "Clear data" button to initiate the clearing process. Google Chrome will promptly remove the selected browsing data based on your preferences.
By following these steps, you can effectively clear your browsing data in Google Chrome, ensuring that your browsing history, cookies, and cached files are managed according to your preferences. This proactive approach not only safeguards your privacy but also contributes to the smooth functioning of your browser, enhancing your overall browsing experience.
Step 4: Choose the Time Range
When it comes to managing your browsing data in Google Chrome, the ability to choose the time range for clearing specific data types offers valuable flexibility and control. This feature empowers users to tailor their data management preferences according to their browsing habits and privacy considerations.
Upon reaching the browsing data management interface, you will encounter the option to select the time range for which you want to clear the chosen data types. This functionality allows you to customize the scope of data clearance based on specific timeframes, catering to both immediate and long-term data management needs.
Google Chrome offers several predefined time range options, each catering to different user preferences and scenarios. These options include:
-
The Past Hour: Selecting this option clears the chosen data types for the past hour, ensuring that recent browsing activity is managed effectively. This can be particularly useful for users who wish to remove data generated during a short browsing session or a specific timeframe within the last hour.
-
The Past 24 Hours (1 Day): Choosing this time range clears the selected data types for the past 24 hours, providing a broader scope for data clearance while retaining recent browsing history and site data. Users who engage in daily browsing activities may find this option beneficial for maintaining a balance between data management and retaining recent browsing information.
-
The Past 7 Days (1 Week): Opting for this time range clears the chosen data types for the past 7 days, offering a comprehensive approach to managing browsing history and site data over the course of a week. This option is suitable for users who seek periodic data clearance while retaining a week's worth of browsing activity for reference.
-
The Past 4 Weeks (1 Month): Selecting this time range extends the data clearance to the past 4 weeks, accommodating users who prefer a monthly approach to managing their browsing history and site data. This option strikes a balance between data retention and periodic clearance, catering to users with diverse browsing habits.
-
All Time: Choosing this option clears the selected data types accumulated since the inception of the browsing history, providing a comprehensive and thorough approach to data clearance. Users who wish to start afresh or remove all accumulated data can utilize this option to maintain a clean slate for their browsing activities.
By offering these distinct time range options, Google Chrome empowers users to align their data management practices with their specific preferences and privacy considerations. Whether it's a need for immediate data clearance or a periodic approach to managing browsing history, the ability to choose the time range ensures that users have the flexibility to maintain control over their online privacy and data management practices.
Step 5: Select the Data to Delete
After accessing the browsing data management interface in Google Chrome, you are presented with a list of data types that can be cleared, including browsing history, cookies and other site data, cached images and files, and more. This step allows you to selectively choose the specific data types that you wish to remove, providing a tailored approach to managing your browsing history and site data.
The ability to select the data to delete offers valuable customization, enabling you to maintain control over your online privacy and browsing experience. Let's explore the significance of each data type and the considerations involved in selecting the data to delete:
Browsing History
Clearing your browsing history removes the record of websites you've visited, ensuring that your browsing activity remains private and confidential. By selectively deleting specific entries from your browsing history, you can manage your online footprint and maintain discretion regarding your web activity.
Cookies and Other Site Data
Cookies are small pieces of data stored by websites on your browser, often used for authentication, tracking, and personalization purposes. Clearing cookies and other site data can enhance privacy and security by removing stored information from websites, potentially improving website loading times and addressing issues related to site functionality.
Cached Images and Files
Cached images and files are temporary data stored by websites to improve page loading speeds and overall browsing performance. While caching enhances browsing efficiency, clearing cached images and files can free up storage space and address issues related to outdated or corrupted cached data, contributing to a smoother browsing experience.
Other Site Data
The "Other site data" category encompasses a range of site-specific data, including local storage, indexed databases, and more. By selectively deleting this data, you can manage site-specific information stored by websites, contributing to a more streamlined and privacy-conscious browsing environment.
When selecting the data to delete, it's essential to consider your specific privacy preferences, browsing habits, and the potential impact on website functionality. By customizing the data clearance process based on your individual needs, you can effectively manage your browsing history and site data while maintaining a seamless and secure browsing experience.
By offering the flexibility to choose the data to delete, Google Chrome empowers users to align their data management practices with their unique preferences, contributing to a personalized and privacy-conscious browsing environment. This step underscores the importance of tailored data management and the proactive approach to maintaining control over browsing history and site data.
Step 6: Clear Browsing Data
Clearing browsing data in Google Chrome is the final step in the process of managing your online privacy and maintaining the efficiency of your browser. This pivotal action ensures that accumulated data, including browsing history, cookies, cached images and files, and other site data, is promptly removed, providing a clean slate for your future browsing sessions.
Upon customizing the data types to be cleared and selecting the time range for clearance, initiating the clearing process is straightforward. By clicking on the "Clear data" button within the browsing data management interface, Google Chrome promptly removes the selected data based on your preferences.
The clearing process is designed to be efficient and seamless, allowing users to maintain control over their browsing history and site data without unnecessary complexity. As the selected data types are cleared, users can experience the immediate benefits of enhanced privacy, improved browser performance, and a streamlined browsing experience.
By clearing browsing data, users can effectively manage their online footprint, ensuring that their browsing activities remain private and confidential. This proactive approach aligns with evolving privacy considerations and empowers users to maintain discretion regarding their web activity.
Furthermore, the removal of accumulated data such as cookies and cached files contributes to improved privacy and security, addressing potential concerns related to tracking, site functionality, and data storage. This proactive data management approach not only safeguards user privacy but also contributes to a smoother and more efficient browsing experience.
In essence, the process of clearing browsing data in Google Chrome represents a proactive and user-centric approach to managing online privacy and data management. By offering a streamlined and customizable data clearance process, Google Chrome empowers users to maintain control over their browsing history and site data, contributing to a personalized and privacy-conscious browsing environment.
As users navigate the digital landscape, the ability to effectively manage browsing data becomes increasingly significant. With the clear and intuitive process offered by Google Chrome, users can confidently maintain control over their online privacy, ensuring a secure and personalized browsing experience.