Introduction
Google Chrome is one of the most popular web browsers, known for its speed, simplicity, and user-friendly interface. It offers a wide range of features and functionalities, including the ability to share your screen with others during video calls, presentations, or online meetings. Screen sharing can be incredibly useful for collaborating with colleagues, providing remote support, or simply showing something on your screen to a friend or family member.
In this article, we will explore the step-by-step process of allowing Google Chrome to share your screen. Whether you're using Chrome for work, education, or personal communication, knowing how to enable screen sharing can greatly enhance your online interactions. By following the instructions outlined in this guide, you'll be able to seamlessly share your screen with others, making your virtual experiences more engaging and productive.
So, if you've ever wondered how to enable screen sharing in Google Chrome, you've come to the right place. Whether you're a seasoned Chrome user or just getting started with the browser, this article will walk you through the necessary steps to make screen sharing a seamless and hassle-free experience. Let's dive in and explore the process of allowing Google Chrome to share your screen, empowering you to communicate and collaborate effectively in various online scenarios.
Step 1: Update Google Chrome to the latest version
Keeping your web browser up to date is crucial for ensuring optimal performance, security, and access to the latest features. When it comes to enabling screen sharing in Google Chrome, having the latest version installed is essential to leverage the most recent enhancements and bug fixes. Here's how you can ensure that your Chrome browser is up to date:
-
Open Google Chrome: Launch the Chrome browser on your computer by clicking on its icon in the taskbar, desktop, or applications folder.
-
Access the Menu: In the top-right corner of the Chrome window, you'll find the menu icon, which looks like three vertical dots. Click on this icon to open the Chrome menu.
-
Navigate to Settings: From the menu, navigate to "Settings" and click on it. This will open the Settings page in a new tab.
-
Check for Updates: In the Settings page, scroll down and click on "About Chrome" in the left-hand menu. This will automatically trigger Chrome to check for updates.
-
Update Chrome: If there's a new version of Chrome available, the browser will begin downloading and installing the update. Once the update is complete, you'll be prompted to relaunch Chrome to apply the changes.
-
Relaunch Chrome: Click on the "Relaunch" button to restart the browser and finalize the update process.
By following these steps, you can ensure that your Google Chrome browser is running the latest version. This is essential for accessing the most up-to-date features and security patches, including any improvements related to screen sharing functionality. With your Chrome browser now updated, you're ready to move on to the next step of enabling screen sharing in Chrome settings.
Ensuring that your browser is up to date is a fundamental aspect of maintaining a secure and efficient online experience. With the latest version of Google Chrome installed, you can take full advantage of its capabilities, including the ability to seamlessly share your screen with others during virtual interactions. Now that your browser is updated, let's proceed to the next step and delve into the process of enabling screen sharing in Chrome settings.
Step 2: Enable screen sharing in Chrome settings
Enabling screen sharing in Chrome settings is a crucial step in preparing your browser to share your screen with others. Google Chrome provides a straightforward method to configure screen sharing permissions, allowing you to customize your preferences based on your specific needs. Here's a detailed walkthrough of how to enable screen sharing in Chrome settings:
-
Access Chrome Settings: To begin, open Google Chrome on your computer and click on the menu icon in the top-right corner of the window. From the dropdown menu, select "Settings" to open the Chrome Settings page.
-
Navigate to Privacy and Security: In the Settings page, scroll down and locate the "Privacy and security" section in the left-hand menu. Click on this section to expand its options.
-
Select Site Settings: Within the "Privacy and security" section, you'll find various settings related to website permissions. Click on "Site settings" to access a range of site-specific controls and preferences.
-
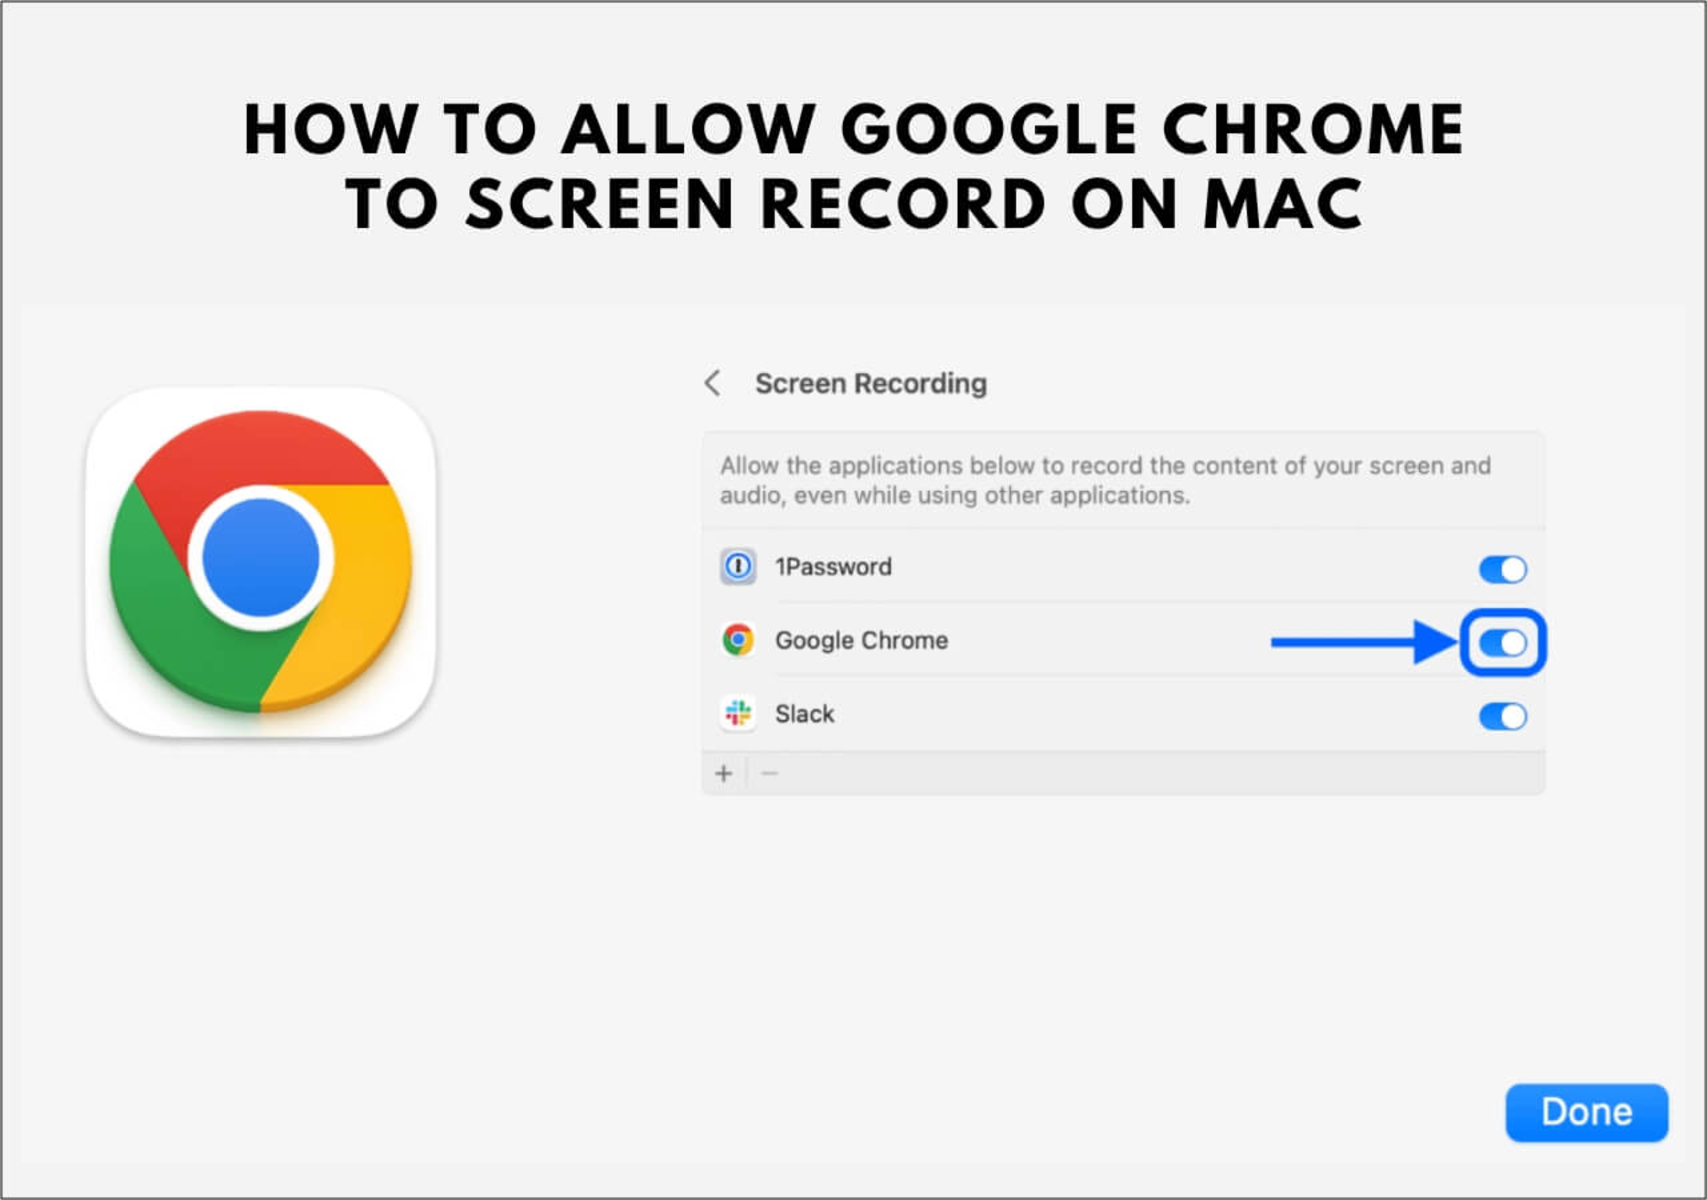
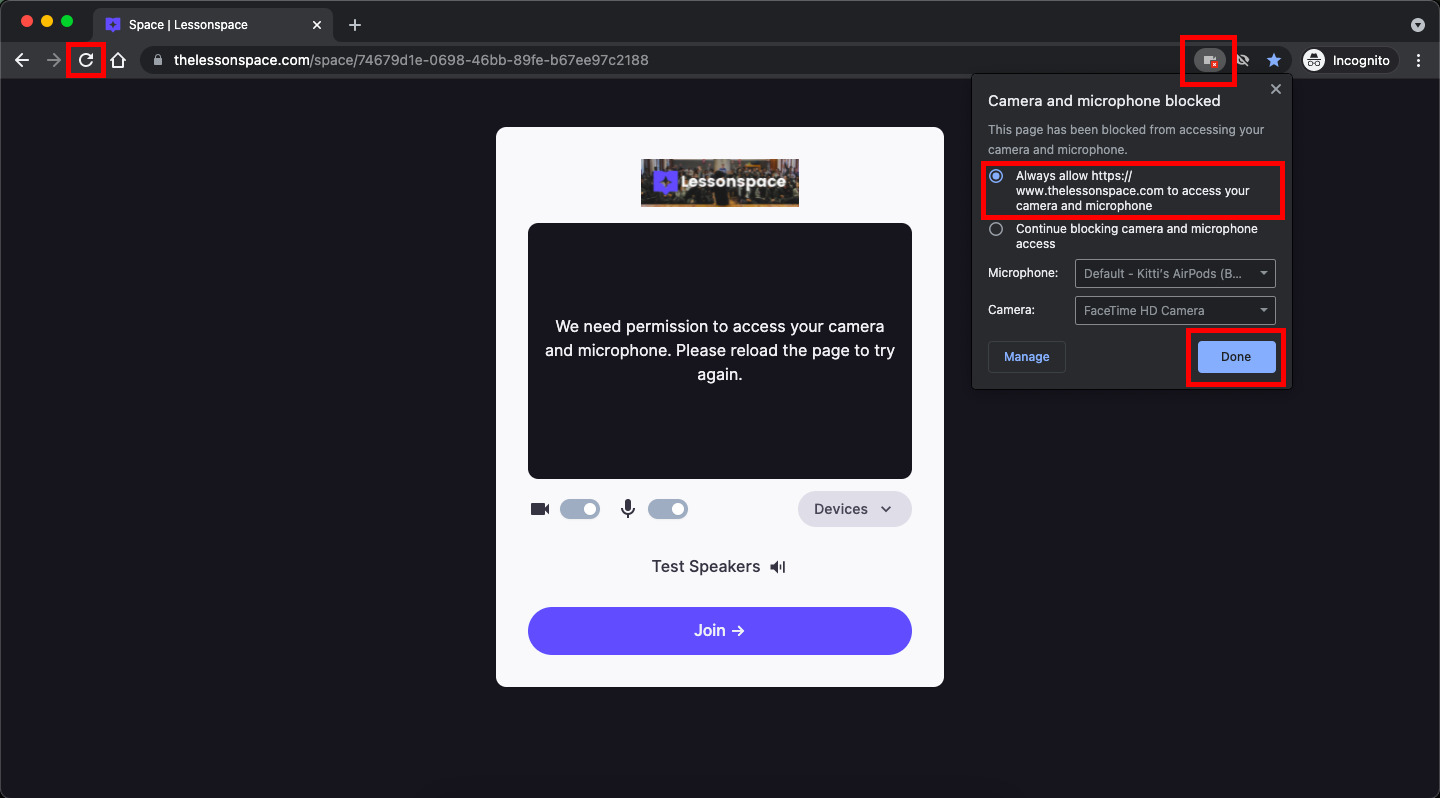
Manage Permissions: Under the "Permissions" section, you'll see a list of available permissions, including "Camera," "Microphone," and "Notifications." Look for the "Additional permissions" section and click on "Microphone" or "Camera" to manage these permissions.
-
Enable Screen Sharing: Once you've selected "Microphone" or "Camera," you'll find the option to manage permissions for specific websites. Look for the "Block" or "Allow" options next to each website. To enable screen sharing, ensure that the relevant websites, such as video conferencing platforms or collaboration tools, are set to "Allow" for both microphone and camera access.
-
Customize Permissions: Chrome also allows you to customize permissions for specific websites. If you want to fine-tune your screen sharing preferences for individual sites, you can click on the dropdown arrow next to a website and adjust the permissions accordingly.
By following these steps, you can effectively enable screen sharing in Chrome settings, granting the necessary permissions for websites to access your screen during video calls or online meetings. Customizing these settings ensures that you have full control over when and how your screen is shared, enhancing your privacy and security while engaging in virtual interactions.
Enabling screen sharing in Chrome settings empowers you to seamlessly share your screen with others, whether for professional collaboration, educational purposes, or personal communication. With these settings configured, you're now ready to proceed to the next step and grant permission to share your screen when the need arises.
Step 3: Grant permission to share screen
Granting permission to share your screen is a crucial step in the process of enabling screen sharing in Google Chrome. Once you've updated your browser and configured the necessary settings, it's essential to ensure that you can seamlessly initiate screen sharing when engaging in video calls, online presentations, or collaborative sessions. Here's a detailed exploration of how to grant permission to share your screen in Chrome:
-
Initiate Screen Sharing: When you're in a video call or using an online platform that requires screen sharing, such as a virtual meeting or presentation tool, you'll typically encounter a prompt to share your screen. This prompt may appear as a button or option within the interface of the application or website you're using.
-
Click on the Screen Sharing Option: Upon encountering the screen sharing prompt, click on the designated option to initiate the process. This action will trigger Chrome to request permission to access your screen for sharing purposes.
-
Grant Permission: A dialog box or pop-up window will appear, asking for your permission to share your screen. You'll be prompted to select the specific screen or application window you want to share. Additionally, Chrome will request your authorization to proceed with screen sharing.
-
Confirm Permission: Once you've selected the desired screen or window to share, confirm your permission to proceed. This confirmation may involve clicking an "Allow" or "Share" button within the dialog box, indicating your consent to share the chosen content.
-
Verify Sharing Status: After granting permission, the screen sharing process will commence, and the selected content from your screen will be visible to the participants in the video call or online session. You can verify that your screen is being shared by observing the interface of the application or platform, which typically displays a visual indicator when screen sharing is active.
By following these steps, you can effectively grant permission to share your screen in Google Chrome, enabling you to seamlessly showcase your content, presentations, or applications during virtual interactions. This process empowers you to engage in productive and collaborative activities, leveraging the capabilities of Chrome to enhance your online communication and sharing experiences.
Granting permission to share your screen is a straightforward yet essential aspect of leveraging the screen sharing functionality in Google Chrome. With these permissions in place, you're equipped to initiate and manage screen sharing activities with ease, contributing to more engaging and interactive virtual interactions across various contexts.
Step 4: Start sharing your screen
Once you've updated Google Chrome, enabled screen sharing in the browser settings, and granted permission to share your screen, you're ready to initiate the screen sharing process. Whether you're conducting a virtual presentation, collaborating with colleagues, or providing remote assistance, starting to share your screen in Google Chrome is a seamless and straightforward endeavor.
Here's a detailed exploration of how to start sharing your screen in Google Chrome:
-
Initiate Screen Sharing: When you're in a video call or using a platform that supports screen sharing, look for the screen sharing option within the interface. This option may be labeled as "Share Screen," "Present Now," or a similar designation, depending on the specific application or website you're using.
-
Select Screen or Application Window: Upon clicking the screen sharing option, Chrome will prompt you to choose the specific screen or application window you want to share. You can select your entire screen, a specific application window, or a browser tab, depending on your preferences and the content you wish to showcase.
-
Confirm Sharing Selection: After selecting the desired screen or application window, confirm your sharing selection. This confirmation may involve clicking an "OK," "Share," or "Start Sharing" button within the screen sharing interface, indicating your readiness to commence sharing.
-
Verify Sharing Status: Once you've confirmed your sharing selection, Chrome will initiate the screen sharing process, making the selected content visible to the participants in the video call or online session. You can verify that your screen is being shared by observing the interface of the application or platform, which typically displays a visual indicator when screen sharing is active.
-
Manage Sharing Controls: During the screen sharing session, you'll have access to various controls and options to manage the sharing experience. These controls may include the ability to pause or stop sharing, switch between shared screens or applications, and adjust the sharing settings based on your specific requirements.
By following these steps, you can seamlessly start sharing your screen in Google Chrome, leveraging the browser's capabilities to showcase content, deliver presentations, and collaborate effectively in virtual environments. The intuitive nature of Chrome's screen sharing functionality empowers you to engage in dynamic and interactive online interactions, fostering enhanced communication and productivity across diverse scenarios.
Initiating screen sharing in Google Chrome is a pivotal aspect of leveraging the browser's features for virtual collaboration and communication. With these steps at your disposal, you can confidently initiate and manage screen sharing activities, contributing to more engaging and impactful online interactions in various professional, educational, and personal contexts.
Conclusion
In conclusion, enabling screen sharing in Google Chrome opens up a world of possibilities for seamless virtual collaboration, engaging presentations, and effective communication in online environments. By following the step-by-step process outlined in this guide, you've gained the knowledge and insights necessary to harness the power of Chrome's screen sharing functionality.
Updating your Google Chrome browser to the latest version ensures that you have access to the most recent features and enhancements, including optimizations related to screen sharing. By keeping your browser up to date, you can leverage the full potential of Chrome's capabilities, contributing to a secure and efficient online experience.
Configuring screen sharing permissions in Chrome settings empowers you to customize your preferences and control how your screen is shared with others. By managing permissions for specific websites and fine-tuning your preferences, you can ensure that your screen sharing activities align with your privacy and security requirements, enhancing your confidence in sharing content online.
Granting permission to share your screen in Google Chrome is a pivotal step that enables you to initiate and manage screen sharing activities seamlessly. By understanding the process of granting permission and confirming your sharing selections, you can confidently showcase your content, presentations, or applications during virtual interactions, contributing to more engaging and interactive online experiences.
Initiating screen sharing in Google Chrome is a straightforward and intuitive endeavor that empowers you to deliver impactful presentations, collaborate effectively, and engage in dynamic online interactions. By following the steps to start sharing your screen, you can leverage Chrome's capabilities to enhance communication, productivity, and engagement across diverse professional, educational, and personal contexts.
In essence, the ability to allow Google Chrome to share your screen represents a valuable asset in your digital toolkit, enabling you to connect with others, share ideas, and collaborate in virtual spaces with ease. Whether you're conducting remote meetings, delivering online presentations, or providing support from a distance, Chrome's screen sharing functionality equips you to communicate and collaborate effectively, fostering meaningful interactions and productive outcomes.
By mastering the process of enabling screen sharing in Google Chrome, you're poised to elevate your online interactions, leveraging the browser's features to create impactful and engaging virtual experiences. With the knowledge and skills acquired from this guide, you're well-equipped to harness the power of screen sharing in Google Chrome, contributing to more dynamic, collaborative, and effective online communication.