Introduction
Adding extensions to your web browser can significantly enhance your online experience, providing added functionality and convenience. One such extension that has gained popularity for its password management and digital wallet features is the Dashlane Extension for Chrome. This comprehensive guide will walk you through the step-by-step process of adding the Dashlane Extension to your Chrome browser, enabling you to seamlessly manage your passwords and secure your digital identity.
With the increasing importance of online security, the need for a reliable password manager has become more pronounced than ever. Dashlane offers a robust solution, allowing users to store and manage their passwords securely, generate strong passwords, and autofill login credentials across various websites. Additionally, the digital wallet feature enables secure storage and autofill of payment information, streamlining online transactions while prioritizing security.
By integrating the Dashlane Extension into your Chrome browser, you can take advantage of these features directly within your browsing environment, eliminating the need to switch between applications or manually input sensitive information. This not only saves time but also reduces the risk of falling victim to phishing attacks or password breaches.
Whether you are a seasoned Dashlane user or considering it for the first time, this guide will provide clear and concise instructions for seamlessly adding the Dashlane Extension to your Chrome browser. By following these steps, you can harness the full potential of Dashlane's features and ensure a more secure and efficient online experience. Let's dive into the process of integrating Dashlane into your Chrome browser and take control of your digital security.
Step 1: Open Chrome Web Store
To begin the process of adding the Dashlane Extension to your Chrome browser, the first step is to open the Chrome Web Store. The Chrome Web Store serves as a centralized hub for a wide range of extensions, apps, and themes designed to enhance the functionality and customization of the Chrome browser.
To access the Chrome Web Store, launch your Chrome browser and click on the three-dot menu icon located in the top-right corner of the browser window. From the dropdown menu, select "More tools," and then click on "Extensions." Alternatively, you can directly navigate to the Chrome Web Store by entering "chrome://extensions/" in the address bar and pressing Enter.
Upon reaching the Chrome Web Store, you will be greeted by a visually appealing interface showcasing various categories of extensions and apps. The search bar at the top of the page allows you to explore specific extensions by entering their names or relevant keywords. In this case, you will be searching for the Dashlane Extension to seamlessly integrate it into your browsing experience.
The Chrome Web Store offers a user-friendly interface, making it easy to navigate and discover new extensions that cater to your specific needs. As you embark on this journey to add the Dashlane Extension, take a moment to explore the diverse array of extensions available in the store, ranging from productivity tools to entertainment add-ons.
By opening the Chrome Web Store, you are taking the first step towards unlocking the full potential of your Chrome browser, empowering it with additional features and capabilities tailored to your preferences. The store's intuitive layout and extensive collection of extensions make it a valuable resource for enhancing your browsing experience and maximizing productivity.
With the Chrome Web Store now accessible, you are ready to proceed to the next step in the process of adding the Dashlane Extension to your Chrome browser. This entails searching for the Dashlane Extension within the store, a crucial step that will bring you closer to integrating Dashlane's powerful password management and digital wallet features directly into your browsing environment.
Stay tuned as we delve into the next step, guiding you through the process of locating the Dashlane Extension within the Chrome Web Store and seamlessly incorporating it into your Chrome browser for a more secure and efficient online experience.
Step 2: Search for Dashlane Extension
After accessing the Chrome Web Store, the next pivotal step in integrating the Dashlane Extension into your Chrome browser is to search for the extension within the store's vast repository. The search functionality provided by the Chrome Web Store enables users to quickly locate specific extensions and apps, streamlining the process of enhancing their browsing experience with tailored features.
To initiate the search for the Dashlane Extension, navigate to the search bar prominently displayed at the top of the Chrome Web Store's interface. With a simple click or tap, the search bar becomes active, ready to receive your input. Enter "Dashlane" into the search bar and press Enter or click on the magnifying glass icon to initiate the search.
As you enter the keyword "Dashlane" into the search bar, the Chrome Web Store's search algorithm swiftly processes your input, generating relevant results in real time. The search results page will display a list of extensions, apps, and themes related to the keyword "Dashlane," with the most relevant and popular items showcased prominently.
Scan through the search results to identify the official Dashlane Extension among the displayed options. The official Dashlane Extension is developed and maintained by Dashlane, ensuring compatibility, security, and seamless integration with the Dashlane application and services. Look for the Dashlane Extension with the official Dashlane logo or branding to ensure that you are adding the authentic and trusted extension to your Chrome browser.
Upon identifying the official Dashlane Extension, click on its listing to access the extension's detailed information page. This page provides an overview of the extension's features, user reviews, ratings, and additional details to help you make an informed decision before adding the extension to your browser.
By searching for the Dashlane Extension within the Chrome Web Store, you are taking a crucial step towards integrating a powerful tool for password management and digital security into your browsing environment. The search process empowers you to discover and evaluate the Dashlane Extension, ensuring that it aligns with your specific needs and preferences.
With the official Dashlane Extension identified and its details reviewed, you are now prepared to proceed to the next step in the process: adding the Dashlane Extension to your Chrome browser. This seamless integration will enable you to harness the full potential of Dashlane's features directly within your browsing experience, enhancing both security and convenience.
Stay tuned as we delve into the subsequent step, guiding you through the process of adding the Dashlane Extension to your Chrome browser and unlocking its powerful capabilities for secure and efficient password management.
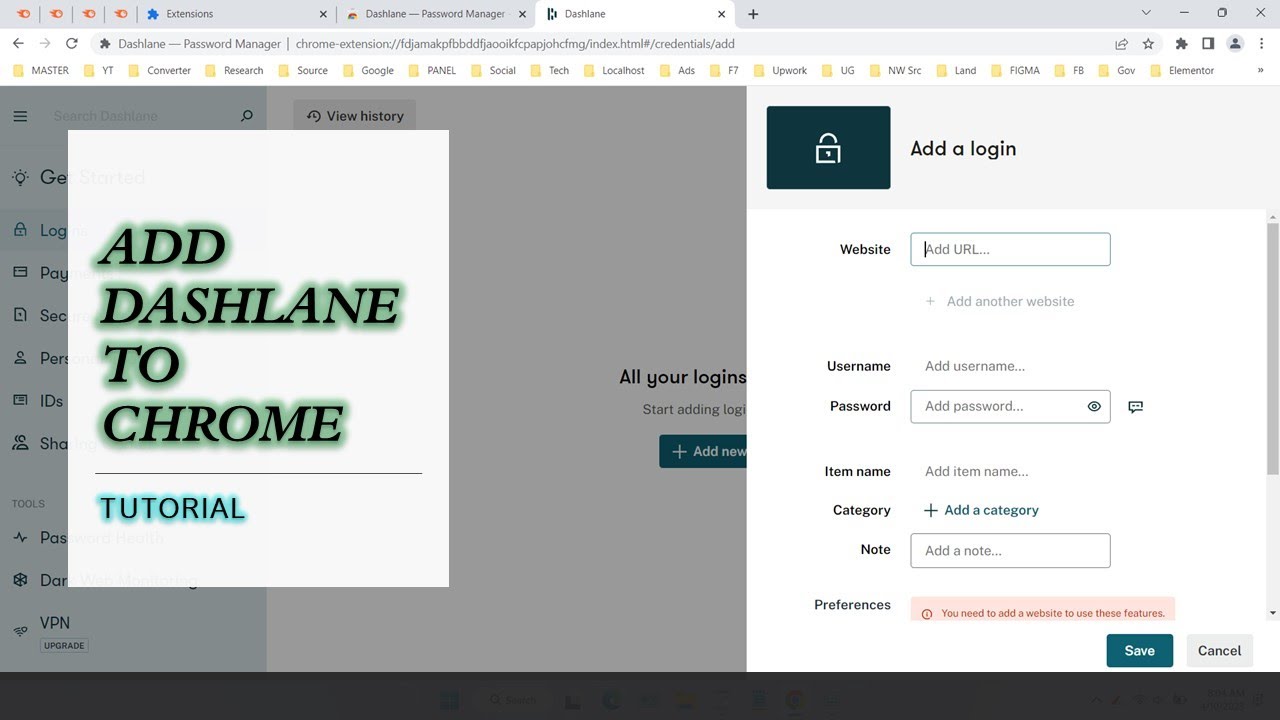
Step 3: Add Dashlane Extension to Chrome
Adding the Dashlane Extension to your Chrome browser is a straightforward process that seamlessly integrates Dashlane's powerful features directly into your browsing environment. Once you have located the official Dashlane Extension within the Chrome Web Store and reviewed its details, the next step is to add the extension to your browser, enabling quick access to password management and digital wallet functionalities.
To initiate the addition of the Dashlane Extension to Chrome, click on the "Add to Chrome" button prominently displayed on the extension's information page within the Chrome Web Store. This action prompts a confirmation dialog to appear, requesting your approval to add the extension to your browser. Confirm the addition by clicking on the "Add extension" button within the dialog, initiating the installation process.
Upon confirming the addition, Chrome will proceed to download and install the Dashlane Extension, a swift and automated process that requires no further action from the user. Once the installation is complete, the Dashlane Extension icon will appear in the Chrome toolbar, indicating that the extension is now an integral part of your browsing experience.
With the Dashlane Extension successfully added to your Chrome browser, you gain immediate access to its robust password management and digital wallet features. The extension's icon serves as a gateway to Dashlane's functionalities, allowing you to effortlessly manage your passwords, generate secure credentials, and securely store and autofill payment information as you navigate various websites.
By seamlessly integrating the Dashlane Extension into your Chrome browser, you are taking a proactive step towards enhancing your online security and streamlining your digital interactions. The extension's presence in the Chrome toolbar provides convenient access to Dashlane's capabilities, empowering you to maintain strong password hygiene and safeguard sensitive information during online transactions.
As the Dashlane Extension becomes an integral part of your browsing experience, you are poised to experience a seamless fusion of convenience and security, with password management and digital wallet functionalities readily available at your fingertips. This integration marks a significant stride towards fortifying your digital identity and ensuring a more secure and efficient online experience.
With the Dashlane Extension now seamlessly integrated into your Chrome browser, you are ready to explore its features and customize its settings to align with your preferences. The next step in the process involves logging in to your Dashlane account, enabling synchronization and personalized configuration of the extension to suit your specific needs.
Stay tuned as we delve into the subsequent step, guiding you through the process of logging in to your Dashlane account and customizing the Dashlane Extension settings within your Chrome browser, further enhancing its capabilities to cater to your unique requirements.
Step 4: Log in to Your Dashlane Account
After successfully adding the Dashlane Extension to your Chrome browser, the next crucial step is to log in to your Dashlane account, enabling seamless synchronization of your password vault and digital wallet across devices. By logging in to your Dashlane account within the newly integrated extension, you can access and manage your stored passwords, secure notes, and payment information with unparalleled convenience and security.
To log in to your Dashlane account, click on the Dashlane Extension icon located in the Chrome toolbar. This action opens the extension's interface, presenting a login prompt where you can enter your Dashlane account credentials. If you already have a Dashlane account, simply input your email address and password, then click on the "Log in" button to proceed.
If you are new to Dashlane and do not yet have an account, you can easily create one by clicking on the "Sign up" or "Create an account" option within the extension's interface. This initiates the account creation process, guiding you through the steps to set up your Dashlane account and establish a secure master password to safeguard your encrypted data.
Upon successful login to your Dashlane account, the extension seamlessly synchronizes with your existing password vault and digital wallet, granting you immediate access to your stored credentials and payment information. This synchronization ensures that any updates or additions made to your Dashlane account are reflected in real time within the extension, providing a unified and consistent experience across your devices.
By logging in to your Dashlane account within the Chrome Extension, you unlock the full potential of Dashlane's features, allowing you to effortlessly autofill login credentials, generate strong passwords, and securely manage your digital wallet directly within your browsing environment. This streamlined access to your Dashlane account empowers you to maintain robust security practices and efficiently navigate online interactions with confidence.
As you proceed with the process of logging in to your Dashlane account within the newly integrated extension, you are poised to experience the seamless convergence of password management and digital security within your Chrome browser. This integration marks a pivotal step towards fortifying your digital identity and ensuring a more secure and efficient online experience, underpinned by the robust capabilities of Dashlane's comprehensive security platform.
With your Dashlane account successfully logged in within the Chrome Extension, you are now prepared to explore the next step in the process: customizing the Dashlane Extension settings to align with your preferences and optimize its functionality within your browsing environment. This customization phase empowers you to tailor the extension to suit your unique requirements, further enhancing its capabilities and usability.
Stay tuned as we delve into the subsequent step, guiding you through the process of customizing the Dashlane Extension settings within your Chrome browser, enabling you to personalize its features and maximize its utility in safeguarding your digital identity and streamlining your online interactions.
Step 5: Customize Dashlane Extension Settings
Customizing the Dashlane Extension settings within your Chrome browser empowers you to tailor the extension's features and functionality to align with your unique preferences and security requirements. By delving into the customization options offered by the extension, you can optimize its capabilities, streamline your password management practices, and enhance the overall security of your digital interactions.
Upon successfully logging in to your Dashlane account within the Chrome Extension, you gain access to a range of customization options that enable you to personalize the extension according to your specific needs. To begin customizing the Dashlane Extension settings, click on the Dashlane Extension icon in the Chrome toolbar to open the extension's interface.
Within the extension's interface, you will find a dedicated settings or preferences section, providing a comprehensive array of customization options. These options typically encompass preferences related to autofill behavior, security settings, password generation, and the display of Dashlane's features within your browsing environment.
One of the key customization features offered by the Dashlane Extension is the ability to configure autofill settings, allowing you to define how the extension interacts with login forms and payment fields across websites. You can specify autofill preferences, such as whether to automatically fill login credentials and payment information, providing granular control over the autofill behavior to suit your browsing habits.
Additionally, the extension's settings may include security-related options, enabling you to enhance the protection of your stored credentials and sensitive data. These settings often encompass features such as two-factor authentication, biometric authentication, and secure password sharing, empowering you to fortify the security of your Dashlane account and the extension's functionality.
Furthermore, the customization options within the Dashlane Extension may encompass password generation settings, allowing you to define the criteria for generating strong and unique passwords. By customizing the password generation parameters, you can ensure that the passwords created by Dashlane align with your specific security standards, bolstering the strength of your online credentials.
As you explore the customization settings provided by the Dashlane Extension, take the opportunity to review and adjust the display preferences for the extension's features within your browsing environment. These display settings may include options to show or hide the Dashlane icon, enable quick access to the password generator, and customize the appearance of Dashlane's prompts and notifications.
By engaging with the customization options offered by the Dashlane Extension, you are actively shaping the extension's behavior and appearance to seamlessly integrate with your browsing habits and security practices. This personalized approach to customizing the extension settings empowers you to harness the full potential of Dashlane's features while maintaining a tailored and intuitive user experience.
With the Dashlane Extension settings now customized to align with your preferences and security requirements, you have effectively optimized the extension's capabilities within your Chrome browser. This tailored configuration enhances the efficiency and security of your password management practices, ensuring a seamless and personalized experience as you navigate the digital landscape.
As you conclude the process of customizing the Dashlane Extension settings, you are poised to embark on a secure and efficient online journey, fortified by the robust capabilities and personalized configuration of Dashlane's comprehensive security platform. By seamlessly integrating Dashlane into your browsing environment and customizing its settings, you have taken a proactive step towards safeguarding your digital identity and streamlining your online interactions with confidence.
Conclusion
In conclusion, the seamless integration of the Dashlane Extension into your Chrome browser marks a significant stride towards fortifying your digital security and enhancing your online experience. By following the step-by-step process outlined in this guide, you have successfully added the powerful capabilities of Dashlane's password management and digital wallet features directly into your browsing environment.
The process commenced with accessing the Chrome Web Store, a centralized hub for a diverse array of extensions, apps, and themes designed to augment the functionality of the Chrome browser. Navigating through the store and searching for the official Dashlane Extension empowered you to discover and evaluate this trusted tool for password management and digital security.
Upon locating the Dashlane Extension within the Chrome Web Store, you seamlessly added it to your browser, unlocking immediate access to its robust features. The integration of the Dashlane Extension into the Chrome toolbar signifies a proactive step towards streamlining your password management practices and securing your digital interactions.
Logging in to your Dashlane account within the newly integrated extension further solidified the synchronization of your password vault and digital wallet, ensuring that your stored credentials and payment information are readily accessible and consistently updated across devices. This streamlined access to your Dashlane account empowers you to maintain robust security practices and efficiently navigate online interactions with confidence.
Furthermore, customizing the Dashlane Extension settings within your Chrome browser allowed you to tailor its features and functionality to align with your unique preferences and security requirements. By engaging with the customization options offered by the extension, you actively shaped its behavior and appearance to seamlessly integrate with your browsing habits and security practices, enhancing the efficiency and security of your password management practices.
As a result of this comprehensive integration and customization process, you are now poised to embark on a secure and efficient online journey, fortified by the robust capabilities and personalized configuration of Dashlane's comprehensive security platform. The seamless fusion of convenience and security within your browsing environment underscores the proactive measures taken to safeguard your digital identity and streamline your online interactions with confidence.
In essence, the addition of the Dashlane Extension to your Chrome browser signifies a commitment to prioritizing online security and efficiency. By harnessing the full potential of Dashlane's features directly within your browsing experience, you have elevated your digital security posture and positioned yourself to navigate the digital landscape with confidence and peace of mind.