Introduction
Connecting your Dell laptop to a mobile hotspot is a convenient way to access the internet when you're on the go. Whether you're traveling, working remotely, or simply need a backup internet connection, using a mobile hotspot can provide the flexibility and freedom to stay connected. In this guide, we'll walk you through the simple steps to connect your Dell laptop to a mobile hotspot, allowing you to access the internet from virtually anywhere.
By leveraging the hotspot feature on your mobile device, you can create a portable Wi-Fi network that your Dell laptop can connect to. This is especially useful in situations where traditional Wi-Fi networks are unavailable or unreliable. With just a few taps on your mobile device and a couple of clicks on your Dell laptop, you can establish a secure and stable internet connection, enabling you to stay productive and connected regardless of your location.
Whether you're a digital nomad, a frequent traveler, or someone who occasionally needs an alternative internet source, understanding how to connect your Dell laptop to a mobile hotspot is a valuable skill. This guide aims to simplify the process and empower you to take advantage of the connectivity options available to you. With the increasing reliance on digital connectivity in today's fast-paced world, being able to seamlessly switch to a mobile hotspot when needed can make a significant difference in your ability to stay connected and productive.
Now, let's dive into the step-by-step instructions for connecting your Dell laptop to a mobile hotspot, so you can harness the power of portable internet access and stay connected wherever your journey takes you.
Step 1: Turn on the Hotspot on Your Mobile Device
The first step in connecting your Dell laptop to a mobile hotspot is to activate the hotspot feature on your mobile device. This feature allows your mobile device to function as a portable Wi-Fi router, providing internet access to other devices, such as your Dell laptop. The process of enabling the hotspot feature may vary slightly depending on your mobile device's operating system, but the general steps are relatively consistent across different devices.
To turn on the hotspot on your mobile device, begin by accessing the device's settings or quick settings menu. Look for the "Hotspot," "Tethering," or "Mobile Hotspot" option, which is typically located within the "Network & Internet" or "Connections" section of the settings.
Once you've located the hotspot feature, tap on it to enable it. You may be prompted to configure the hotspot settings, such as the network name (SSID) and password. It's important to choose a strong and unique password to secure your hotspot and prevent unauthorized access.
After configuring the hotspot settings, activate the hotspot by toggling the switch or pressing the "Turn On" button. Your mobile device will then start broadcasting a Wi-Fi signal, allowing other devices, including your Dell laptop, to detect and connect to the hotspot network.
It's worth noting that some mobile carriers may have specific requirements or limitations regarding the use of the hotspot feature, such as data usage restrictions or additional charges for hotspot usage. Therefore, it's advisable to check with your carrier to ensure that you understand any potential limitations or associated costs before using the hotspot feature extensively.
By turning on the hotspot on your mobile device, you're effectively creating a portable Wi-Fi network that your Dell laptop can utilize to access the internet. This capability is particularly valuable in situations where traditional Wi-Fi networks are unavailable or unreliable, providing you with a versatile and convenient means of staying connected.
With the hotspot feature activated on your mobile device, you're now ready to proceed to the next step, which involves turning on the Wi-Fi on your Dell laptop and connecting to the hotspot network. This seamless process enables you to harness the power of portable internet access and enjoy the freedom of staying connected wherever you go.
Step 2: Turn on the Wi-Fi on Your Dell Laptop
After successfully activating the hotspot on your mobile device, the next step is to enable the Wi-Fi feature on your Dell laptop. By turning on the Wi-Fi, you allow your laptop to detect and connect to available wireless networks, including the hotspot network created by your mobile device. This process is straightforward and can be completed in just a few simple steps.
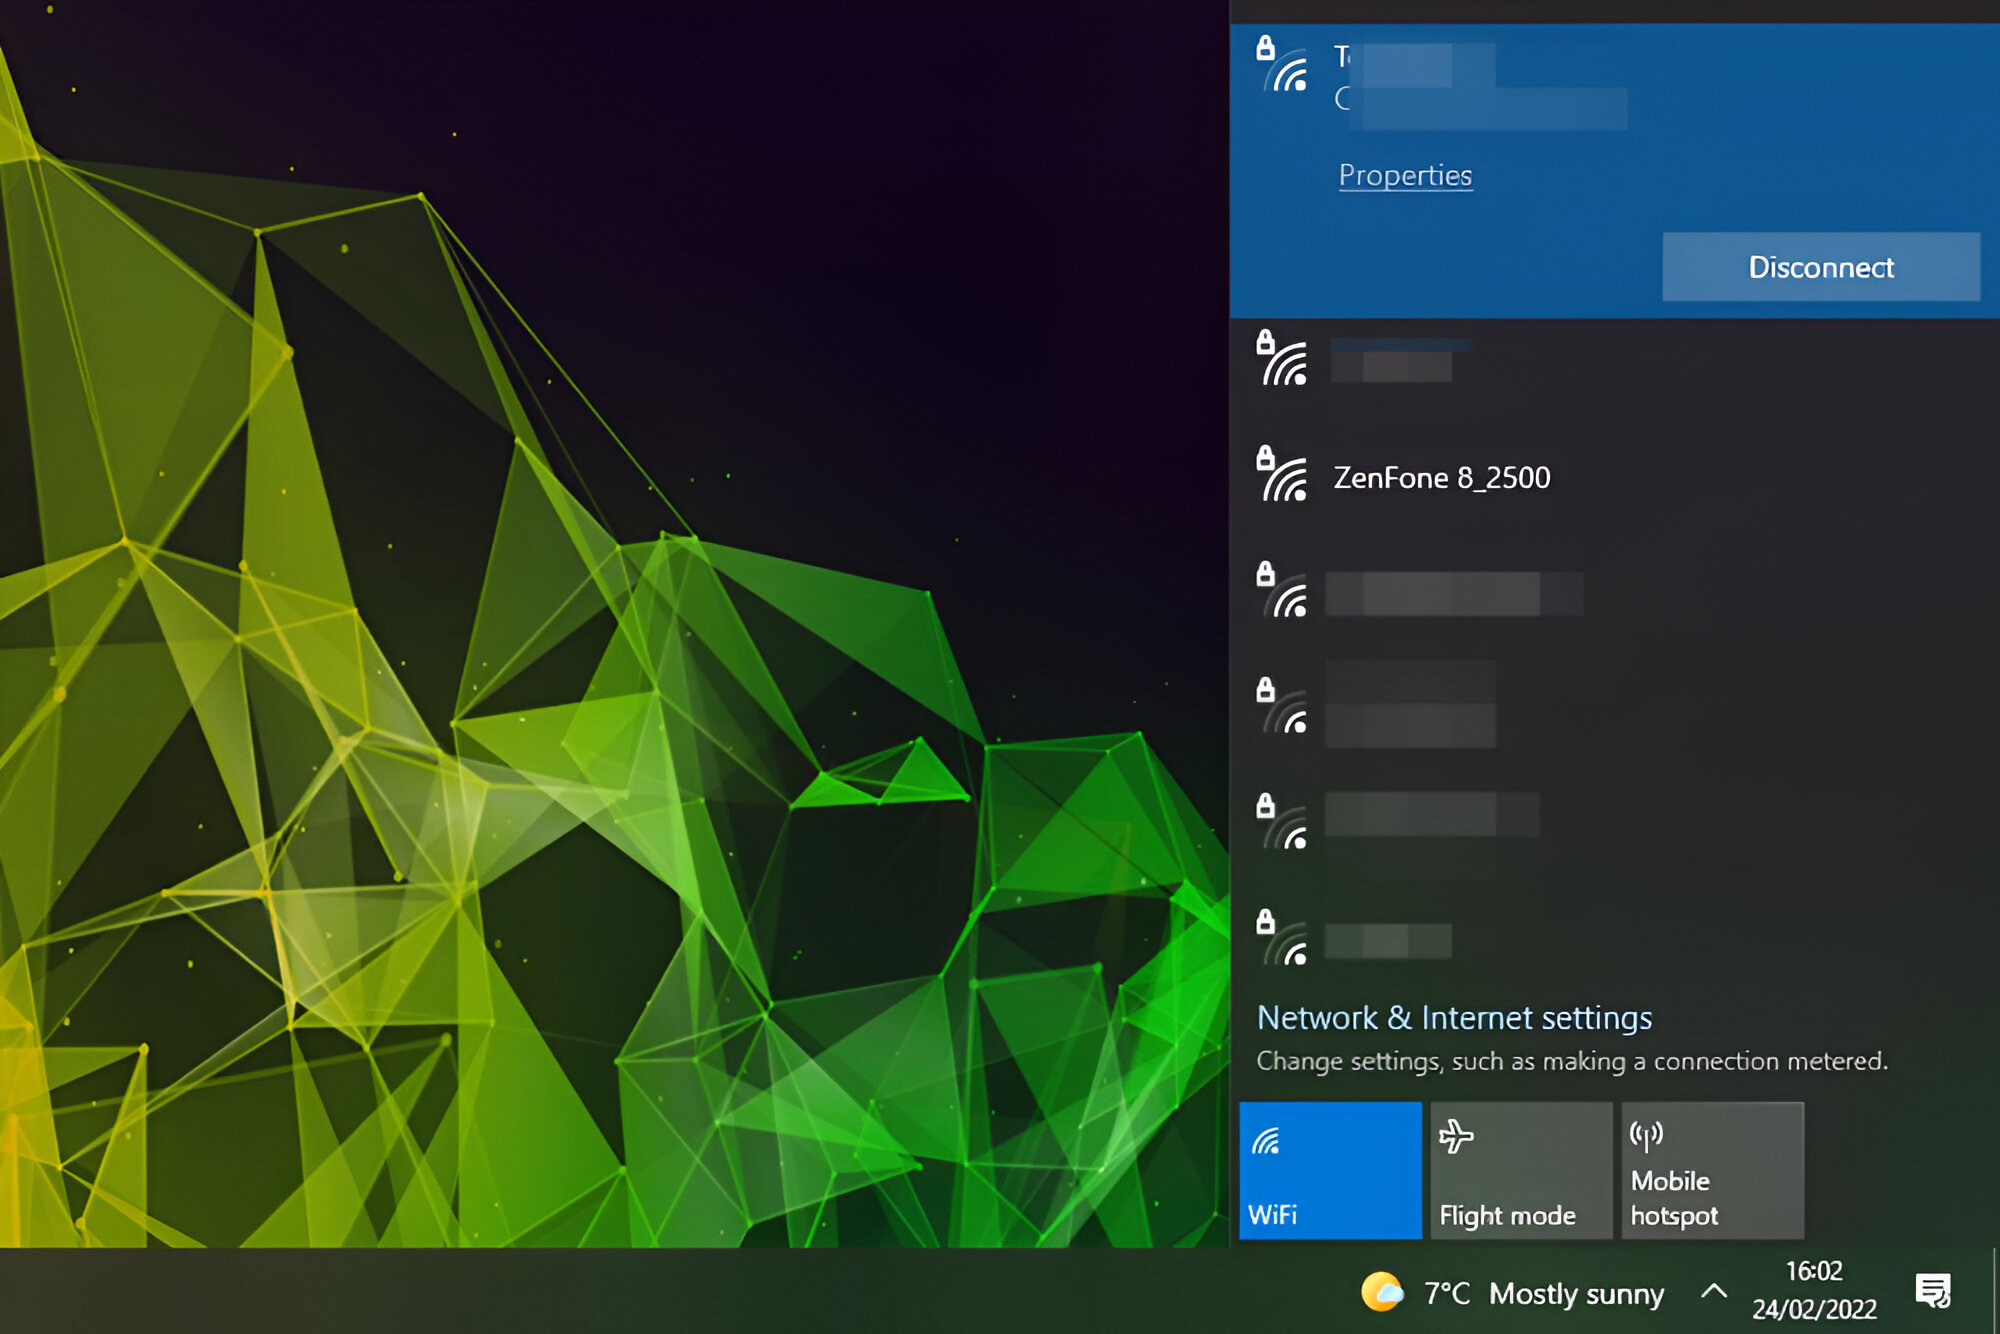
To begin, locate the Wi-Fi icon on your Dell laptop. This icon is typically displayed in the system tray, which is located in the lower-right corner of the screen on the taskbar. The Wi-Fi icon resembles a series of concentric arcs, representing wireless signals. Click on this icon to open the Wi-Fi menu.
Upon clicking the Wi-Fi icon, a list of available wireless networks, including the hotspot network from your mobile device, will be displayed. The hotspot network will appear in the list of available networks, typically identified by the network name (SSID) you configured when setting up the hotspot on your mobile device.
Next, click on the name of the hotspot network to initiate the connection process. If prompted, you may need to enter the hotspot password that you set when configuring the hotspot on your mobile device. This password ensures the security of the hotspot network and prevents unauthorized access.
Once the correct password is entered, your Dell laptop will proceed to establish a connection to the hotspot network. A confirmation message will appear, indicating that your laptop is now connected to the hotspot and has access to the internet through the mobile device's network.
With the Wi-Fi on your Dell laptop successfully turned on and connected to the hotspot network, you now have a reliable and secure internet connection at your disposal. This seamless process empowers you to leverage the flexibility of mobile connectivity, allowing you to stay connected and productive, regardless of your location.
By following these simple steps to turn on the Wi-Fi on your Dell laptop and connect to a mobile hotspot, you can harness the power of portable internet access and enjoy the freedom of staying connected wherever your journey takes you. This capability provides a valuable alternative to traditional Wi-Fi networks and ensures that you can remain productive and connected, even when on the move.
Step 3: Connect to the Hotspot Network
Once the Wi-Fi on your Dell laptop is turned on, the next crucial step is to connect to the hotspot network created by your mobile device. This process allows your laptop to establish a secure and reliable connection to the mobile hotspot, enabling you to access the internet and stay connected on the go.
To connect to the hotspot network, begin by clicking on the Wi-Fi icon located in the system tray on your Dell laptop. This action will open the list of available wireless networks, where you should see the hotspot network broadcasted by your mobile device. The network name (SSID) of the hotspot should be visible in the list of available networks.
Next, select the hotspot network from the list by clicking on it. Your Dell laptop will then initiate the connection process with the selected hotspot network. In some cases, you may be prompted to enter the password for the hotspot network. This password is the one you configured when setting up the hotspot on your mobile device. It's important to enter the correct password to establish a successful connection to the hotspot network.
After entering the password, your Dell laptop will proceed to authenticate and connect to the hotspot network. Once the connection is established, a confirmation message will typically appear, indicating that your laptop is now connected to the hotspot network and has access to the internet through your mobile device.
It's important to ensure that the hotspot network you're connecting to is secure and authorized. By verifying the network name (SSID) and entering the correct password, you can safeguard your connection and prevent unauthorized access to your mobile hotspot.
By successfully connecting your Dell laptop to the hotspot network, you gain the ability to access the internet and utilize the connectivity provided by your mobile device. This seamless process enables you to leverage the flexibility and convenience of mobile connectivity, allowing you to stay connected and productive, regardless of your location.
With your Dell laptop now connected to the hotspot network, you have established a reliable and secure internet connection that empowers you to work, communicate, and access online resources with ease. This capability provides a valuable alternative to traditional Wi-Fi networks and ensures that you can remain productive and connected, even when on the move.
Step 4: Enter the Hotspot Password (if required)
In the process of connecting your Dell laptop to a mobile hotspot, you may encounter a security measure that requires entering the hotspot password. This step is crucial for ensuring the security and privacy of the hotspot network, as it prevents unauthorized access and safeguards the integrity of the internet connection.
When prompted to enter the hotspot password, it's essential to input the correct password that you configured when setting up the hotspot on your mobile device. The password serves as a key to authenticate your Dell laptop's connection to the hotspot network, establishing a secure and encrypted link that protects the transmitted data from potential threats.
Upon selecting the hotspot network and initiating the connection process, your Dell laptop may display a prompt requesting the password. This prompt typically appears as a dialog box or a password entry field, where you can input the designated password for the hotspot network. It's important to enter the password accurately, paying attention to uppercase and lowercase characters, as passwords are case-sensitive.
The hotspot password, also known as the pre-shared key (PSK) or network security key, acts as a barrier against unauthorized users attempting to access the hotspot network. By entering the correct password, you demonstrate that you are an authorized user with permission to connect to the hotspot, thereby ensuring the security and exclusivity of the network's resources.
In situations where the hotspot password is not required, it's still advisable to configure the hotspot with a strong and unique password to prevent unauthorized access and protect the privacy of the network. Strong passwords typically consist of a combination of uppercase and lowercase letters, numbers, and special characters, making them resilient against potential intrusion attempts.
By entering the hotspot password when prompted, you contribute to the overall security posture of the hotspot network, fostering a safe and trusted environment for internet connectivity. This simple yet crucial step reinforces the integrity of the connection between your Dell laptop and the mobile hotspot, allowing you to access the internet with confidence and peace of mind.
With the hotspot password successfully entered, your Dell laptop completes the authentication process and establishes a secure connection to the hotspot network. This seamless interaction ensures that your internet access is protected and reliable, empowering you to stay connected and productive wherever your journey takes you.
Step 5: Enjoy Your Internet Connection!
With your Dell laptop successfully connected to the mobile hotspot, you are now ready to fully enjoy the benefits of a reliable internet connection, regardless of your location. This seamless connectivity empowers you to access online resources, communicate with others, and stay productive while on the move.
By leveraging the mobile hotspot feature on your mobile device, you have unlocked the flexibility of portable internet access, enabling you to work, study, or simply stay connected to the digital world from virtually anywhere. Whether you're at a coffee shop, on a train, or in a remote location, the ability to connect your Dell laptop to a mobile hotspot provides a valuable lifeline to the online realm.
With a stable and secure internet connection at your disposal, you can engage in various activities, such as browsing the web, checking emails, participating in video calls, streaming media, and accessing cloud-based applications. This level of connectivity ensures that you can seamlessly transition between different environments without compromising your ability to stay connected and productive.
Moreover, the convenience of connecting to a mobile hotspot extends beyond personal use. In professional settings, the capability to establish a reliable internet connection through a mobile hotspot can be a game-changer. Whether you're attending off-site meetings, conducting fieldwork, or collaborating with colleagues while on the go, the ability to connect your Dell laptop to a mobile hotspot ensures that you remain seamlessly integrated into your work environment.
The versatility of a mobile hotspot also provides a valuable contingency plan in situations where traditional Wi-Fi networks may be unavailable or unreliable. By having the capability to create your own Wi-Fi network through a mobile device, you can mitigate the impact of connectivity challenges and maintain a consistent level of productivity, regardless of external circumstances.
In essence, the ability to connect your Dell laptop to a mobile hotspot represents a powerful tool for staying connected, productive, and engaged in today's dynamic and fast-paced world. The seamless integration of mobile connectivity into your workflow ensures that you can adapt to changing environments and continue to harness the full potential of digital resources, regardless of your physical location.
With your Dell laptop successfully connected to the mobile hotspot, you are now poised to fully embrace the freedom and flexibility of portable internet access, enabling you to navigate the digital landscape with confidence and efficiency. This level of connectivity empowers you to stay connected, productive, and engaged, regardless of where your journey takes you.