Introduction
Have you ever come across a captivating video on a website or social media platform and wished you could download it for offline viewing? While downloading videos directly from a website can be a challenging task, there’s a handy trick that you can use. By using the “Inspect Element” feature in your web browser, you can access and download videos that are embedded on a webpage.
Inspect Element is a powerful tool built into popular web browsers like Google Chrome, Mozilla Firefox, and Safari. It allows you to view and explore the underlying HTML code of a webpage, giving you access to various elements, including videos. By following a few simple steps, you’ll be able to download videos using Inspect Element in no time.
In this guide, we’ll walk you through the step-by-step process of downloading videos using Inspect Element. Whether you’re on YouTube, Facebook, or any other website, this method works universally across different platforms. So without further ado, let’s dive into the exciting world of video downloads!
Step 1: Open the video in your web browser
The first and foremost step in downloading a video using Inspect Element is to open the webpage containing the desired video in your web browser. This could be a video on a website, a social media platform, or even a streaming service. Simply navigate to the webpage and ensure that the video is fully loaded and ready to be played.
It’s important to note that not all web browsers support the Inspect Element feature. However, popular browsers like Google Chrome, Mozilla Firefox, and Safari all have this functionality. If you’re using a different browser, consider switching to one of these options for a seamless video download experience.
Once you’ve opened the webpage, locate the video that you wish to download. It might be embedded in a blog post, featured on a news website, or shared by a friend on a social media platform. Take a moment to ensure that the video is visible on the screen and that it’s ready to be played.
If the video is autoplaying, you may need to pause it before proceeding to the next step. This will ensure that the video player doesn’t interfere with the Inspect Element functionality. Simply hover over the video and click on the pause button to temporarily stop the playback.
Now that you have successfully opened the video in your web browser, it’s time to move on to the next step and explore how Inspect Element can help you download it.
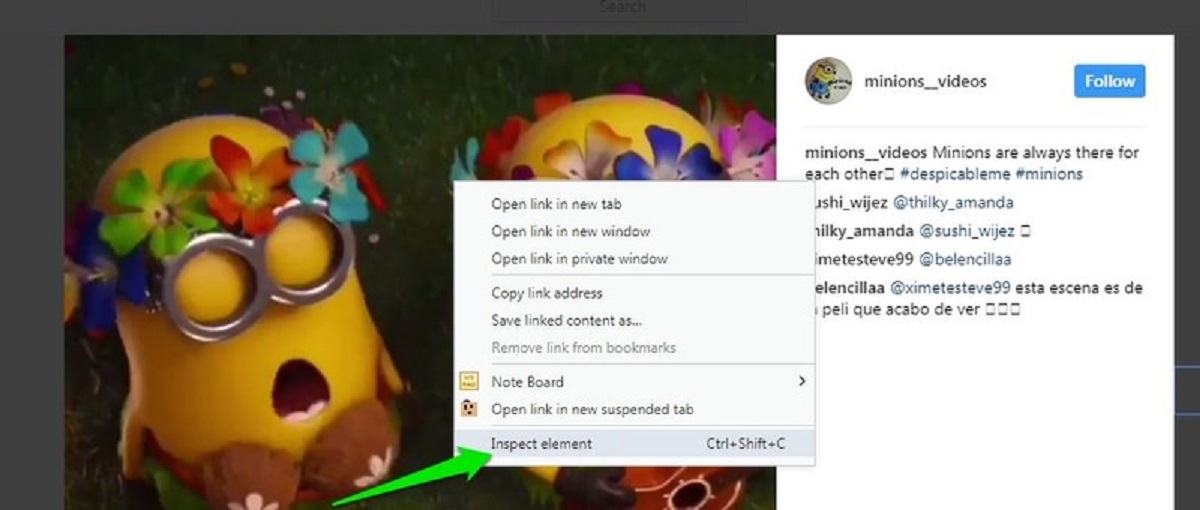
Step 2: Right-click on the video
Once you have the video loaded and ready to go, it’s time to right-click on it. Right-clicking on the video will open a context menu with various options. This menu will allow you to access the Inspect Element feature, which is crucial for downloading the video.
Position your cursor over the video and right-click. A menu will appear, displaying different options depending on your web browser. Look for the option that says “Inspect” or “Inspect Element.” This option may be listed under different names, but the functionality remains the same.
If you’re using Google Chrome as your web browser, you’ll find the “Inspect” option near the bottom of the context menu. In Mozilla Firefox, it’s called “Inspect Element.” Safari users can locate it by right-clicking on the video and selecting “Inspect Element” from the menu.
Clicking on the “Inspect” or “Inspect Element” option will open a new window or panel on your web browser. This window is known as the Developer Tools or the Inspect Element panel. It provides an in-depth view of the HTML code that makes up the webpage, including the video element that you’re interested in.
Now that you’ve successfully accessed the Inspect Element feature, it’s time to move on to the next step and start exploring the HTML code to find the video source and download it.
Step 3: Click on “Inspect” or “Inspect Element”
After right-clicking on the video, a context menu will appear. From this menu, you need to select the option that says “Inspect” or “Inspect Element” to access the Inspect Element panel. This panel allows you to examine the HTML code of the webpage, including the video element that you want to download.
When you click on “Inspect” or “Inspect Element,” a new window or panel will open in your web browser. This window is commonly referred to as the Developer Tools or the Inspect Element panel. It provides a detailed view of the HTML code that constructs the webpage.
In this panel, you will see a multitude of HTML tags and elements that are responsible for creating the webpage’s structure. It might seem overwhelming at first, but don’t worry – we will guide you through the process of locating the video element.
Take a moment to familiarize yourself with the Inspect Element panel. Notice the different sections, such as the HTML structure, CSS styles, and JavaScript functions. The video element that you are interested in will typically be located within the HTML structure section.
Now that you have successfully accessed the Inspect Element panel, it’s time to move on to the next step and start searching for the video element within the HTML code.
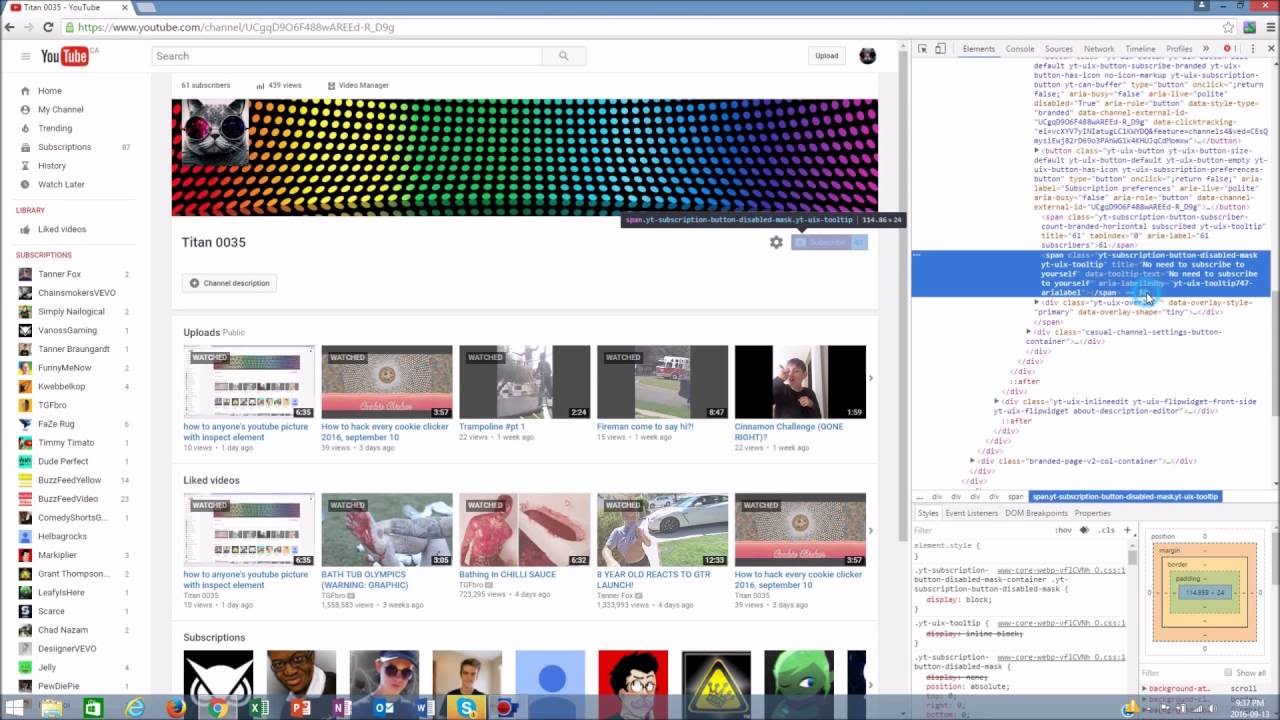
Step 4: Locate the video element in the HTML code
Now that you have opened the Inspect Element panel, it’s time to locate the video element within the HTML code. This will allow you to identify the URL or source of the video and proceed with the downloading process.
Within the Inspect Element panel, you will see a hierarchical representation of the HTML code that makes up the webpage. The video element is typically enclosed within a video tag, which is denoted by the “” closing tag.
Look for the “
Once you have located the video element, you might notice various attributes associated with it, such as “src” (source), “type”, or “data-video-url”. These attributes contain the information you need to download the video.
If you can’t find the video element by visually scanning the HTML code, you can use a handy shortcut within the Inspect Element panel. Simply press “Ctrl + F” (or “Command + F” on a Mac) to open a search bar. Type “video” or any related keywords, and the Inspect Element panel will highlight the relevant sections for you.
Now that you have successfully located the video element within the HTML code, it’s time to proceed to the next step and extract the URL or source code of the video.
Step 5: Copy the video URL or source code
After locating the video element within the HTML code, the next step is to copy the video URL or source code. This will allow you to obtain the necessary information to download the video.
In the Inspect Element panel, you will find various attributes associated with the video element, such as “src” (source), “type”, or “data-video-url”. These attributes contain the crucial information needed to access the video.
Right-click on the value of the attribute that represents the video URL or source code. For example, if the video URL is located within the “src” attribute, right-click on the URL itself.
A context menu will appear. From this menu, select the option that allows you to copy the value. It may be labeled as “Copy Link Address” or “Copy Attribute Value”, depending on your web browser.
Alternatively, you can manually highlight the URL or source code and copy it by pressing “Ctrl + C” (or “Command + C” on a Mac) on your keyboard.
Once you have successfully copied the video URL or source code, you can proceed to the next step and download the video using a video downloading tool or browser extension.
Note that the method of copying the video URL or source code may vary depending on the website and video player used. Some websites may employ different techniques or encryption methods to protect their videos. If the conventional method described here doesn’t work, you may need to explore alternative methods specific to that website.
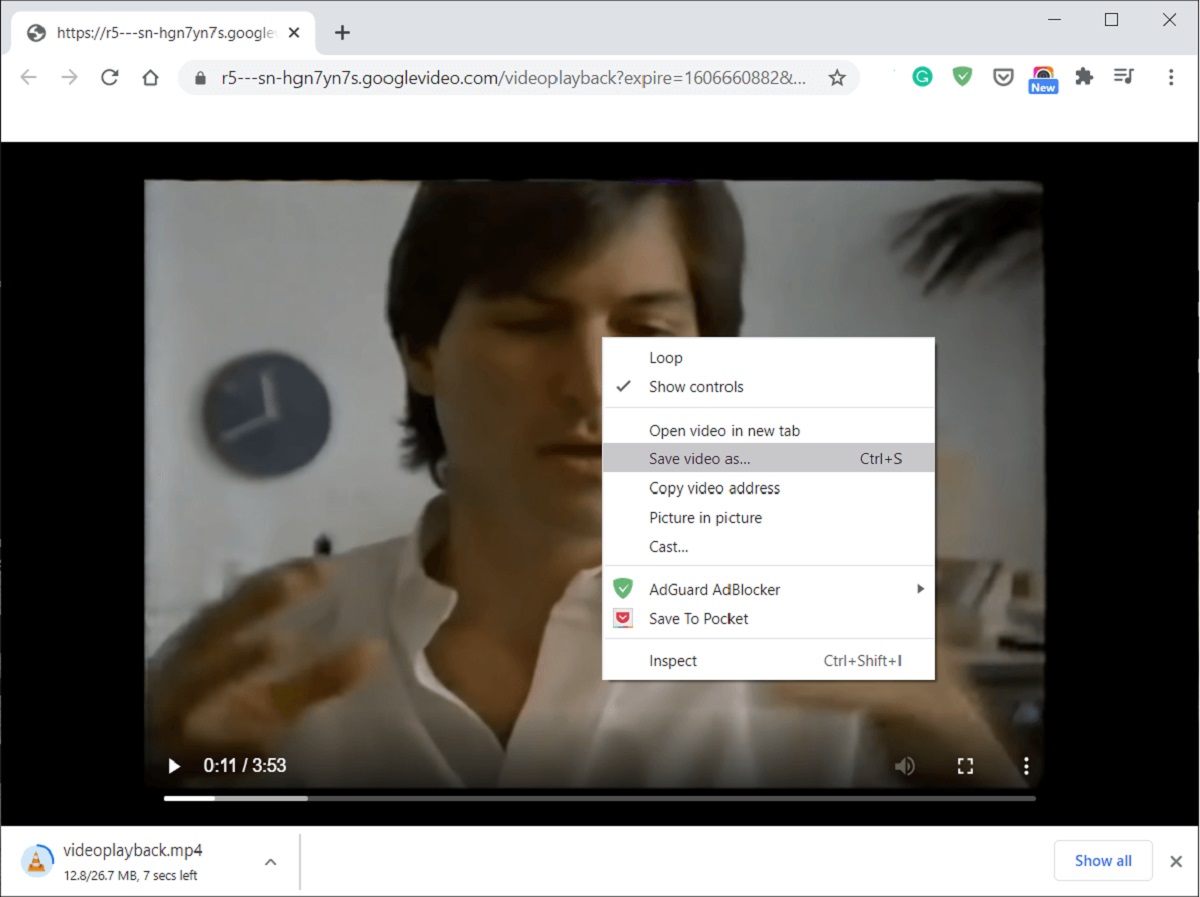
Step 6: Open a new tab and paste the URL or code
Now that you have copied the video URL or source code, it’s time to open a new tab in your web browser and paste the URL or code you have obtained. This step is crucial as it allows you to access the video’s direct source and proceed with the downloading process.
Start by opening a new tab in your web browser. You can do this by clicking on the “+” icon near the top of the browser window or by pressing “Ctrl + T” (or “Command + T” on a Mac) on your keyboard.
In the address bar of the new tab, right-click and select the option to paste the video URL or code. Alternatively, you can press “Ctrl + V” (or “Command + V” on a Mac) to paste the URL or code directly.
Once you have pasted the URL or code, press “Enter” on your keyboard or click the “Go” button next to the address bar. This action will navigate to the video’s source location and initiate the downloading process.
It’s important to note that sometimes pasting the video URL or code directly into the address bar may not work. In such cases, you might need to use a video downloading tool or a browser extension that is compatible with the website or platform you’re using.
By opening a new tab and pasting the video URL or code, you are one step closer to downloading the video and having it saved on your computer or device for offline viewing.
Step 7: Download the video using a video downloading tool or browser extension
After pasting the video URL or code in a new tab, it’s time to download the video using a video downloading tool or a browser extension. These tools and extensions are specifically designed to capture and download video content from various websites and platforms.
There are numerous video downloading tools and browser extensions available, depending on your web browser and the specific requirements of the website or platform you’re using. Some popular options include Video DownloadHelper, 4K Video Downloader, and YTD Video Downloader.
To download the video, you need to install the video downloading tool or browser extension of your choice. Most tools and extensions can be found in the official extensions marketplace of your web browser, such as the Chrome Web Store or Firefox Add-Ons Store.
Once you’ve installed the video downloading tool or browser extension, it’s time to activate it. Look for the icon of the tool or extension in your browser’s toolbar. Click on the icon to open its interface and activate it for use.
Now, navigate back to the tab where you pasted the video URL or code. The video downloading tool or browser extension should automatically detect the video and display options for downloading it.
Click on the appropriate download button or option provided by the tool or extension. You might be able to choose the desired video quality and format before initiating the download process.
The video downloading tool or browser extension will start fetching the video file from its source location and save it to your computer or device. The time taken for the download process will depend on the size of the video and your internet connection speed.
Once the download is complete, you will have the video saved on your computer or device. You can now access and enjoy the video offline at your convenience.
Remember to respect the copyright and intellectual property rights of the video content you download. Ensure that you are downloading videos for personal use or with proper permissions from the content creator or owner.
Step 8: Choose the desired video quality and format
When downloading a video using a video downloading tool or browser extension, you often have the option to choose the desired video quality and format. This step allows you to tailor the downloaded video to your specific needs and preferences.
After initiating the download process with the video downloading tool or browser extension, you will typically be presented with a list of available video quality options. The exact options will vary depending on the original video and the capabilities of the website or platform you’re using.
Common video quality options include SD (Standard Definition), HD (High Definition), and sometimes even 4K UHD (Ultra High Definition). The higher the quality, the better the video’s resolution and overall visual clarity.
Consider the playback device you intend to use for watching the downloaded video. If you plan to watch it on a small screen, such as a smartphone or tablet, a lower quality option may suffice. On the other hand, if you want to enjoy the video on a larger screen, like a computer monitor or television, opting for a higher quality option may provide a more immersive viewing experience.
Along with video quality, you may also have the option to select the video format. Common formats include MP4, AVI, MKV, and FLV. MP4 is widely supported across various devices and is the recommended choice for compatibility. However, if you have a specific requirement or a device that only supports certain formats, make sure to choose the appropriate format during the download process.
Keep in mind that selecting higher-quality options and certain video formats may result in larger file sizes, which may affect the storage capacity of your device. Consider the available storage space and choose the video quality and format accordingly.
Once you have chosen the desired video quality and format, proceed with the download. The video downloading tool or browser extension will fetch and save the video file with your selected preferences.
By choosing the optimal video quality and format, you can enhance your viewing experience and ensure compatibility with your preferred playback devices.
Step 9: Save the video to your computer
Now that you have chosen the desired video quality and format, it’s time to save the downloaded video to your computer or device. This final step ensures that you can access and watch the video whenever you want, even without an internet connection.
After the video downloading tool or browser extension completes the download process, you will need to specify the location where you want to save the video on your computer. Typically, a dialog box will appear, allowing you to select the destination folder.
Choose a convenient and easily accessible location on your computer, such as the “Downloads” folder or a dedicated folder for videos. It’s a good practice to create a separate folder for your downloaded videos to keep them organized and easily findable in the future.
Specify the destination folder by navigating to the desired location using the file explorer or browsing interface provided by your operating system. Once you have selected the destination folder, click “Save” or “OK” to initiate the saving process.
The video file will be saved to the designated folder on your computer. The time required to save the video will depend on the size of the file and the speed of your computer’s storage system.
Once the video is saved to your computer, you can access it at any time by navigating to the specified folder. Double-click on the video file to open it with the default media player on your computer, or right-click and choose a different media player if desired.
Now that you have successfully saved the video to your computer, you can enjoy watching it offline, share it with others, or transfer it to other devices for convenient viewing.
Remember to respect the copyright and intellectual property rights of the video content you download. Ensure that you are downloading videos for personal use or with proper permissions from the content creator or owner.
Conclusion
Downloading videos from websites and platforms using Inspect Element can be a handy trick when you want to have access to your favorite videos offline. By following the step-by-step process outlined in this guide, you can easily download videos using Inspect Element in your web browser.
We started by opening the video in our web browser and then right-clicking on it to access the Inspect Element feature. From there, we located the video element within the HTML code and copied the video URL or source code. Next, we opened a new tab and pasted the URL or code to access the video’s source location.
Using a video downloading tool or browser extension, we were able to download the video, choosing the desired video quality and format. Finally, we saved the video to our computer, allowing us to watch it offline at our convenience.
It’s important to remember that when downloading videos, you should respect the copyright and intellectual property rights of the content. Make sure you are downloading videos for personal use or with proper permissions from the content creator or owner.
While downloading videos using Inspect Element is a useful technique, it’s crucial to stay up to date with the terms and conditions of websites and platforms you visit. Some websites may have specific policies against downloading videos, so always ensure that you are abiding by their guidelines.
Now that you are equipped with the knowledge of how to download videos using Inspect Element, you can enjoy your favorite videos at your convenience, without the need for an internet connection. So go ahead, give it a try, and start building your offline video library today!