Introduction
Welcome to the era of video content! With platforms like YouTube offering a vast array of videos on every topic imaginable, it’s no wonder that YouTube has become the go-to platform for watching and sharing videos. However, sometimes it’s not just the video that you’re interested in; you may want to access the transcript or subtitles of a particular YouTube video.
Transcripts can be helpful in many situations. Whether you’re conducting research, trying to understand an interview, or simply prefer reading over watching, having the ability to download the transcript from a YouTube video can be incredibly useful. Luckily, there are simple ways to download transcripts from YouTube, allowing you to access the text content of a video without hassle.
In this article, we will guide you through the process of downloading transcripts from YouTube in a few easy steps. You don’t need any special software or technical expertise; just follow our instructions and you’ll be well on your way to accessing the transcript of any YouTube video you desire.
Don’t worry—we know your time is valuable. That’s why we’ve compiled the most straightforward and efficient methods for downloading YouTube transcripts. Whether you’re on a computer or mobile device, you’ll find a solution that works for you. So, without further ado, let’s dive into the steps.
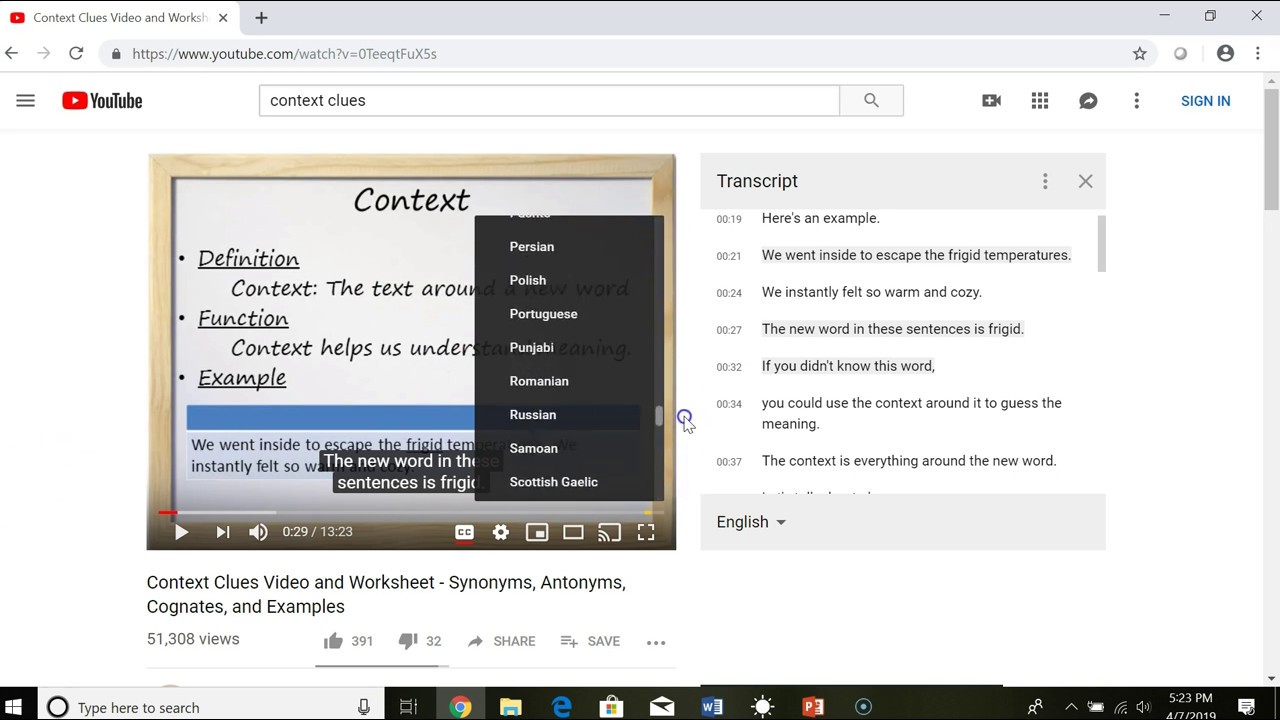
Step 1: Copy the URL of the YouTube video
The first step in downloading a transcript from YouTube is to locate the video you’re interested in and copy its URL. This URL will serve as the link to the video from which you want to extract the transcript.
To find the URL of the YouTube video, you can follow these steps:
- Open a web browser and navigate to YouTube’s website.
- Search for the video you want to download the transcript from using the search bar at the top of the page.
- Once you’ve found the video, click on it to open it in the YouTube player.
- Look at the address bar of your web browser. The URL of the YouTube video should be displayed there.
- Click on the address bar to highlight the URL, then right-click and select “Copy” from the context menu. Alternatively, you can use the keyboard shortcut “Ctrl+C” (Windows) or “Command+C” (Mac) to copy the URL.
Once you have copied the URL of the YouTube video, you’re ready to move on to the next step: finding a YouTube transcript downloader website. These websites are specifically designed to extract the transcript from YouTube videos, making it easy for you to access the text content you’re looking for. In the following steps, we will guide you through the process of using one of these transcript downloader websites to download the transcript of your chosen video.
Step 2: Go to a YouTube transcript downloader website
After copying the URL of the YouTube video, the next step is to visit a YouTube transcript downloader website. These websites are specifically designed to extract the transcript from YouTube videos and provide an easy way for you to download it.
There are several reliable and user-friendly YouTube transcript downloader websites available. Here’s how you can find and choose a suitable one:
- Open a new tab or window in your web browser.
- Use a search engine like Google to search for “YouTube transcript downloader.”
- Review the search results and visit a few different websites to find one that suits your needs.
- Ensure that the website is reputable and trustworthy by checking user reviews or recommendations from reliable sources.
- Consider factors such as user interface, ease of use, and additional features offered by the website.
Once you have chosen a YouTube transcript downloader website, you can proceed to the next step. Keep in mind that different websites may have slightly different interfaces or functionality, but the general process remains the same.
By using a dedicated YouTube transcript downloader website, you can simplify the process of extracting the transcript from a YouTube video. These websites are specifically designed to handle the extraction and provide you with the transcript file for download. In the next step, we will guide you through the process of pasting the video URL and initiating the transcript download.
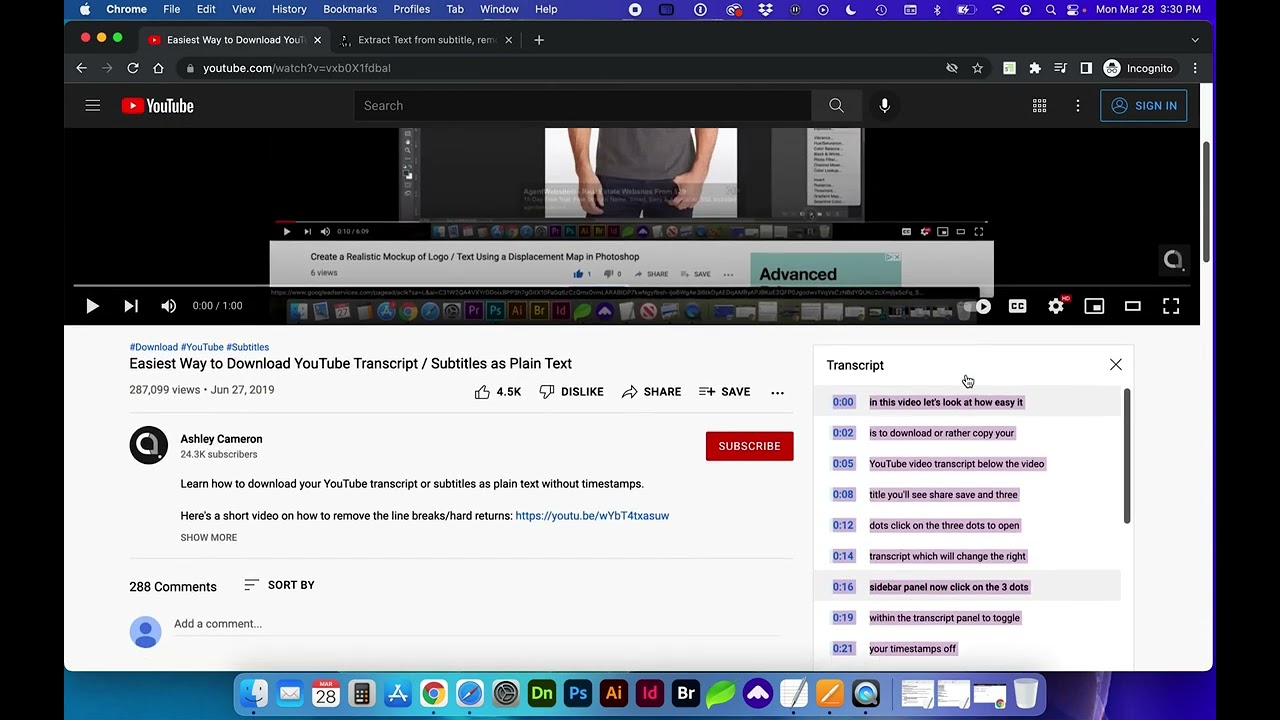
Step 3: Paste the video URL and download the transcript
Now that you have chosen a YouTube transcript downloader website, it’s time to put it to use. In this step, we’ll guide you through the process of pasting the video URL and initiating the transcript download.
Follow these steps to download the transcript from the YouTube video:
- Visit the YouTube transcript downloader website you have chosen in the previous step.
- Look for the designated text box or field where you can paste the video URL.
- Right-click inside the text box and select “Paste” from the context menu. Alternatively, you can use the keyboard shortcut “Ctrl+V” (Windows) or “Command+V” (Mac) to paste the URL.
- Ensure that the pasted URL is correct and complete.
- Once you have successfully pasted the YouTube video URL, look for the “Download” or “Get Transcript” button on the website.
- Click on the button to initiate the transcript download process.
Depending on the website you’re using, the download process may vary. Some websites may generate the transcript file instantly, while others may require a brief processing time. Regardless, the website will typically provide you with a download link or prompt to save the transcript file to your computer.
Remember to save the downloaded transcript file in a location that is easily accessible and memorable for future reference. Now that you have successfully downloaded the transcript file, you’re ready to move on to the next step: opening and accessing the transcript.
Step 4: Open the downloaded transcript file
Once you have downloaded the transcript file from the YouTube transcript downloader website, you will need to open it to access the text content. In this step, we will guide you through the process of opening the downloaded transcript file.
Follow these steps to open the transcript file:
- Locate the downloaded transcript file on your computer. Depending on your web browser and settings, the file may be saved in your “Downloads” folder or a predefined folder for saved files.
- Once you have found the transcript file, double-click on it to open it. The file will typically have a .txt or .srt extension, indicating that it is a text-based file.
- The transcript file will open in a text editor or word processing program, such as Notepad (Windows) or TextEdit (Mac).
- Scroll through the transcript file to view the text content. The transcript should be formatted in a clear and readable manner, with each line representing a segment of the video and any timestamps included.
Some platforms or video creators may include additional information or formatting in the transcript file, such as speaker names or notations. Take a moment to familiarize yourself with the content and format of the transcript.
Now that you have successfully opened the downloaded transcript file, you can read, review, or make any necessary adjustments to the text. If you prefer, you can also proceed to the next step to learn how to edit and format the transcript file.
Step 5: Edit and format the transcript (optional)
After opening the downloaded transcript file, you may find it necessary or beneficial to edit and format the content according to your preferences. This step is entirely optional but can help enhance readability and ensure the transcript meets your specific requirements.
Consider the following tips when editing and formatting the transcript:
- Remove any unnecessary information: If the transcript includes timestamps, speaker labels, or other extraneous details that are not relevant to your needs, you can choose to remove them.
- Edit for clarity and accuracy: While the transcript is usually generated automatically by the YouTube transcript downloader website, it may contain errors or inaccuracies. Take the time to review the text and make any necessary corrections to ensure accuracy.
- Organize the transcript: If the transcript appears as a continuous block of text, you may want to separate it into paragraphs or sections to improve readability.
- Add formatting: Consider adding formatting such as headers, bullet points, or numbered lists to make the transcript more structured and easier to navigate.
- Proofread: Before finalizing the transcript, go through it again to catch any spelling or grammatical errors. This will help ensure the transcript is polished and professional.
Remember, the extent of editing and formatting depends on your specific needs and preferences. Take the time to make the necessary adjustments to transform the transcript into a format that meets your requirements.
Once you are satisfied with the edited and formatted transcript, it’s time to save your changes and move on to the final step of the process.
Step 6: Save the edited transcript file
After you have finished editing and formatting the transcript according to your preferences, it is time to save your changes. This step ensures that your edited transcript is preserved for future reference or use.
Follow these steps to save your edited transcript file:
- Click on the “File” menu in the text editor or word processing program you are using to access the saving options.
- Choose the “Save” or “Save As” option from the dropdown menu. This will prompt a dialog box to appear.
- In the dialog box, navigate to the desired location on your computer where you want to save the edited transcript file.
- Enter a descriptive and recognizable name for the file in the “File Name” field.
- Choose the appropriate file format for your edited transcript. Typically, the .txt format is suitable for plain text transcripts, while .doc or .docx formats can be used for more advanced formatting.
- Click on the “Save” or “OK” button to save the edited transcript file to your selected location.
Once you have saved the file, you can easily access it for future use or share it with others as needed. Make sure to store the edited transcript file in a location that is easily accessible and well-organized to avoid losing or misplacing it.
Congratulations! You have successfully completed the process of downloading, opening, editing, and saving the transcript from a YouTube video. Now you have a text-based transcript that you can refer to whenever needed.
With these simple steps, you can easily access and work with YouTube video transcripts to meet your specific requirements. Whether you need them for research, study, or personal use, having access to the transcript of a YouTube video can greatly enhance your experience and understanding.
Conclusion
Downloading transcripts from YouTube videos can be incredibly valuable, allowing you to access the text content of a video for various purposes. In this article, we’ve walked you through a simple step-by-step process to download and work with YouTube transcripts.
By following these steps, you can easily extract the transcript from any YouTube video. From copying the video URL to pasting it into a transcript downloader website, and downloading the transcript file, you’ve learned how to obtain the text content you’re looking for. Additionally, we’ve discussed the optional steps of editing and formatting the transcript to suit your specific needs.
Remember, transcripts can be particularly useful for research, studying, or when you prefer reading over watching videos. With the ability to edit the transcript as needed, you can ensure accuracy and clarity in the text. Saving the edited transcript file allows for easy access and reference in the future.
Now that you’re armed with this knowledge, you can confidently download and utilize YouTube transcripts whenever you need them. Take advantage of this valuable resource to enhance your learning, understanding, and overall experience with YouTube videos.
So go ahead and explore the world of YouTube transcripts, uncovering the text content hidden within the videos, and leveraging them to suit your specific needs.