Why download Python?
Python is a versatile and powerful programming language that has gained immense popularity among developers and non-technical individuals alike. Whether you are a beginner or an experienced programmer, downloading Python opens up a world of opportunities and possibilities. Here are a few compelling reasons why you should consider downloading Python:
- Easy to Learn and Use: Python has a clean and straightforward syntax that makes it easy to understand, read, and write. This simplicity makes Python an excellent choice for beginners who are just starting their programming journey.
- Extensive Library Support: Python boasts a vast collection of libraries and frameworks that can be easily integrated into your projects. These libraries offer pre-written code snippets and functionalities, saving you valuable time and effort in developing your applications.
- Cross-platform Compatibility: Python is a cross-platform programming language, meaning it can run on various operating systems such as Windows, macOS, and Linux. This versatility allows you to write code once and deploy it on multiple platforms without major modifications.
- Large Developer Community: Python has a thriving and supportive community of developers worldwide. This community is always ready to help and provide solutions to your programming queries, making your learning process smoother and more enjoyable.
- Data Science and Machine Learning: Python offers an array of libraries such as NumPy, Pandas, and TensorFlow, which are widely used for data analysis, data manipulation, and machine learning. If you are interested in these domains, downloading Python will equip you with the tools necessary to dive into these exciting fields.
- Web Development: Python provides various frameworks for web development, such as Django and Flask. These frameworks make it easier to build scalable and robust web applications with minimal effort.
- Automation and Scripting: Python’s simplicity and flexibility make it a popular choice for automation tasks and scripting. With Python, you can automate repetitive tasks, create scripts to streamline workflows, and even build small utilities to simplify your daily activities.
With its simplicity, versatility, and extensive library support, Python has gained recognition as one of the most popular programming languages across different domains. Whether you are interested in web development, data science, automation, or simply looking to expand your programming skills, downloading Python is a step towards unlocking a world of possibilities.
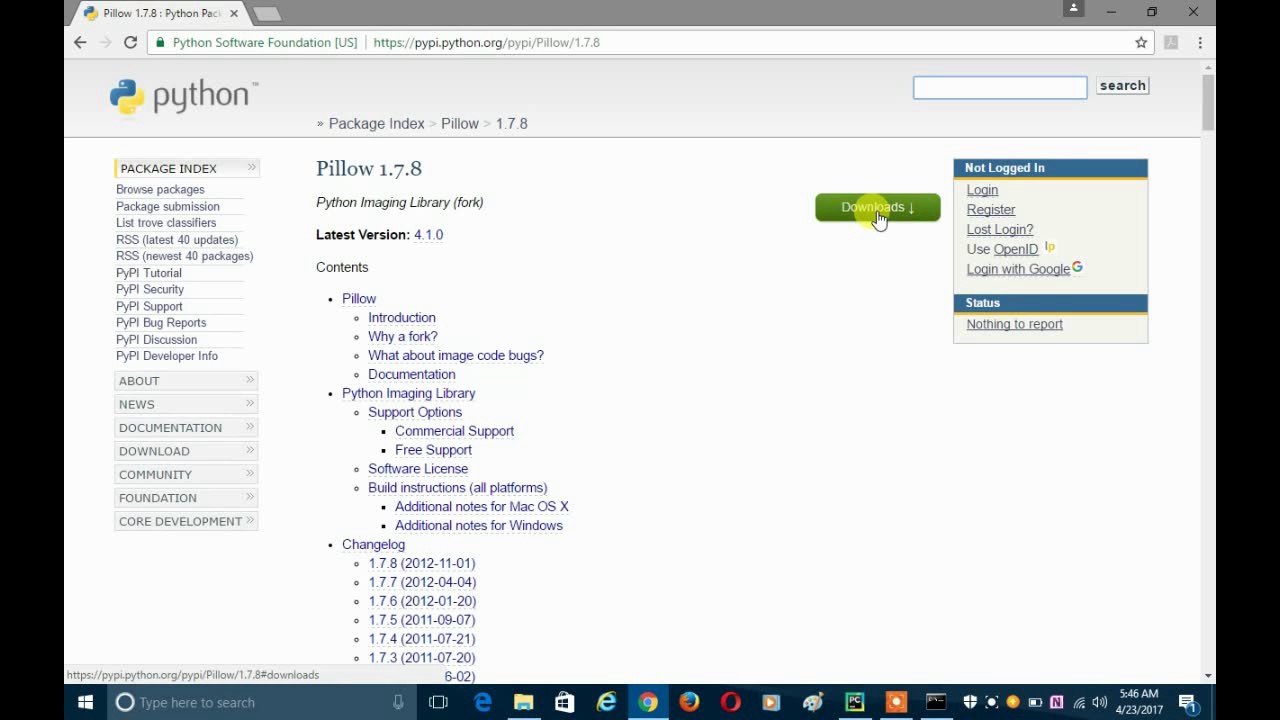
Step 1: Visit the official Python website
To download Python, the first step is to visit the official Python website. Here’s how:
- Open your preferred web browser and go to the official Python website, which is https://www.python.org.
- Once you’ve reached the website, you will see the homepage, which provides a wealth of information about Python, its features, and the latest news and updates related to the language.
- Take a moment to explore the website and familiarize yourself with the various resources available, such as the documentation, community forums, and downloads section.
- Next, navigate to the “Downloads” section of the website. You can usually find this in the top navigation bar or as a prominent button on the homepage.
- On the downloads page, you will see different versions of Python listed. The latest stable version is typically displayed prominently, and older versions may be available as well.
- Before proceeding, consider the specific requirements of your project or development environment. It is generally recommended to download the latest stable version of Python, but certain projects may have dependencies on specific versions.
- Once you have decided on the version of Python you wish to download, click on the download link to proceed.
Visiting the official Python website is the first crucial step in downloading Python. It not only provides you with access to the official Python downloads but also serves as a hub for documentation, community support, and additional resources to help you in your Python programming journey.
Step 2: Choose the latest version
After visiting the official Python website, the next step in downloading Python is to choose the version that best suits your needs. Here’s how you can select the latest version:
- On the Python downloads page, you will find a list of available Python versions. The latest stable version is usually highlighted and recommended for most users.
- Consider the requirements of your project or any specific dependencies before selecting a version. It is generally advisable to choose the latest stable version to benefit from the latest features, bug fixes, and security updates.
- Keep in mind that older versions may still be available and may be necessary if you have specific compatibility requirements.
- Take a moment to read any accompanying information or release notes to understand any notable changes or compatibility considerations introduced in the latest version.
- If you are unsure which version to choose, consider seeking guidance from the Python community or consulting the documentation specific to your project or development environment.
Choosing the latest version of Python is crucial to ensure that you have access to the latest features, improvements, and security updates. It is also important to consider any specific project or compatibility requirements that may necessitate the use of a particular version.
Step 3: Select the appropriate installer
After choosing the Python version in the previous step, the next step is to select the appropriate installer for your operating system. Here’s how you can do it:
- On the Python downloads page, you will find different installers available for different operating systems such as Windows, macOS, and Linux.
- Identify your operating system and locate the corresponding installer. Make sure to select the version that matches your system architecture (32-bit or 64-bit) for optimal performance.
- For Windows users, there are typically two options: an executable installer (.exe) and a web-based installer (.msi). The executable installer is recommended for most users as it is self-contained and does not require an internet connection during installation.
- macOS users can choose between a standard installer package (.pkg) and a framework-only installer (.tar.gz). The standard installer is suitable for most users, while the framework-only installer offers more flexibility for advanced users who wish to customize their Python installation.
- Linux users can find various options, such as source code packages or distribution-specific packages. It is advisable to use the package manager provided by your Linux distribution to install Python.
- If you are unsure which installer to choose, consult the Python documentation or seek guidance from the Python community.
Selecting the appropriate installer for your operating system is essential to ensure a smooth and hassle-free installation process. Make sure to download the installer that matches your system architecture and operating system type to ensure compatibility.
Step 4: Download the Python installer
Once you have selected the appropriate installer for your operating system, the next step is to download the Python installer. Here’s how you can do it:
- Click on the download link for the chosen installer. This will begin the downloading process.
- Depending on your web browser and settings, you may be prompted to choose a download location or the installer might be saved automatically in your default downloads folder.
- While the installer is downloading, it’s a good idea to keep an eye on the progress to ensure it completes successfully.
- The download time will vary depending on your internet connection speed, the size of the installer, and other factors.
- Be patient and avoid interrupting the download process to avoid any potential issues.
- Once the download is complete, you will have the Python installer saved on your computer.
Downloading the Python installer is a crucial step as it allows you to have the necessary files to proceed with the installation. Make sure to complete this step before moving on to the next one.
Step 5: Run the installer
After downloading the Python installer, the next step is to run it on your computer. Here’s how you can do it:
- Navigate to the location on your computer where the downloaded Python installer is saved.
- Double-click on the installer to initiate the installation process.
- You may be prompted by your operating system or security software to confirm that you want to run the installer. If prompted, click “Yes” or “Run” to proceed.
- The Python installer will launch, and you will be presented with various installation options and settings.
- Take a moment to read through the installer screens to understand the options available to you.
- By default, the installer will suggest a standard installation setup, which should be suitable for most users. However, you can customize the installation by selecting different options based on your preferences.
- Follow the on-screen instructions to proceed with the installation.
- During the installation process, you may be asked to accept the Python Software Foundation License Agreement. Read the agreement carefully, and if you agree to the terms, select the checkbox to proceed.
- Ensure that you have sufficient disk space on your computer for the installation.
- Once you have reviewed the options and made any necessary selections, click on the “Install” button to start the installation process.
Running the Python installer is a critical step in installing Python on your computer. Make sure to follow the on-screen instructions and customize the installation, if needed, to match your preferences and requirements.
Step 6: Customize the installation (optional)
While the Python installer offers a standard installation setup that is suitable for most users, you also have the option to customize the installation according to your specific needs. Here’s how you can do it:
- During the installation process, you will be presented with various options and settings that you can customize to tailor the installation to your requirements.
- Read through each screen carefully and make selections based on your preferences.
- Some of the common customization options include choosing the installation location, adding Python to the system’s PATH variable, and selecting additional features or modules to install.
- To change the installation location, click on the “Change” button and specify a different directory where you want Python to be installed. It is recommended to keep the default installation location unless you have a specific reason to change it.
- Adding Python to the system’s PATH variable is crucial if you plan on using Python from the command prompt or terminal. Enabling this option will allow you to access Python from any location on your computer.
- If you require additional features or modules that are not included in the standard installation, you can select them from the available options. Be mindful of the disk space requirements when selecting additional components.
- Make sure to review your selections before proceeding with the installation.
Customizing the installation of Python is an optional step that allows you to tailor the installation to your specific needs. Consider your preferences and requirements carefully when making choices to ensure that the installation meets your expectations.
Step 7: Add Python to the system’s PATH variable (optional)
Adding Python to the system’s PATH variable is an optional step but can be advantageous if you plan to use Python from the command prompt or terminal without navigating to the Python installation directory each time. Follow the steps below to add Python to the system’s PATH variable:
- During the Python installation process, you may have encountered an option to add Python to the system’s PATH variable. If you chose not to enable it during the installation, you can still do it manually.
- Open the Start menu and search for “environment variables” or “edit the system environment variables.”
- Click on the “Edit the system environment variables” option. This will open the System Properties window.
- In the System Properties window, click on the “Environment Variables” button.
- In the Environment Variables window, under the “System variables” section, scroll down to find the “Path” variable and select it.
- Click on the “Edit” button to modify the selected variable.
- In the Edit Environment Variable window, click on the “New” button to add a new entry.
- Type the path to the Python installation directory. By default, it is located at “C:\PythonXX” (replace “XX” with the version number).
- Click “OK” to save the changes and close the windows.
- Verify that the changes have taken effect by opening a new command prompt or terminal window and typing “python” to check if the Python interpreter is now accessible from any location.
Adding Python to the system’s PATH variable makes it easier to use Python from any directory within the command prompt or terminal. While this step is optional, it can streamline your workflow and make Python more accessible for execution and development purposes.
Step 8: Complete the installation process
After customizing the Python installation, the next step is to complete the installation process. Here’s how you can do it:
- Review your selections and options one last time to ensure they match your preferences and requirements.
- Once you are satisfied, click on the “Install” button to begin the installation process.
- Depending on your computer’s performance and the options you selected, the installation process may take a few minutes to complete.
- During the installation, you may see progress indicators or prompts for additional tasks like installing dependencies or configuring settings. Follow any on-screen instructions as necessary.
- Once the installation is finished, you will see a completion message indicating that Python has been successfully installed.
- Take a moment to read any post-installation information or prompts to ensure you have a clear understanding of the next steps.
Completing the installation process is a crucial step in setting up Python on your computer. Make sure to follow any post-installation instructions and prompts to ensure a successful installation.
Step 9: Verify the installation
After completing the installation of Python, it is essential to verify that the installation was successful and that Python is functioning as expected. Here’s how you can do it:
- Open the command prompt or terminal on your computer.
- Type “python –version” or “python3 –version” (depending on your installation) and press Enter.
- If Python is installed correctly, the command prompt or terminal will display the installed Python version.
- You can also type “python” or “python3” and press Enter to open the Python interactive shell. This allows you to execute Python code directly in the command prompt or terminal.
- To exit the Python shell, type “exit()” and press Enter.
- Additionally, you can create a simple Python script file with a “.py” extension, such as “hello.py”, and write a simple print statement inside. Save the file.
- Open the command prompt or terminal and navigate to the directory where you saved the script.
- Type “python hello.py” or “python3 hello.py” (replace “hello.py” with the actual filename) and press Enter.
- If the script executes without errors and displays the expected output, it confirms that Python is installed and working correctly.
- Remember to delete the test script file if needed.
Verifying the installation ensures that Python is functioning properly on your system and allows you to start writing and executing Python scripts. If you encounter any errors during this step, it is advisable to double-check your installation and review the installation instructions to ensure everything was performed correctly.
Step 10: Start using Python
Now that you have successfully installed and verified Python on your computer, it’s time to start using it to develop and run Python programs. Here’s how you can get started:
- Open your preferred code editor or Python Integrated Development Environment (IDE).
- Create a new Python file with a “.py” extension or open an existing Python file.
- Begin writing your Python code in the editor, using the Python syntax and features.
- Save the file with a meaningful name in a location of your choice.
- To execute the Python code, open the command prompt or terminal and navigate to the directory where the Python file is located.
- Type “python” or “python3” followed by the name of the file, such as “python myscript.py”, and press Enter.
- The Python interpreter will execute the code, and any output or errors will be displayed in the command prompt or terminal.
- Continue to develop and refine your Python programs by editing the source code in the code editor and running it in the command prompt or terminal as needed.
- Explore the vast array of Python libraries, frameworks, and resources available to enhance your Python development experience.
- Refer to the Python documentation, online tutorials, and community resources for guidance and assistance in your Python programming journey.
Starting to use Python is an exciting step that opens up a world of possibilities in terms of coding and development. With Python’s versatility and extensive library support, you can build a wide range of applications, from web development to data analysis and machine learning.
Remember to continuously practice and learn, leveraging resources available online and engaging with the Python community to further enhance your Python programming skills.
Conclusion
Downloading and installing Python is a vital starting point for anyone interested in programming, automation, data analysis, or web development. With Python’s simplicity, versatility, and extensive library support, it has gained widespread popularity among developers of all levels of expertise.
In this guide, we have walked through the step-by-step process of downloading and installing Python:
- Visit the official Python website: Begin by visiting the official Python website at python.org to access the latest version of Python and other resources.
- Choose the latest version: Select the latest stable version of Python unless your specific project or requirements dictate otherwise.
- Select the appropriate installer: Choose the installer that matches your operating system and system architecture (32-bit or 64-bit).
- Download the Python installer: Download the selected installer to your computer.
- Run the installer: Launch the installer and follow the on-screen instructions to proceed with the installation.
- Customize the installation (optional): Customize the installation by selecting specific options and features according to your preferences and project requirements.
- Add Python to the system’s PATH variable (optional): Add Python to the system’s PATH variable to easily access it from any location in the command prompt or terminal.
- Complete the installation process: Review your selections and complete the installation process.
- Verify the installation: Check that Python is installed correctly by running a version check command or executing a simple Python script.
- Start using Python: Begin writing, testing, and running Python programs in your preferred code editor or Python IDE.
By following these steps, you have successfully set up Python on your computer and are ready to embark on your Python programming journey. Remember to practice regularly, explore the vast Python ecosystem, and seek help from the thriving Python community whenever needed.
Python’s versatility, readability, and extensive library support make it an excellent choice for developers, whether you are a beginner or an experienced programmer. Enjoy your Python programming experience and unlock the endless possibilities that this powerful language has to offer!