Introduction
Having a collection of memorable photos on your Android phone is great, but sometimes you may want to transfer them to your computer for safekeeping, editing, or sharing with others. Fortunately, the process of downloading photos from an Android phone to a computer is simple and straightforward. In this article, we will guide you through the step-by-step process to help you easily transfer your photos.
Whether you’re using a Windows PC or a Mac, the methods discussed here will work for both platforms. All you need is your Android phone, a USB cable, and your computer. With just a few simple steps, you’ll have your cherished photos safely stored on your computer in no time.
Before we dive into the steps, it’s important to note that the exact steps to download photos from an Android phone to a computer may vary slightly depending on the manufacturer and the software version of your phone. However, the general process is similar across all Android devices, so you should be able to follow these steps with ease.
Now, let’s get started with the first step of connecting your Android phone to your computer.
Step 1: Connecting Your Android Phone to Your Computer
The first step in downloading photos from your Android phone to your computer is to establish a physical connection between the two devices. To do this, you will need a USB cable that is compatible with your Android phone.
Here are the steps to connect your Android phone to your computer:
- Locate the USB port on your computer. It is usually found on the front or back panel of your computer tower.
- Take the USB cable and plug one end into the USB port on your computer.
- Now, take the other end of the USB cable and connect it to the charging port on your Android phone.
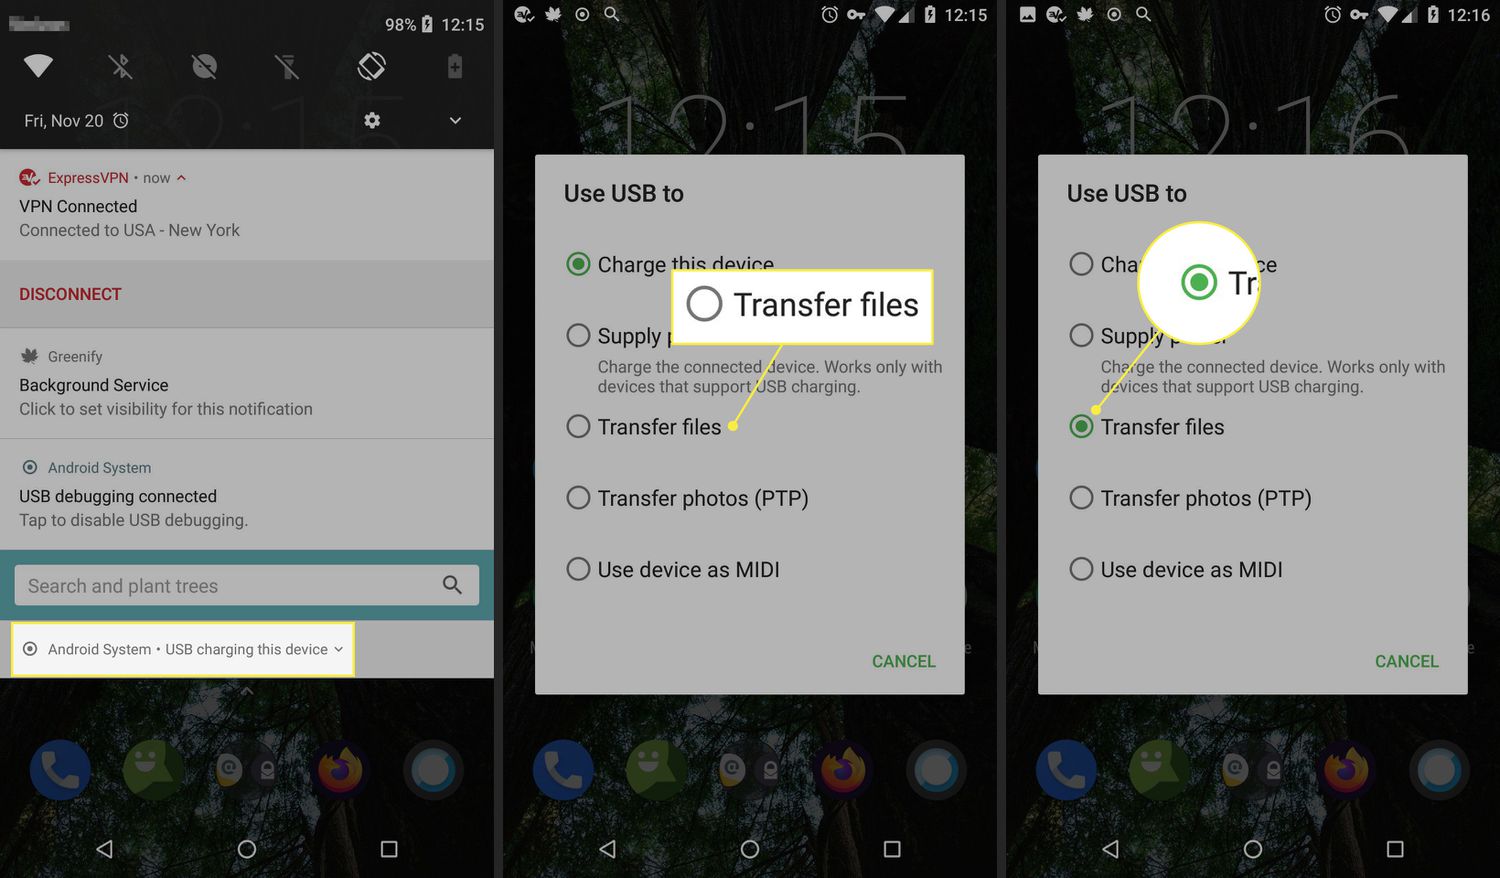
- Once the cable is securely connected to both devices, you should see a notification on your Android phone indicating that it is connected to a computer.
It’s important to note that some Android phones may require you to change the USB connection settings to enable file transfer mode. If you don’t see the notification or if your phone doesn’t show up as a connected device on your computer, you may need to enable USB debugging mode on your Android phone. We’ll go into detail on how to do this in the next step.
Now that your Android phone is successfully connected to your computer, it’s time to move on to the next step: enabling USB debugging on your Android phone.
Step 2: Enabling USB Debugging on Your Android Phone
In order to successfully transfer photos from your Android phone to your computer, you may need to enable USB debugging mode on your device. USB debugging allows your computer to communicate with your Android phone and access its file system.
Here’s how you can enable USB debugging on your Android phone:
- Go to the “Settings” on your Android phone.
- Scroll down and tap on “About phone” (or a similar option).
- Look for the “Build number” and tap on it multiple times (usually about seven times) until you see a message saying that you are now a developer.
- Go back to the main “Settings” menu and scroll down to find the newly unlocked “Developer options” or “Developer settings” (it may be located under “System” or “System & updates”).
- Tap on “Developer options” to access the settings.
- Look for the “USB debugging” option (it may be located under the “Debugging” or “Developer tools” section) and toggle the switch to enable it.
- You may see a warning message asking for your confirmation. Tap “OK” to proceed.
Once USB debugging is enabled on your Android phone, you can now proceed to access your phone’s storage from your computer. This will allow you to find and select the photos you want to download.
In the next step, we’ll guide you on how to access your Android phone’s storage on your computer.
Step 3: Accessing Your Android Phone’s Storage on Your Computer
Now that USB debugging is enabled on your Android phone, you can easily access its storage from your computer. This will allow you to navigate through the folders on your phone and locate the photos you want to download.
Here are the steps to access your Android phone’s storage on your computer:
- On your computer, open a file explorer or file manager application. For Windows, you can use File Explorer, while Mac users can utilize Finder.
- Look for your Android phone under the “This PC” or “My Computer” section on Windows, or under the “Devices” section on a Mac.
- Double-click on your Android phone’s icon to open its storage.
- You will see various folders and files stored on your Android phone. Look for a folder named “DCIM” (which stands for Digital Camera Images) or “Pictures”. This is where your photos are usually stored.
- Open the “DCIM” or “Pictures” folder to access the photos saved on your Android phone.
Once you have accessed the folder where your photos are stored, you can proceed to the next step of locating and selecting the specific photos you want to download.
In the upcoming step, we’ll explore how to find and select the photos you wish to transfer from your Android phone to your computer.
Step 4: Locating and Selecting the Photos You Want to Download
With access to your Android phone’s storage on your computer, you can now easily locate and select the photos you wish to download. This step will allow you to choose the specific photos you want to transfer and exclude any unnecessary files.
Follow these steps to locate and select the photos you want to download from your Android phone:
- Navigate through the folders in your Android phone’s storage until you reach the “DCIM” or “Pictures” folder.
- Open the folder to view the collection of photos stored on your Android phone.
- Browse through the photos to find the ones you want to download.
- To select multiple photos, hold down the Ctrl key on Windows or the Command key on a Mac while clicking on each photo you want to transfer.
- If you want to select all the photos in the folder, you can click on one photo, then press Ctrl+A (Windows) or Command+A (Mac).
Once you have selected the desired photos, you are ready to proceed to the next step: transferring the photos from your Android phone to your computer.
In the following step, we’ll guide you through the process of transferring the selected photos to your computer.
Step 5: Transferring the Photos from Your Android Phone to Your Computer
Now that you have selected the photos you want to download from your Android phone, it’s time to transfer them to your computer. There are a few different methods you can use to accomplish this, depending on your computer’s operating system.
Here are the steps to transfer the photos from your Android phone to your computer:
Method 1: Drag and Drop
- Open the folder on your computer where you want to save the transferred photos.
- Drag and drop the selected photos from the folder on your Android phone to the folder on your computer.
- The photos will begin transferring, and you can monitor the progress in the file transfer window.
- Once the transfer is complete, you will find the downloaded photos in the destination folder on your computer.
Method 2: Copy and Paste
- Right-click on the selected photos and choose the “Copy” option.
- Navigate to the destination folder on your computer.
- Right-click inside the folder and choose the “Paste” option.
- The selected photos will be copied from your Android phone and transferred to your computer.
Method 3: Using Import Tools
- If you are using Windows, you can use the built-in Photos app to import photos from your Android phone to your computer. Simply connect your phone to your computer, open the Photos app, click on the “Import” button, and follow the prompts to import the selected photos.
- For Mac users, you can utilize the Image Capture application. Connect your phone to your computer, open the Image Capture app, select the connected device from the sidebar, choose the destination folder, and click on the “Import” button to transfer the selected photos.
Choose the method that best suits your preference and computer’s operating system. Once the transfer is complete, you will have successfully downloaded the selected photos from your Android phone to your computer.
With the photos safely transferred, you can now edit, organize, and share them as desired.
In the next step, we will discuss the final step of safely disconnecting your Android phone from your computer.
Step 6: Safely Disconnecting Your Android Phone from Your Computer
After successfully transferring the photos from your Android phone to your computer, it’s important to follow the proper steps to safely disconnect your device. This ensures that no data is lost and prevents any potential damage to your phone or computer.
Here are the steps to safely disconnect your Android phone from your computer:
- Close any open windows or file explorer applications that were accessing your Android phone’s storage.
- On your computer, look for the “Safely Remove Hardware” or “Eject” icon located in the system tray or taskbar. This icon may appear as a USB plug or an upward arrow.
- Click on the “Safely Remove Hardware” or “Eject” icon.
- A list of devices connected to your computer will be displayed. Find your Android phone from the list.
- Click on your Android phone to safely eject it from your computer.
- Wait for the notification indicating that it is safe to remove your phone.
- Once the notification appears, you can disconnect the USB cable from your computer by gently pulling it out.
By following these steps, you ensure that all data transfer processes are complete and that your Android phone is disconnected safely from your computer.
Now that you have successfully downloaded your photos and safely disconnected your Android phone, you can enjoy your transferred photos on your computer or proceed with further editing, organizing, or sharing.
Congratulations! You have mastered the process of downloading photos from your Android phone to your computer. Feel free to utilize this knowledge anytime you need to transfer photos in the future, and enjoy the convenience and security of having your cherished memories stored on your computer.
If you have any further questions or need assistance with any other topics, feel free to reach out. Happy photo transferring!
Conclusion
Transferring photos from your Android phone to your computer is a simple process that allows you to backup, edit, and share your precious memories with ease. By following the step-by-step guide outlined in this article, you have learned how to connect your Android phone to your computer, enable USB debugging, access your phone’s storage, locate and select the photos you want to download, transfer them to your computer, and safely disconnect your phone.
Remember, the methods described here are applicable to both Windows and Mac computers and can be easily adapted to different Android phone models. Just make sure to enable USB debugging mode on your phone and follow the instructions for accessing your phone’s storage.
Now that you have transferred your photos to your computer, you can enjoy the benefits of having a backup and the flexibility to organize and edit your images using various software tools. Additionally, with your photos on your computer, you can conveniently share them with friends and family through emails, social media, or other online platforms.
By mastering the process of downloading photos from your Android phone to your computer, you have empowered yourself to take control of your photo library. You can now preserve your memories and have peace of mind knowing that your photos are safe and easily accessible.
We hope that this guide has been helpful to you and that you have found the information provided valuable. If you have any further questions or need assistance with any other topics, do not hesitate to reach out. Happy photo transferring!