Introduction
Welcome to the world of multimedia presentations! Adding music to your PowerPoint slides can greatly enhance the impact of your presentation, creating a more engaging and memorable experience for your audience. Whether you’re preparing a business pitch, a classroom lecture, or a personal slideshow, incorporating the right music can set the right mood and make your content more captivating.
However, not everyone is familiar with how to download music and integrate it into a PowerPoint presentation. In this guide, we will walk you through the step-by-step process of downloading music and seamlessly adding it to your slides. From selecting the perfect music to configuring playback options, we’ve got you covered.
Before we dive into the technicalities, it’s important to note that the use of copyrighted music without proper permission can lead to legal issues. To avoid any complications, we’ll focus on finding and using royalty-free music, which is free from copyright restrictions and can be used without any legal concerns.
Now, let’s get started on our journey to turn your ordinary PowerPoint presentation into an extraordinary one with the power of music!
Step 1: Choose the Right Music for Your PowerPoint Presentation
Choosing the right music for your PowerPoint presentation is crucial as it sets the tone and enhances the overall impact of your content. The music you select should align with the theme, message, and mood of your presentation. Here are some tips to help you choose the perfect music:
- Consider the Purpose: Think about the objective of your presentation. Are you trying to inspire, educate, entertain, or persuade? The music should align with the purpose and evoke the desired emotional response from your audience.
- Reflect the Content: Take into account the subject matter and content of your slides. If you’re presenting a light-hearted topic, you may opt for upbeat and cheerful music. For a serious or professional presentation, choose music that resonates with the tone.
- Know Your Audience: Understand the preferences and demographics of your audience. Consider their age group, cultural background, and personal interests. The music should appeal to your specific audience and enhance their experience.
- Keep it Subtle: The music should complement your presentation without overpowering it. Avoid selecting music that is too loud or distracting. It should serve as a background element that adds depth and enhances the overall atmosphere.
- Listen and Experiment: Take the time to listen to various music tracks and experiment with different options. Keep in mind the tempo, rhythm, and genres that align with your presentation’s mood. Trust your instincts and select music that you connect with and feel confident about.
By considering these factors and taking a thoughtful approach, you can select the right music that enhances your PowerPoint presentation and captivates your audience. Remember, the music you choose sets the stage for your message, so choose wisely!
Step 2: Find and Download Royalty-Free Music
Now that you have a clear understanding of the type of music you want to include in your PowerPoint presentation, the next step is to find and download royalty-free music. Royalty-free music is a type of music that can be used without the need to pay royalties or obtain additional permissions. Here’s how you can find and download royalty-free music:
- Online Royalty-Free Music Libraries: There are numerous websites that offer a wide variety of royalty-free music tracks. Some popular options include sites like AudioJungle, Epidemic Sound, and PremiumBeat. These platforms provide a vast collection of tracks categorized by genre, mood, and duration, making it easier for you to find the perfect music for your presentation.
- Free Music Archives: Another option is to explore free music archives like YouTube Audio Library, Free Music Archive, and SoundCloud. These platforms offer a range of royalty-free music tracks contributed by artists worldwide. While the selection might be limited compared to paid libraries, they can still provide great options for your presentation.
- Check Licensing Terms: Regardless of the platform you choose, it’s important to review the licensing terms associated with the music tracks. Ensure that the music is indeed royalty-free for commercial use and that you comply with any attribution requirements, if applicable.
- Preview and Download: Once you find a suitable track, take advantage of the preview feature available on most websites. Listen to the track in its entirety to ensure it aligns with your presentation. If you’re satisfied, click on the download button or follow the specified instructions to save the music to your computer.
Remember to keep track of the downloaded music files and their respective license information for future reference. Additionally, it’s always a good practice to credit the music in your PowerPoint presentation, even if it’s not explicitly required. This acknowledges the work of the artist and ensures that you are using the music ethically.
By exploring online libraries and free archives, you can easily find and download high-quality royalty-free music that enhances your PowerPoint presentation and adds that extra touch of professionalism.
Step 3: Convert Music Files if Needed
Once you have downloaded your selected royalty-free music tracks for your PowerPoint presentation, it’s essential to ensure compatibility with PowerPoint. In some cases, you may need to convert the music files to a format supported by PowerPoint. Follow these steps to convert music files if needed:
- Check File Formats: First, confirm the file format of the downloaded music. PowerPoint supports commonly used audio formats such as MP3, WAV, and WMA. If your music files are already in one of these formats, you can skip the conversion process.
- Use Conversion Software: If your music files are in an unsupported format, you’ll need to convert them. There are several software programs available that can convert audio files from one format to another. Popular options include freeware like Audacity and online conversion tools such as Zamzar or Convertio.
- Follow Conversion Instructions: Install or access the chosen conversion software and follow the provided instructions. Typically, you’ll need to select the desired output format (e.g., MP3), choose the input music files, and initiate the conversion process. Wait for the software to complete the conversion before proceeding.
- Verify Converted Files: After the conversion is complete, double-check the converted music files to ensure they are in the supported format. Play the files using a media player to confirm their quality and integrity. If everything looks and sounds good, you’re ready to move on to the next step.
Remember, it’s essential to keep a backup of the original music files before converting them. This ensures that you have a copy in case you need to make any changes or adjustments later on.
By converting the music files to a compatible format, you ensure smooth playback and avoid any issues when integrating the music into your PowerPoint presentation.
Step 4: Insert Music Into PowerPoint Slides
Now that you have prepared your music files and they are in a compatible format, it’s time to insert the music into your PowerPoint slides. Follow these steps to seamlessly integrate music into your presentation:
- Open PowerPoint: Launch PowerPoint and open the presentation where you want to add the music. It’s recommended to save a copy of your presentation before making any changes, as a precaution.
- Navigate to the Slide: Go to the slide where you want the music to start playing. You can choose to play the music throughout the entire presentation or for specific slides.
- Access the Insert Tab: Click on the “Insert” tab in the top menu bar of PowerPoint. This tab contains various options for adding elements to your slides.
- Select Audio: Locate the “Audio” option on the Insert tab and click on it. This will display a dropdown menu with different audio options.
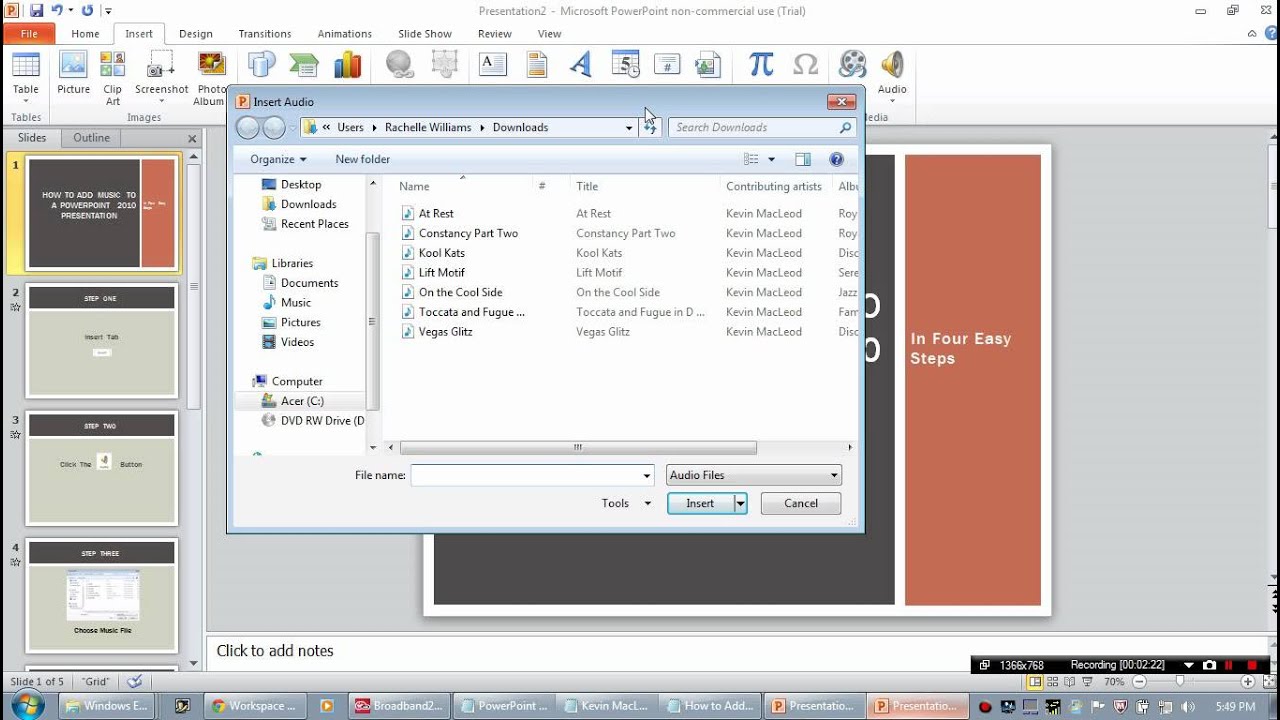
- Choose Audio from File: From the dropdown menu, select “Audio from File” if you have saved the music track on your computer. This will open a file explorer window for you to browse and select the music file you want to insert.
- Adjust Audio Playback: Once your music file is inserted, you can make additional adjustments to the audio playback. Right-click on the inserted audio icon and a menu will appear. From here, you can select options like “Play across slides” or “Play in background”.
- Set Timing and Trigger: If you want to control when the music starts playing, you can set timing options for the audio. Click on the audio icon, go to the “Playback” tab on the menu bar, and choose “Start Automatically” or “Start On Click” based on your preference.
Remember to test the music playback within your presentation to ensure that it starts and stops where you intended it to. Adjust the volume levels if necessary to achieve the desired balance between the music and your narration or other audio elements in your presentation.
By inserting music into your PowerPoint slides, you add an extra layer of engagement and captivate your audience with an immersive multimedia experience.
Step 5: Configure Music Playback Options
Once you have successfully inserted the music into your PowerPoint slides, it’s time to configure the playback options to ensure a seamless experience for your audience. Here’s how you can customize the music playback settings:
- Modify Audio Settings: Right-click on the audio icon and select “Edit Sound Object” or a similar option, depending on your PowerPoint version. This will open the audio settings menu.
- Adjust Volume Levels: In the audio settings menu, you can modify the volume levels for the music. Consider the size of your presentation venue and the audio equipment available to ensure that the music is audible without overpowering other elements.
- Trim Audio: If your music track is longer than needed, you can trim it to match the duration of your presentation. Use the “Trim Audio” option in the audio settings menu to remove any unnecessary sections.
- Loop Playback: If you want the music to repeat continuously throughout the entire presentation, check the “Loop until Stopped” option in the audio settings menu. This ensures that the music doesn’t end abruptly and maintains a consistent background ambiance.
- Apply Fades: Smoothly introduce and end the music by adding fade-in and fade-out effects. In the audio settings menu, check the “Fade in” and “Fade out” options and set the desired durations. This gradual transition enhances the overall flow of your presentation.
- Hide Audio Icon: If you don’t want the audio icon visible on your slides, you can hide it. Right-click on the audio icon, select “Hide During Show” or a similar option, depending on your PowerPoint version. This keeps the focus on your visuals while the music plays in the background.
Once you have made the necessary adjustments to the playback settings, preview your presentation to ensure that the music plays smoothly and is synchronized with your slides. Consider seeking feedback from colleagues or friends to verify that the music enhances the overall impact of your presentation.
By configuring the music playback options, you can create a seamless and immersive experience that elevates your PowerPoint presentation to new heights.
Step 6: Test and Fine-Tune Your Presentation with Music
Once you have integrated music into your PowerPoint presentation and configured the playback options, it’s crucial to test and fine-tune your presentation to ensure a flawless delivery. Follow these steps to make sure everything goes smoothly:
- Review Slide Transitions: Go through your presentation and pay close attention to the transitions between slides. Make sure that the music seamlessly flows from one slide to the next, enhancing the overall cohesiveness of your presentation.
- Check Timing: Time your presentation to ensure that the music aligns with the flow of your speech or narration. You want the music to complement your content without overpowering it. Adjust the timings if necessary to find the perfect balance.
- Test Across Devices: Play your presentation on different devices to ensure that the music plays correctly, regardless of the playback device or operating system. This includes testing it on desktop computers, laptops, tablets, and smartphones.
- Anticipate Technical Issues: Prepare for any potential technical difficulties that may arise during your presentation. Have a backup plan in case the music doesn’t play, the volume is too low, or any other unforeseen issues occur. This will help you tackle any hiccups confidently and keep your presentation running smoothly.
- Solicit Feedback: Share your presentation with colleagues, friends, or family members and gather feedback on the overall impact of the music. Ask for their honest opinions on whether the music enhances the message and engages the audience effectively. Use this feedback to make any necessary adjustments or fine-tuning.
- Practice, Practice, Practice: Rehearse your presentation multiple times with the music to ensure that you feel comfortable and confident with the timing, cues, and delivery. The more you practice, the smoother your presentation will be.
By testing and fine-tuning your presentation with music, you can identify and address any issues, ensuring that your audience has a seamless and engaging experience.
Conclusion
Congratulations, you have successfully learned how to download music and incorporate it into your PowerPoint presentations! By following the step-by-step process outlined in this guide, you can take your presentations to the next level, captivating your audience with the power of music.
Remember, choosing the right music that aligns with your presentation’s purpose, content, and audience is essential. By selecting suitable royalty-free music, you can avoid any legal issues while still creating an immersive and engaging experience.
Finding and downloading royalty-free music is made easy through various online libraries and archives. These platforms provide a wide range of music genres and styles, allowing you to find the perfect track that adds depth and enhances the overall atmosphere of your presentation.
Converting music files to compatible formats, inserting the music into your slides, and configuring the playback options are crucial steps in ensuring a seamless experience for your audience. Adjusting volume levels, trimming tracks, applying fades, and controlling timing give you full control over how the music integrates with your presentation.
Don’t forget to thoroughly test and fine-tune your presentation with the added music. Review slide transitions, verify timings, test across different devices, and anticipate any technical issues that may arise. Seeking feedback from others can help you gauge the impact of the music and make necessary adjustments before your final presentation.
With the right music and careful attention to detail, you have the power to create impactful and memorable PowerPoint presentations that leave a lasting impression on your audience. So go ahead, unleash your creativity, and let the magic of music elevate your next presentation to new heights!


