Introduction
With the advancements in technology, downloading and burning movies has become more accessible than ever before. Gone are the days of having to visit a video store or wait for a DVD to arrive in the mail. Now, you can easily download your favorite movies directly to your computer and even burn them onto a DVD for convenient offline viewing.
Downloading and burning movies not only allows you to have a personal collection of your favorite films, but it also gives you the freedom to watch them anytime, anywhere without relying on an internet connection. Whether you want to enjoy a movie on a long flight, share it with friends, or simply have a backup copy, downloading and burning movies is a simple and effective solution.
In this step-by-step guide, we will walk you through the process of downloading and burning movies, so you can build your movie library and enjoy your favorite titles whenever you want. We will cover everything from choosing a reliable download website to obtaining the necessary software and finally, burning the movie onto a DVD.
It is important to note that downloading and burning movies should only be done for personal use and with legal copies of the films. Engaging in unauthorized sharing or downloading copyrighted content is illegal and unethical. Always ensure that you have the necessary rights to download and burn a movie before proceeding.
Now, let’s dive into the exciting world of downloading and burning movies, so you can start building your own personal movie collection!
Step 1: Choose a Reliable Movie Download Website
The first step in the process of downloading and burning movies is to choose a reliable movie download website. With numerous websites available on the internet, it is essential to select a trustworthy platform to ensure the quality and legality of the movies you download.
Here are some factors to consider when choosing a movie download website:
- Reputation: Look for websites with a good reputation and positive user reviews. This indicates that the site is reliable and trustworthy.
- Selection: Ensure that the website offers a wide selection of movies in various genres. This will ensure that you have access to a diverse range of films.
- Legal Compliance: Verify that the website is legally authorized to distribute movies. Avoid websites that offer pirated or copyrighted content, as this is not only illegal but also supports unethical practices.
- User Interface: Evaluate the website’s user interface and ease of navigation. A well-designed website will make it easier for you to search and download movies efficiently.
- Subscription Options: Consider whether the website offers subscription plans or pay-per-download options. Assess the pricing and benefits of each plan to determine which best suits your needs.
Once you have narrowed down your options, take the time to read through the terms and conditions provided by the website. Ensure that you understand the website’s policies on downloading, copyright, and any limitations or restrictions on the movies you can access.
Remember, choosing a reliable movie download website is crucial to ensure a seamless and legal downloading experience. Doing your research and selecting a trustworthy source will help you avoid any potential issues down the line.
Now that you have chosen a reliable movie download website, it’s time to move on to the next step: selecting and downloading the movie of your choice.
Step 2: Select and Download the Movie
Now that you have chosen a reliable movie download website, it’s time to select and download the movie of your choice. Follow these steps to successfully download your desired movie:
- Search for the Movie: Use the search feature provided on the website to find the movie you wish to download. You can either search by the movie title or browse through different genres and categories.
- Check Available Formats: Once you have located the desired movie, check if it is available in the format you prefer. Most websites offer movies in different formats, such as MP4, MKV, or AVI. Choose the format that is compatible with your media player or preferred device.
- Review Movie Details: Before proceeding with the download, take a moment to review the movie details. Check the synopsis, genre, cast, and ratings to ensure it meets your preferences.
- Confirm Download Option: Some movie download websites provide multiple download options. Select the appropriate download option based on your preference and internet connection speed. If you have a fast and stable internet connection, you can opt for a higher-quality download option for a better viewing experience.
- Start the Download: Click on the download button or link provided on the website to initiate the download process. Depending on the movie’s file size and your internet speed, the download may take a few minutes to complete.
- Track Download Progress: Monitor the download progress to ensure it is successfully completing without any interruptions. Some websites provide a download manager or progress bar to track the status of your download.
- Save the Movie File: After the download is complete, you will have the movie file saved on your computer. Choose a location on your hard drive where you want the file to be stored, and make a note of the file’s location for future reference.
Once you have successfully downloaded the movie, you can proceed to the next step of the process. In the following step, we will discuss how to locate the downloaded movie file on your computer.
Step 3: Locate the Downloaded Movie File on Your Computer
After you have downloaded the movie file onto your computer, it’s important to be able to locate it. Here are the steps to find the downloaded movie file:
- Open your File Explorer or Finder: Depending on whether you are using a Windows PC or a Mac, open the corresponding file management program. You can usually find the File Explorer icon on your taskbar or by searching for “File Explorer” in the Start menu. On a Mac, the Finder is located in the dock or can be accessed from the Applications folder.
- Navigate to the Download Folder: In the File Explorer or Finder window, locate and click on the “Downloads” folder on the left-hand side of the window. This is the default location where most browsers save downloaded files.
- Sort the Files: Once you are inside the Downloads folder, you may see multiple files. To quickly locate the downloaded movie file, sort the files by date modified. Click on the “Date Modified” column header to sort the files in descending order, with the most recent files appearing at the top.
- Look for the Movie File: Scan through the list of files in the Downloads folder and look for the movie file you just downloaded. The movie file may have a recognizable title or be in a format such as MP4, MKV, or AVI.
- Move or Rename the File (Optional): If you wish to organize your movie files in a different folder or rename the file for easier identification, you can do so by right-clicking on the file and selecting “Cut” or “Copy.” Then, navigate to the desired location or folder, right-click, and select “Paste” to move or copy the file. To rename the file, right-click on it, select “Rename,” and type in the desired name.
Once you have located the downloaded movie file and, if necessary, moved or renamed it, you are ready to proceed to the next step. In the next step, we will discuss obtaining a blank DVD and DVD burning software to prepare for the burning process.
Step 4: Obtain Blank DVD and DVD Burning Software
Now that you have successfully downloaded the movie and located the file on your computer, it’s time to prepare for the burning process. Follow these steps to obtain a blank DVD and DVD burning software:
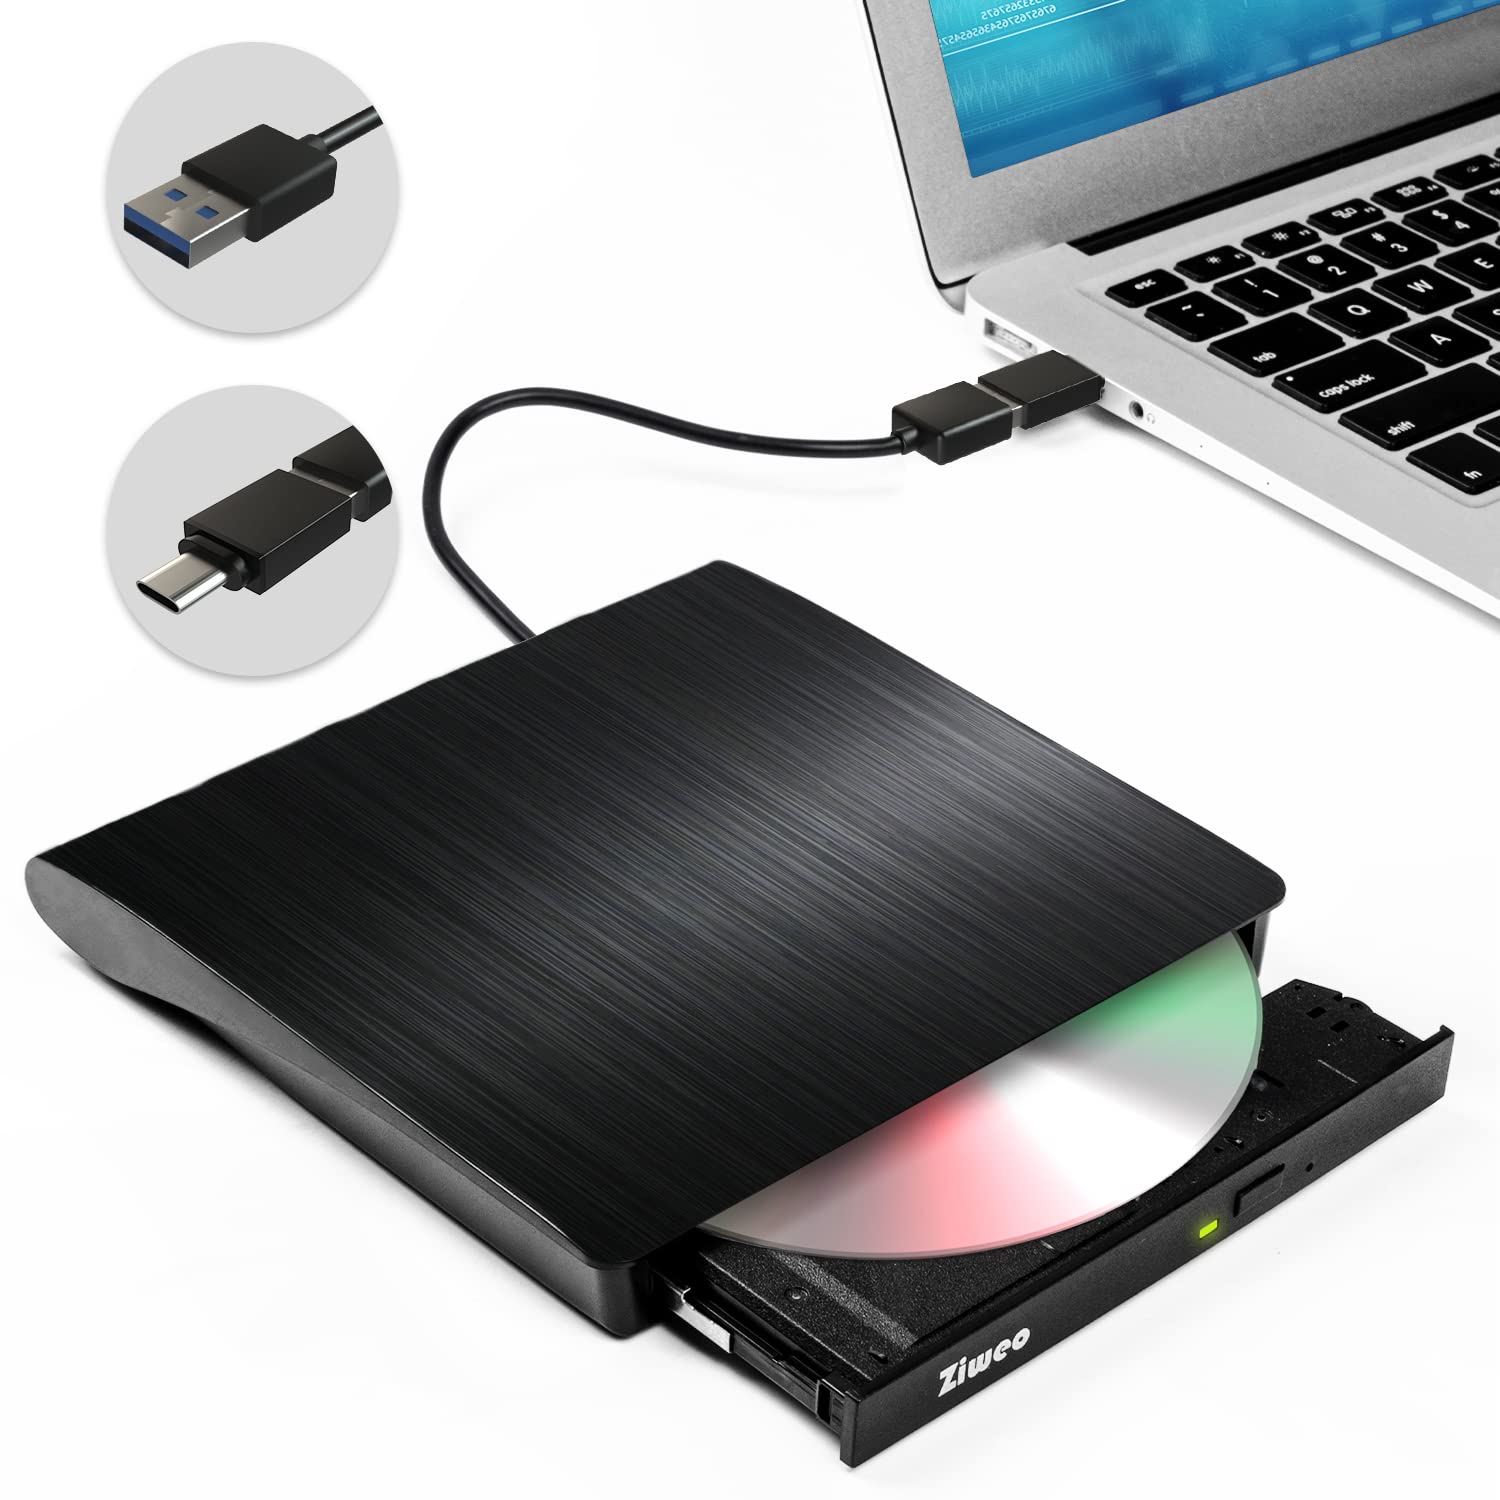
- Check DVD Compatibility: Before proceeding, ensure that your computer’s DVD burner is compatible with the blank DVD you plan to use. Check the disc format requirements (e.g., DVD-R, DVD+R, DVD-RW, DVD+RW) and ensure that your DVD burner supports that format.
- Purchase Blank DVDs: Visit a local electronics store or an online retailer to purchase a stack of blank DVDs. Choose a reputable brand and make sure the DVDs are compatible with your DVD burner. For best results, opt for DVD-R discs, as they tend to have higher compatibility with different DVD players.
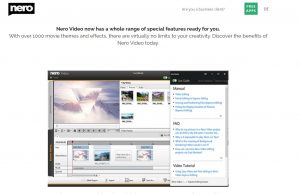
- Obtain DVD Burning Software: DVD burning software is required to transfer the downloaded movie file onto the blank DVD. There are various options available, both free and paid. Research different options and choose a software that is compatible with your operating system and offers the features you need, such as DVD menu creation and burning speed control.
- Download and Install the Software: Once you have selected a DVD burning software, navigate to the developer’s website or a reputable software download platform, and download the installation file. Follow the prompts to install the software onto your computer.
- Activate or Register the Software (if necessary): Some DVD burning software may require activation or registration to unlock all features and remove any limitations on burning time or output quality. Follow the instructions provided by the software developer to activate the software or enter a valid license key, if necessary.
By obtaining a blank DVD and DVD burning software, you have taken the necessary steps to prepare for the burning process. In the next step, we will discuss how to install and open the DVD burning software on your computer.
Step 5: Install and Open the DVD Burning Software
Now that you have obtained the necessary DVD burning software, it’s time to install it on your computer and open it to begin the DVD burning process. Follow these steps to install and open the DVD burning software:
- Locate the Installation File: Depending on where you downloaded the DVD burning software, locate the installation file on your computer. It is usually in the Downloads folder or the location you specified during the download process.
- Run the Installation File: Double-click on the installation file to run the DVD burning software’s setup program. Follow the on-screen prompts to begin the installation process.
- Accept the License Agreement: Read the license agreement provided by the software developer and click “Agree” or “Accept” to proceed with the installation. Make sure to review any additional options or customizations available during the installation process.
- Choose the Installation Location: If given the option, select the desired location or folder where you want to install the DVD burning software. The default location is usually fine, but you can choose a different location if preferred.
- Complete the Installation: After selecting the installation location, click “Install” or “Finish” to complete the installation process. Depending on the software, it may take a few moments to install all the necessary files and components.
- Launch the DVD Burning Software: Once the installation is complete, locate the DVD burning software on your computer. It is usually accessible from the Start menu, desktop shortcut, or in the Programs/Applications folder.
- Open the DVD Burning Software: Double-click on the software’s icon or name to open it. The software’s interface should appear on your screen, ready for you to proceed with the DVD burning process.
Now that you have installed and opened the DVD burning software, you are ready to move on to the next step of the process. In the following step, we will discuss how to load the downloaded movie file into the DVD burning software.
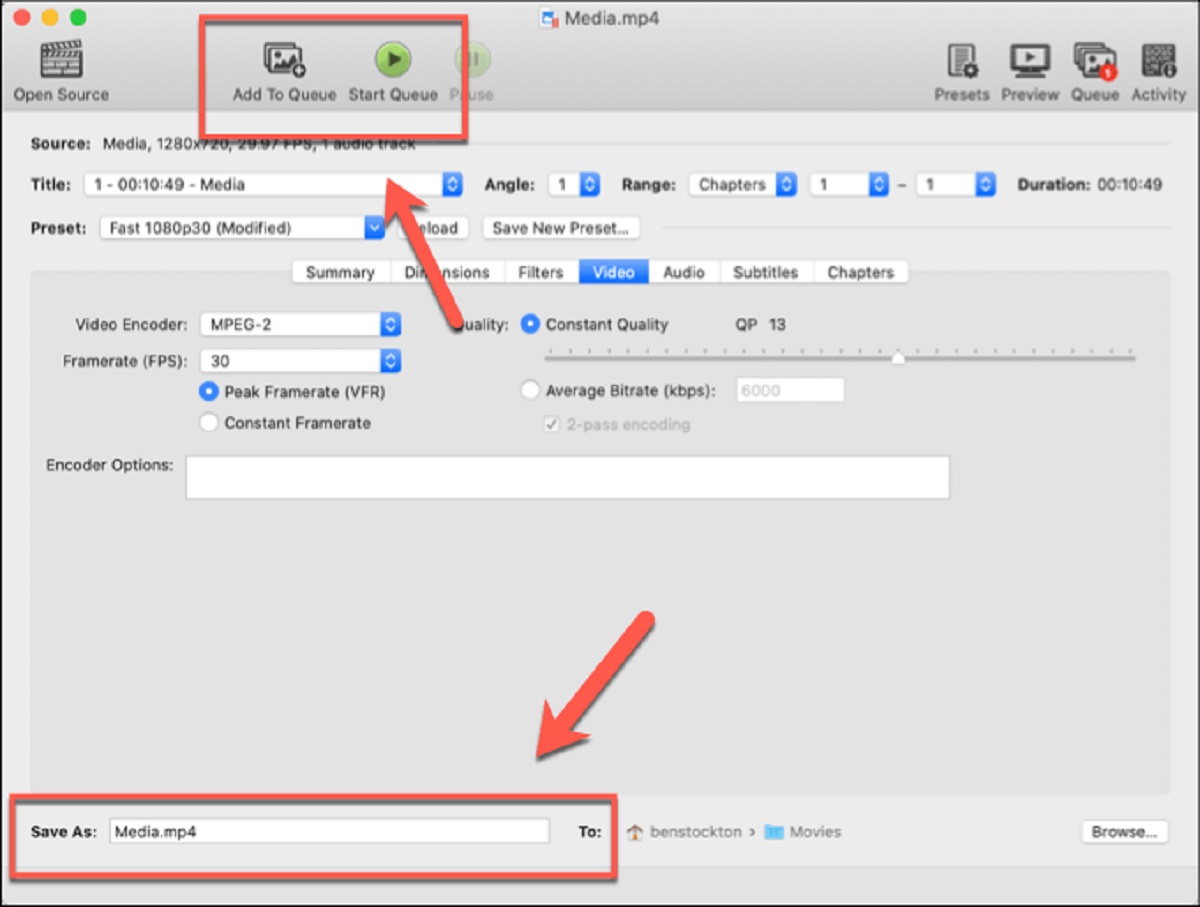
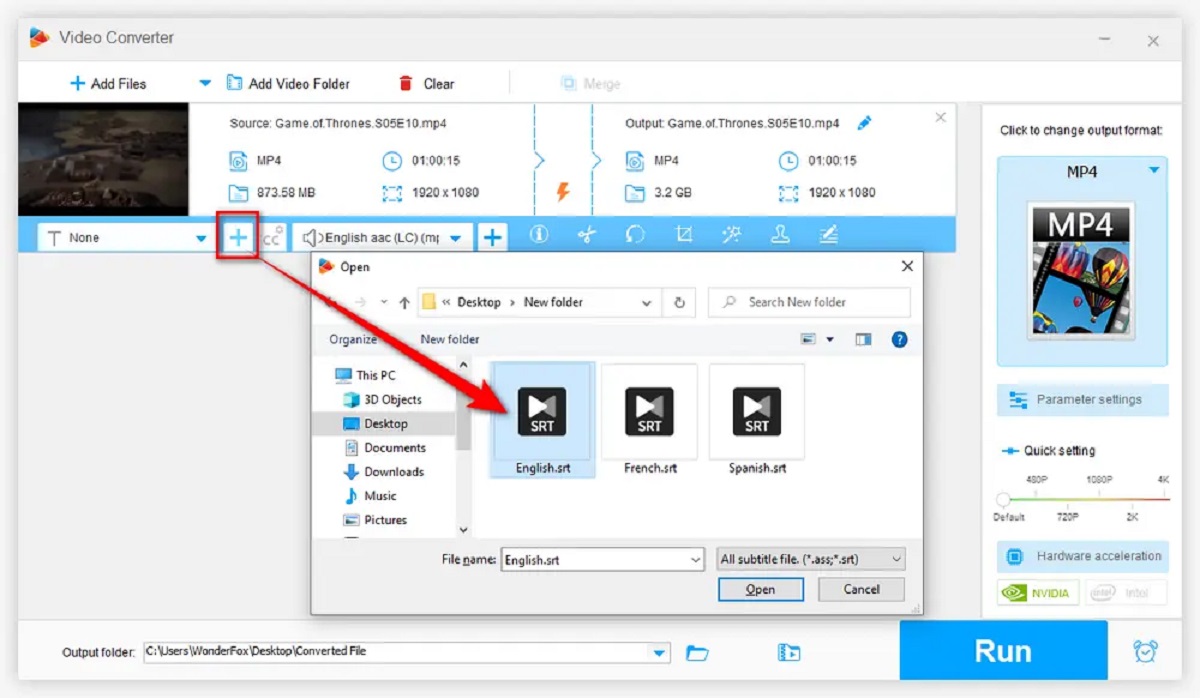
Step 6: Load the Downloaded Movie File into the DVD Burning Software
With the DVD burning software open and ready, it’s time to load the downloaded movie file into the software. This step is crucial as it allows the software to recognize and prepare the movie for the burning process. Follow these steps to load the downloaded movie into the DVD burning software:
- Click on the “Add” or “Import” Button: Look for an “Add” or “Import” button in the DVD burning software’s interface. This button is usually located at the top menu or toolbar. Click on it to open the file selection window.
- Select the Downloaded Movie File: In the file selection window, navigate to the location where you saved the downloaded movie file. Click on the file to select it, and then click “Open” or “OK” to confirm the selection.
- Verify the Movie Details: Once you have loaded the movie file into the DVD burning software, review the details displayed. These details typically include the movie’s title, format, length, and file size. Ensure that the information aligns with the movie you intended to burn.
- Optional: Edit the Movie if Desired: Some DVD burning software provides basic editing features, allowing you to trim or cut specific parts of the movie, adjust the audio and video settings, add subtitles, or apply special effects. If you wish to make any edits to the movie before burning, explore the software’s editing capabilities.
- Repeat for Additional Movies (Optional): If you want to burn multiple movies onto the DVD, repeat the process of loading the downloaded movie file for each additional movie. Most DVD burning software allows you to add multiple files to create a compilation or DVD menu.
By loading the downloaded movie file into the DVD burning software, you are ready to move on to the next step. In the following step, we will discuss how to customize the DVD settings and menu (optional) before starting the burning process.
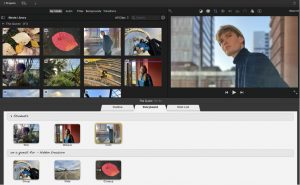
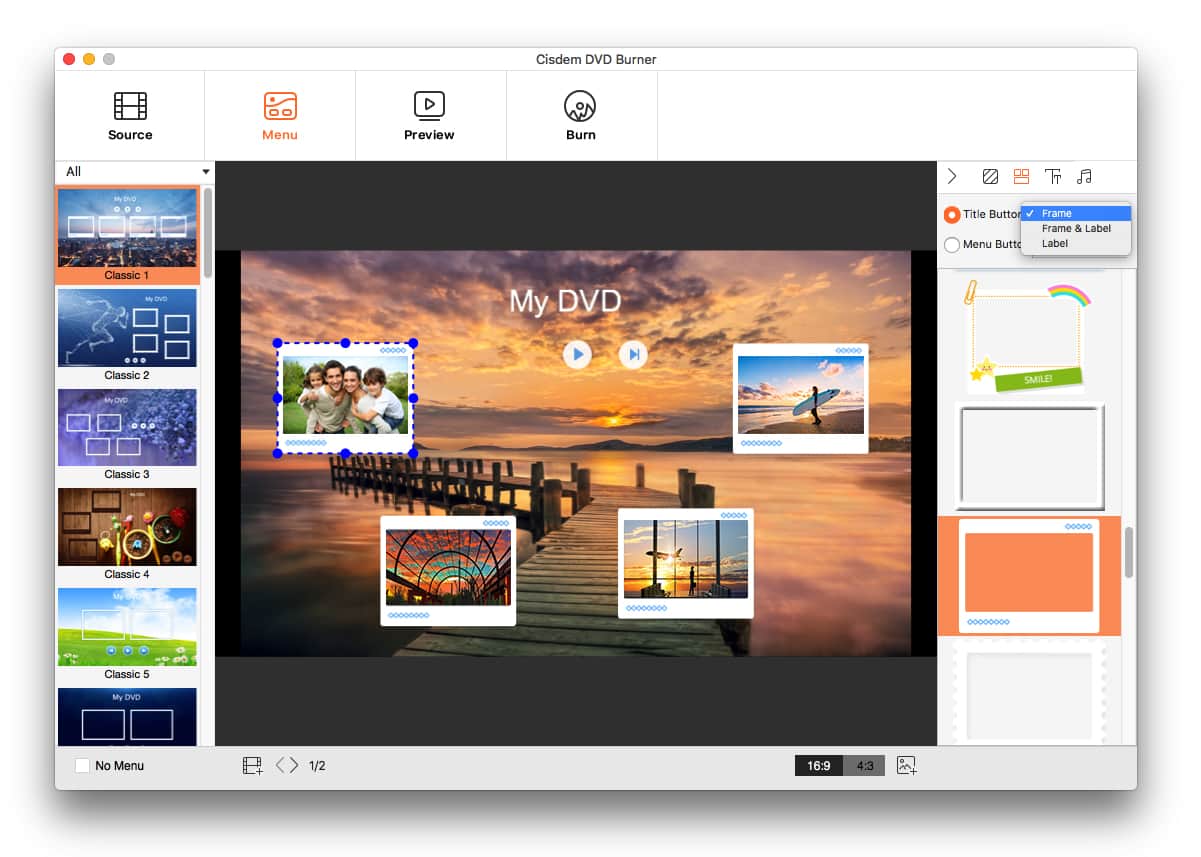
Step 7: Customize the DVD Settings and Menu (Optional)
Before starting the DVD burning process, you have the option to customize the settings and menu of the DVD. Customization allows you to add a personal touch and enhance the viewing experience. Follow these steps to customize the DVD settings and menu (if desired):
- Explore the Software’s Customization Options: Look for a “Settings” or “Customize” tab in the DVD burning software’s interface. This tab contains various options to customize the DVD’s settings and menu. Click on it to access the customization features.
- Choose a DVD Menu Template: Most DVD burning software offers pre-designed menu templates that you can select and customize. Browse through the available templates and choose one that suits the theme or genre of the movie. Some software also allows you to create custom menu designs.
- Add Background Images or Music (Optional): If desired, you can personalize the DVD menu further by adding background images or music. Some DVD burning software provides the option to import your own images or select from a library of built-in background images. Similarly, you can add background music or select from available tracks.
- Set DVD Title and Chapter Menus: For multi-movie DVDs or DVDs with chapters, you can create title and chapter menus to navigate easily between different movies or sections of a movie. Follow the software’s instructions to set up these menus and assign titles or chapter markers.
- Customize Text and Button Styles: Customize the text styles, font, color, and position of the menu buttons and titles. Ensure that the text is clear and legible for easy navigation. You can also add additional text layers, such as movie descriptions or cast information, if desired.
- Preview and Adjust Customizations: After making the desired customizations, take a moment to preview the DVD menu. Use the software’s preview feature to simulate how the menu will look and function on a DVD player. Make any necessary adjustments to ensure a seamless and visually appealing menu.
- Save Customizations: Once you are satisfied with the customizations, save the changes. Depending on the software, you may have the option to save the customization settings as a template for future use.
Customizing the DVD settings and menu is optional, but it can add a personal touch to your DVD and enhance the overall viewing experience. Take your time to explore the customization options available in your DVD burning software and create a DVD that reflects your style and preferences.
Now that you have customized the DVD settings and menu (if desired), it’s time to move on to the final step: starting the DVD burning process.
Step 8: Start the DVD Burning Process
After selecting the movie, loading it into the DVD burning software, and customizing the DVD settings and menu, you are now ready to proceed with the DVD burning process. Follow these steps to start the DVD burning process:
- Insert a Blank DVD: Insert a blank DVD into your computer’s DVD burner. Make sure to insert it properly, with the label side facing up.
- Check the Disc Capacity: Before burning the DVD, ensure that the size of the movie(s) and any additional content, such as menu or chapters, does not exceed the capacity of the blank DVD. Most DVDs have a capacity of 4.7GB or 8.5GB.
- Verify the DVD Settings: Double-check that the DVD settings, such as the burning speed and format, are properly configured according to your preferences in the DVD burning software.
- Select the Burning Destination: If you have multiple DVD burners connected to your computer, select the appropriate burning destination or drive in the DVD burning software. This step is necessary if you have multiple DVD drives installed or connected to your computer.
- Click “Burn” or “Start”: Once you have verified the settings and inserted the blank DVD, click on the “Burn” or “Start” button in the DVD burning software. The burning process will begin, and a progress bar or status indicator will show the burning progress.
- Wait for the Burning Process to Complete: Allow the DVD burning software to complete the burning process. This may take some time, depending on the size of the movie and the speed of your DVD burner. Avoid interrupting or using the computer for other tasks during the burning process to ensure a successful burn.
- Eject the Burned DVD: Once the burning process is complete, the software will notify you. Eject the burned DVD from your computer’s DVD burner, and if desired, label the DVD with the movie title or any other relevant information.
- Test the Burned DVD: To ensure that the DVD was burned successfully and the movie plays properly, insert the burned DVD into a DVD player or computer DVD drive. Check for any playback issues and verify that the movie and menu function as intended.
Congratulations! You have successfully completed the DVD burning process. Now you can enjoy your favorite movie on any standard DVD player or share it with friends and family.
Remember to store the burned DVD in a safe and dry place to prevent scratches or damage, as this may affect its playback quality. Additionally, make sure to comply with copyright laws and only burn movies that you have legal rights to.
Conclusion
Congratulations! You have successfully learned the step-by-step process of downloading and burning movies. By following these guidelines, you can now create your own personal movie collection and enjoy your favorite films offline on any standard DVD player.
We began by emphasizing the importance of choosing a reliable movie download website, ensuring that it offers legal and high-quality movie downloads. We also explored how to select and download movies, locate the downloaded files on your computer, and obtain the necessary blank DVDs and DVD burning software.
After obtaining the required materials, we delved into installing and opening the DVD burning software, as well as customizing the DVD settings and menu to add a personal touch. Finally, we covered how to start the DVD burning process and test the burned DVD on a player to verify its successful creation.
Remember to always respect copyright laws and only download and burn movies for personal use or with authorized copies. Engaging in unauthorized sharing or downloading copyrighted content is illegal and unethical.
Now that you have mastered the art of downloading and burning movies, take some time to enjoy your newly created DVD collection. Whether it’s a movie marathon with friends, a cozy night in with loved ones, or a thoughtful gift for someone special, your DVD collection will bring hours of entertainment and joy.
Thank you for following this guide, and happy movie watching!