Introduction
Are you a Windows user who has always been curious about the Mac operating system? Do you want to experience the seamless performance and user-friendly interface of macOS? Well, you’re in luck! In this article, we will guide you through the steps to download and install Mac OS on your Windows computer.
While macOS is designed to run exclusively on Apple hardware, there are ways to create a virtual machine that emulates a Mac environment on a Windows PC. By setting up a virtual machine, you can enjoy all the benefits of macOS without needing to invest in a separate Mac computer.
Before we jump into the process, it’s important to note that installing macOS on a Windows computer involves technical steps that may require some prior knowledge of computer systems. Additionally, you will need a high-performance computer with sufficient hardware specifications to ensure a smooth virtualization experience.
In the following sections, we will outline the system requirements and provide a comprehensive step-by-step guide on how to download and install macOS on your Windows PC using a virtual machine. We will walk you through the process from creating the virtual machine to setting up macOS, allowing you to experience the best of both worlds on your Windows computer.
So, if you’re ready to embark on this Mac adventure, grab a cup of coffee and let’s dive in!
System Requirements
Before you begin the process of downloading and installing macOS on your Windows computer, it’s crucial to ensure that your system meets the necessary requirements. Running a virtual machine can be resource-intensive, so having a capable computer is essential for a smooth experience.
Here are the minimum system requirements for running macOS on a Windows PC:
- Processor: An Intel Core i5, i7, or i9 processor with at least four cores is recommended for optimal performance.
- RAM: You should have a minimum of 8GB of RAM, although 16GB or more is highly recommended for smoother virtualization.
- Storage Space: Ensure that you have at least 50GB of free disk space on your hard drive or solid-state drive (SSD) to accommodate the macOS installation and files.
- Graphics Card: A dedicated graphics card with at least 2GB of VRAM is preferable for better graphics performance.
- Virtualization Technology: Check if your computer’s BIOS supports and has virtualization technology enabled. This feature is essential for running a virtual machine.
In addition to these hardware requirements, you will also need to download a virtual machine software that supports macOS. Popular options include Oracle VM VirtualBox, VMWare Workstation Player, and Parallels Desktop.
It’s important to note that these system requirements are merely the minimum specifications. If you want a smoother and more seamless experience, it’s recommended to exceed these requirements where possible.
Now that you are aware of the system requirements, you can proceed confidently with the next steps to create a macOS virtual machine on your Windows computer.
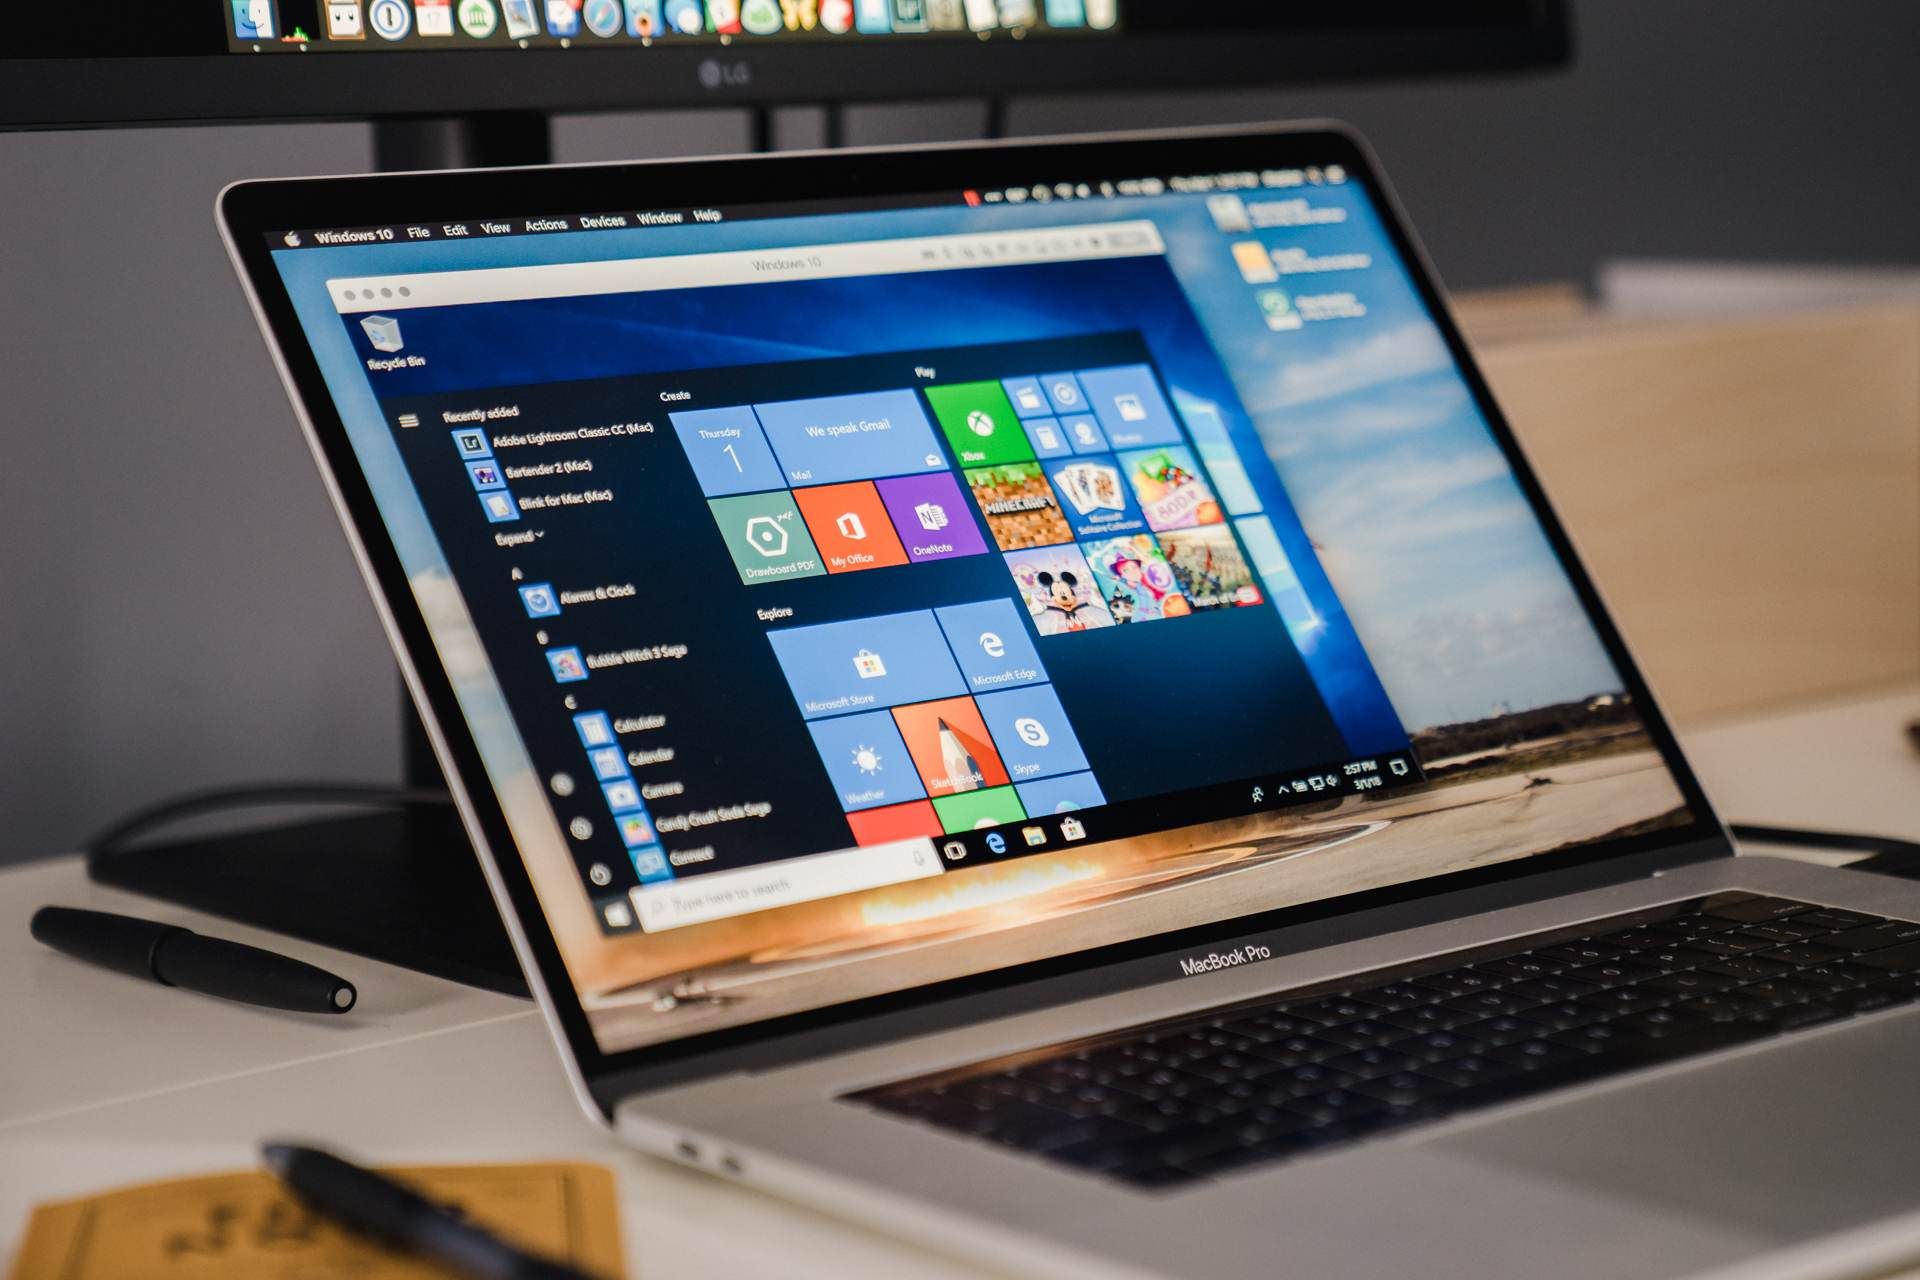
Step 1: Create a macOS Virtual Machine
To begin the process of downloading and installing macOS on your Windows computer, you first need to create a virtual machine. A virtual machine allows you to run an operating system within another operating system, effectively emulating the Mac environment on your Windows PC.
Follow these steps to create a macOS virtual machine:
- Choose a Virtual Machine Software: Select a virtual machine software that is compatible with macOS, such as Oracle VM VirtualBox or VMWare Workstation Player. Visit the respective website and download the software for your Windows operating system.
- Install the Virtual Machine Software: Open the downloaded installer file and follow the on-screen instructions to install the virtual machine software on your Windows computer.
- Create a New Virtual Machine: Once the software is installed, launch it. Click on the ‘New’ or ‘Create’ button to create a new virtual machine.
- Select the macOS Version: In the virtual machine creation wizard, you will be prompted to select the operating system type and version. Choose ‘macOS’ as the operating system and select the appropriate macOS version you want to install.
- Allocate Memory: Set the amount of memory (RAM) that you want to allocate to the virtual machine. It is recommended to allocate at least 4GB or more for optimal performance.
- Create a Virtual Hard Drive: Create a new virtual hard drive to store the macOS installation files and the operating system itself. Allocate sufficient storage space, preferably around 50GB or more.
- Configure Virtual Machine Settings: Customize additional settings like CPU allocation, graphics memory, network settings, and other preferences as per your requirements.
- Create the Virtual Machine: Review the configuration settings and click on the ‘Create’ or ‘Finish’ button to create the macOS virtual machine.
Once the virtual machine is created, you are ready to proceed to the next step: downloading the macOS ISO file.
Step 2: Download macOS ISO
After creating the macOS virtual machine, the next step is to obtain the macOS ISO file. The ISO file contains the installation media for macOS, allowing you to install the operating system on the virtual machine.
Here’s how you can download the macOS ISO:
- Make Sure You Have a Mac App Store Account: To download the macOS ISO file legally, you need to have a valid Apple ID and access to the Mac App Store. If you don’t have an Apple ID, create one by visiting the Apple website.
- Open the Mac App Store: Launch the Mac App Store on your Mac computer or use the App Store application on your iOS device.
- Search for macOS: In the search bar, enter the name of the macOS version you wish to download. For example, if you want to download macOS Mojave, search for “macOS Mojave”.
- Click on the Download Button: Locate the macOS version you want, and click on the download button to start the download process. Please note that downloading the macOS ISO file requires a stable internet connection and may take some time depending on your internet speed.
- Wait for the Download to Complete: Once the download is finished, the macOS ISO file will be available in the ‘Applications’ folder on your Mac computer.
- Transfer the ISO File: Transfer the downloaded ISO file to your Windows computer. You can use external storage devices, cloud storage services, or a shared network folder to transfer the file.
It’s important to ensure that you download the correct macOS version that is compatible with the virtual machine software you are using. Compatibility issues may arise if you use an incompatible ISO file with the virtual machine.
With the macOS ISO file ready, you can proceed to the next step: installing a virtual machine software on your Windows computer.
Step 3: Install a Virtual Machine Software
Now that you have downloaded the macOS ISO file, the next step is to install a virtual machine software on your Windows computer. This software will allow you to create a virtual environment where you can run macOS.
Follow these steps to install a virtual machine software:
- Select a Virtual Machine Software: Choose a virtual machine software that is compatible with macOS, such as Oracle VM VirtualBox, VMWare Workstation Player, or Parallels Desktop. Visit the official website of your chosen software and download the installer for your Windows operating system.
- Run the Installer: Locate the downloaded installer file and double-click on it to run the installation process. Follow the on-screen instructions to proceed.
- Accept the License Agreement: Read and accept the license agreement presented during the installation process.
- Customize the Installation: Depending on the virtual machine software you choose, you may have the option to customize the installation by selecting additional features or configuring certain settings. Make your selections based on your preferences.
- Complete the Installation: Once you have customized the installation (if applicable), click on the ‘Install’ or ‘Finish’ button to start the installation process. The software will be installed on your Windows computer.
After the installation is complete, you will have the virtual machine software ready to create and run the macOS virtual machine.
It’s important to note that each virtual machine software may have its own unique installation process. Therefore, it is recommended to refer to the official documentation provided by the software developer for specific instructions on how to install the virtual machine software.
With the virtual machine software installed, you can proceed to the next step: configuring the virtual machine for macOS installation.
Step 4: Configure the Virtual Machine
After installing the virtual machine software on your Windows computer, the next step is to configure the virtual machine for macOS installation. This involves adjusting various settings to ensure optimal performance and compatibility with macOS.
Follow these steps to configure the virtual machine:
- Open the Virtual Machine Software: Launch the virtual machine software that you installed in the previous step.
- Create a New Virtual Machine: Click on the ‘New,’ ‘Create,’ or ‘Add’ button to start the process of creating a new virtual machine.
- Specify the Guest Operating System: In the virtual machine creation wizard, choose ‘macOS’ as the guest operating system. Select the appropriate macOS version from the provided options.
- Allocate System Resources: Allocate adequate resources to the virtual machine, such as memory (RAM) and CPU cores. It is recommended to assign at least 4GB of RAM to ensure smooth performance.
- Configure Storage: Create a virtual hard disk for the macOS installation. Specify the size, file format, and location for the virtual hard disk. It is recommended to allocate sufficient storage space, around 50GB or more, for the macOS installation and future updates.
- Adjust Display Settings: Configure the display settings of the virtual machine, including screen resolution, graphics memory, and accelerated graphics. Select the options that best match your computer’s capabilities.
- Customize Network Settings: Configure the network settings of the virtual machine to establish internet connectivity. Choose between NAT (Network Address Translation) or Bridged networking, depending on your requirements.
- Save and Apply Changes: Review the configuration settings you have made and click on the ‘Apply’ or ‘Finish’ button to save the changes and exit the configuration menu.
These steps may vary slightly depending on the virtual machine software you are using. It is advisable to refer to the official documentation or user guide provided by the software developer for detailed instructions on configuring the virtual machine.
With the virtual machine configured, you are now ready to move on to the next step: installing macOS on the virtual machine.
Step 5: Install macOS on the Virtual Machine
With the virtual machine configured, it’s time to proceed with the installation of macOS on the virtual machine. This step involves booting up the virtual machine with the macOS ISO file and performing the installation process.
Follow these steps to install macOS on the virtual machine:
- Start the Virtual Machine: Open the virtual machine software and select the newly created virtual machine from the list.
- Mount the macOS ISO: In the virtual machine settings or toolbar, find the option to mount the macOS ISO file. Locate the ISO file you downloaded in the previous steps and select it.
- Boot macOS: Start the virtual machine, and it should boot from the mounted macOS ISO file. Follow the on-screen instructions to begin the macOS installation process.
- Choose Language and Region: Select your preferred language and region settings for macOS.
- Format the Disk: In the macOS setup screen, open the Disk Utility application, and format the virtual hard disk created for the virtual machine. Create a new APFS or Mac OS Extended (Journaled) partition.
- Select the Installation Destination: Choose the formatted virtual hard disk as the installation destination for macOS.
- Begin the Installation: Start the macOS installation process and wait for it to complete. This may take some time.
- Set Up User Account: Follow the prompts to set up your user account, including creating a username and password for your macOS environment.
- Complete the Installation: Once the installation is finished, you will be taken to the macOS desktop within the virtual machine.
During the installation process, you may encounter additional prompts or customization options, depending on the version of macOS you are installing.
Remember to carefully read and follow the instructions provided on-screen to ensure a successful installation of macOS on the virtual machine.
With macOS installed on the virtual machine, you can now move on to the next step: setting up macOS and configuring it to your preferences.
Step 6: Set Up macOS on the Virtual Machine
After successfully installing macOS on the virtual machine, the next step is to set up the operating system within the virtual environment. This involves configuring system preferences, account settings, and installing necessary software to make your macOS experience complete.
Follow these steps to set up macOS on the virtual machine:
- Complete the Initial Setup: After the installation process, macOS will guide you through the initial setup process. This includes selecting your country or region, setting up a Wi-Fi connection, and agreeing to the terms and conditions.
- Sign in with your Apple ID: If you have an Apple ID, you can sign in to it to access your iCloud storage, App Store purchases, and other Apple services. Alternatively, you can skip this step and create a new Apple ID later.
- Configure System Preferences: Access the System Preferences panel by clicking on the Apple menu icon and selecting “System Preferences.” Customize settings such as display resolution, date and time, sound, network preferences, and more.
- Install Essential Software: Install any necessary software or applications that you require for a seamless macOS experience. This includes productivity tools, media players, web browsers, and any other software you deem necessary.
- Customize the Dock: The Dock is a convenient shortcut bar located at the bottom or side of the screen. Drag and drop frequently used applications onto the Dock for quick access.
- Transfer Data (if applicable): If you have data that you want to transfer from your Windows computer to the macOS virtual machine, you can use migration tools or copy it manually from shared folders or connected storage devices.
- Set Up User Accounts: Create additional user accounts, if needed, to allow multiple users to access the macOS virtual machine. This can be done through the System Preferences panel.
- Install Updates: It is essential to keep your macOS virtual machine up to date with the latest software updates and security patches. Use the Software Update feature in the System Preferences panel to install any available updates.
By following these steps, you will be able to set up macOS on the virtual machine to your desired preferences. Feel free to explore the various features and functionalities of macOS, just like you would on a physical Mac computer.
Remember, while using macOS on a virtual machine provides the experience of a Mac environment, it may not offer the same level of performance and hardware integration as running macOS on native Apple hardware.
With the completion of the setup process, you are all set to enjoy using macOS on your Windows computer. Embrace the Mac experience within the virtual environment and make the most of its features and capabilities!
Conclusion
Congratulations! You have successfully learned how to download and install macOS on your Windows computer through a virtual machine. By following the step-by-step guide outlined in this article, you can now experience the seamless performance and user-friendly interface of macOS without the need for a separate Mac computer.
We began by discussing the system requirements, ensuring that your Windows computer meets the necessary specifications for running a virtual machine. We then walked through the process of creating a macOS virtual machine, downloading the macOS ISO file, installing a virtual machine software, configuring the virtual machine, and finally, installing and setting up macOS within the virtual environment.
It’s important to note that running macOS on a virtual machine may have some limitations compared to using a physical Mac. Performance may vary depending on your computer’s hardware capabilities, and not all features or functions may be available. However, this method provides a great alternative for Windows users who want to explore macOS and its capabilities.
Remember to always refer to official documentation or user guides provided by the virtual machine software developer for detailed instructions specific to the software you choose.
Now that you have successfully set up macOS, take some time to explore the features, install your favorite software, and customize the virtual environment to your preferences. Enjoy the best of both worlds, with macOS running on your Windows computer!
Thank you for reading this guide, and we hope you found it helpful. If you have any questions or need further assistance, feel free to reach out.