Introduction
Welcome to the world of Kami, the ultimate digital classroom tool that allows you to annotate, collaborate, and share documents seamlessly. With Kami, you can elevate your learning experience and take your productivity to new heights. Whether you’re a student, teacher, or professional, Kami offers a wide range of features that make it an indispensable tool for anyone using a Mac.
Downloading Kami on your Mac is a straightforward process that will open up a myriad of possibilities for your work or studies. In this article, we will walk you through the steps to download Kami on your Mac and get you started on your digital journey.
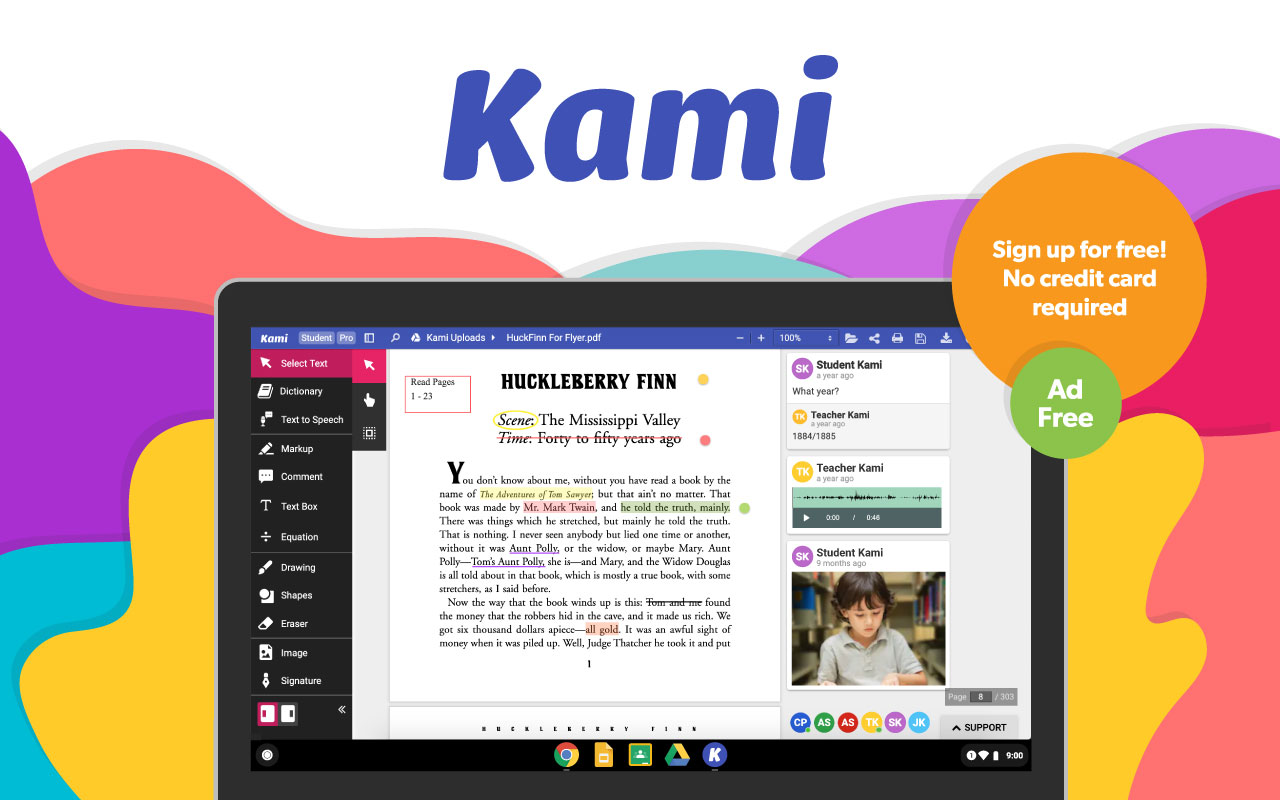
With Kami, you’ll be able to annotate PDFs, documents, and images effortlessly. You can highlight, underline, strikethrough, and add text directly to your files. Collaborating with others is a breeze, as Kami allows real-time commenting, drawing, and editing. The best part is that everything is saved automatically, so you can always pick up where you left off.
So, let’s dive into the steps to download Kami on your Mac and unlock a world of possibilities!
Step 1: Go to the Kami website
The first step to download Kami on your Mac is to visit the official Kami website. Open up your preferred web browser on your Mac and type in “www.kamiapp.com” in the address bar. Hit Enter and you will be directed to the Kami homepage.
Once you land on the Kami website, take a moment to familiarize yourself with the user-friendly interface. You’ll notice that Kami offers various solutions for different user types, such as K-12 schools, higher education institutions, and individual users. Take your time to explore the different features and options that Kami has to offer.
Whether you’re a teacher looking to enhance your classroom experience or a student wanting to improve your digital note-taking, Kami has something for everyone. Along with the ability to annotate and collaborate on documents, Kami also offers a range of useful tools such as text-to-speech, screen capture, and equation editor.
Once you’ve had a chance to explore the website and understand the features that Kami provides, it’s time to move on to the next step: downloading the Kami app on your Mac.
Step 2: Click on the “Download” button
After you have arrived at the Kami website, it’s time to download the Kami app onto your Mac. Look for the prominent “Download” button on the homepage or navigate to the dedicated “Download” page.
Once you locate the “Download” button, give it a single click with your mouse or trackpad. This action will initiate the Kami app download process and prompt a dialogue box to appear on your screen.
In the dialogue box, you may be asked to confirm the download by clicking on a “Download” or “Save File” button, depending on your web browser. The exact wording and appearance may vary slightly, but the purpose remains the same—to start the Kami app download process.
As the Kami app file is being downloaded, you will see a progress indicator that shows the status of the download. This may only take a few seconds if you have a stable internet connection. Once the download is complete, the file will automatically save to your designated “Downloads” folder on your Mac.
It’s worth noting that if you encounter any issues during the download process, ensure that your internet connection is stable and try refreshing the page and clicking the “Download” button again. If the problem persists, you may need to troubleshoot your browser settings or seek assistance from the Kami support team.
With the Kami app successfully downloaded to your Mac, it’s time to move on to the next step, which involves installing the app onto your device.
Step 3: Install the Kami app
Now that you have downloaded the Kami app file onto your Mac, it’s time to proceed with the installation process. Follow the steps below to install the Kami app:
- Navigate to your “Downloads” folder on your Mac. You can either click on the folder icon in the dock or access it through the Finder.
- Locate the Kami app file that you downloaded. It will typically have a name like “Kami.dmg” or “KamiInstaller.pkg”.
- Double-click on the Kami app file to begin the installation process.
- A security prompt may appear, asking you if you want to open the file. Click “Open” to proceed.
- The Kami installer window will open. Follow the prompts and instructions provided to install the app. This may involve agreeing to the terms and conditions, selecting the desired installation location, and entering your administrator password.
- Once you have completed the installation process, you will receive a notification confirming that Kami has been successfully installed on your Mac.
After the installation is complete, you can close the installer window and proceed to the next step of opening the Kami app on your Mac. It’s important to note that the installation process may vary slightly depending on the version of macOS you are using. If you encounter any issues during the installation, refer to the Kami website for troubleshooting steps or contact their support team for assistance.
Now that you have Kami installed on your Mac, you’re one step closer to harnessing its powerful features. In the next step, we will guide you on how to open the Kami app on your Mac and get started with your digital annotations and collaborations.
Step 4: Open Kami on your Mac
With Kami successfully installed on your Mac, it’s time to open the app and begin your digital journey. Follow the steps below to open Kami:
- Locate the Kami app icon on your Mac. It may be in your Applications folder or on your desktop, depending on your preferences and how you chose to install it.
- Double-click on the Kami app icon to launch the application. You will see the Kami logo appear, indicating that the app is starting up.
- Once Kami has launched, a login page will appear. If you already have a Kami account, you can sign in using your registered email address and password. If you are new to Kami, you can click on the “Sign Up” button to create a new account.
- If you choose to sign up for a new account, you will be guided through the registration process. Provide the necessary information, such as your name, email address, and desired password. Follow the prompts to complete the sign-up process.
- After signing in or creating a new account, Kami will load your dashboard. This dashboard is your central hub for accessing your documents, managing your annotations, and collaborating with others.
Once you have successfully opened Kami on your Mac, you are ready to explore the wide range of features and functionalities that Kami offers. Take some time to familiarize yourself with the app’s interface and menu options. You can navigate through your documents, create new annotations, and access the various tools available to customize your annotations and collaborations.
It’s important to note that Kami also provides browser extensions for popular web browsers like Chrome, Firefox, and Safari. These extensions allow you to seamlessly integrate Kami’s features into your web browsing experience. If you prefer using Kami directly within your browser, you can install the appropriate browser extension from the Kami website.
Now, you’re all set to unleash the power of Kami on your Mac. In the next step, we will guide you on how to sign in to your Kami account (optional) and make the most out of Kami’s collaborative features.
Step 5: Sign in to your Kami account (optional)
If you have a Kami account, signing in allows you to access your saved files, sync your annotations across devices, and collaborate with others. Follow the steps below to sign in to your Kami account on your Mac:
- If you haven’t already done so, open the Kami app on your Mac by clicking on the Kami app icon.
- On the login page, enter the email address associated with your Kami account in the designated field.
- Next, enter the password for your Kami account in the provided password field. Make sure to enter the password accurately, as passwords are case-sensitive.
- Click on the “Sign In” button to log in to your Kami account.
Once you have successfully signed in to your Kami account, you will have access to all your saved documents and annotations. This allows you to continue working seamlessly across different devices, such as your Mac, PC, or mobile devices.
Signing in also enables you to collaborate with others using Kami’s real-time annotation and commenting features. You can invite others to view and edit your documents, allowing for collaborative note-taking, feedback, and discussions. This is particularly beneficial for students and professionals who need to collaborate remotely or share and receive feedback on their work.
However, if you do not have a Kami account or prefer not to sign in, you can still use Kami as a standalone application on your Mac. You will have access to all the core features and functionality, but you will not be able to sync your annotations or collaborate with others.
Now that you have the option to sign in to your Kami account, the next step will guide you on how to explore and make the most of Kami’s extensive features on your Mac.
Step 6: Explore Kami’s features
Now that you have Kami open on your Mac and, optionally, signed in to your account, it’s time to dive into the rich features that Kami offers. Here are some key features you can explore:
- Annotate documents: With Kami, you can easily annotate PDFs, documents, and images. Use tools such as highlighting, underlining, and strikethrough to mark important information or add comments and notes to specific sections.
- Collaborate in real-time: Invite others to collaborate on your documents or work together on group projects. With Kami’s real-time collaboration, you can make annotations, comments, and edits simultaneously, fostering effective teamwork no matter where you are.
- Integrate with Google Drive: Seamlessly integrate Kami with Google Drive to access and annotate your Google Docs, Slides, and Sheets. This integration simplifies workflow and allows for easy sharing and collaboration on Google Drive files.
- Text-to-speech: Enhance accessibility by utilizing Kami’s text-to-speech feature. Hear your documents read aloud, allowing for easier comprehension, proofreading, and multitasking.
- Screen capture: Capture screenshots within Kami to save and annotate sections of your screen. This feature is useful when you want to highlight specific information or explain concepts using visual aids.
- Equation editor: Create mathematical equations and formulas directly within Kami using the built-in equation editor. This tool is essential for students and professionals in subjects such as mathematics, physics, and engineering.
These are just a few of the many features that Kami offers. Take your time to explore the app, experiment with different tools, and discover how they can enhance your digital note-taking, collaboration, and productivity.
Feel free to refer to Kami’s extensive documentation, tutorials, and support resources for more in-depth guides on using specific features. The more familiar you become with Kami, the more you can unlock its full potential and amplify your learning or work experience.
Now that you have explored Kami’s features, it’s time to move on to the final step—using Kami on your Mac!
Step 7: Start using Kami on your Mac
Congratulations! You are now ready to fully utilize Kami on your Mac and make the most of its powerful features to enhance your digital workflow. Here are some tips to help you get started:
- Open your desired document: Navigate to your desired document on your Mac and open it within Kami. You can either drag and drop the file into the Kami app, use the “Open” option within the app’s menu, or utilize the Kami browser extension to open online documents directly.
- Explore annotation tools: Use the wide range of annotation tools, such as highlighting, underlining, and adding text, to annotate your document. Experiment with different colors, font styles, and sizes to customize your annotations to your preference.
- Collaborate with others: Invite others to collaborate on your document by sharing the file or providing them with access. Engage in real-time discussions, feedback, and edits, making collaboration seamless and efficient.
- Utilize additional tools: Take advantage of Kami’s additional tools, such as text-to-speech, screen capture, and equation editor, to further enhance your productivity and learning experience.
- Save and sync your work: Ensure that you regularly save your annotated documents within Kami to preserve your progress. If you are signed in with your Kami account, your annotations will automatically sync across devices, allowing you to seamlessly switch between your Mac, PC, or mobile devices.
- Experiment and learn: Don’t be afraid to explore and experiment with different features and functionalities within Kami. The more you use the app and get familiar with its capabilities, the more you’ll be able to tailor it to your specific needs and workflow.
Remember, using Kami on your Mac is all about enhancing your learning or work experience. Take the time to discover how Kami can streamline your digital note-taking, collaboration, and document management.
If you encounter any difficulties or have questions while using Kami, refer to their comprehensive documentation, FAQ, or reach out to their support team for assistance. They are there to help you make the most out of the app.
Now that you have followed all the steps to download, install, and use Kami on your Mac, you are equipped with a powerful tool that will redefine how you interact with digital documents. Enjoy the benefits of Kami and take your productivity to new heights!
Conclusion
Congratulations on successfully downloading, installing, and using Kami on your Mac! You have unlocked a world of possibilities for annotating, collaborating, and managing your digital documents. By following the steps outlined in this guide, you have gained the knowledge and skills necessary to leverage the full capabilities of Kami.
With Kami’s intuitive interface and extensive range of features, you can enhance your learning, streamline your workflow, and collaborate seamlessly with others. Whether you’re a student, teacher, or professional, Kami provides a versatile and user-friendly platform that empowers you to take control of your digital documents.
Remember to explore Kami’s annotation tools, experiment with different features, and discover how they can align with your specific needs and preferences. Don’t hesitate to utilize resources such as tutorials, documentation, and support provided by Kami to enhance your understanding and usage of the app.
Whether you’re highlighting important information, collaborating in real-time, utilizing the text-to-speech or equation editor, or simply organizing and managing your documents, Kami on your Mac offers endless possibilities for productivity and creativity.
Now it’s time to put your newly acquired Kami skills into practice. Open up Kami, start annotating your documents, collaborate with others, and experience the power of this versatile digital classroom tool firsthand. Enjoy your journey with Kami and unlock new levels of efficiency and productivity!


