Introduction
Welcome to this guide on how to download Google Play on your Mac. Google Play is a platform that allows you to download various apps, games, and other digital content for your Android device. While Google Play is primarily designed for Android devices, you can still access and download apps from the Play Store on your Mac by using an Android emulator.
An Android emulator is a software that mimics the Android operating system on your Mac, allowing you to run Android apps and games. By installing an emulator on your Mac, you can enjoy the benefits of Google Play and access a wide range of apps and games that are otherwise only available on Android devices.
In the following steps, we will guide you through the process of setting up an Android emulator on your Mac and downloading Google Play. Whether you want to access popular social media apps, productivity tools, or entertaining games, this guide will help you get started.
Before we dive into the steps, it’s important to note that there are several Android emulators available for Mac users. In this guide, we will focus on using the widely popular emulator called BlueStacks. It is user-friendly, reliable, and offers a seamless Android app experience on Mac.
So, let’s get started with step one, where we will download the Android emulator!
Step 1: Download an Android Emulator
The first step to accessing Google Play on your Mac is to download an Android emulator. As mentioned earlier, we will be using the BlueStacks emulator, which is widely regarded as one of the best options available.
To download BlueStacks, follow these steps:
- Open your web browser and go to the official BlueStacks website.
- Click on the “Download” button to start the download process.
- Once the download is complete, locate the file in your “Downloads” folder.
- Double-click on the file to begin the installation process.
- Follow the on-screen instructions to complete the installation of BlueStacks on your Mac.
After the installation is finished, you will have the BlueStacks emulator ready to use on your Mac. BlueStacks provides a clean and user-friendly interface that closely resembles the Android operating system.
It’s worth noting that BlueStacks requires a minimum system requirement to run smoothly on your Mac. Make sure your Mac meets the following specifications:
- Operating System: Mac OS Mojave (10.14) or later
- Processor: Intel or AMD Processor
- RAM: At least 4 GB RAM
- Storage: Minimum 4 GB of free storage space
With BlueStacks successfully installed on your Mac, you’re now ready to move on to the next step: installing the Android emulator. Stay tuned!
Step 2: Install the Android Emulator on your Mac
Now that you have downloaded the BlueStacks Android emulator, it’s time to install it on your Mac. Follow these simple steps to get the emulator up and running:
- Locate the BlueStacks installer file that you downloaded in the previous step.
- Double-click on the installer file to open it.
- You may be prompted to grant permission for the installation process to proceed. If so, click “Allow” or enter your administrator password.
- The BlueStacks installer will launch. Click on the “Install Now” button to start the installation process.
- Wait for the installation to complete. This may take several minutes, depending on the speed of your Mac.
- Once the installation is finished, click on the “Complete” button.
After the installation process is complete, the BlueStacks Android emulator will be successfully installed on your Mac. You will now have access to a virtual Android environment on your computer.
Upon launching BlueStacks for the first time, you may be prompted to sign in with your Google account. This step is necessary to access the Google Play Store and download apps.
That’s it for step two! You have successfully installed the BlueStacks Android emulator on your Mac. In the next step, we will guide you through the process of setting up the emulator to ensure optimal performance. Keep reading!
Step 3: Set up the Android Emulator
Now that you have installed the BlueStacks Android emulator on your Mac, it’s time to set it up to ensure optimal performance. This step involves configuring some basic settings within the emulator. Follow these steps:
- Launch the BlueStacks Android emulator by double-clicking on its icon in the Applications folder or on your desktop.
- Once BlueStacks opens, you will see a welcome screen and an Android-like interface.
- Click on the “Sign in with Google” button if you haven’t already signed in. Enter your Google account credentials to log in. This step is necessary to access the Google Play Store.
- Follow the on-screen instructions to complete the initial setup process.
- Once the setup is complete, you will be taken to the BlueStacks home screen.
- Before you start downloading apps from the Google Play Store, it is recommended to adjust a few settings. Click on the gear icon located on the top-right corner of the BlueStacks window to access the settings.
- In the settings window, you can customize various aspects such as display resolution, device model, keyboard shortcuts, and more. Adjust these settings according to your preferences.
- Take some time to familiarize yourself with the BlueStacks interface and features. You can explore various tabs and menus to discover the full potential of the emulator.
By following these steps, you have successfully set up the BlueStacks Android emulator on your Mac. You are now ready to access the Google Play Store and download your favorite apps and games.
In the next step, we will guide you through the process of accessing the Google Play Store within the BlueStacks emulator. Stay tuned!
Step 4: Access the Google Play Store
Now that you have set up the BlueStacks Android emulator on your Mac, it’s time to access the Google Play Store and start downloading apps. Follow these steps to get started:
- Launch the BlueStacks Android emulator on your Mac.
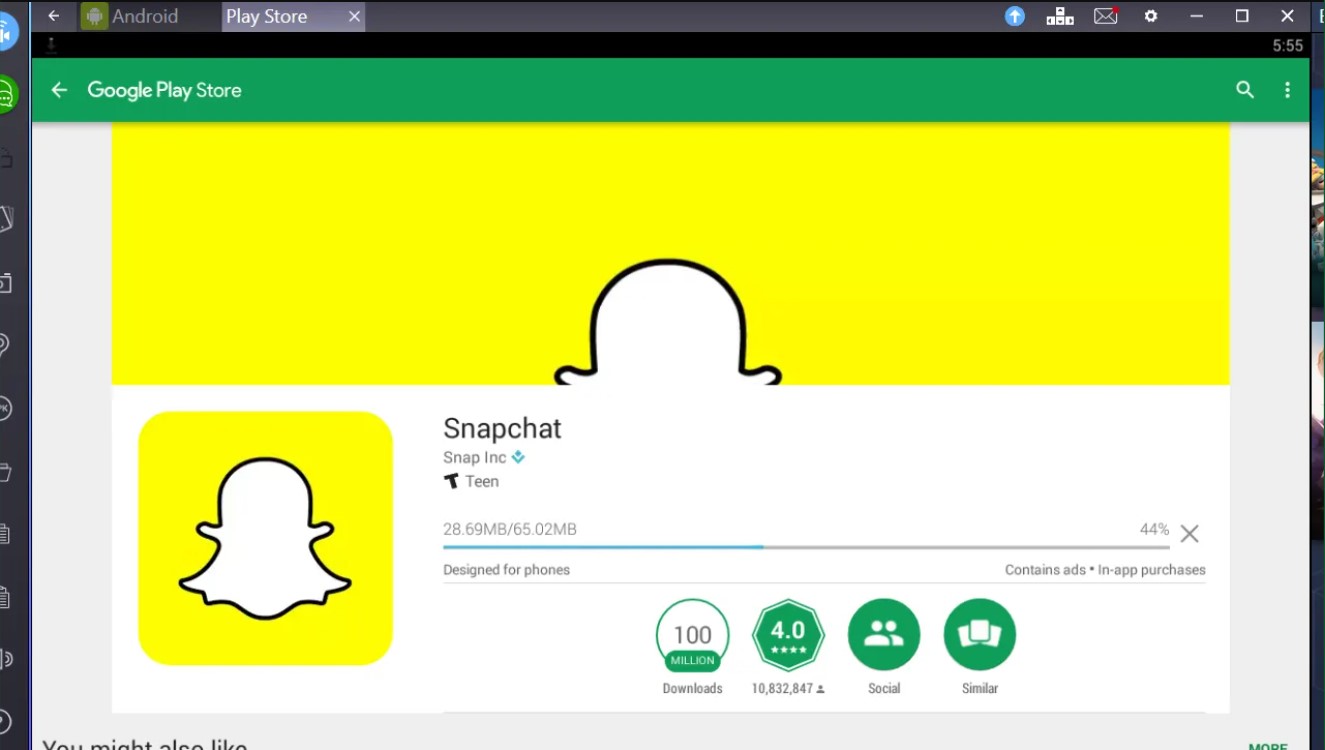
- On the BlueStacks home screen, you will see a Play Store icon. Click on it to open the Google Play Store.
- If prompted, sign in to your Google account once again. This step is necessary to access the Play Store and download apps.
- Once signed in, you will be greeted by the familiar Google Play Store interface, similar to what you see on an Android device.
- You can now browse through the various categories, top charts, or search for a specific app using the search bar at the top.
- When you find an app you want to download, click on it to open the app’s page.
- Read the app’s description, reviews, and ratings to ensure it meets your requirements.
- To download the app, click on the “Install” button. The app will start downloading and installing automatically.
- Once the installation is complete, you can open the app directly from the BlueStacks home screen or through the app drawer.
Repeat these steps to download and install any other apps or games you want from the Google Play Store. The apps will be installed within the BlueStacks emulator and can be accessed and used just like on an Android device.
Remember, the apps you download and install within the BlueStacks emulator will only be available and usable within the emulator. They will not affect your Mac’s system or installation.
Congratulations! You have successfully accessed the Google Play Store within the BlueStacks emulator on your Mac. In the next step, we will guide you through signing in to your Google account within the emulator. Keep reading!
Step 5: Sign in to your Google Account
In order to fully access and utilize the features of the Google Play Store within the BlueStacks emulator, you need to sign in with your Google account. Here’s how you can do it:
- Launch the BlueStacks Android emulator on your Mac.
- If you haven’t already done so, you will be prompted to sign in with your Google account. Click on the “Sign in with Google” button.
- Enter your Google account email address and password in the provided fields.
- Click on the “Next” button.
- If you have enabled two-factor authentication for your Google account, you may be prompted to verify your identity using a verification code.
- Follow the on-screen instructions to complete the sign-in process.
Once you have successfully signed in to your Google account within the BlueStacks emulator, you will have access to all the features and services tied to your Google account, including the ability to download and install apps from the Google Play Store.
It is important to note that signing in with your Google account allows you to sync your app purchases, settings, and preferences across multiple devices. This means that any app you download or purchase within the BlueStacks emulator can also be accessed on other devices linked to your Google account.
Signing in to your Google account within the BlueStacks emulator ensures a personalized experience and allows you to make the most out of your app downloads. Once signed in, you can continue exploring and downloading apps from the Google Play Store.
In the next step, we will guide you through the process of downloading apps from the Google Play Store. Stay tuned!
Step 6: Download apps from the Google Play Store
Now that you have successfully signed in to your Google account within the BlueStacks emulator, you can start downloading and installing apps from the Google Play Store. Here’s how:
- Launch the BlueStacks Android emulator on your Mac.
- Click on the Play Store icon on the BlueStacks home screen to open the Google Play Store.
- If prompted, sign in to your Google account again.
- Once you are in the Google Play Store, you can browse through the various categories, top charts, or use the search bar to find a specific app.
- When you find an app you want to download, click on it to open the app’s page.
- Read the app’s description, reviews, and ratings to ensure it meets your requirements.
- To download the app, click on the “Install” button.
- The app will start downloading and installing automatically. You can track the progress of the installation from the notification panel.
- Once the installation is complete, the app will appear in the app drawer or on the BlueStacks home screen.
- Click on the app’s icon to open and use it within the BlueStacks emulator.
Repeat these steps to download and install any other apps or games from the Google Play Store. The apps will be installed within the BlueStacks emulator and can be accessed and used just like on an Android device.
It’s important to note that while you can download and install a wide range of apps from the Google Play Store, some apps may not be optimized for use within the BlueStacks emulator. In such cases, the performance or functionality of the app may be limited.
With the ability to download apps from the Google Play Store on your Mac using the BlueStacks emulator, you can now explore a vast collection of apps and games right at your fingertips.
Congratulations! You have completed all the steps to download Google Play on your Mac and start enjoying the vast library of apps and games available through the Play Store. Happy exploring!
Conclusion
Congratulations! You have successfully learned how to download Google Play on your Mac using the BlueStacks Android emulator. Now you can enjoy the vast array of apps and games available through the Google Play Store, right from your Mac computer.
By following the steps outlined in this guide, you have installed the BlueStacks emulator, set it up, and accessed the Google Play Store. You have also learned how to sign in to your Google account and download apps directly from the Play Store within the BlueStacks emulator.
With the BlueStacks emulator, you have transformed your Mac into an Android-like environment, allowing you to explore and utilize the wide range of applications and games available on the Google Play Store. Whether you’re looking for productivity apps, social media platforms, or entertaining games, the possibilities are endless.
Remember to keep your BlueStacks emulator and Google Play Store up to date, as updates often bring new features, bug fixes, and security enhancements. Regularly updating your apps will ensure that you have access to the latest versions and the best possible experience.
Now that you have the knowledge and tools to download Google Play on your Mac, it’s time to explore, experiment, and make the most of the vast app ecosystem. Discover new and exciting apps, improve your productivity, and entertain yourself with a variety of games.
Enjoy your journey through the Google Play Store on your Mac with the BlueStacks emulator. Embrace the convenience and versatility of accessing Android apps from your computer, and make the most out of your digital experience.
Have fun exploring and using the apps and games available through Google Play on your Mac!