Introduction
Welcome to this guide on how to download Origin games to a different hard drive. If you’re a gaming enthusiast who loves playing games on Origin, you may have encountered the issue of limited disk space on your primary hard drive. Fortunately, there’s a solution! By following the steps in this guide, you’ll be able to download and install your favorite Origin games onto a secondary hard drive, providing you with ample space to enjoy your gaming experience.
Having a separate hard drive for your games can offer several advantages. It allows you to keep your primary hard drive clutter-free, enabling your operating system and other critical applications to run smoothly. Additionally, it provides you with the flexibility to expand your game library without worrying about running out of space. Whether you have an existing secondary hard drive or plan to purchase one specifically for gaming, this guide will walk you through the process of downloading and installing Origin games to a different location.
Before we dive into the steps, it’s essential to understand that modifying the installation location of Origin games may require some technical knowledge. Ensure you follow the instructions carefully and back up any important data to avoid potential data loss. Now, let’s get started on this exciting journey to expanding your gaming world!
Checking Disk Space
Before you begin the process of downloading Origin games to a different hard drive, it’s crucial to check the available disk space on both your primary and secondary drives. This step will help you determine if you have enough storage capacity to accommodate the games you wish to download.
To check the disk space on Windows:
- Open File Explorer and locate “This PC” or “My Computer”.
- Right-click on your primary hard drive (usually the C drive) and select “Properties”.
- In the General tab, you’ll see the total capacity of the drive, as well as the amount of used and free space.
To check the disk space on Mac:
- Click on the Apple menu and select “About This Mac”.
- In the window that opens, click on the “Storage” tab.
- You’ll see a visual representation of your storage devices and the amount of used and free space.
Once you have determined the available space on your primary hard drive, check the capacity of your secondary hard drive as well. Ensure that it has enough space to accommodate the games you plan to download.
Keep in mind that games can vary in size, with some reaching several gigabytes or more. Take into consideration the size of your desired games and the available free space before proceeding to the next steps. It’s always a good idea to have ample free space on both hard drives to accommodate future game installations or updates.
In the upcoming sections, we will explore how to choose a new installation location, change the default installation path, create a new folder on a different hard drive, download and install Origin games to the new location, and manage your game library on the secondary hard drive. Let’s continue on this journey of expanding your gaming possibilities!
Choosing a New Installation Location
When it comes to downloading and installing Origin games to a different hard drive, the first step is to choose a new installation location. This will determine where the games will be stored on your secondary hard drive.
The process of choosing a new installation location may vary depending on the operating system you’re using.
For Windows:
- Open the Origin client on your computer.
- Click on “Origin” in the menu bar, then select “Application Settings”.
- In the Application tab, find the “Installers” section.
- Click on the “Change” button next to “Downloaded Games”.
- Browse your computer and select the drive and folder on your secondary hard drive where you want to install your Origin games.
- Click “Select Folder” to confirm your new installation location.
For Mac:
- Open the Origin client on your Mac.
- Click on “Origin” in the menu bar, then select “Preferences”.
- In the Advanced tab, find the “Downloaded Games” section.
- Click on the “Browse” button next to the current installation location.
- Select the drive and folder on your secondary hard drive where you want to install your Origin games.
- Click “Open” to confirm your new installation location.
By choosing a new installation location, you are specifying the folder on your secondary hard drive where all future Origin game downloads and installations will take place. It’s important to ensure that you have sufficient space available on this drive to accommodate the games you want to install.
Once you’ve selected a new installation location, you’re ready to proceed with the next steps: changing the default installation path and creating a new folder on your secondary hard drive. These steps will ensure that your Origin games are downloaded and stored in the desired location.
Changing Default Installation Path
After selecting a new installation location for your Origin games, the next step is to change the default installation path. This step ensures that any future game installations will automatically be directed to the new location on your secondary hard drive.
The process of changing the default installation path may differ depending on the operating system you’re using.
For Windows:
- Open the Origin client on your computer.
- Click on “Origin” in the menu bar, then select “Application Settings”.
- In the Application tab, find the “Installers” section.
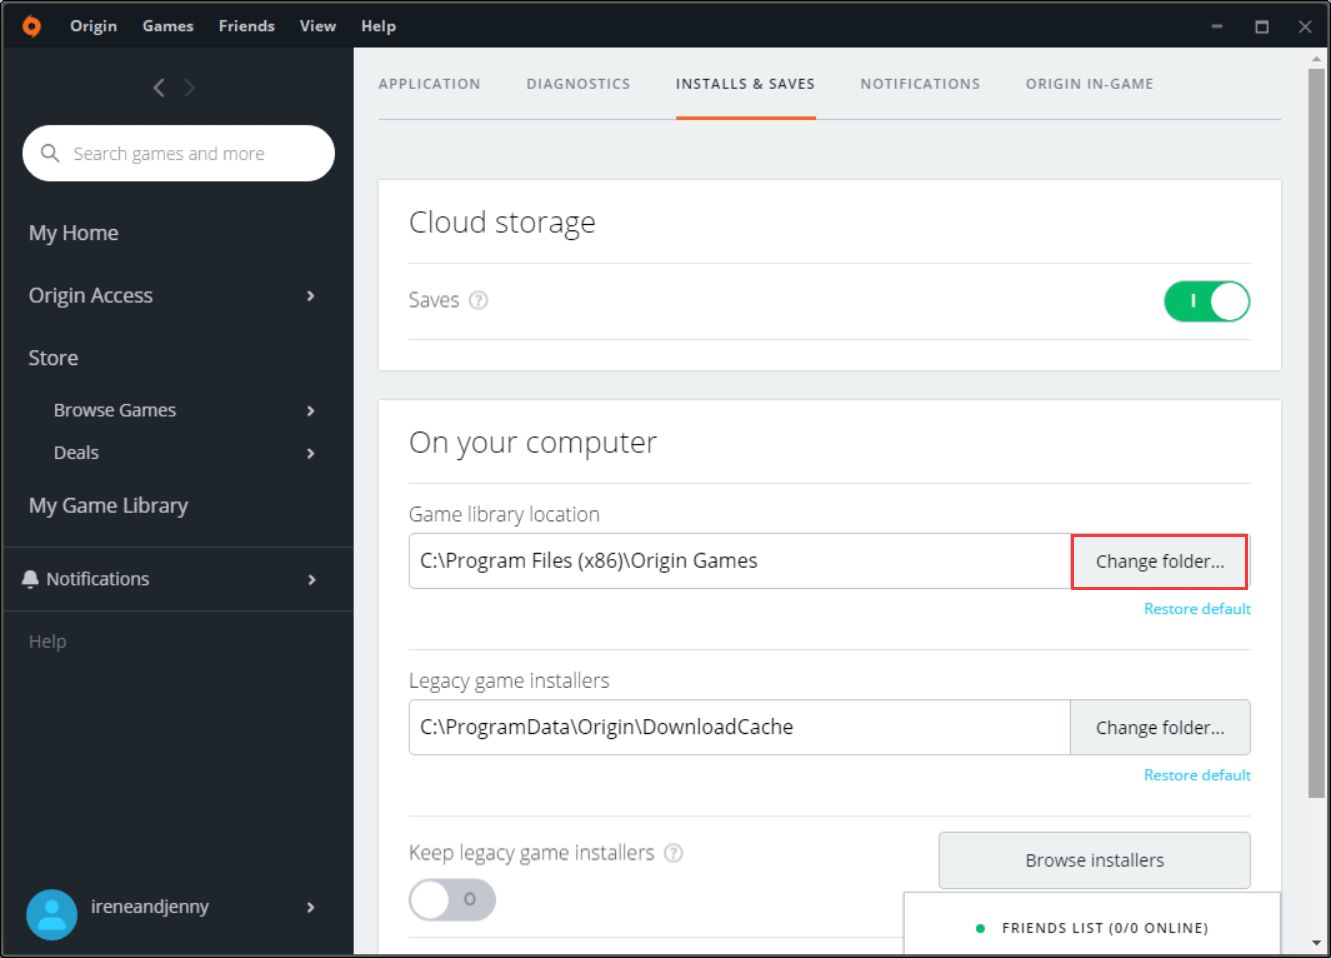
- Click on the “Change” button next to “Game Library Location”.
- Browse your computer and select the drive and folder on your secondary hard drive where you want to store your Origin games.
- Click “Select Folder” to confirm the new default installation path.
For Mac:
- Open the Origin client on your Mac.
- Click on “Origin” in the menu bar, then select “Preferences”.
- In the Advanced tab, find the “Game Library Location” section.
- Click on the “Browse” button next to the current default installation path.
- Select the drive and folder on your secondary hard drive where you want to store your Origin games.
- Click “Open” to confirm the new default installation path.
By changing the default installation path, you’re ensuring that any new game downloads or installations will automatically be directed to your chosen location on the secondary hard drive. This saves you the hassle of manually selecting the installation location for each game.
With the default installation path modified, you’re now one step closer to downloading and installing your Origin games to the new location. In the next section, we’ll look at the process of creating a new folder on your secondary hard drive.
Creating a New Folder on Different Hard Drive
Before downloading and installing your Origin games to a different hard drive, it’s important to create a new folder where your games will be stored. This step ensures that your games are organized and easily accessible.
The process of creating a new folder on a different hard drive may vary slightly depending on the operating system you’re using.
For Windows:
- Open File Explorer and locate your secondary hard drive.
- Right-click on an empty space in the drive and select “New” > “Folder”.
- Name the folder something descriptive, such as “Origin Games” or “Game Library”.
- Press Enter to save the folder name.
For Mac:
- Open Finder and locate your secondary hard drive.
- Click on “File” in the menu bar, then select “New Folder”.
- Name the folder something relevant, like “Origin Games” or “Game Library”.
- Press Enter to save the folder name.
By creating a new folder on your secondary hard drive, you’re establishing a dedicated space where your Origin games will be stored. This folder acts as the destination for your game downloads and installations.
Once the folder is created, you can further organize your games by creating subfolders based on genre, release year, or any other categorization that suits your preference. This will make it easier to navigate and locate specific games in your library.
With the new folder created, you’re now ready to move on to the next steps: downloading and installing your Origin games to the different hard drive. In the upcoming section, we’ll explore the process of downloading and installing Origin games to the new location.
Downloading and Installing Origin Games to Different Hard Drive
Now that you have chosen a new installation location, changed the default installation path, and created a new folder on your different hard drive, it’s time to download and install your desired Origin games to the new location.
To download and install Origin games to the different hard drive, follow these steps:
- Open the Origin client on your computer.
- Log in to your Origin account. If you don’t have an account, create one.
- In the Origin client, navigate to the “Store” tab to browse and search for your desired games.
- Once you find a game you want to download and install, click on it to access the game details page.
- On the game details page, click on the “Buy” or “Add to Game Library” button to initiate the download.
- In the subsequent prompts, select the desired installation location. Choose the new folder you created on your different hard drive.
- Click on the “Install” or “Download” button to begin the download and installation process.
- Wait for the download to complete, and then follow any additional prompts to install the game.
- Once the installation is finished, you can launch and play your Origin games from the new location on your different hard drive.
It’s important to note that the download and installation time will vary depending on the game’s size and your internet connection speed. Be patient during the process and ensure that you have a stable internet connection to avoid any interruptions.
By downloading and installing your Origin games onto the different hard drive, you have successfully expanded your game library’s storage capacity. This allows you to enjoy a larger collection of games without overwhelming your primary hard drive.
Now that you have mastered the process of downloading and installing Origin games to a different hard drive, let’s explore how to manage your game library on the secondary hard drive in the next section.
Managing Game Library on Different Hard Drive
Once you have successfully downloaded and installed your Origin games to a different hard drive, it’s important to know how to effectively manage your game library in this new location. Proper management ensures easy access to your games and allows you to maintain an organized and enjoyable gaming experience.
Here are some tips for managing your game library on a different hard drive:
- Organize your games: Consider organizing your games within the new folder on your different hard drive. You can create subfolders based on genres, game series, or any categorization that suits your preference. This makes it easier to find and access specific games in your library.
- Keep track of updates: Regularly check for game updates to ensure you have the latest versions. Origin usually prompts you for updates, but if not, you can manually check for updates within the Origin client to keep your games up to date.
- Manage storage space: As you continue to expand your game library, monitor the storage space on your different hard drive. Delete games you no longer play or move them to an external storage device if necessary. This helps free up space for new games and prevents clutter.
- Backup game files: Consider backing up your game files to an external storage device to protect them from potential data loss or system crashes. This is especially important if you have invested considerable time and effort in a particular game.
- Uninstall unwanted games: If you have games in your library that you no longer play or have lost interest in, uninstalling them frees up storage space on your different hard drive. You can always reinstall them later if you decide to revisit them.
- Take advantage of cloud storage: Utilize cloud storage services, if available, to back up your game saves and settings. This ensures that even if you reinstall a game or switch devices, your progress and preferences are preserved.
By following these tips, you can efficiently manage your game library on the different hard drive, keeping it organized, up to date, and free of unnecessary clutter. This will enhance your gaming experience and make it easier to navigate and enjoy your collection of Origin games.
With the knowledge of managing your game library on a different hard drive, you are now equipped to make the most out of your gaming experience. In the next section, we will wrap up this guide on downloading Origin games to a different hard drive.
Conclusion
Congratulations! You have successfully learned how to download Origin games to a different hard drive. By following the steps outlined in this guide, you now have the ability to expand your game library and enjoy your favorite Origin games without worrying about limited disk space on your primary hard drive.
We began by checking the disk space on both your primary and secondary hard drives to ensure you have enough available storage. Then, we walked through the process of choosing a new installation location and changing the default installation path in the Origin client. We also discussed the importance of creating a new folder on your different hard drive to keep your games organized.
With the technical steps completed, we then delved into the process of downloading and installing Origin games to the different hard drive. By selecting your desired games from the Origin store and choosing the new installation location, you were able to expand your gaming possibilities.
Furthermore, we explored effective management techniques for your game library on the different hard drive. Organizing your games, staying updated with game updates, managing storage space, and backing up your game files were all highlighted as important factors to consider.
By following these steps and implementing the management strategies, you can enjoy a seamless and enjoyable gaming experience with your Origin games stored on a different hard drive.
Remember, always ensure that you have enough free space on your different hard drive to accommodate new game installations, and regularly check for updates and backups to safeguard your gaming progress.
Thank you for reading this guide, and we hope it has been helpful in expanding your gaming world. Now, go ahead and start downloading and enjoying your favorite Origin games on your different hard drive!