Introduction
Welcome to the world of gaming! Origin is a popular digital distribution platform developed by Electronic Arts (EA) that allows you to purchase, download, and play a wide range of exciting games. Whether you’re a casual gamer or a dedicated enthusiast, Origin offers a vast library of titles to choose from, including popular franchises like The Sims, FIFA, Battlefield, and more.
In this guide, we will walk you through the process of downloading games from Origin. Whether you’re new to the platform or just need a refresher, we’ve got you covered. By following the steps outlined in this article, you’ll be able to navigate the Origin client with ease and start enjoying your favorite games in no time.
Before we dive into the details, it’s important to note that creating an Origin account is the first step to accessing the platform’s features. If you already have an account, feel free to skip ahead to Step 2. If not, don’t worry – we’ll guide you through the account creation process as well.
So, if you’re ready to embark on an exciting gaming journey, let’s get started by creating your Origin account.
Step 1: Create an Origin Account
The first step to downloading games from Origin is creating an account. Follow these simple steps to get started:
- Open your web browser and visit the Origin website.
- Click on the “Sign Up” button located at the top-right corner of the homepage.
- Fill in your personal details, including your email address, password, and date of birth.
- Agree to the Terms of Service and Privacy Policy by checking the boxes.
- Complete the reCAPTCHA to verify that you are not a robot.
- Click on the “Create Account” button to finalize the registration process.
Once you have successfully created your Origin account, you will have access to a range of features, including purchasing and downloading games, managing your library, and connecting with other gamers.
It’s important to remember your login credentials as you will need them when accessing the Origin client on your computer. If you ever forget your password, don’t worry – Origin provides a password recovery option to help you regain access to your account.
Now that you have created your Origin account, you are ready to move on to the next step, which involves downloading the Origin client.
Step 2: Download the Origin Client
To download games from Origin, you’ll need to install the Origin Client on your computer. Follow these steps to get started:
- Open your web browser and visit the Origin website.
- On the homepage, you’ll find the “Download” button located at the top-right corner. Click on it.
- Depending on your operating system (Windows or Mac), the website will automatically detect it and provide you with the corresponding download link.
- Click on the “Download Origin” button to start the download.
- Once the download is complete, locate the installation file (typically found in your Downloads folder) and double-click on it.
- Follow the on-screen instructions to install the Origin Client. You may be asked to agree to the End User License Agreement and choose a destination folder for the installation.
- After the installation is complete, the Origin Client will launch automatically.
It’s worth noting that the Origin Client is a lightweight application that serves as a central hub for managing your games. From here, you can browse and search for titles, purchase games, manage your library, and even connect with friends through the built-in social features.
Now that you have successfully installed the Origin Client, it’s time to move on to the next step, which is launching the client on your computer.
Step 3: Install the Origin Client
After you have downloaded the Origin Client, the next step is to install it on your computer. Follow these steps to complete the installation:
- Locate the downloaded installation file, which is typically found in your Downloads folder.
- Double-click on the installation file to start the installation process.
- Depending on your operating system, you may be prompted to grant permission for the installation to proceed. Click “Yes” or “Allow” to continue.
- The installation wizard will guide you through the process. Review and agree to the End User License Agreement and other terms if prompted.
- Choose the destination folder where you want the Origin Client to be installed. If you’re unsure, you can leave the default location as is.
- Click on the “Install” button to begin the installation process.
- Wait for the installation to complete. This may take a few minutes depending on your computer’s speed.
- Once the installation is finished, you will see a confirmation message indicating that the Origin Client has been successfully installed.
Now that you have successfully installed the Origin Client, you are one step closer to enjoying your favorite games. The next step is to launch the Origin Client on your computer, which will allow you to access the full range of features and games available on the platform.
With the Origin Client installed, you’ll have a seamless and convenient way to discover, purchase, and play the latest games from EA and other developers. So let’s move on to the next step and launch the Origin Client on your computer.
Step 4: Launch the Origin Client
After installing the Origin Client, you’re ready to launch it and start exploring the world of gaming. Follow these steps to launch the Origin Client on your computer:
- Locate the Origin Client icon, which should now be available on your desktop or in your start menu.
- Double-click on the Origin icon to launch the client.
- If prompted, log in to your Origin account using the email and password you used during the account creation process.
- After successfully logging in, the Origin Client will open, displaying the homepage with featured games and promotions.
Launching the Origin Client is your gateway to a wide range of gaming content. From the client, you can browse, purchase, and install games, as well as access additional features like managing your library, updating games, and connecting with friends.
The Origin Client provides an intuitive and user-friendly interface, making it easy to navigate through the various sections and discover new games based on your interests. The homepage displays recommended games, popular titles, and current sales, ensuring you never miss out on exciting opportunities.
Now that you have successfully launched the Origin Client, you’re ready to start exploring the extensive game library and adding games to your collection. In the next steps, we will guide you through the process of browsing, purchasing, and downloading games from Origin. So let’s move on to Step 5 and dive into the exciting world of gaming!
Step 5: Browse and Search for Games
Now that you have launched the Origin Client, it’s time to explore the vast collection of games available on the platform. Follow these steps to browse and search for games:
- On the Origin Client homepage, you will see a navigation bar at the top. Here, you will find different sections such as “Store,” “Library,” and “Friends.” Click on the “Store” tab to begin browsing for games.
- Once you are on the Store page, you can browse through the various game categories such as “New and Trending,” “Top Selling,” “Upcoming Releases,” and more. You can scroll down to discover games or use the search bar to find specific titles.
- To search for a specific game, simply type the name of the game in the search bar and press Enter. The search results will display various games related to your search query.
- You can further refine your search by using filters such as genre, price range, and platform compatibility. These filters will help you narrow down your options and find games that align with your preferences.
- Click on a game’s thumbnail to view more details, such as a description, screenshots, system requirements, and user reviews. This will help you make an informed decision before making a purchase.
- While browsing, you can also add games to your wishlist by clicking on the heart-shaped icon. This is a convenient way to keep track of games you are interested in and wish to purchase or try in the future.
Browsing and searching for games on Origin is an enjoyable experience, thanks to its user-friendly interface and organized layout. Whether you are looking for the latest releases, popular titles, or hidden gems, Origin offers a vast collection to suit every gamer’s taste.
Once you have found a game that catches your interest, the next step is to add it to your library and make a purchase. In the following steps, we will guide you through the process of adding games to your library and purchasing them. So let’s move on to Step 6 and take your gaming experience to the next level!
Step 6: Add Games to your Library
Once you have found a game you want to play, it’s time to add it to your Origin library. Adding games to your library allows you to keep track of your purchased games and easily access them whenever you want. Follow these steps to add games to your library:
- When you are on the game’s page, click on the “Add to Library” or “Buy Now” button, depending on whether you have already purchased the game or not.
- If you haven’t purchased the game yet and clicked on “Buy Now,” you will be prompted to complete the purchase process. Follow the on-screen instructions to proceed with the purchase. You can choose your preferred payment method and complete the transaction securely.
- Once you have added the game to your library, it will be listed in your Origin library. To access your library, click on the “Library” tab on the top navigation bar of the Origin client.
- In your library, you will find all the games you have purchased and added to your collection. You can sort the games by various categories like recently played, alphabetical order, or the date of purchase.
- To start playing a game, simply double-click on its thumbnail in your library. The game will start downloading and installing onto your computer.
Adding games to your Origin library not only allows for easy access but also enables you to take advantage of various features like automatic updates and cloud saves. Your game progress will be saved in the cloud, allowing you to continue playing from where you left off on any computer with the Origin Client installed.
Now that you have successfully added games to your library, it’s time to move on to the next step, which is the purchase process for games you have chosen. In the next step, we will guide you through the process of purchasing games from Origin. So let’s move on to Step 7 and expand your gaming library!
Step 7: Purchase Games
Now that you have added games to your library, it’s time to make the purchase and officially own the games you want to play. Here’s how to purchase games from Origin:
- In the Origin Client, click on the “Store” tab at the top navigation bar to access the store page.
- Browse or search for the game you want to purchase. You can explore different categories, genres, or check out the featured games on the store page.
- Once you have found the game you want to purchase, click on its thumbnail to view the game’s details page. Here, you will find information such as the game’s description, screenshots, system requirements, and user reviews. Take your time to decide if the game is right for you.
- On the game’s details page, you will see the price and different purchasing options, such as different editions or DLCs. Choose the edition you want and click on the “Buy Now” button.
- Follow the on-screen instructions to complete the purchase process. You may be prompted to log in to your Origin account if you’re not already logged in. Choose your preferred payment method and enter the necessary details to complete the transaction.
- Once the purchase is complete, the game will be added to your Origin library.
Origin offers various payment options, including credit or debit cards, PayPal, and Origin Wallet, making it convenient for you to choose the method that suits you best. You can also take advantage of sales and promotions that are regularly available on the store page to get great deals on your favorite games.
With the purchase process complete, you are now ready to download and install the game onto your computer. In the next step, we will guide you through the steps to download and install games from Origin. So let’s move on to Step 8 and get your game up and running!
Step 8: Download and Install Games
After purchasing a game from Origin, the next step is to download and install it onto your computer. Follow these steps to download and install games from Origin:
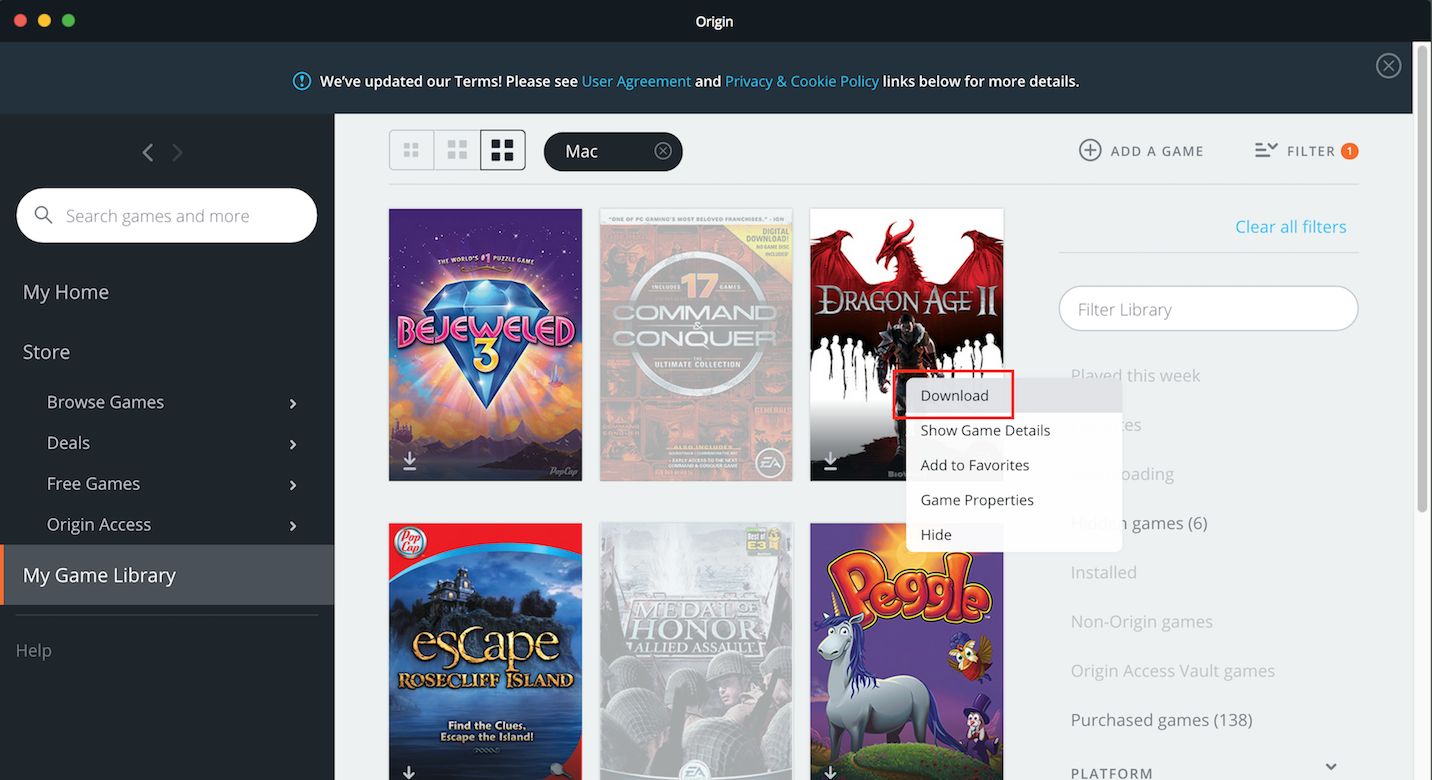
- In your Origin library, locate the game you want to download and install. The games in your library will be listed with their respective thumbnails.
- Click on the game’s thumbnail to open its details page. Here, you will find information about the game, including available downloadable content (DLC) and expansions.
- On the details page, click on the “Download” or “Install” button to start the download and installation process. The button may vary depending on the game’s current status.
- During the download process, you will see a progress bar indicating the download status. The time it takes to download a game depends on the size of the game and your internet speed.
- Once the download is complete, the game will automatically begin the installation process. Follow any on-screen prompts to complete the installation.
- After the installation is finished, the game will be ready to play. You can access it directly from your Origin library by double-clicking on its thumbnail.
It’s worth noting that the download and installation times can vary depending on the size of the game and the speed of your internet connection. It’s recommended to have a stable and high-speed internet connection to ensure a smooth and timely installation process.
In case you encounter any issues during the download or installation of a game, Origin provides helpful troubleshooting resources on their website. You can find guides, FAQs, and community forums to seek assistance and resolve any problems you may encounter.
With the game successfully downloaded and installed, you are now ready to launch and play it. In the next step, we will guide you through the process of launching and playing games from Origin. So let’s move on to Step 9 and start gaming!
Step 9: Launch and Play Games
Once you have downloaded and installed a game from Origin, you’re just a few steps away from immersing yourself in the gaming experience. Follow these steps to launch and play games from Origin:
- In your Origin library, locate the game you want to play. The games in your library will be listed with their respective thumbnails.
- Double-click on the game’s thumbnail to launch the game.
- Depending on the game, you may be prompted to update the game or install any additional required files. Follow the on-screen instructions to complete these processes.
- Once the game is fully launched, you can start playing and enjoy the immersive gaming experience.
While playing a game, you can customize the in-game settings, such as graphics quality, audio settings, and control configurations, to suit your preferences. These settings can usually be accessed through the game’s settings menu.
It’s important to ensure that your computer meets the minimum system requirements for the game you’re playing. This will ensure smooth gameplay and prevent any performance issues. You can usually find the system requirements for a game on its details page in your Origin library or on the game’s official website.
If you encounter any technical issues while playing a game, Origin provides support resources, including troubleshooting guides and community forums, to assist you in resolving the problem. You can also check for game updates and patches to ensure you have the latest version for the best gaming experience.
Now that you know how to launch and play games from Origin, you’re ready to dive into the exciting worlds and adventures they offer. Enjoy your gaming experience and have fun exploring the multitude of titles available through the Origin platform!
Conclusion
Congratulations! You have successfully learned how to download, install, and play games from Origin. By following the nine steps outlined in this guide, you have gained the knowledge and skills to navigate the Origin platform with ease and enjoy a wide range of exciting games.
We started by creating an Origin account, which is the first step to accessing the platform’s features. Then, we proceeded to download and install the Origin Client, the central hub for managing your games and exploring new titles. Once the client was installed, we learned how to launch it and navigate through the various sections, including browsing and searching for games.
After finding a game you wanted to play, you discovered how to add it to your Origin library and make a purchase. The process involved choosing the preferred edition, completing the transaction, and obtaining the game in your library. Finally, we covered how to download, install, and launch the game to begin an immersive gaming experience.
Remember, Origin offers a vast collection of games, including popular franchises and various genres to suit every gamer’s taste. Keep an eye out for sales and promotions to grab great deals on your favorite titles. Additionally, stay connected with the Origin community, where you can find updates, troubleshooting resources, and connect with friends to enhance your gaming experience.
Now that you are familiar with the steps involved in downloading, installing, and playing games from Origin, it’s time to embark on your gaming journey and explore the incredible worlds that await you. So, launch the Origin Client, browse through the extensive game library, and let the gaming adventures begin!