Introduction
Facebook Messenger is a popular messaging platform that allows users to connect with friends and family instantly. Whether it’s for personal or professional reasons, you may find yourself wanting to download and save a conversation from Facebook Messenger. Perhaps you want to keep a record of an important conversation, or maybe you want to review past messages for sentimental reasons. Whatever the case may be, knowing how to download your Facebook Messenger conversation is a valuable skill to have.
This article will guide you through the step-by-step process of downloading your Facebook Messenger conversation. By following these instructions, you’ll be able to save your conversation as a file on your computer, making it easily accessible whenever you need it. Whether you’re using Facebook Messenger on your desktop or mobile device, the process is relatively straightforward.
Before we dive into the steps, it’s worth noting that the ability to download your Facebook Messenger conversations is a feature provided by Facebook, and it may be subject to updates and changes. It’s always a good idea to check for any recent changes or updates to the platform. With that in mind, let’s get started!
Step 1: Accessing the Facebook Menu
To begin, open your web browser and navigate to the Facebook website. Log in to your Facebook account using your credentials. Once you’re logged in, you’ll land on your Facebook news feed. Look for the menu icon, which is represented by three horizontal lines in the top-right corner of the page. Click on this icon to access the Facebook menu.
When you click on the menu icon, a dropdown list will appear, displaying various options and settings. This menu is where you’ll find the necessary settings to download your Facebook Messenger conversation. Take a moment to familiarize yourself with the options in the menu, as you’ll be navigating through it in the following steps.
On the menu, you may also find shortcuts to other popular features of Facebook, such as Groups, Events, and Pages. These shortcuts are designed to enhance your Facebook experience and provide quick access to different sections of the platform.
Once you’re ready, move on to the next step to continue the process of downloading your Facebook Messenger conversation.
Step 2: Selecting “Settings & Privacy”
After accessing the Facebook menu, you will see a list of options and settings. Look for the “Settings & Privacy” option and click on it. This will open a submenu with additional settings related to your Facebook account.
The “Settings & Privacy” option is where you can control various aspects of your Facebook experience, including your privacy settings, account security, and more. It is an essential section to explore, as it allows you to customize your Facebook settings according to your preferences and requirements.
By clicking on “Settings & Privacy,” you will be taken to a new page with different sections. It is on this page that you’ll find the specific settings related to downloading your Facebook Messenger conversation.
Take a moment to explore the various options available within the “Settings & Privacy” section. Familiarizing yourself with these settings will help you make informed decisions and better manage your Facebook account. Once you’re ready to proceed, move on to the next step to continue with the process of downloading your conversation.
Step 3: Navigating to “Settings”
After selecting “Settings & Privacy” from the Facebook menu, you will be taken to a new page with various sections. Look for the “Settings” option and click on it to access the settings page.
The “Settings” page is where you can view and manage all the specific settings related to your Facebook account. It allows you to customize your profile, privacy settings, notifications, and more.
On the “Settings” page, you will see a list of different categories or tabs on the left-hand side. These tabs include General, Security and Login, Privacy, and more. To continue with the process of downloading your Facebook Messenger conversation, we need to navigate to the right section.
Scroll through the list of tabs on the left-hand side until you find the “Your Facebook Information” tab. Click on this tab to access the settings related to your Facebook information, including the option to download your conversation.
Once you’re on the “Your Facebook Information” tab, you’ve successfully navigated to the section where you can find the settings to download your Messenger conversation. Now let’s move on to the next step and explore how to proceed with the download process.
Step 4: Selecting “Your Facebook Information”
After accessing the “Settings” page, you will find various categories or tabs on the left-hand side. Scroll through the tabs until you locate the “Your Facebook Information” option. Click on it to proceed to the next step.
The “Your Facebook Information” section is where you can manage and control the data associated with your Facebook account. It provides you with options to download a copy of your data, including your Messenger conversation. By selecting this option, you can obtain a file that contains your entire conversation history.
Upon clicking on “Your Facebook Information,” you will be taken to a new page where you have access to all the settings related to your Facebook data. This page allows you to control the information you’ve shared on Facebook and gives you the ability to download a copy of specific data.
Before proceeding to the next step, take a moment to familiarize yourself with the options and settings available on the “Your Facebook Information” page. Understanding these settings will help you customize and manage your Facebook data according to your preferences.
Once you’re ready, let’s move on to the next step and explore how to download your Facebook Messenger conversation.
Step 5: Choosing “Download Your Information”
After accessing the “Your Facebook Information” section, you will see a list of options related to your Facebook data. Look for the “Download Your Information” option and click on it to proceed with the download process.
The “Download Your Information” feature allows you to choose and download a copy of your Facebook data, including your Messenger conversation. This feature grants you the ability to maintain a backup of your conversation, ensuring that you have access to it even if you no longer have access to your Facebook account.
When you click on “Download Your Information,” you will be presented with a range of options to customize your download. These options include selecting the specific data types you want to download, the date range for the data, the media quality, and more. By customizing these settings, you can ensure that your download includes the desired content from your Messenger conversation.
Take a moment to review the available options and customize your download settings according to your preferences. Pay particular attention to selecting the “Messages” option to include your Messenger conversation in the download. You may also want to specify the date range to narrow down the messages you want to save.
Once you have customized your download settings, you’re ready to generate the download file. Proceed to the next step to learn how to generate the file and access your Messenger conversation.
Step 6: Customizing Your Download
After selecting “Download Your Information,” you will be presented with a range of options to customize your download. This step allows you to tailor the download to include the specific data you want from your Facebook account.
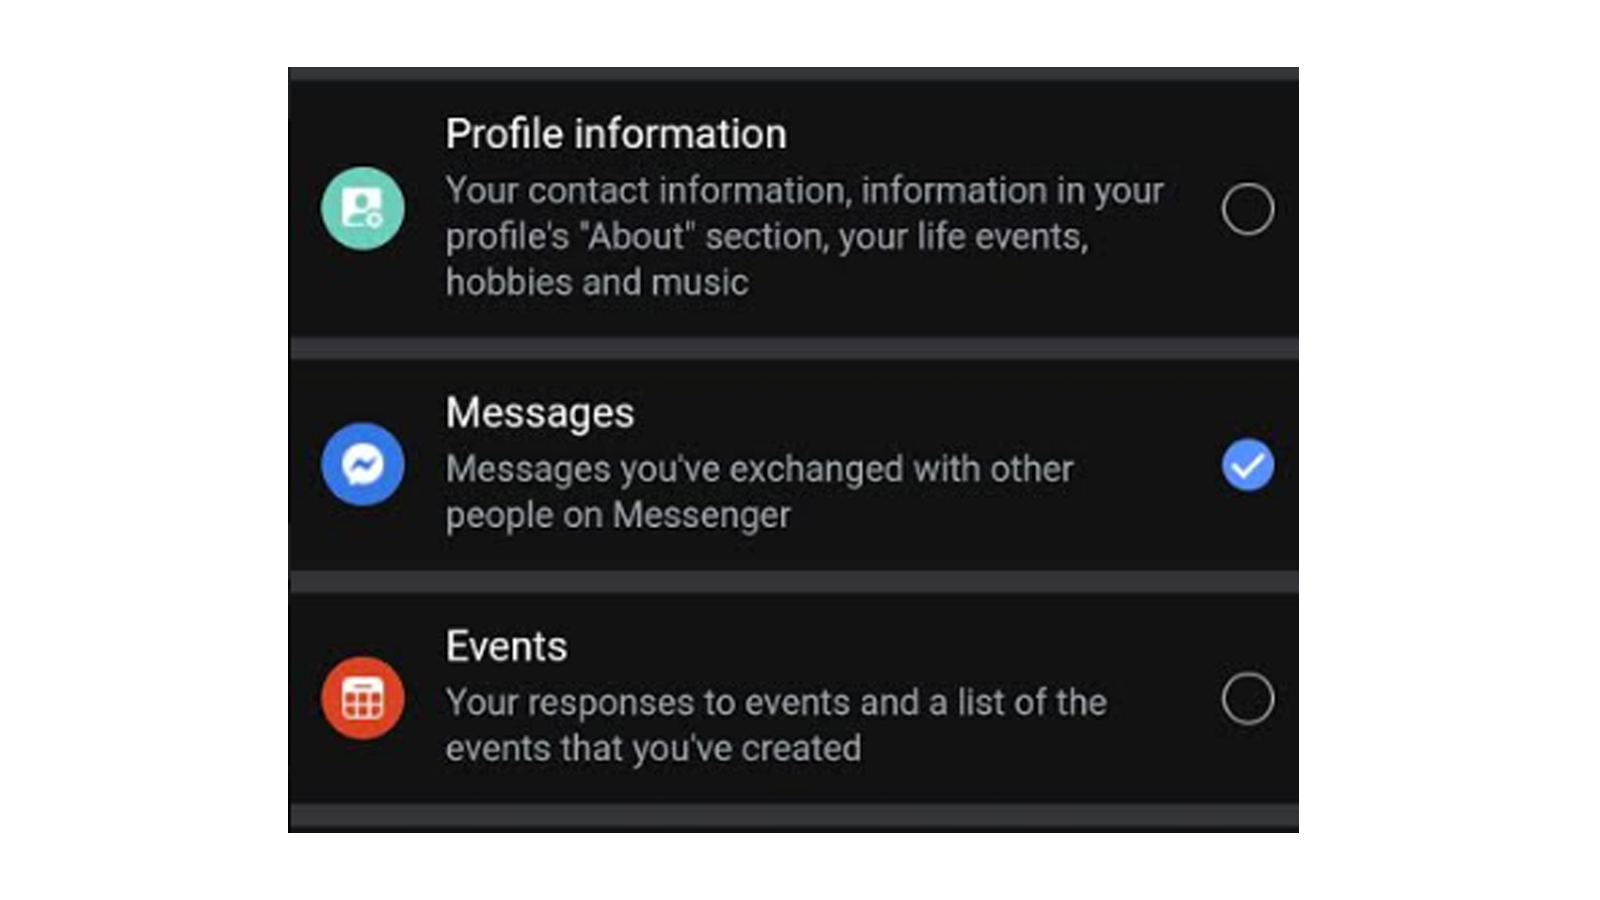
On the “Download Your Information” page, you will see a list of checkboxes representing different types of data. To save your Messenger conversation, make sure to select the “Messages” option. If you wish to include any attachments, such as photos or videos, select the appropriate checkboxes as well.
In addition to selecting the desired data types, you can further customize your download by specifying the date range for the messages. This is useful if you only want to download a specific set of conversations from a particular time period.
Besides the data type and date range, you also have the option to choose the format and quality of the media files. Depending on your preferences, you can select between HTML and JSON formats for the download file, as well as the desired media quality.
Once you have customized the download settings to your liking, proceed to the next step to generate the download file and access your Messenger conversation.
Step 7: Selecting “Messages”
After customizing your download settings, it’s time to select the specific data you want to include in the download. On the “Download Your Information” page, locate the “Messages” option and make sure it is selected.
By selecting the “Messages” option, you are indicating that you want to include your Messenger conversation in the download file. This ensures that all your messages, both sent and received, will be saved and accessible in the downloaded file.
It’s important to note that selecting the “Messages” option includes all conversations you’ve had on Messenger, including individual chats, group chats, and even conversations from archived chats. This allows you to have a comprehensive record of your Messenger activity.
In addition to selecting “Messages,” you can choose to include other types of data that may be relevant to you, such as photos or videos shared in your conversations. If you wish to include these attachments, make sure to select the corresponding checkboxes as well.
Once you have selected the desired data types and ensured that “Messages” is included, you’re ready to proceed to the next step and specify the date range for your download, if necessary.
Step 8: Specify Date Range or Include Attachments
At this point in the download process, you have the option to specify the date range for your Messenger conversation or choose to include attachments in the download.
If you don’t have any specific date range requirements, you can skip this step and proceed with the default settings, which will include all messages from the beginning to the present. However, if you want to narrow down the conversation history, you can specify a specific date range by selecting the “Date Range” option.
When you choose the “Date Range” option, a window will appear where you can select the start and end dates for your conversation. This is particularly useful if you only want to download messages from a specific time frame, allowing you to exclude irrelevant or outdated conversations.
In addition to specifying the date range, you also have the option to include attachments in the download. If you want to save photos, videos, or any other media files shared within your Messenger conversations, make sure to select the corresponding checkbox for attachments.
Remember that including attachments may increase the size of the download file and take longer to generate. Consider whether including attachments is necessary for your specific needs before making your selection.
Once you have made your choices regarding the date range and attachments, you’re ready to proceed to the next step and generate the download file.
Step 9: Generating Download File
After customizing your download settings including the date range and attachments, it’s time to generate the download file. On the “Download Your Information” page, locate the button or link that allows you to start the download process.
Clicking on the designated button or link will initiate the download request. Facebook will then begin compiling your selected data, creating a file that contains your Messenger conversation and any other chosen data. The time it takes for Facebook to generate the download file depends on the size of your data and the type of media included.
During this process, you may need to wait for a few moments or longer, depending on the amount of data and attachments you have selected for download. It’s best to be patient and allow Facebook to complete the process without interruption.
Once the download file is ready, Facebook will provide you with a notification or message containing a link to download the file. Depending on your settings, you may also receive an email notification with the download link.
It’s crucial to remember that this download link is uniquely associated with your Facebook account. Make sure to keep it secure and avoid sharing it with anyone. This will ensure that your Messenger conversations and personal data stay protected.
Now that you’ve successfully generated the download file, let’s move on to the final step and learn how to access and extract your Messenger conversation.
Step 10: Accessing and Extracting the Conversation File
After receiving the notification or email containing the download link, it’s time to access and extract your Messenger conversation file. Follow the instructions provided below to complete this final step of the process:
- Click on the download link provided in the notification or email you received from Facebook.
- Once clicked, your web browser will begin downloading the file. The file format may vary depending on your selected preferences during the customization step.
- Navigate to the location where the file was downloaded on your computer. By default, it is usually saved in your computer’s “Downloads” folder.
- Locate the downloaded file and extract it if necessary. This step may be required if the file is compressed or stored in a ZIP format. Right-click on the file and select the “Extract All” option to extract its contents.
- After extracting the file, you will have access to your Messenger conversation data. Open the file using a web browser or the appropriate software associated with the file format to view and review your conversations.
- Browse through the conversation file to find specific messages or search for keywords if necessary. The conversation file will typically include the text of your messages, timestamps, and any media or attachments you included in the download.
Remember to keep a backup of the downloaded file in a secure location for future reference. It is advised to store it in an encrypted folder or an external storage device to ensure the safety of your data.
Now that you have successfully accessed and extracted your Messenger conversation file, you can review and navigate through your messages whenever you need to reminisce or reference important information.
Conclusion
Downloading your Facebook Messenger conversation can be a valuable tool for preserving important conversations, accessing past messages, or simply keeping a record of your interactions. By following the step-by-step process outlined in this article, you have learned how to download and access your Messenger conversation with ease.
Starting with accessing the Facebook menu and navigating to the appropriate settings, you then customized your download preferences by selecting the desired data types, specifying the date range, and choosing whether to include attachments. After generating the download file, you accessed and extracted the conversation file to view and review your messages.
Remember, the process of downloading your Facebook Messenger conversation is subject to updates and changes by Facebook. It’s essential to stay updated on any modifications to the platform’s features and adjust the process accordingly.
By downloading your Messenger conversation, you can preserve memories, refer back to important information, or simply keep a record of your conversations. It provides a sense of control and ensures that your valuable communication is not lost in the digital realm.
So, the next time you want to access your Facebook Messenger conversation, follow these steps and easily generate a downloadable file of your messages. Enjoy the convenience and peace of mind that comes with having your conversations readily accessible whenever you need them.