Social media sites like Facebook, Instagram, and Twitter has become an indispensable part of many people’s lives. However, it doesn’t come without pitfalls. Many people suffer from overwhelming anxiety due to the constant influx of information and bad news in particular. Not only that, but big tech companies like Facebook have also become notorious for neglecting privacy. That’s why many people decide to either deactivate Messenger or delete their Facebook entirely. While the latter option is a bit drastic for many who use Facebook, the first one is a temporary measure.
Are you among those people who find social media toxic and what to find an escape out of it? If you’re wondering about the difference between deactivating Facebook and deleting it and how can you deactivate Messenger and Facebook, we’ll discuss them in detail here.
Making the Decision to Deactivate Facebook and Messenger
If you’re like most people, you probably have a Facebook account. You have friends from school, work, your distant relatives, and other people you’ve encountered throughout your life. Facebook is one of the biggest platforms and chances are most of the people you know are on it, too.
Facebook does provide many other benefits apart from being a communication and socialization platform. Firstly, it serves as a third-party medium for people to sign in to many different applications. If you’ve signed in with Facebook on a mobile game or application before, you know what we’re talking about. When you deactivate messenger and Facebook, you’ll have problems with third-party apps with which you used Facebook to sign in.
Secondly, Facebook is the platform that connects people not just for socialization. It’s evolved over the years. Now, it’s where you buy and sell goods, run background checks, find a house to live in, etc. The platform is a vital part of society in some ways and deactivating it may affect your business relationships.
You can attempt to deactivate or delete Messenger and Facebook only if you’re ready to turn your back on these advantages. Of course, it’s understandable why someone would still do so because it’s toxic for mental health and privacy. If you’re decided on quitting Facebook and Messenger, the next thing you need to consider is whether you want it to be permanent or temporary. Should you delete or deactivate Facebook and Messenger?
Deactivating vs. Deleting Facebook: The Differences
The distinction between deactivation and deletion is an important one. Before you do either, let’s run over what they both mean.
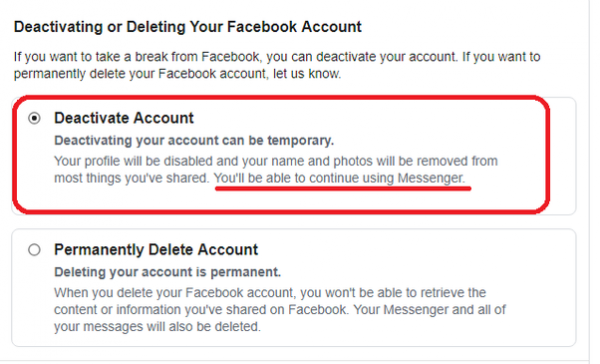
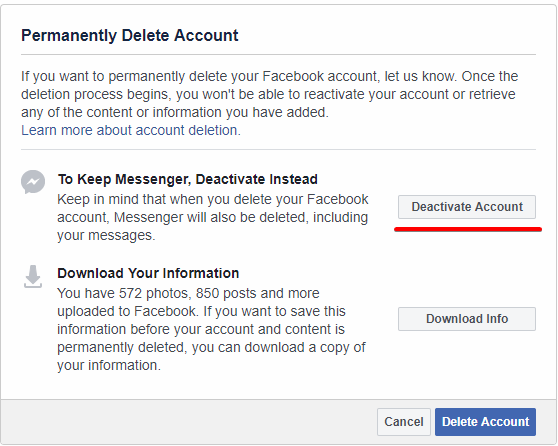
Firstly, the key distinction between the two lies in the matter of permanence. With deactivation, you can temporarily disable Facebook and Messenger without losing them forever. This can be good for when you want to fast from social media and just take a break for a while. It’s not a big commitment as you can come back to your Facebook and Messenger accounts later. In contrast, deleting your Facebook account will completely wipe your Facebook profile and all the data you’ve stored on it. Well, roughly speaking.
Secondly, if you’re looking to swipe your data, deactivating your Facebook won’t do much. However, that isn’t to say that deleting your Facebook will erase everything, either. Startled? Yes, we’re somewhat taken aback, too. Let’s get into the nitty-gritty of what exactly happens when you deactivate Messenger and Facebook vs. when you delete them.
What Happens When I Choose to Deactivate Messenger & Facebook?
When you deactivate Messenger and Facebook, you need to know that none of your data gets wiped. Your personal information is still there kept in stasis. You’ll still have your profile, although your timeline will become invisible. However, Facebook will still keep all your personal information in case you come back. In case it isn’t obvious, it’s because Facebook wants you to come back. They don’t want to lose a valuable user. Once you do, all your data will be restored without problems.
If you think deactivating your Facebook will make your embarrassing comments disappear too, think again. While comments on your posts and timeline will disappear, they won’t if you’ve commented on someone else’s. Your name and comment will still be there but your name will no longer have a link to your profile. Instead, it’ll just appear as a plain text. Your profile icon will also be replaced by Facebook’s default anonymous profile photo.
Once you’ve deactivated your Facebook account, your profile shouldn’t be searchable through the social media site. They can search your name but your account shouldn’t show up, at least in theory. Some users have reported that their profiles are searchable after deactivation because they still find new friend requests upon reactivation. Do you want to make sure your profile’s invisible after deactivating? You can try to by searching for your name via your friend’s Facebook account. If you find yourself still searchable, try reactivating and deactivating again. However, if the problem persists, contact Facebook and make a complaint.
Can Someone Still Message Me After I Deactivate Messenger?
This is a common question. When you deactivate Facebook, you won’t necessarily deactivate Messenger, too. You’ll have the option when you deactivate your Facebook, but it’s not a necessary step. You can continue using Messenger and its app with a deactivated Facebook account. However, if you deactivate Messenger as well after you deactivate your Facebook account, no one can message you. That’s true even in your existing conversation threads. Moreover, people will no longer have access to your profile via Messenger.
However, you should know that while people can no longer message you, your past conversations will still exist. That means conversations aren’t wiped out when you deactivate your account. If your main goal is to wipe your conversation data on Facebook, then you’re out of luck. Before you think deleting your account will solve the problem, know that it also won’t work. Your conversations will only read as “Facebook User” but they’ll never be deleted.
When Can I Reactivate My Deactivated Messenger and Facebook?
As we said, Facebook’s main interest is in keeping you on the platform. That’s why it’s very easy to reactivate your deactivated Facebook and Messenger accounts. You can reactivate your account anytime when you sign into the platform again. Note that if you’ve deactivated Facebook and Messenger, signing into Messenger will also automatically reactivate your Facebook account. If you prefer to reactivate just your Messenger, you can sign into the app and deactivate your Facebook account again.
You should also know that you can reactivate your Facebook account via third-party apps. If you’ve signed into other apps using your Facebook while you’re deactivated, your Facebook account will automatically reactivate. Once you sign into the app, Facebook will send you a text or email verification code to sign in. After you do, your profile will be up and running again.
Another way to reactivate your Facebook is via Facebook’s text messages. Yes, you read that right. Facebook texts people who’ve deactivated their accounts to tempt them to come back. Of course, that’s only possible if you’ve given Facebook your mobile number. If you did, then expect to receive a text after having deactivated for quite some time. Some people have accidentally reactivated their accounts this way because of the accompanying link to reactivate their profile. If you do click on the accompanying link, then you can also reactivate this way.
How Many Times Can I Deactivate Messenger And Facebook?
You can do it as many times as you want. Thus, if you want frequent sabbaticals from the social media site, it’s possible. However, if you’ve deactivated multiple times, you might have to wait 24 hours after logging in for full activation.
What Happens When I Choose to Delete My Facebook?
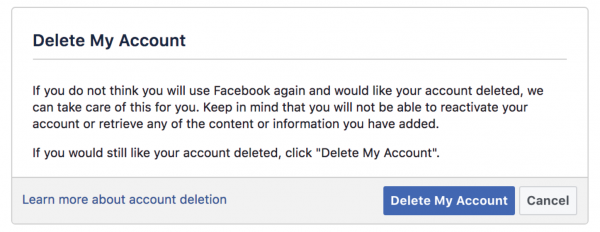
You already know that your data is in stasis when you deactivate Messenger and Facebook. In contrast, when you delete your Facebook, most of your data will vanish. Once you request to delete your account, Facebook will give you 30 days to reconsider before everything vanishes. This will give you time to decide to come back in case you change your mind.
However, don’t think that after 30 days, the company will delete all your data. Yes, you can’t change your mind and undelete after 30 days, but it takes 90 days for Facebook to permanently delete your data. Although you needn’t worry that third parties will snag your data during that time, either. Facebook vouches for that.
When you delete your Facebook account, your existence on the platform mostly vanishes. This includes your timeline, your liked pages, groups you were a member of, etc. However, as we said, not everything is deleted. Your comments on posts will remain but without a personal identifier. Moreover, your messages on Messenger won’t be deleted. They’ll just read as “Facebook User” so your history is still there. However, you won’t be able to use or come back to Messenger after deleting your Facebook account. There’s no existing way to use Messenger without a Facebook account.
In addition, all your log data (for example, times you logged in, groups you’ve visited, etc.) will remain with Facebook. They’ll still use it for their algorithms and research, but your name will no longer be attached to the records. Essentially, your data will be kept as a demographic.
Can I Reactivate My Deleted Facebook Account?
There is a way to restore your Facebook after deleting it. However, certain steps have to have been taken before you deleted your account. That step is to download a copy of all your data stored by Facebook. This will help you get your account back much easier. However, it is a trickier reactivation process and one that’s only possible if you’ve taken this specific step before deletion.
How to Download Your Data
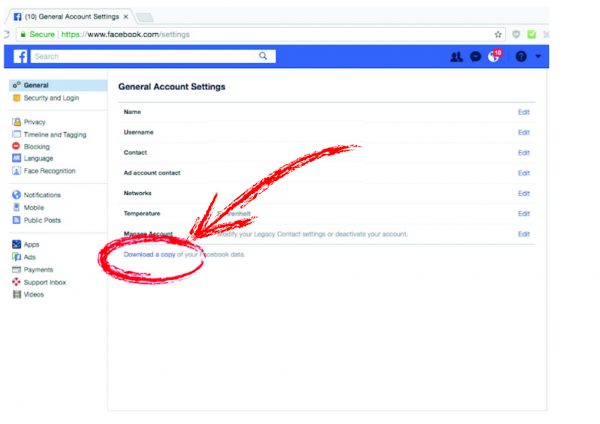
If you want to keep this as a possible option, you can follow these steps to download a copy of your Facebook data:
- Go to Facebook.com and log in via browser (unfortunately, you can’t do this using the mobile app).
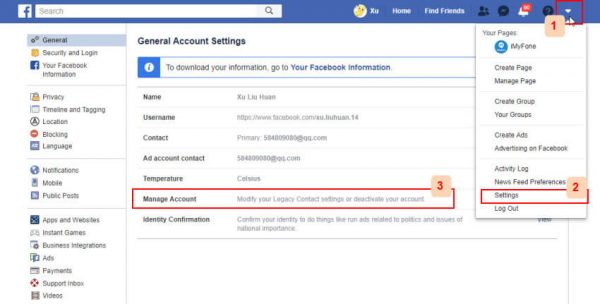
- Click on the downward arrow in the upper-right corner of your Facebook page.
- Go to Settings & Privacy then navigate to Settings.
- Click on Your Facebook Information.
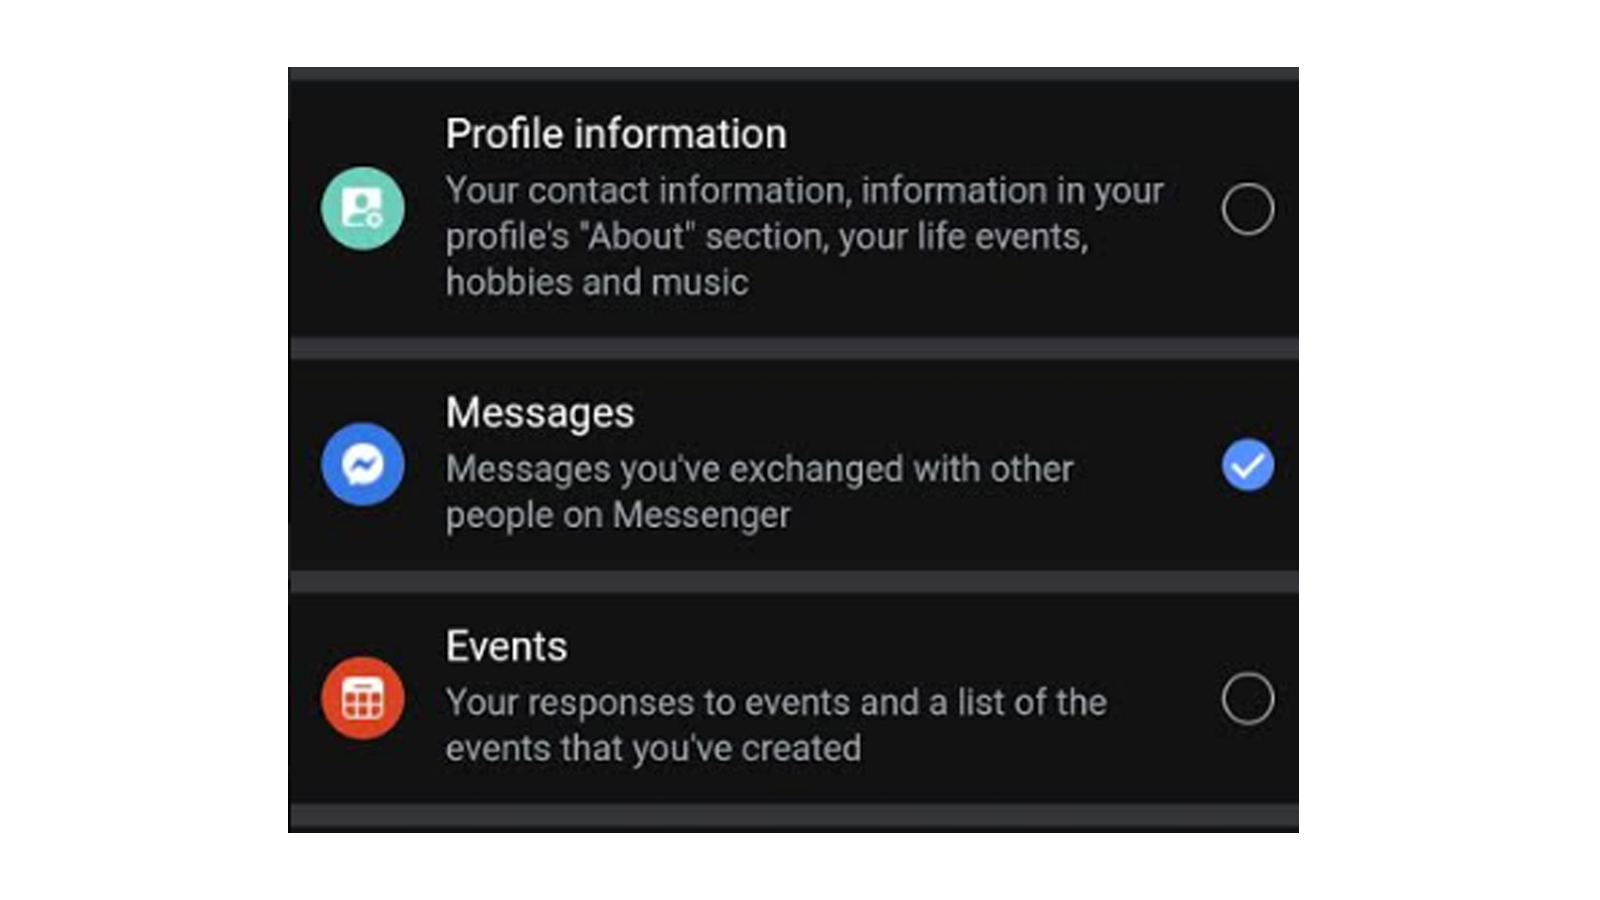
- Choose Download Your Information.
- You’ll see a list of information you might want to download. Select what you want, the date range, file type, etc.
- After selecting everything (or letting them remain default), click Create File.
- Wait for your file to be created until it’s ready for download. You should receive a notification when it’s done getting ready.
- Click on the notification to review the file size; if all is good, then click Download.
- Type in your password to confirm your Facebook identity and then wait for the download to finish.
Once your download is finished, it should be given to you as a ZIP file. You’ll have to unzip it to view the content, but it’s handy if you want to reactivate a deleted account. However, remember to do this step right before you delete your account so that all of your information will be restored. Otherwise, you’ll lose some of the information. It’s problematic if you download it now and delete your account months or years later. If so, you’ll only be able to restore the information from the beginning to the time you downloaded the file. Information after the download before account deletion will be lost.
Step-By-Step Guide: How to Deactivate Messenger and Facebook
With all of that out of the way, here are some step-by-step guides for how to deactivate Messenger and Facebook. Before proceeding, note that if you want to deactivate Messenger, you have to deactivate your Facebook account as a prerequisite.
Facebook Account
There are different ways to deactivate your account on Facebook, depending on whether you’re using New Facebook or Classic Facebook. At the time of writing, Facebook is updating how the platform looks between New and Classic Facebook. As such, there are two methods to deactivating your account:
How to Deactivate Using New Facebook
- Sign in to your Facebook account.
- Click on the down arrow on the top right of Facebook.
- Go to Settings & Privacy.
- Navigate to Settings.
- Click on Your Facebook Information on the left-hand side.
- Choose Deactivation and Deletion.
- Click on Deactivate Account.
- Select Continue to Account Deactivation and just follow the given steps for confirmation.
How to Deactivate Using Classic Facebook
- Sign in to your Facebook account.
- At the top-right of Facebook, click on the down arrow.
- Navigate to Settings.
- Click on Your Facebook Information on the left column.
- Choose Deactivation and Deletion.
- Then click on Deactivate Account.
- Click on Continue to Account Deactivation and follow Facebook’s instructions for confirmation.
Note that once you deactivate your Facebook, the platform will also ask if you want to deactivate Messenger. You can choose either yes or no but the choice to deactivate Messenger remains optional.
Messenger
If you didn’t deactivate Messenger when you deactivated Facebook, you can do so separately. Follow the given steps depending on which app and OS you’re using.
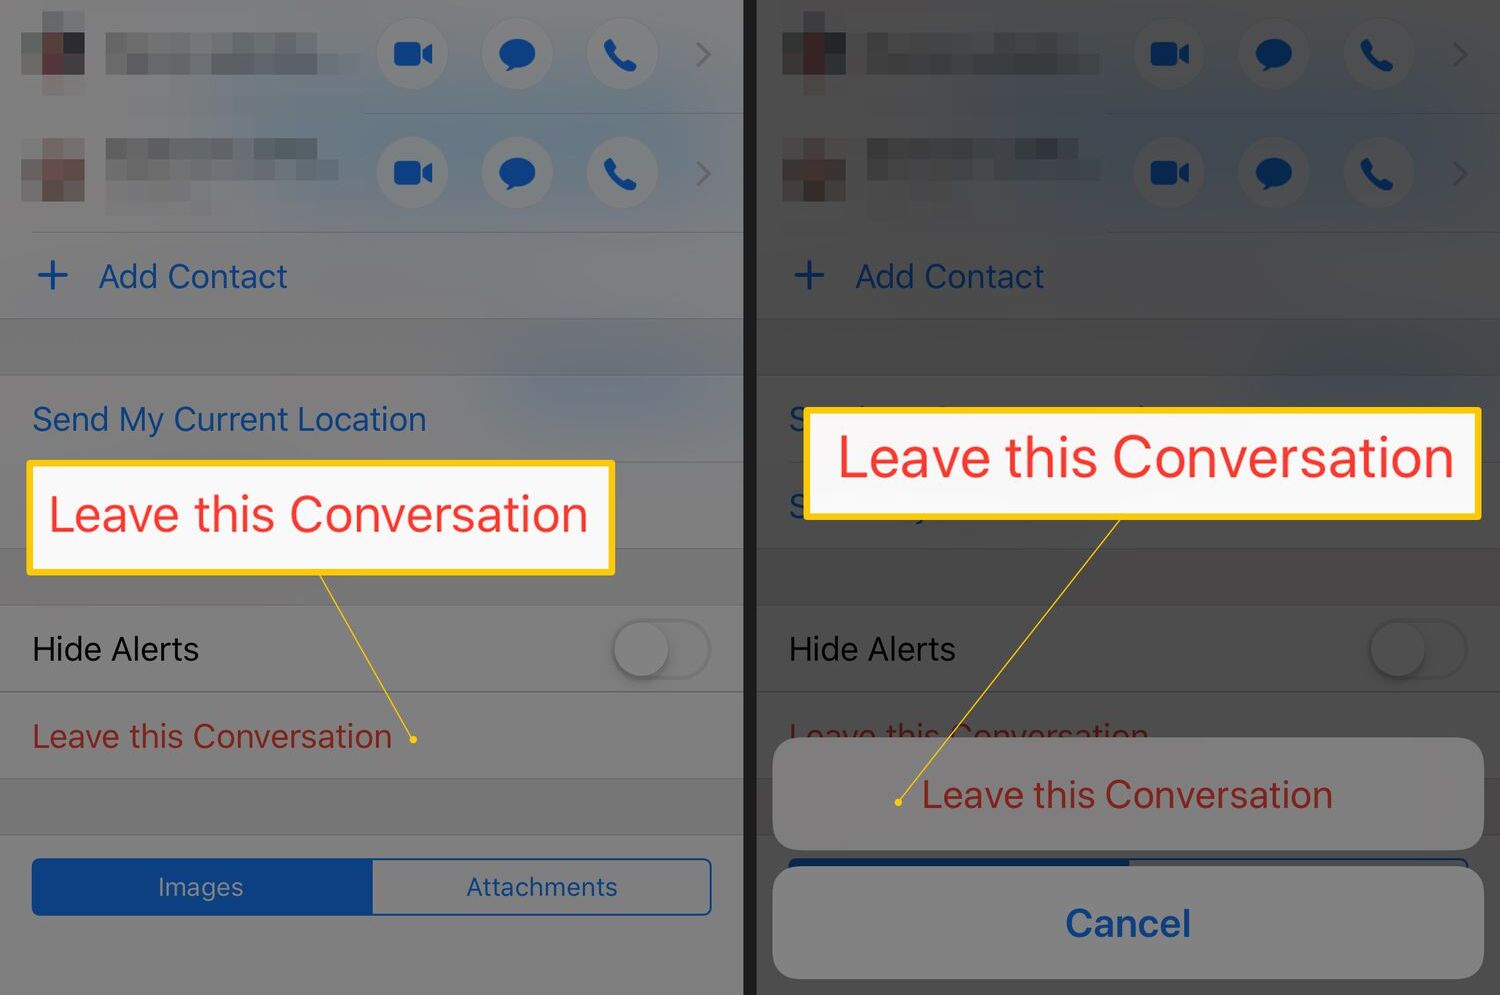
iPhone and iPad
- From the Chats home, click on your profile icon on the top left.
- Go to Account Settings.
- Tap on Delete Your Account and Information right under Your Facebook Information.
- Choose Deactivate.
- Type in your password and submit.
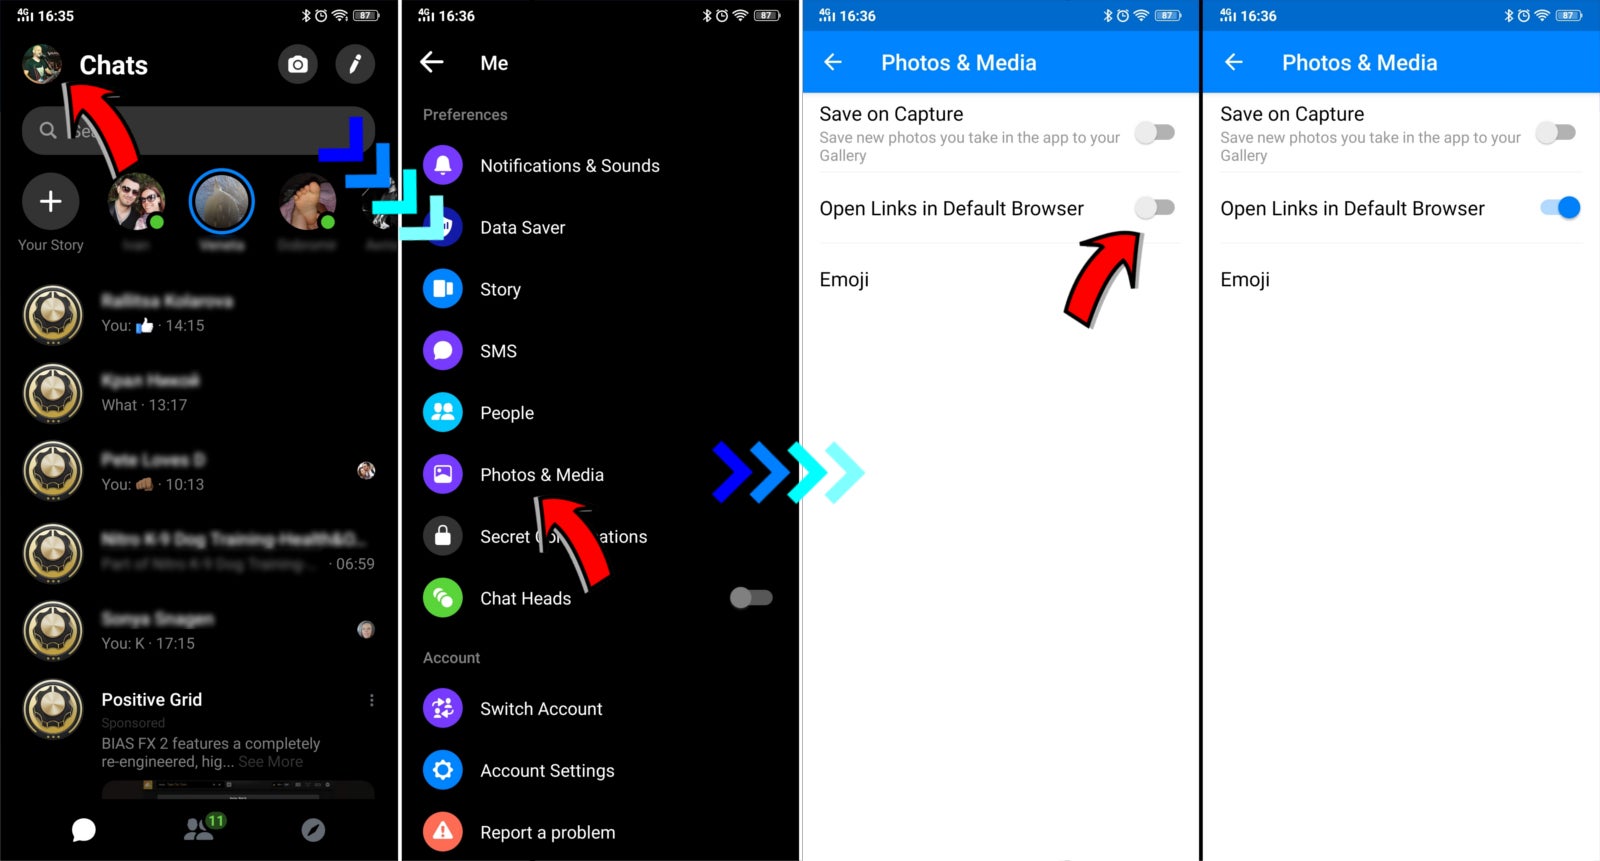
Android
- From the Chats home, click on your profile icon on the top left.
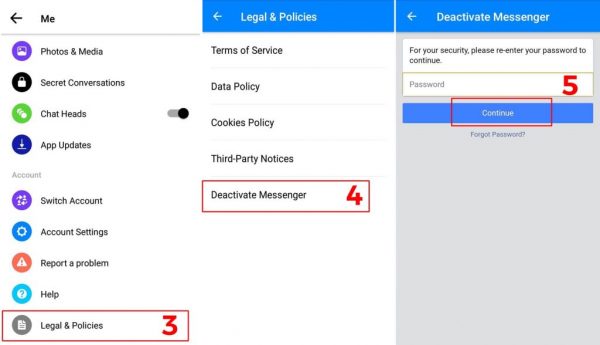
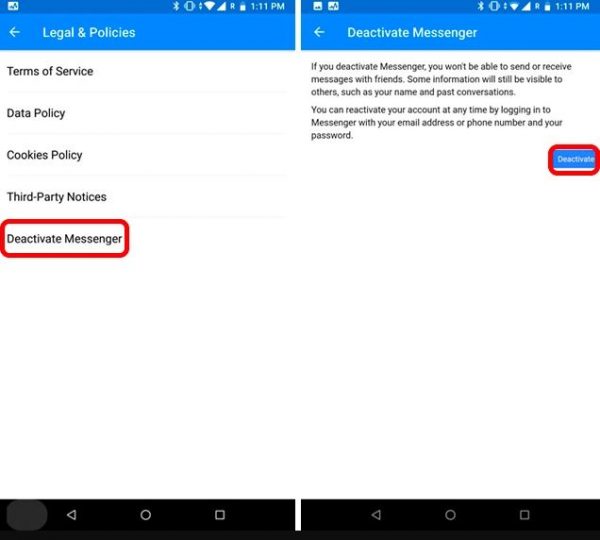
- Go to Legal & Policies.
- Tap on Deactivate Messenger.
- Choose Deactivate.
Messenger Lite App
- Tap on the Gear Icon on the top right.
- Choose Account Settings.
- Scroll down then choose Account Ownership and Control.
- Choose Deactivation and Deletion.
- Select Deactivate Account.
- Tap on Continue to Account Deactivation.
- Type in your reason for deactivation, then click on Continue.
- Tap on Deactivate My Account.
Why Can’t I Deactivate My Messenger?
If you’ve tried to follow the steps above and found that some of the options aren’t available, don’t panic. You might have not yet deactivated your Facebook account if that’s the case. Remember, you can only deactivate Messenger after you’ve deactivated your Facebook account. There’s no other way around it. Thus, if you want those pesky messages to go away, you’ll have to deactivate your Facebook. However, there’s also the option to just mute your Messenger if annoying messages are your problem.
Final Word
It’s a serious undertaking to delete your account because society is interconnected through social media. The reality is that big tech companies hold much of our digital information. Whether we like it or not, it’s an integral part of how we operate. Some of us even make a living out of it. However, since there are some concerns about privacy and mental health-related issues, it’s understandable to want to quit. While deleting your account may be a very reasonable option, it’s also good to have deactivation as an option. You can quit for a while without commitment and see how it goes. Whether it does or doesn’t work for you will depend, but at least you won’t have to drastically delete all your data immediately.