Introduction
Welcome to this step-by-step guide on how to download Canva presentations as PowerPoint (PPT) files. Canva is a popular online graphic design tool that allows you to create stunning presentations with its user-friendly interface and extensive library of templates and design elements.
One of the great features of Canva is the ability to download your presentations in various formats, including PDF, image files, and PowerPoint (PPT). This flexibility ensures that you can easily share your presentation with others or use it in different contexts.
In this guide, we will focus specifically on downloading Canva presentations as PowerPoint files. You may need to do this if you want to make further edits to your presentation using Microsoft PowerPoint, or if you need to present your slides in a more traditional format.
Whether you are a student, professional, or someone who loves creating visually appealing presentations, Canva offers a wide range of tools and options to bring your ideas to life. By following the steps outlined in this guide, you’ll be able to download your Canva presentation as a PowerPoint file and explore further possibilities with your work.
Now, let’s dive into the step-by-step process of downloading Canva presentations as PowerPoint (PPT) files.
Step 1: Open Canva
The first step in downloading your Canva presentation as a PowerPoint file is to open Canva. If you don’t already have an account, you can easily create one for free by visiting Canva’s website.
Once you’ve logged into your Canva account, you will be greeted by the Canva dashboard. This is where you can access all your previous designs and create new ones.
To begin, click on the “Create a design” button located at the top right corner of the dashboard. This will open a drop-down menu with various design options.
Since we are focusing on presentations, select the “Presentation” option from the drop-down menu. Canva offers a wide range of presentation templates to choose from, or you can start with a blank canvas and design your presentation from scratch.
Once you’ve made your selection, Canva will open the presentation editor. Here, you can customize your slides, add text, images, shapes, and other design elements to make your presentation visually appealing.
With Canva’s intuitive drag-and-drop interface, you can easily rearrange elements on your slides, change fonts and colors, and apply various effects to create a polished and professional-looking presentation.
Now that you have successfully opened Canva and accessed the presentation editor, you are ready to move on to the next step: selecting the presentation you want to download as a PowerPoint file.
Step 2: Select the Presentation
After opening Canva and accessing the presentation editor, it’s time to select the specific presentation that you want to download as a PowerPoint (PPT) file.
If you have previously created presentations in Canva, you will see a list of your existing presentations on the dashboard. Scroll through the list to find the presentation you want to download, or use the search bar to quickly locate it.
If you are starting a new presentation from scratch, you can skip this step and move on to customizing your presentation in the editor.
Once you have identified the presentation you want to download, click on it to open it in the presentation editor. This will load your selected presentation with all its slides and design elements.
In the presentation editor, you can review your slides and make any necessary edits or adjustments before downloading it as a PowerPoint file. Take this opportunity to double-check for any typos, formatting issues, or missing content.
If you want to make changes to the overall design of your presentation, such as applying a different template or theme, you can also do so at this stage. Canva provides a variety of pre-designed templates and design elements that you can easily swap out to customize your presentation according to your preferences.
Remember, the way your presentation looks in Canva may differ slightly when exported as a PowerPoint file. It’s a good idea to have a clear idea of how you want the final PowerPoint presentation to look, taking into account any limitations or adjustments that may occur during the conversion process.
Once you are satisfied with how your presentation looks and any edits you made, it’s time to move on to the next step: customizing the presentation.
Step 3: Customize the Presentation
Now that you have selected the presentation you want to download as a PowerPoint file, it’s time to customize it according to your specific needs and preferences.
The Canva presentation editor offers a wide range of customization options to help you create a visually appealing and engaging presentation. Here are some key elements you can customize:
- Slides: Canva allows you to add, delete, and rearrange slides as needed. You can easily duplicate slides to maintain a consistent design throughout your presentation.
- Text: Customize the text on each slide by changing the font, size, color, and alignment. You can also apply formatting options such as bold, italic, and underline to emphasize important information.
- Images: Add images to your presentation by uploading your own photos or choosing from Canva’s extensive library of free and premium stock images. You can resize, crop, and apply filters to the images to enhance their visual impact.
- Shapes and Icons: Canva offers a wide variety of shapes and icons that you can use to enhance your presentation. These elements can be customized in terms of size, color, and position.
- Background: Customize the background of your slides by choosing from a selection of colors, patterns, or images. This helps to create a cohesive and visually appealing theme throughout your presentation.
- Animations and Transitions: Canva also allows you to add animations and transitions to your slides to create dynamic and engaging presentations. Experiment with different effects to bring your content to life.
Take your time to customize each slide according to your desired layout and design. Use Canva’s editing tools to align elements, maintain consistency in font choices and colors, and ensure that your presentation looks polished and professional.
Remember, the more attention you pay to the customization of your presentation, the better it will resonate with your audience and convey your message effectively.
Once you have customized your presentation to your satisfaction, it’s time to move on to the next step: downloading your presentation as a PowerPoint (PPT) file.
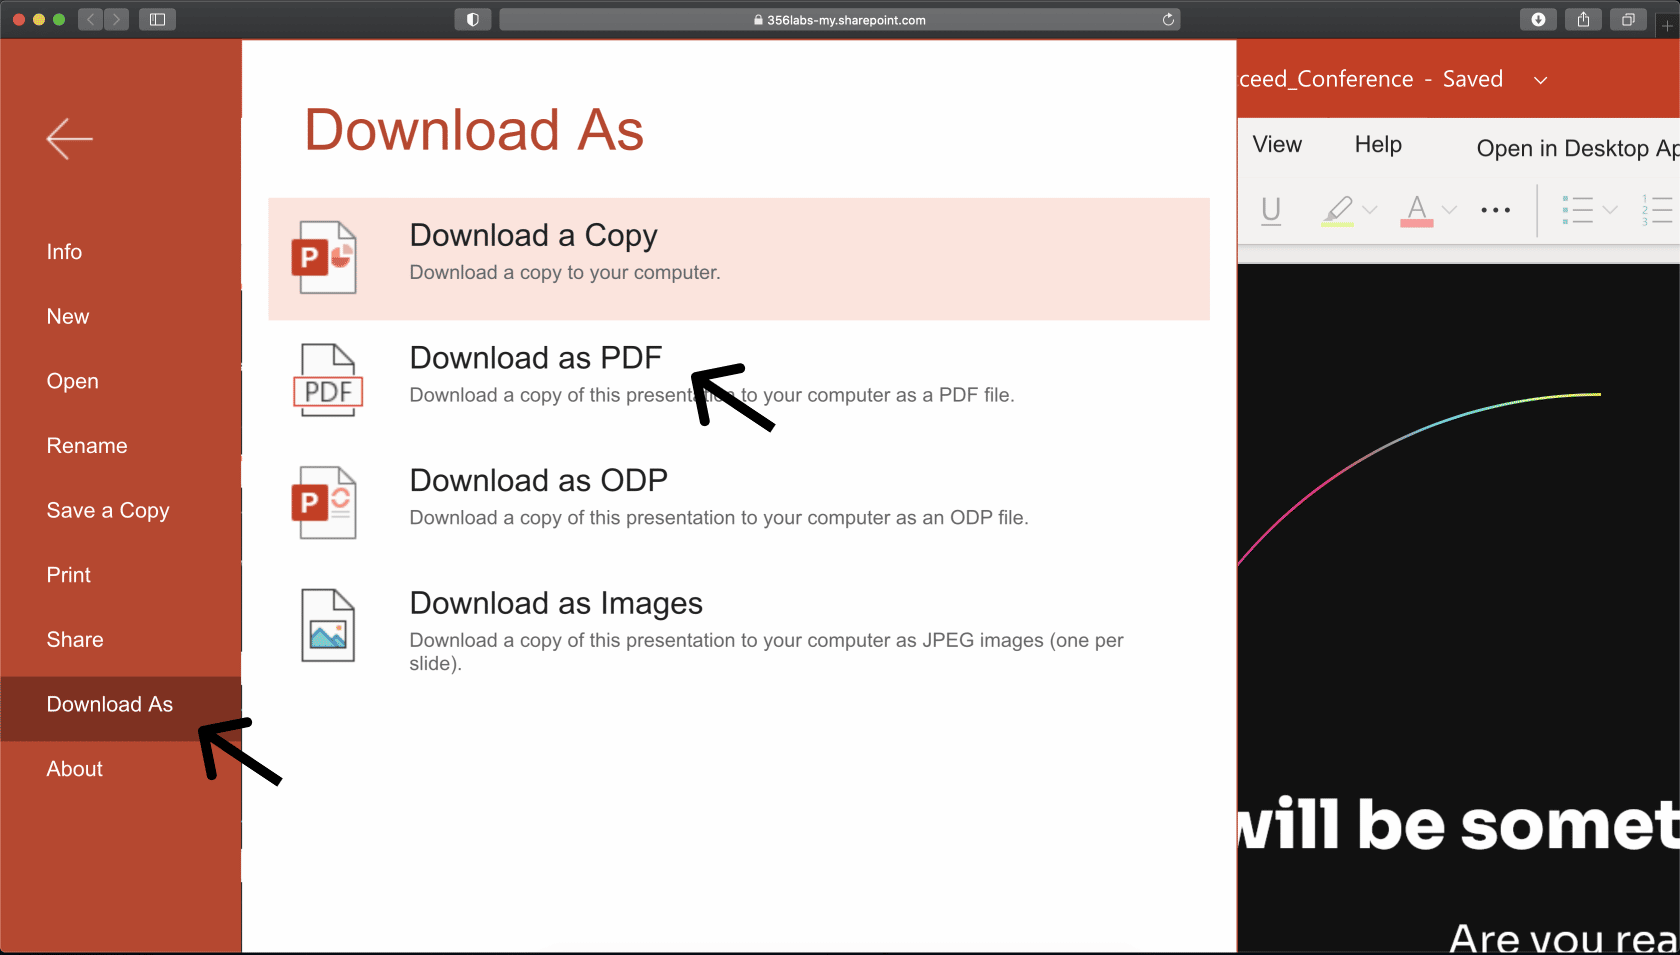
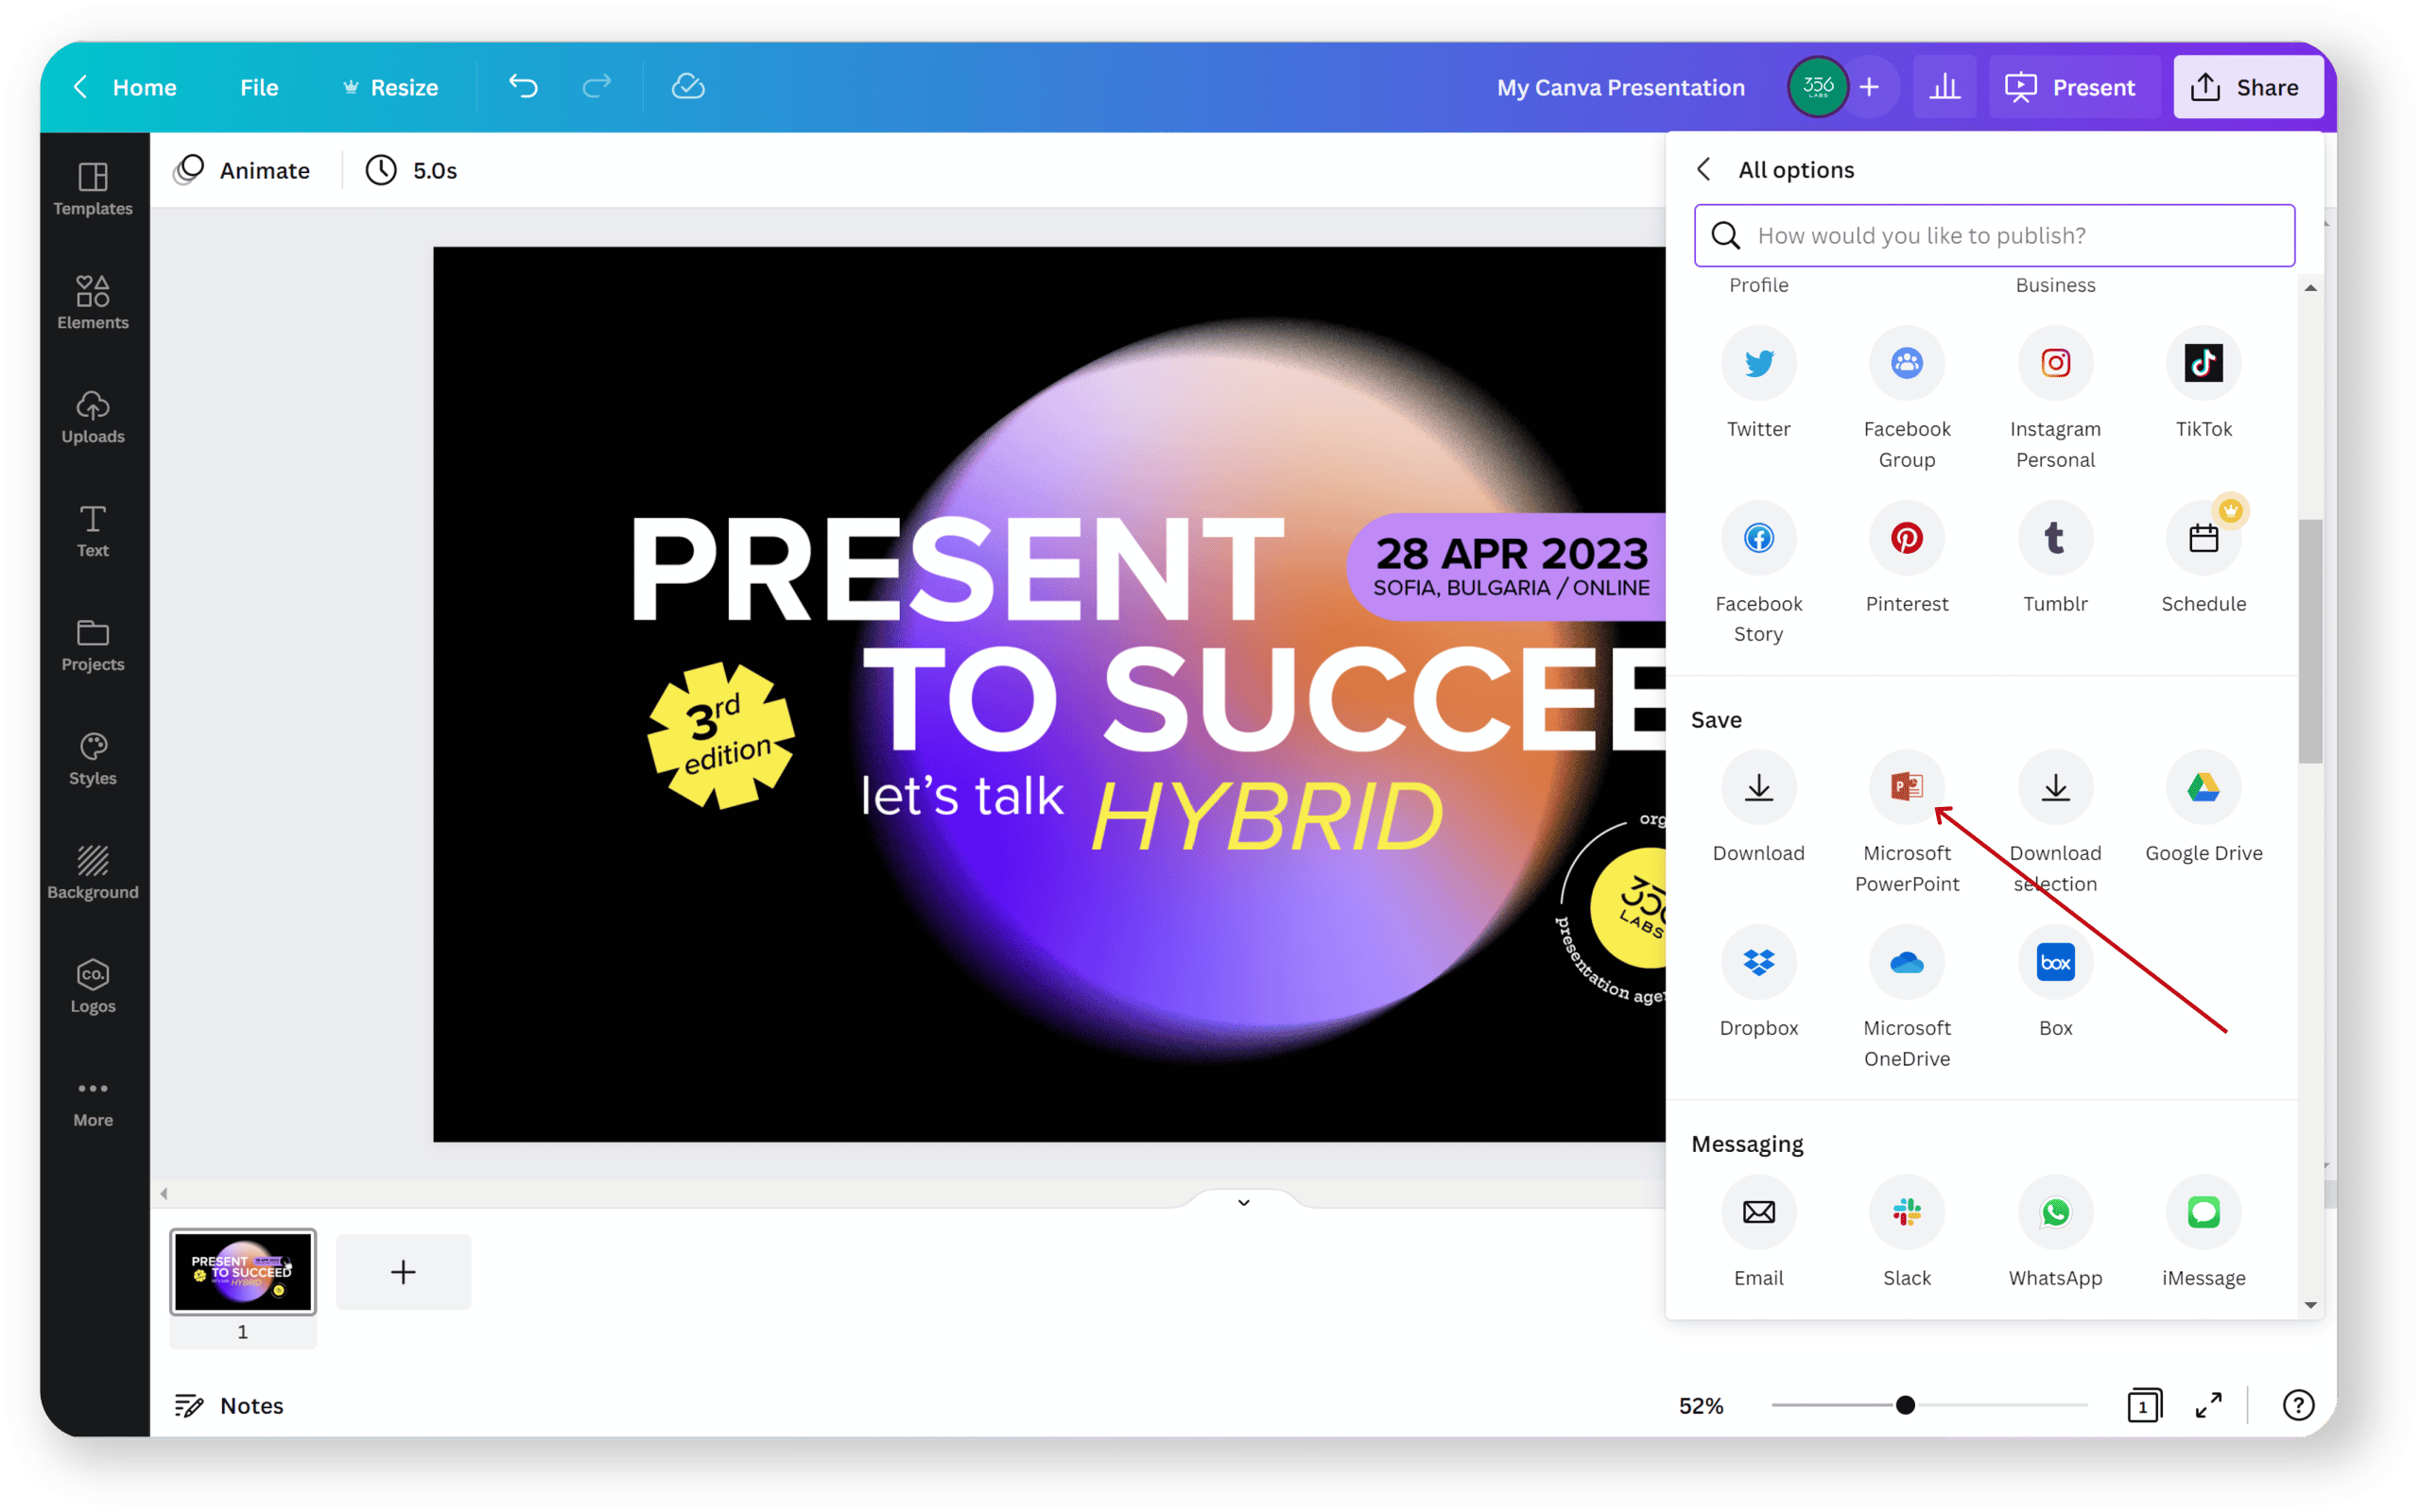
Step 4: Click on “Download”
Once you have customized your Canva presentation to suit your needs, it’s time to proceed with downloading it as a PowerPoint (PPT) file.
To download your presentation, locate the toolbar at the top of the Canva editor. On the right side of the toolbar, you will find a button labeled “Download.” Click on this button to open the download options.
When you click on the “Download” button, a dropdown menu will appear with several download options. Choose the “PowerPoint” option from the list. This will initiate the process of converting your Canva presentation into a PowerPoint file.
Depending on the complexity and size of your presentation, the conversion process may take a few moments. Be patient and wait for Canva to generate your PowerPoint file.
It’s important to note that Canva may prompt you to confirm your download by asking you to verify your email address. This additional step is to ensure the security and privacy of your downloaded file. Follow the instructions provided by Canva to proceed with the download confirmation process.
Once the conversion process is complete, Canva will either automatically start downloading the PowerPoint file to your device or provide a link to download it. Keep in mind that the download process may vary depending on your internet connection speed and device.
It’s advisable to save the downloaded PowerPoint file in a location on your device where you can easily locate it later. Choose a file name that accurately reflects the content of your presentation and makes it easy for you to identify it in the future.
Congratulations! You have successfully downloaded your Canva presentation as a PowerPoint (PPT) file. Now, it’s time to move on to the next step: choosing the PPT format.
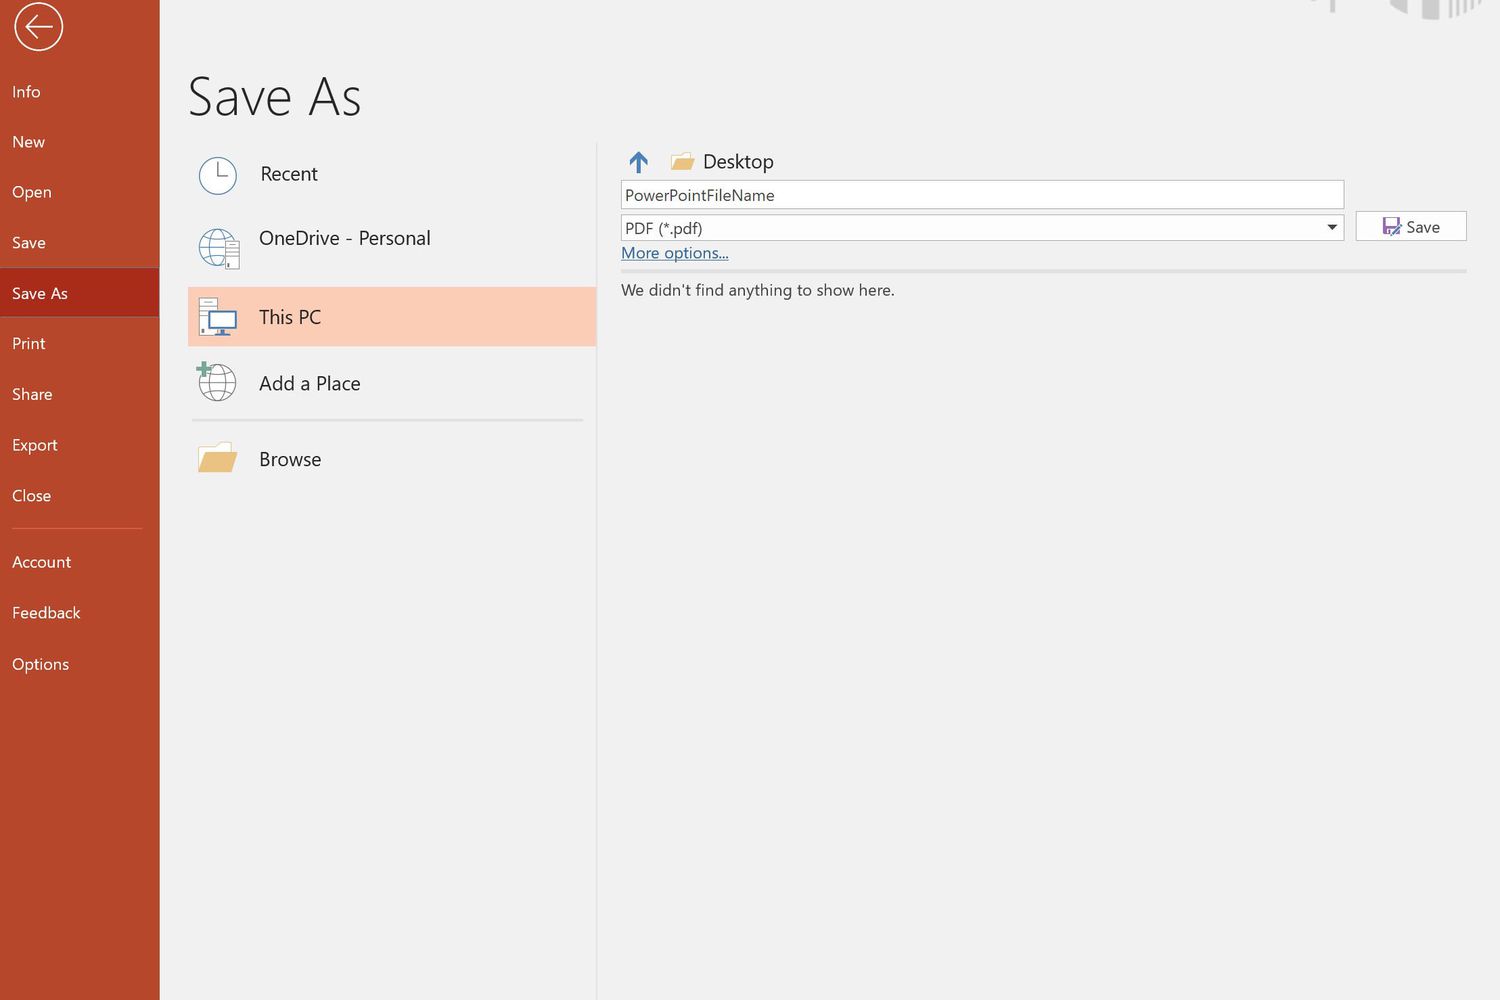
Step 5: Choose PPT Format
After downloading your Canva presentation as a PowerPoint (PPT) file, it’s important to ensure that you have selected the correct PPT format that is compatible with your requirements.
Canva offers different PPT formats to choose from, depending on your intended use for the presentation. Here are a few commonly used PPT formats:
- PPT: The standard PowerPoint format that is widely supported by various versions of Microsoft PowerPoint.
- PPTX: An updated version of the PPT format that offers enhanced features and functionality. This format is compatible with newer versions of Microsoft PowerPoint.
- PPTM: A macro-enabled PPT format that allows the inclusion of macros and interactive elements in the presentation.
- POT: A PowerPoint template format that can be used as a starting point for creating new presentations with a consistent design.
When choosing the PPT format, consider the compatibility of your file with the devices and software you plan to use for presenting or editing your presentation. If you are unsure which format to select, the standard PPT format is generally a safe choice.
During the download process from Canva, you will likely be prompted to select the PPT format. Make sure to review the options provided and choose the format that best suits your needs.
It’s worth noting that some advanced features or design elements in your Canva presentation may not be fully supported in certain PPT formats. It’s a good idea to test your downloaded presentation in the chosen PPT format to ensure that everything is as expected and functioning correctly.
Once you have selected the appropriate PPT format, proceed with saving the downloaded Canva presentation in that format. Choose a location on your device where you can easily access the file.
With the PPT format selected and the presentation saved, you are now ready to move on to the final step: concluding the process and saving your presentation.
Step 6: Save the Presentation
After successfully downloading your Canva presentation as a PowerPoint (PPT) file and selecting the desired PPT format, it’s crucial to save the presentation to a location where you can easily access it whenever needed.
When saving the downloaded presentation, consider the following steps:
- Choose a File Name: Give your presentation a descriptive and meaningful file name that accurately represents its content. This will make it easier for you to identify and locate the presentation in the future.
- Select a Storage Location: Determine where you want to store the presentation on your device. It’s advisable to choose a dedicated folder or directory for your presentations to keep them organized.
- Backup and Cloud Storage: Consider backing up your presentation to an external storage device or uploading it to a cloud storage platform for extra security and accessibility.
- Revision Control: If you plan to make further edits or updates to the presentation, consider using version control or document management tools to keep track of changes and maintain a history of revisions.
- Sharing and Collaboration: If you intend to share or collaborate on the presentation with others, make sure to enable appropriate sharing settings or grant access permissions to the relevant individuals.
By saving your Canva presentation in a secure and organized manner, you can easily access and work on it whenever necessary. It also allows you to maintain control over your presentation and ensure its availability for future use.
Remember to periodically update and save new versions of your presentation as you make changes or improvements. This will help you maintain a well-maintained and up-to-date collection of presentations.
With these final steps completed, congratulations! You have successfully downloaded your Canva presentation as a PowerPoint (PPT) file, selected the appropriate PPT format, and saved the presentation to a location of your choice. You can now confidently use your presentation for various purposes, whether it’s for professional presentations, academic projects, or any other related activities.
Conclusion
Congratulations! You have now reached the end of this guide on how to download Canva presentations as PowerPoint (PPT) files. By following the step-by-step process outlined in this guide, you have learned how to open Canva, select a presentation, customize it to your liking, and download it in the desired PPT format.
Canva provides an intuitive and user-friendly platform for creating visually stunning presentations. With its extensive library of templates, design elements, and customization options, you have the tools to create professional and engaging presentations that captivate your audience.
Remember, as you customize your Canva presentation, pay attention to the overall design, fonts, colors, and other elements that contribute to the visual appeal of your slides. Ensure that your presentation effectively communicates your message and aligns with your intended purpose.
By downloading your Canva presentation as a PowerPoint file, you can easily share it with others, present it in a more traditional format, or further edit it using Microsoft PowerPoint or other compatible software.
Additionally, make sure to save your downloaded presentation in a secure location and consider backing it up to prevent any data loss. Regularly update and make new versions of your presentation as needed, staying organized and ready to access your work whenever necessary.
Now that you have successfully completed the process of downloading Canva presentations as PowerPoint (PPT) files, you can confidently showcase your ideas, concepts, and information using a format that works best for you and your audience.
So go ahead, unleash your creativity, and make impactful presentations with Canva!