Introduction
Converting a PowerPoint presentation into a PDF format can be incredibly useful, whether you want to ensure the document’s compatibility across different devices or protect its content from being edited. Fortunately, the process is simple and can be accomplished in just a few steps. In this article, we will guide you through the process of downloading a PowerPoint presentation as a PDF file.
PowerPoint is a widely used software for creating visually appealing and engaging presentations. However, when sharing your presentation with others, there may be instances where you want to provide a PDF version to ensure that the formatting remains intact, regardless of the operating system or device used by the recipient. Additionally, PDFs are often preferred in professional settings as they cannot be easily modified, providing an added layer of security for your presentation.
In the following sections, we will outline a step-by-step guide on how to download a PowerPoint presentation as a PDF. Whether you are using the latest version of PowerPoint or an older edition, the process remains largely the same. So, let’s get started and learn how to convert your PowerPoint presentations into PDF files.
Step 1: Open the PowerPoint Presentation
The first step in converting a PowerPoint presentation to a PDF is to open the presentation in the PowerPoint software. If you already have the PowerPoint presentation saved on your computer or device, locate the file and double-click on it to open it in PowerPoint. Alternatively, you can open PowerPoint first and then navigate to the “File” menu to find and open the presentation you wish to convert.
Once the presentation is open, you will be able to view and edit its content as needed. Take this opportunity to ensure that the slides are arranged in the desired order and that any necessary modifications or updates have been made. If you need to make any changes to the presentation, do so before proceeding with the conversion process.
If you don’t have a PowerPoint presentation yet, you can create a new one by selecting “New” from the “File” menu in PowerPoint. This will give you a blank slate to start creating your slides from scratch or using pre-designed templates provided by PowerPoint. Remember to save your presentation before proceeding to the next step.
Opening the PowerPoint presentation is an essential first step in converting it to a PDF. This will allow you to review and make any necessary changes to the slides to ensure that your final PDF version is accurate and complete. Now that you have your presentation open, let’s move on to the next step: accessing the “File” menu.
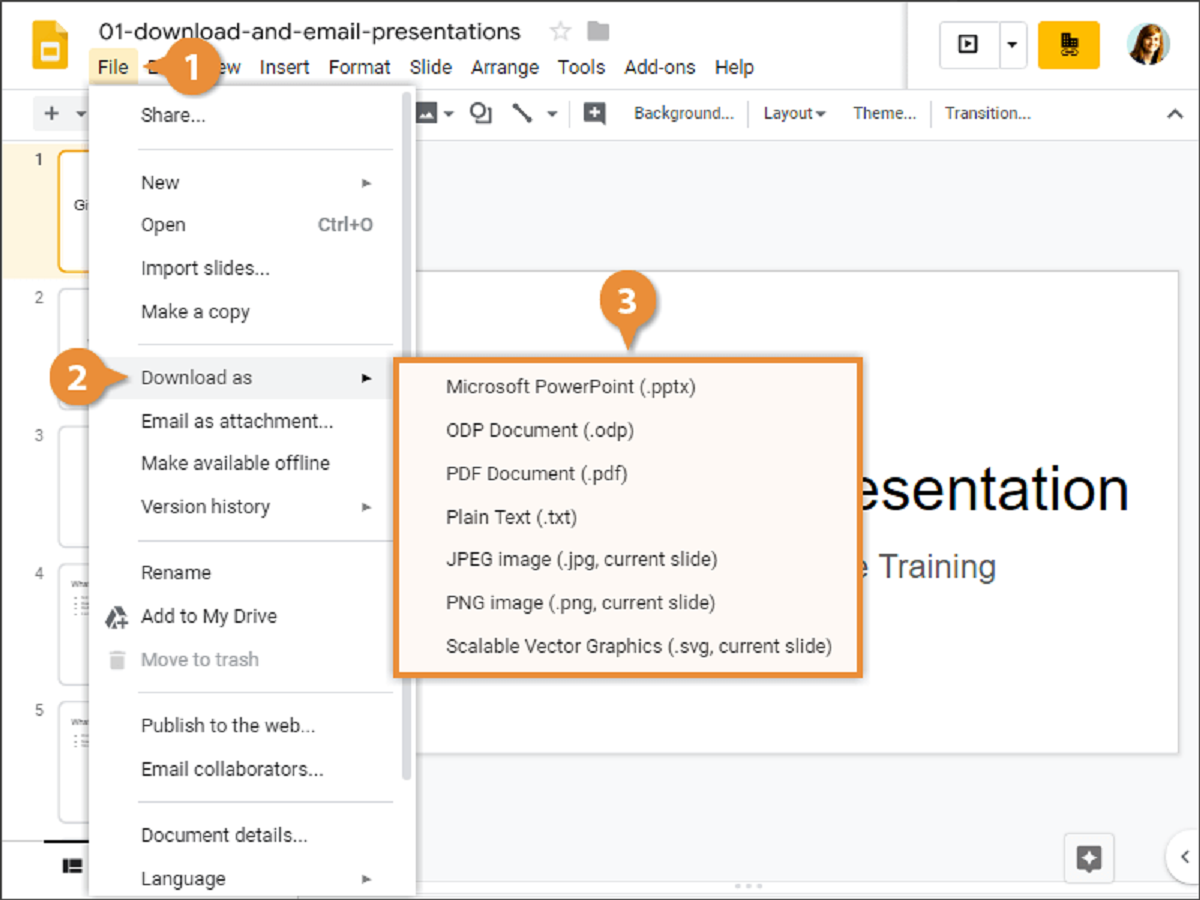
Step 2: Go to the “File” Menu
Once you have opened your PowerPoint presentation, the next step in converting it to a PDF is to go to the “File” menu. The “File” menu is where you can access various options and settings related to your presentation, including saving, printing, and exporting functionalities.
To find the “File” menu, look towards the top left corner of the PowerPoint window. Typically, you will see a tab labeled “File” or an icon that resembles a file folder. Click on this tab or icon to open the dropdown menu.
Upon clicking on the “File” menu, a panel will appear on the left side of the screen. This panel will display a range of options related to your presentation, such as “Save,” “Save As,” “Open,” and more. We will be utilizing the “Save As” option to generate a PDF version of the PowerPoint presentation.
Locating the “File” menu is an important step as it grants you access to the necessary tools and features needed to convert your PowerPoint presentation into a PDF. This menu is where you will find the option to save your presentation in different file formats, including PDF.
Now that you know how to navigate to the “File” menu, let’s move on to the next step: clicking on the “Save As” option.
Step 3: Click on “Save As”
After accessing the “File” menu in your PowerPoint presentation, the next step in converting it to a PDF is to click on the “Save As” option. This option allows you to save a copy of your presentation in a different file format, including PDF.
Once you click on “Save As,” a new window or dialog box will appear, presenting you with various saving options. In this window, you will be able to choose the destination folder where you want to save the PDF file, as well as modify other settings specific to the PDF format conversion.
Before proceeding further, it is essential to double-check that you have the necessary permissions to save the presentation and that you have selected a suitable location to save the PDF file. It is also recommended to give the PDF file a descriptive and relevant name to facilitate easy identification in the future.
In the “Save As” window, you may see different file formats available for selection. Since we are interested in converting the presentation to PDF, make sure to choose the PDF format or select the option that indicates saving as a PDF file.
Once you have selected the PDF format and determined the appropriate destination folder, you are ready to proceed with the conversion process by clicking on the “Save” button. This will initiate the conversion process and generate a PDF version of your PowerPoint presentation.
Clicking on the “Save As” option is a crucial step in converting your PowerPoint presentation to a PDF. It provides you with the flexibility to choose the file format, destination folder, and other relevant settings that will result in a high-quality PDF file.
Now that you have learned how to click on “Save As,” let’s move on to the next step: choosing the destination folder.
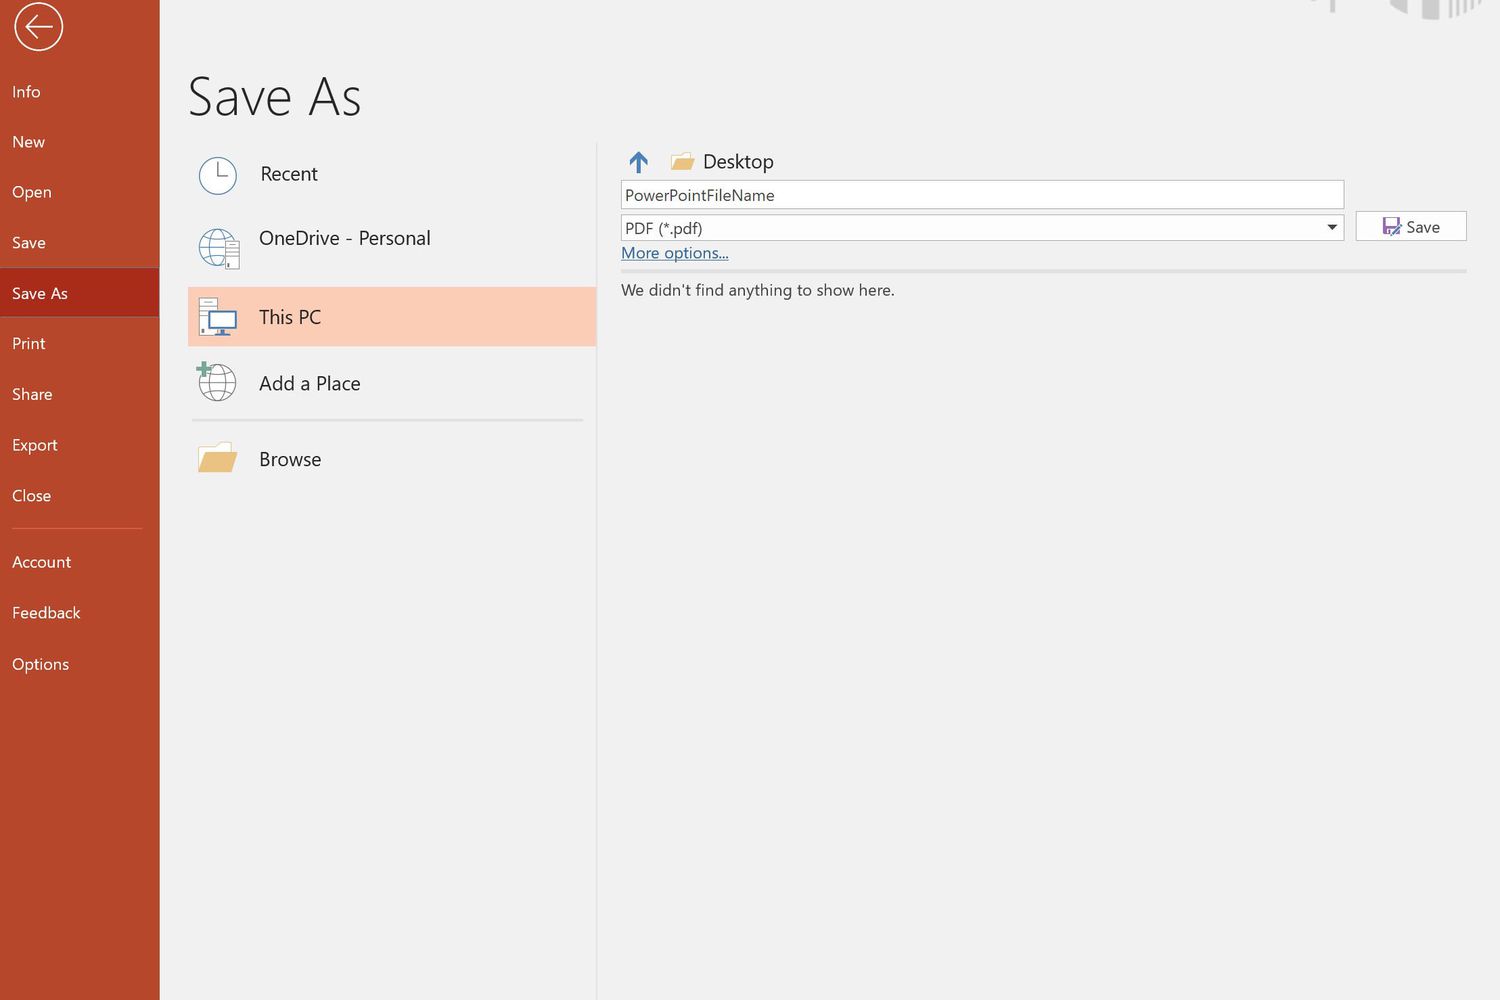
Step 4: Choose the Destination Folder
After clicking on the “Save As” option in your PowerPoint presentation, the next step in converting it to a PDF is to choose the destination folder where you want to save the converted file. The destination folder is the location on your computer or device where the PDF file will be stored.
When the “Save As” window or dialog box appears, you will typically see a navigation pane that allows you to browse through your computer’s file system. Use this pane to navigate to the desired folder location where you want to save the PDF file. You can choose any existing folder or create a new one specifically for saving your PowerPoint presentations as PDFs.
Selecting the right destination folder is crucial as it ensures easy access and organization of your saved PDF files. Consider creating a dedicated folder or subfolder for your converted PowerPoint presentations to keep them separate from other files.
It is also important to double-check that you have the necessary permissions to save files to the selected destination folder. If you encounter any issues regarding permissions, consider selecting an alternative folder or contacting your system administrator for assistance.
Once you have identified the appropriate destination folder, click on it to select it. This will indicate to the software where the PDF file should be saved. After selecting the destination folder, proceed by clicking the “Save” button to continue with the conversion process.
Choosing the destination folder is a critical step in converting your PowerPoint presentation to a PDF. It ensures that the converted file is saved in the desired location for easy retrieval and organization. Now that you know how to choose the destination folder, let’s move on to the next step: changing the file format to PDF.
Step 5: Change the File Format to PDF
After selecting the destination folder to save your PowerPoint presentation, the next step in converting it to a PDF is to change the file format. By default, PowerPoint saves presentations in its proprietary PPT or PPTX format. However, for the purpose of converting your presentation to a PDF, you need to change the file format to PDF.
In the “Save As” window or dialog box, you will find a dropdown menu or a list of available file formats. Look for an option that references PDF, such as “PDF,” “Portable Document Format,” or a PDF icon. Selecting this option will change the file format to PDF.
Before finalizing the conversion, it is advisable to check if there are any additional settings or options related to the PDF format conversion. Some versions of PowerPoint may provide options for adjusting the quality, resolution, or other parameters specific to the PDF output. These settings, if available, can be useful for fine-tuning the appearance and functionality of the resulting PDF file.
Once you have chosen the PDF format and reviewed any additional options, you are ready to proceed by clicking on the “Save” button. This will initiate the conversion process and generate a PDF version of your PowerPoint presentation.
Changing the file format to PDF is a crucial step in converting your PowerPoint presentation. It ensures that the resulting file is in the standardized and widely compatible PDF format, which can be easily viewed and shared across different devices and operating systems.
Now that you know how to change the file format to PDF, let’s move on to the next step: selecting options (optional) that can further enhance your PDF conversion.
Step 6: Select Options (Optional)
After changing the file format to PDF, the next step in converting your PowerPoint presentation is to select any additional options that can enhance the PDF conversion. While these options are optional, they can provide customization and control over the appearance and functionality of the resulting PDF file.
Depending on the version of PowerPoint you are using, you may encounter a dialog box or a settings panel that allows you to modify various options. These options may include choosing the layout, adjusting the resolution, enabling or disabling features like hyperlinks or animations, and specifying the range of slides to include in the PDF.
Let’s explore some common options that you may come across during the PDF conversion process:
- Layout: You may have the option to choose the layout of the PDF file, such as full-page slides, multiple slides per page, or notes pages. Consider selecting a layout that best suits your intended use for the PDF.
- Resolution: Some PowerPoint versions allow you to adjust the resolution of the PDF. Higher resolution results in better quality but may increase the file size. Consider your requirements for image and text clarity when selecting the resolution.
- Include or Exclude Content: You may have the option to include or exclude specific elements from the PDF, such as backgrounds, hidden slides, or speaker notes. Decide which elements are relevant and necessary for the PDF version of your presentation.
- Slide Range: If your presentation contains multiple slides, you may have the option to specify the range of slides to include in the PDF. This can be useful if you only want to convert a specific section or subset of slides.
When selecting options, it’s important to strike a balance between customization and compatibility. Consider your audience’s needs and preferences when making choices that may impact the usability and accessibility of the PDF file.
Once you have selected the desired options, click on the “Save” or “OK” button to proceed with the final conversion of your PowerPoint presentation to a PDF.
Selecting options is an optional step that allows you to customize the PDF conversion according to your specific requirements. Now that you know how to select options, let’s move on to the final step: clicking on “Save” to complete the process.
Step 7: Click on “Save”
After selecting any desired options in the previous step, the final step in converting your PowerPoint presentation to a PDF is to click on the “Save” button. This action will initiate the conversion process and generate the PDF version of your presentation.
Ensure that you have reviewed all the settings and options to ensure they align with your preferences for the resulting PDF file. Double-check that you have selected the appropriate destination folder and that you have given the PDF file a relevant and easily identifiable name.
Clicking on the “Save” button will begin the conversion process, during which PowerPoint will transform your presentation into a PDF format. The time required for the conversion will depend on the complexity and size of your presentation. Generally, larger and more intricate presentations may take a bit longer to convert.
It’s important to allow the conversion process to complete before closing PowerPoint or navigating away from the “Save As” window. Interrupting the conversion process prematurely may result in an incomplete or corrupted PDF file.
Once the conversion is finished, you can navigate to the destination folder you specified earlier to locate your newly created PDF file. Double-clicking on the PDF file will open it in your default PDF viewer, allowing you to view and share the converted presentation.
Congratulations! You have successfully converted your PowerPoint presentation to a PDF. The PDF version retains the formatting and content of your original presentation, making it easily accessible and shareable across different devices and platforms.
Remember to verify the converted PDF to ensure its accuracy and quality. Make sure to proofread the document, check that all elements are properly displayed, and that any interactive or multimedia content functions as expected.
Clicking on “Save” is the final step in the conversion process. Now that you have completed all seven steps, you can confidently convert any PowerPoint presentation into a PDF file.
Remember that the process may vary slightly depending on the version of PowerPoint you are using. While these instructions provide a general guideline, it’s always a good idea to refer to the official documentation or help resources if you encounter any difficulties or discrepancies between your software’s interface and the instructions provided.