Introduction
When it comes to downloading apps on your device, the default storage location is usually the device’s internal memory. However, as apps become increasingly larger in size, this can quickly fill up your device’s storage and limit the number of apps you can have installed.
Fortunately, many devices now support expandable storage options in the form of SD (Secure Digital) cards. By utilizing an SD card, you can save precious internal storage space by downloading apps directly to the card instead. This not only allows you to install more apps but also helps to keep your device running smoothly.
In this article, we will guide you through the process of downloading apps directly to your SD card. We will cover important steps such as checking if your device supports SD card storage, formatting the SD card, changing the default app installation location, and managing apps on the SD card.
Whether you have a smartphone or a tablet, these steps can be applicable to a wide range of Android devices. So, let’s dive in and learn how to make the most of your device’s expandable storage by downloading apps to your SD card.
Why Download Apps to SD Card?
Downloading apps to your SD card offers numerous advantages that can greatly improve your device’s performance and user experience. Here are a few key reasons why you should consider downloading apps directly to your SD card:
- Increased Storage Capacity: The primary benefit of downloading apps to your SD card is the expanded storage capacity it provides. By utilizing the additional space on your SD card, you can install more apps without worrying about running out of internal storage.
- Improved Device Performance: As you install more apps on your device, the internal storage can become burdened and slow down the device’s overall performance. Downloading apps to the SD card frees up internal storage space and helps to keep your device running smoothly.
- Flexibility and Customization: With the ability to download apps to your SD card, you have greater flexibility and control over how you organize your apps. You can choose to install frequently used apps on the device’s internal memory for quicker access, while less frequently used apps can be stored on the SD card.
- Easier App Management: Having apps stored on the SD card makes it easier to manage and transfer them between devices. If you upgrade to a new device or need to free up space on your current device, you can simply remove the SD card and transfer the apps along with the data.
While there are many benefits to downloading apps to your SD card, it’s important to note that not all devices support this feature. Make sure to check if your device allows for expandable storage via an SD card before proceeding with the steps outlined in this guide.
In the next sections, we will guide you through the process of checking if your device supports SD card storage, formatting the SD card, changing the default app installation location, and managing apps on the SD card.
Check If Your Device Supports SD Card
Before you can start downloading apps to your SD card, it’s important to verify if your device has support for SD card storage. Here’s how you can check:
Step 1: Locate the slot for the SD card on your device. This is usually found on the side or back of your device, covered by a small flap or bezel. Some devices may have a tray that requires a SIM ejection tool to access.
Step 2: Once you have located the SD card slot, carefully open it and insert the SD card. Be sure to follow the correct orientation indicated by the markings on the card and the slot.
Step 3: Once the SD card is inserted, close the slot securely. Make sure it is properly seated and locked in place.
Step 4: Now, power on your device and navigate to the device’s settings menu. This can usually be accessed by swiping down from the top of the screen and tapping on the gear icon.
Step 5: In the settings menu, look for the “Storage” or “Storage & USB” option and tap on it. This will display information about the device’s storage and connected SD card, if applicable.
Step 6: On the storage page, you should see details about the device’s internal storage and any external storage options, including the SD card. If the SD card is being recognized and displayed, it indicates that your device supports SD card storage.
If your device does not have an SD card slot or if the storage settings do not show the presence of an SD card, it means that your device unfortunately does not support expandable storage via an SD card. In such cases, you will need to rely on the device’s internal storage for app installations.
Now that you know whether or not your device supports SD card storage, you can proceed to the next steps in this guide to download apps directly to your SD card or explore other options for managing your device’s storage effectively.
Pre-requisites
Before you can proceed with downloading apps to your SD card, there are a few pre-requisites you need to fulfill. These include:
- Compatible SD Card: Make sure you have a compatible SD card that meets the requirements of your device. This includes the storage capacity, speed class, and format compatibility. Refer to your device’s user manual or manufacturer’s website for the recommended specifications.
- Formatted SD Card: It is essential to format the SD card before using it for app installations. This not only prepares the card for use but also helps resolve any file system compatibility issues. Formatting the card will erase all data, so make sure to back up any important files before proceeding.
- Free Storage Space: Ensure that your SD card has sufficient free space to accommodate the apps you wish to download. Keep in mind that some space on the SD card will be reserved for the device’s system files.
- Device Configuration: Check if your device’s settings allow for app installations from external sources. Sometimes, by default, devices only allow installations from the Google Play Store. Allow installations from external sources if necessary to download apps from other trusted sources.
- Stable Internet Connection: A stable internet connection is required to download apps from the internet, including downloading them directly to your SD card. Ensure that you have a reliable Wi-Fi or cellular data connection to proceed with the app downloads.
By fulfilling these pre-requisites, you can ensure a smooth and hassle-free experience when downloading apps to your SD card. Now that you have the necessary preparations in place, let’s move on to the step-by-step process of downloading apps directly to your SD card.
Step 1: Format the SD Card
Before you can start downloading apps to your SD card, you need to format it to ensure compatibility and optimal performance. Here’s how you can format your SD card:
Step 1: Insert the SD card into your device’s SD card slot. Make sure it is inserted correctly and securely.
Step 2: Go to your device’s settings menu. This can usually be accessed by swiping down from the top of the screen and tapping on the gear icon.
Step 3: In the settings menu, find the “Storage” or “Storage & USB” option and tap on it. This will display information about the device’s storage options.
Step 4: Locate the SD card section in the storage settings. You should see an option to format the SD card. Tap on this option.
Step 5: A warning message will appear, informing you that formatting the SD card will erase all data. Make sure you have backed up any important files before proceeding. If you are ready to proceed, tap on “Format” or “Erase” to initiate the formatting process.
Step 6: The formatting process may take a few moments to complete. Once it is finished, you will receive a confirmation message indicating that the SD card has been formatted successfully.
Formatting your SD card prepares it for use and ensures that it is compatible with your device. This process creates a file system that the device can recognize and use to store apps and other data.
It is important to note that formatting the SD card will erase all existing data. Therefore, it is recommended to back up any important files before proceeding with the formatting process.
Now that your SD card is properly formatted, you can proceed to the next step and change the default app installation location to download apps directly to your SD card.
Step 2: Change Default App Installation Location
By default, apps are usually installed on the internal storage of your device. To download apps directly to your SD card, you need to change the default app installation location. Here’s how you can do it:
Step 1: Go to your device’s settings menu. This can be accessed by swiping down from the top of the screen and tapping on the gear icon.
Step 2: In the settings menu, navigate to the “Apps” or “Applications” section. The name may vary depending on your device’s manufacturer and operating system.
Step 3: Within the “Apps” section, you will find a list of all the apps installed on your device. Look for and tap on the three-dot menu icon located either at the top right or bottom right corner of the screen, and select “Settings” or “App Settings” from the dropdown menu.
Step 4: In the app settings, look for an option related to app installation or storage. This may be labeled as “App installation settings,” “Storage settings,” or similar. Tap on this option to proceed.
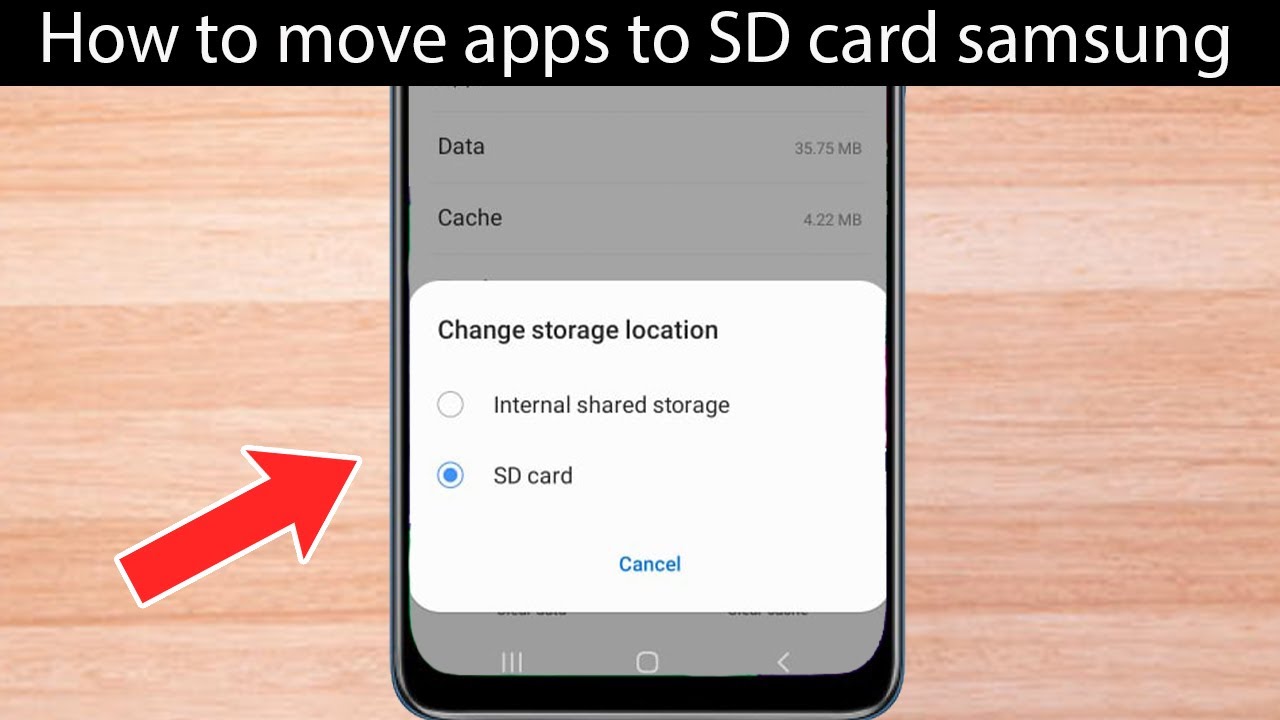
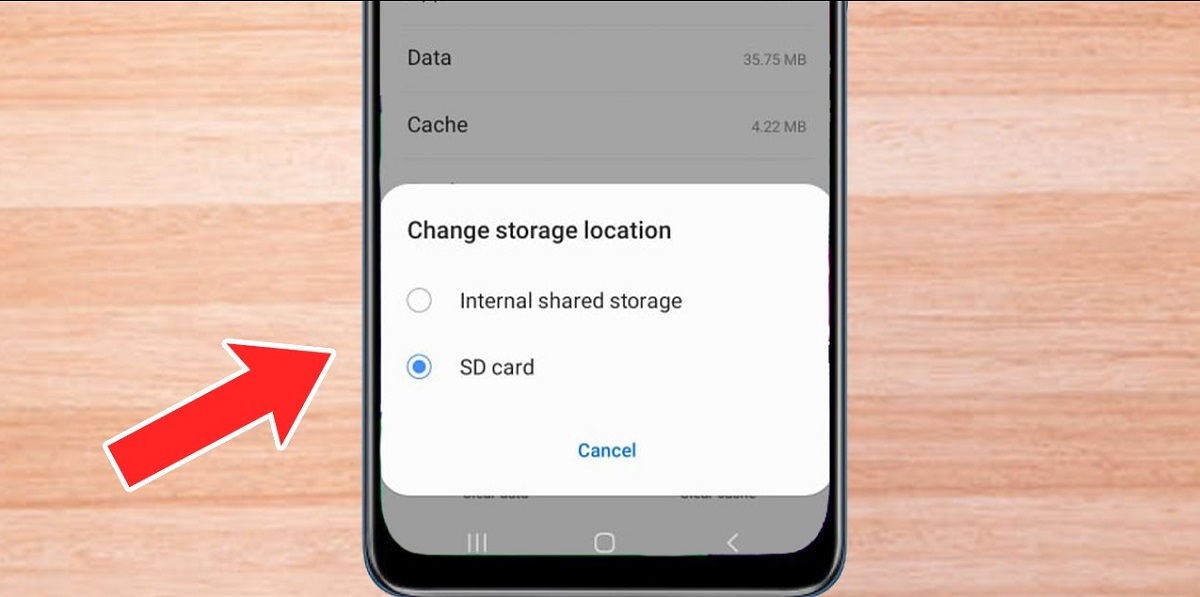
Step 5: Within the app installation settings, you will see the default installation location for apps. By default, this is set to the internal storage of your device. Tap on the option to change the installation location.
Step 6: A prompt will appear, giving you the option to select between the internal storage and the SD card for app installations. Tap on the SD card option to set it as the new default installation location.
After completing these steps, any new apps you download from the Google Play Store or other sources will be automatically installed on your SD card instead of the device’s internal storage.
Keep in mind that changing the default app installation location does not affect the apps already installed on your device. To move existing apps to the SD card, you will need to manually move them using the app settings or a dedicated file manager.
Now that you have changed the default app installation location, you are ready to proceed to the next step and start downloading apps directly to your SD card.
Step 3: Downloading Apps to SD Card
Now that you have set the SD card as the default app installation location, you can proceed to download apps directly to your SD card. Here’s how you can do it:
Step 1: Open the Google Play Store on your device. This is usually represented by a colorful triangle icon.
Step 2: In the Google Play Store, you can either browse through the various categories and featured apps or search for a specific app using the search bar at the top of the screen.
Step 3: Once you have found the app you wish to download, tap on its listing to view more details.
Step 4: On the app’s details page, you will see an “Install” button. Tap on this button to initiate the download and installation process.
Step 5: As the app is downloading, a popup may appear, asking you to confirm the installation location. Make sure the installation location is set to the SD card. If not, tap on the dropdown menu and select the SD card.
Step 6: Once the app is downloaded and installed, you can find it in the app drawer or on your device’s home screen. The app will now be stored on your SD card, saving valuable internal storage space.
It is important to note that not all apps can be downloaded directly to the SD card. Some apps may have certain restrictions or dependencies that require them to be installed on the device’s internal storage. In such cases, you may need to manually move the app to the SD card if it allows for it.
If you wish to move existing apps to the SD card, you can do so by going to the device’s settings, selecting the “Apps” or “Applications” section, choosing the app you want to move, and tapping on the “Move to SD card” option if available.
Now that you know how to download apps directly to your SD card, you can continue to the next step and learn how to effectively manage the apps stored on your SD card.
Step 4: Managing Apps on SD Card
After successfully downloading apps to your SD card, it’s important to know how to manage them effectively. Here are some key steps to manage your apps stored on the SD card:
Step 1: Go to your device’s app settings. This can usually be accessed by going to the settings menu, selecting the “Apps” or “Applications” section, and tapping on the app you want to manage.
Step 2: Once you are in the app settings, you will see options related to the app’s storage and data usage. Look for the option to “Move to SD card,” “Change storage location,” or similar. Tap on this option to move the app from internal storage to the SD card, freeing up space on your device.
Step 3: To uninstall an app stored on the SD card, go to the app settings as mentioned in the previous step. Look for the “Uninstall” button and tap on it to remove the app from your device.
Step 4: You can also view the amount of space each app is occupying on your SD card. In the app settings or the device’s storage settings, you will find information about the size of the app and the data associated with it. Use this information to identify any apps that may be taking up too much space and consider uninstalling or moving them to free up storage.
Step 5: Keep an eye on app updates. When you update an app, it may automatically reinstall itself on the device’s internal storage. To ensure the updated app is stored on the SD card, go to the app settings after the update and verify or change the storage location if needed.
Step 6: Regularly review and manage your apps on the SD card. Take the time to assess the apps you have installed and uninstall any that are no longer needed. This will help keep your SD card organized and maximize its storage capacity.
By effectively managing your apps on the SD card, you can ensure optimal storage usage and keep your device running smoothly. Regularly check for app updates, uninstall unnecessary apps, and periodically assess the space usage on your SD card to make the most of its capacity.
With these management techniques, you can maintain a well-organized and efficient app storage system on your SD card, allowing you to enjoy more apps without worrying about running out of space on your device.
Conclusion
Downloading apps directly to your SD card can be a game-changer when it comes to managing your device’s storage. By following the steps outlined in this guide, you can maximize your device’s storage capacity, improve its performance, and have more flexibility in managing your apps.
Remember to check if your device supports SD card storage before proceeding with the steps. Pre-formatting the SD card, changing the default app installation location, and properly managing the apps on the SD card are crucial to a smooth experience.
With your SD card formatted, the default app installation location changed, and apps downloaded directly to the SD card, you can enjoy more apps without worrying about filling up your device’s internal storage. Take advantage of the flexibility and customization the SD card storage offers, and manage your apps effectively for a clutter-free experience.
Regularly assess your SD card’s storage usage, uninstall unnecessary apps, and keep an eye on app updates to ensure optimal performance and storage efficiency. By staying organized and managing your apps on the SD card, you can make the most of your device’s expandable storage.
Now, armed with the knowledge and steps provided in this guide, you are ready to download apps directly to your SD card and enjoy a seamless and hassle-free user experience on your device. So go ahead, start downloading and managing your apps on the SD card, and make the most of your device’s storage capabilities.