Introduction
Are you tired of having all your downloaded files cluttering up your desktop or default download folder? Do you wish you could easily organize your downloads into specific folders or drives? Well, you’re in luck! In this article, we will show you how to change the download location in Google Chrome.
Google Chrome is one of the most popular web browsers, known for its speed, reliability, and user-friendly interface. By default, Chrome stores downloaded files in a pre-defined location, which is usually the “Downloads” folder on your computer. However, you have the flexibility to change this location based on your personal preferences or organizational needs.
Whether you want to automatically save your downloads to a specific folder, an external hard drive, or a cloud storage service, changing the download location in Chrome is a simple process. By customizing the download location, you can keep your files well-organized and easily locate them whenever you need them.
So, if you’re ready to take control of your downloads and streamline your file management, let’s dive into the step-by-step guide on how to change the download location in Google Chrome.
Why Change the Download Location in Chrome?
Changing the download location in Google Chrome can offer several benefits and improve your overall file management experience. Here are a few reasons why you might consider changing your download location:
- Organizational purposes: By setting a specific download location, you can ensure that all your files are neatly organized and easily accessible. Rather than having files scattered across your desktop or buried within the default download folder, you can place them directly into the desired folder or directory.
- Storage management: If you’re running low on disk space on your computer’s primary drive, changing the download location to an external hard drive or a different partition can help free up space. This can be especially useful for those who frequently download large files or have limited storage capacity on their device.
- Backup and recovery: Setting your download location to a cloud storage service, such as Google Drive or Dropbox, ensures that your downloaded files are automatically backed up. This offers an added layer of data protection and allows you to recover files in case of a device failure or accidental deletion.
- Privacy and security: Changing the download location can help protect your privacy by preventing others from easily accessing or viewing your downloaded files. You can save your sensitive or confidential files in a password-protected folder or a separate drive, adding an extra level of security.
Overall, changing the download location in Chrome gives you more control over how and where your files are stored. It allows you to tailor your download preferences to suit your needs, increasing efficiency and simplifying your file management process.
Step 1: Open Chrome Settings
The first step in changing the download location in Google Chrome is to access the Chrome settings. Here’s how you can do it:
- Launch Google Chrome on your computer by double-clicking the Chrome icon on your desktop or searching for it in the Start menu.
- Once Chrome is open, locate the three vertical dots in the top-right corner of the browser window. This is known as the “Chrome menu.”
- Click on the Chrome menu to reveal a dropdown list of options.
- From the dropdown list, hover over the “Settings” option and click on it.
- You will be redirected to the Chrome Settings page, where you can customize various browser settings.
That’s it! You have successfully accessed the Chrome settings, and now you’re ready to proceed to the next step.
Keep in mind that Chrome’s settings may vary slightly depending on the specific version you have installed. However, the general steps to access the settings should remain the same regardless of the version.
Step 2: Go to the Downloads Section
After accessing the Chrome settings, the next step is to navigate to the Downloads section. Follow these instructions to proceed:
- Within the Chrome Settings page, scroll down until you find the section labeled “Privacy and security.”
- Under the “Privacy and security” section, you will see several options. Look for the “Downloads” option and click on it.
- Upon clicking on the “Downloads” option, the Downloads settings page will open.
Alternatively, you can also access the Downloads settings page directly by entering “chrome://settings/downloads” in the address bar of your Chrome browser and hitting Enter.
The Downloads section in Chrome settings allows you to control various aspects related to your downloaded files, including the location, file types, and behavior of downloads.
Now that you’re on the Downloads settings page, let’s move on to the next step and learn how to change the download location.
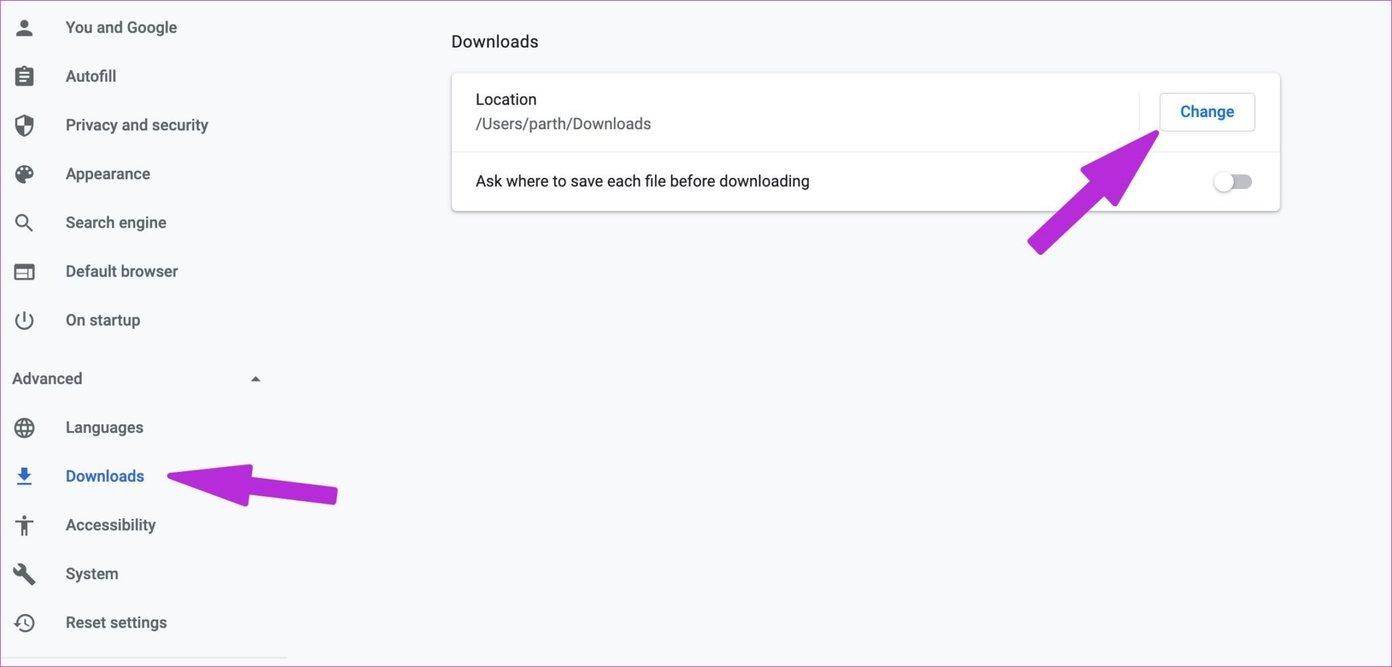
Step 3: Change the Download Location
Once you have reached the Downloads settings page in Chrome, you are now ready to proceed with changing the download location. Follow these simple steps:
- On the Downloads settings page, you will see an option labeled “Location.”
- By default, the location will be set to the default download folder on your computer.
- To change the download location, click on the “Change” button next to the current location.
- A file explorer window will appear, allowing you to browse and select the new download location.
It’s worth noting that you can choose any folder or directory on your computer as the new download location. This includes external storage devices, such as USB drives or external hard drives, or even network drives if you have access to them.
Additionally, if you want to revert to the default download location, you can simply click on the “Reset” button to restore the original settings.
Now that you have changed the download location, let’s move on to the next step and learn how to choose the new download location.
Step 4: Choose the New Download Location
After clicking on the “Change” button in the Downloads settings page, a file explorer window will appear, allowing you to choose the new download location. Here’s what you need to do:
- In the file explorer window, navigate to the desired folder or directory where you want your downloads to be saved.
- You can browse through different drives, folders, and even create new folders if needed.
- Once you have found the desired location, click on it to select it.
- Finally, click on the “OK” or “Select Folder” button in the file explorer window to confirm and choose the new download location.
It’s important to choose a location that is easily accessible and convenient for you. You might consider creating a dedicated folder specifically for your downloads to keep them organized.
Remember, selecting an external storage device or cloud storage service as the download location can be beneficial if you want to save disk space on your computer or ensure automatic backups of your downloaded files.
Great job! You have successfully chosen the new download location in Chrome. Now, let’s move on to the final step and wrap up the process of changing the download location.
Step 5: Confirm and Close Settings
Once you have chosen the new download location in Chrome, it’s important to confirm the changes and close the settings to ensure they take effect. Follow these final steps:
- Review the changes you have made in the Downloads settings page, including the new download location.
- Double-check that the selected location is indeed where you want your downloaded files to be saved.
- If everything looks good, click on the “Done” button or simply close the settings tab or window.
By confirming and closing the settings, you are finalizing the changes and ensuring that any future downloads will be saved in the new location you have chosen.
It’s worth mentioning that you can always revisit the Chrome settings and make adjustments to the download location or any other settings as needed. The process we’ve covered in this guide is applicable for changing the download location in the current session.
With these steps completed, congratulations! You have successfully changed the download location in Google Chrome. From now on, your downloaded files will be saved in the new location, allowing for better organization and easy access.
Enjoy a clutter-free desktop and efficient file management with your new download location in Chrome!
Conclusion
Changing the download location in Google Chrome can greatly enhance your file management experience. By customizing the download location, you can keep your downloads organized, free up disk space, and ensure automatic backups of your files.
In this article, we explored a step-by-step guide on how to change the download location in Chrome. We started by opening the Chrome settings and navigating to the Downloads section. From there, we learned how to change the download location and choose a new folder or directory. Finally, we confirmed the changes and closed the settings to ensure they take effect.
Remember, the ability to change the download location in Chrome offers flexibility and convenience based on your personal preferences and needs. Whether you want to save files to a specific folder, an external storage device, or a cloud storage service, Chrome allows you to tailor the download location to your liking.
By having a well-organized download location, you can easily locate and access your downloaded files whenever you need them. This streamlines your file management process and improves overall productivity.
So, take a few moments to customize the download location in Chrome and optimize your file management today. Enjoy the benefits of a clutter-free desktop and simplified access to your downloads.
Thank you for reading this guide. We hope you found it informative and helpful. Happy downloading!