Introduction
Google Slides is a powerful tool that allows users to create captivating presentations with ease. It offers a wide range of features, including the ability to incorporate images to enhance the visual appeal of your slides. However, what happens when you come across a stunning image in a Google Slides presentation and want to download it for your own use? In this guide, we will walk you through the steps to download an image off of Google Slides.
Downloading images from Google Slides may seem like a challenging task, but rest assured, it is both simple and straightforward. Whether you need the image for a personal project, a blog post, or a presentation of your own, we’ve got you covered. By following a few simple steps, you can quickly and effortlessly save the desired image to your computer.
In the sections below, we will outline the steps you need to take to download an image off of Google Slides. You will learn how to select the slide, export it as an image, and save it to your computer. We will also provide additional tips and considerations to ensure a seamless and successful downloading experience.
If you’re ready to take control and download that eye-catching image, let’s dive into the step-by-step process.
Step 1: Open Google Slides and select the desired slide
The first step in downloading an image from Google Slides is to open the presentation and select the slide that contains the desired image. To do this, follow these simple steps:
- Open your web browser and navigate to Google Slides.
- Sign in to your Google account if prompted.
- Locate the presentation that contains the image you want to download. If you have multiple presentations, you can easily find the specific one by browsing through your Drive or using the search bar at the top of the page.
- Click on the presentation to open it.
- Once the presentation is open, scroll through the slides to find the slide that contains the image you wish to download.
- Click on the slide to select it.
By following these steps, you have successfully opened Google Slides and selected the specific slide that holds the image you want to download. Now it’s time to move on to the next step and export the slide as an image.
Step 2: Export the slide as an image
Now that you have selected the slide that contains the desired image, it’s time to export the slide as an image file. Follow these steps to export the slide from Google Slides:
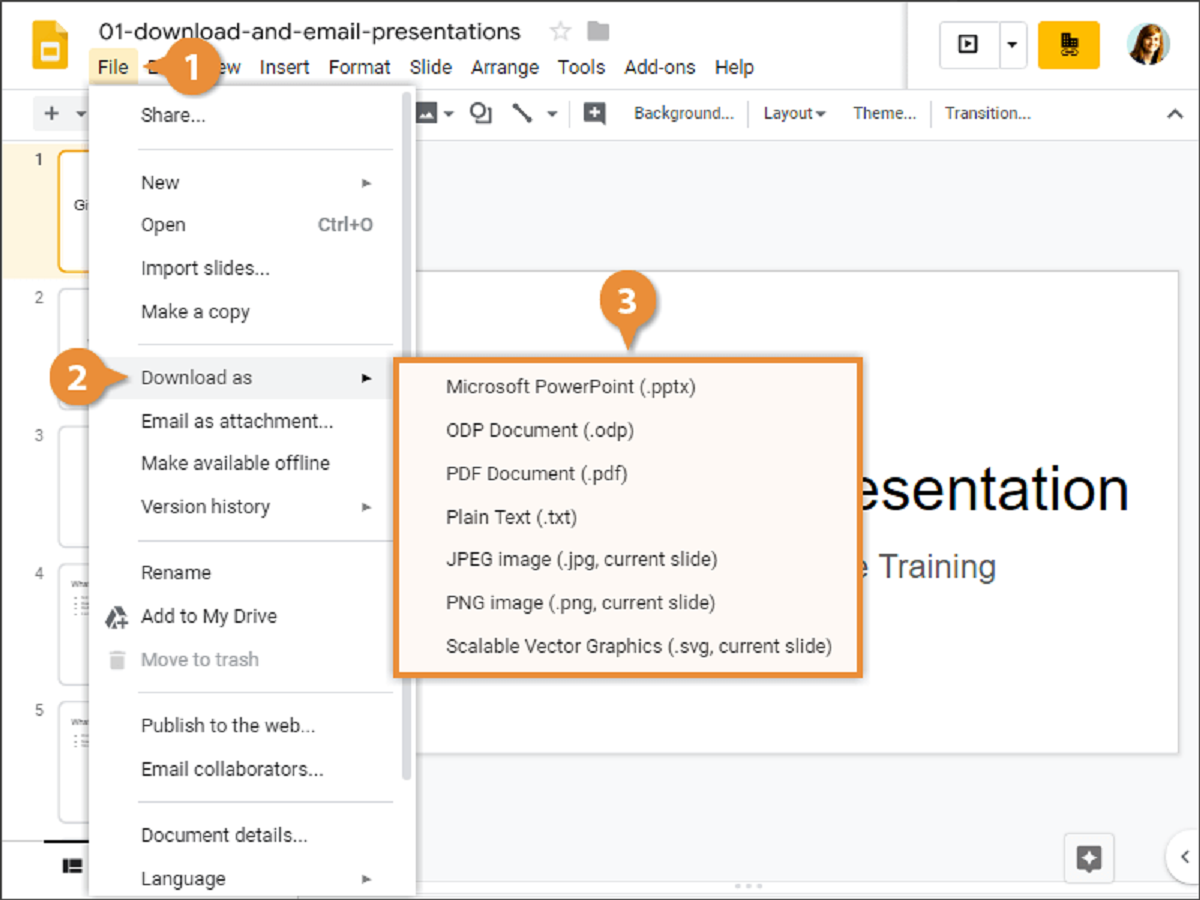
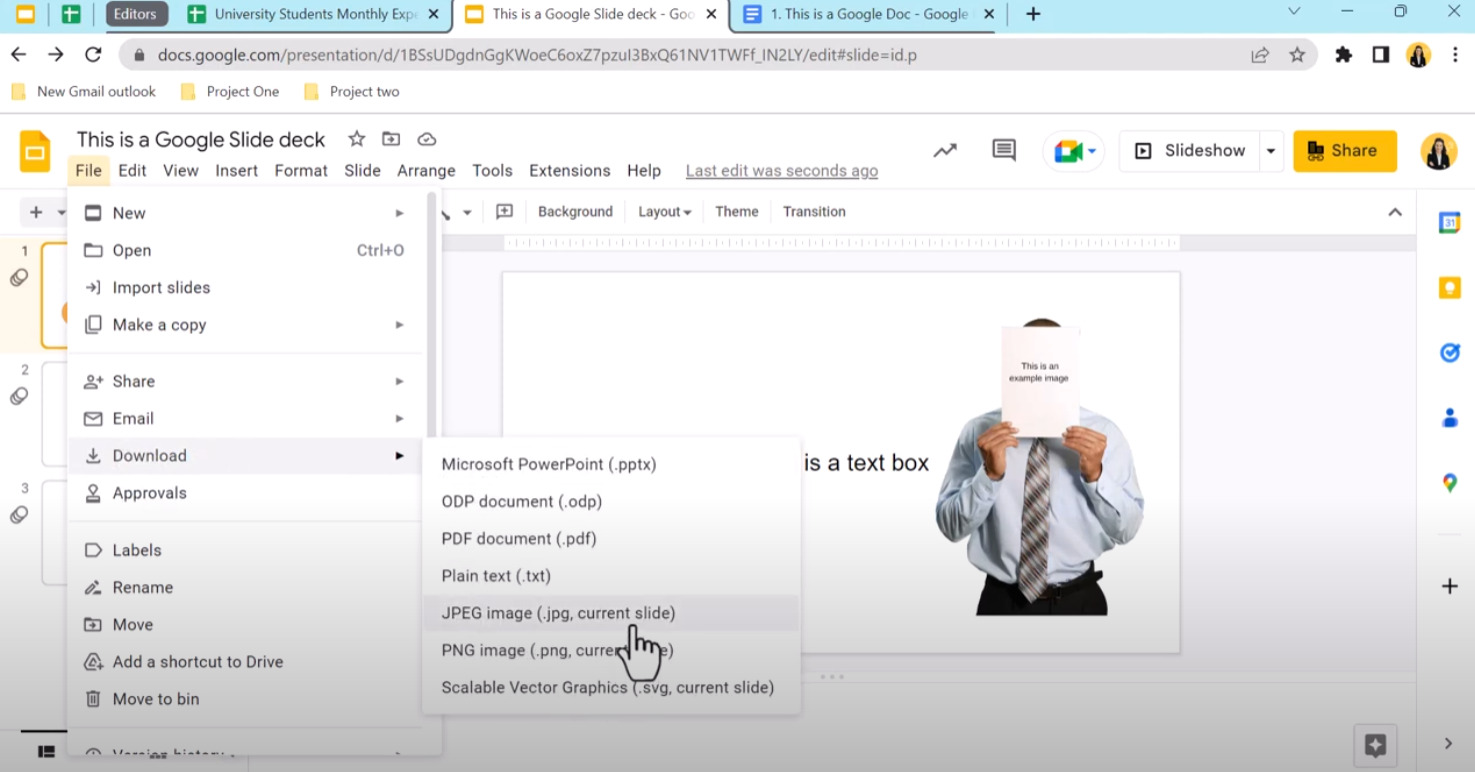
- In the top menu bar of Google Slides, click on the “File” option.
- A drop-down menu will appear. From this menu, click on “Download”.
- Another drop-down menu will appear next to “Download”. From this menu, select the “PNG image” option.
- Google Slides will begin processing the slide and converting it into an image.
- Once the conversion is complete, a dialog box will appear, prompting you to choose the location where you want to save the image.
- Choose the desired location on your computer and click “Save”.
Congratulations! You have successfully exported the slide as an image file. Google Slides has converted the selected slide into a PNG image, which can now be saved to your computer.
It’s important to note that by default, Google Slides exports the entire slide, including any backgrounds or added elements. If you only want to download the image without any background or additional elements, you can crop the image using image editing software after saving it to your computer.
Now that you have saved the image to your computer, let’s move on to the final step and learn how to save the image file properly.
Step 3: Save the image file to your computer
After exporting the slide as an image file, the next step is to save the image to your computer. Follow these simple steps to save the image file:
- Locate the folder or location on your computer where you want to save the image file.
- Open the folder or location.
- Find the saved PNG image file that you downloaded from Google Slides.
- Click and drag the image file to the desired location within the folder, or right-click on the file and select “Copy”. Then, navigate to the desired location within the folder and right-click again, selecting “Paste” to place a copy of the image file there.
- Alternatively, you can simply click on the image file, press “Ctrl + C” to copy it, and then navigate to the desired location and press “Ctrl + V” to paste it there.
- After pasting the image file in the desired location, you can give it a meaningful name by right-clicking on it, selecting “Rename,” and typing a new name for the image.
That’s it! You have successfully saved the image file to your computer. It is now ready for use in your projects, presentations, social media posts, or any other purpose you may have in mind.
Remember to keep the image file in a safe and easily accessible location on your computer for future use. If you plan to use the image in multiple projects or share it with others, it’s a good idea to create a folder specifically for storing images.
With the image file safely saved on your computer, you are now ready to utilize it as you see fit. Let’s move on to the final section of this guide, where we will provide some additional tips and considerations to further enhance your image downloading experience.
Step 4: Additional tips and considerations
While the previous steps have outlined the main process of downloading an image from Google Slides, there are a few additional tips and considerations that can enhance your experience. Take note of the following:
- Select the highest resolution: Before exporting the slide as an image, ensure that you have selected the highest resolution option. Higher resolution images provide better quality and can be useful for printing or projects that require sharp visuals.
- Check for slide modifications: If you plan to use the image in a different context or manipulate it further, double-check that the slide layout or design elements haven’t been modified in a way that affects the image’s composition.
- Consider copyright and permissions: Keep in mind that images found on Google Slides may be subject to copyright. If you plan to use the image commercially or in a public setting, ensure you have the necessary permissions or look for images with appropriate licenses, such as those offered under Creative Commons.
- Edit the image if needed: After saving the image file to your computer, you can further enhance or modify it using image editing software. This allows you to crop, resize, adjust colors, or add effects to better suit your needs.
- Keep organized: As you download images from Google Slides or any other source, it’s important to keep your files organized. Create separate folders or subfolders to categorize your images, making it easier to locate them when needed.
By following these additional tips and considerations, you can ensure a smooth and efficient image downloading process while making the most of the images you acquire from Google Slides.
Now that you have successfully learned the steps to download an image from Google Slides and have gained some valuable tips, you are equipped to save and utilize captivating images for various purposes.
Conclusion
Downloading an image off of Google Slides doesn’t have to be a daunting task. With just a few simple steps, you can save captivating visuals from presentations to use in your own projects, blog posts, social media, or any other creative endeavor. By following the steps outlined in this guide, you can easily select the desired slide, export it as an image, and save it to your computer.
Remember to open Google Slides and locate the specific slide that contains the image you want to download. Then, export the slide as a PNG image by clicking on “File”, selecting “Download”, and choosing the “PNG image” option. Save the image file to your computer by selecting the desired location and clicking “Save”. Finally, consider some additional tips, such as selecting the highest resolution, checking for slide modifications, respecting copyright and permissions, and editing the image if needed.
By following these steps and taking these considerations into account, you are well on your way to becoming a pro at downloading images from Google Slides. Now, go ahead and unleash your creativity with the stunning images you’ve downloaded!