Introduction
Google Slides is a powerful tool that allows users to create dynamic and visually appealing presentations. However, there may be instances when you want to download your Google Slide as a PDF for various reasons, such as sharing the file with others who may not have access to Google Slides or preserving the formatting of your presentation. In this article, we will guide you through the step-by-step process of how to easily download a Google Slide as a PDF.
By following these simple instructions, you can quickly convert your Google Slide presentation into a PDF document without the need for any third-party software or plugins. Whether you’re a student preparing a report, a professional delivering a presentation, or a teacher sharing study materials with your students, knowing how to download a Google Slide as a PDF can come in handy for a multitude of situations.
Not only does converting your presentation into a PDF format ensure that your content remains intact, but it also allows you to easily share your presentation with others who may not have access to Google Slides. Additionally, PDF documents are widely recognized and compatible with various devices and operating systems, making it easier for recipients to access and view your presentation.
Furthermore, converting your Google Slide to a PDF allows you to preserve the visual elements and formatting of your presentation, including font styles, images, and backgrounds. This is especially useful when you want to maintain consistency and ensure that your audience sees your presentation exactly as intended, regardless of the device or software they are using.
Now that you understand the benefits of downloading a Google Slide as a PDF, let’s dive into the step-by-step process to help you convert your presentation effortlessly.
Step 1: Open the Google Slide presentation
The first step in downloading a Google Slide as a PDF is to open the Google Slide presentation that you want to convert. To do this, open your web browser and navigate to slides.google.com. If you’re not already signed in to your Google account, you will be prompted to do so.
Once you’re signed in, you will see the Google Slides homepage. Here, you can access any presentations you have previously created or start a new one. If your presentation is already listed on the homepage, simply click on it to open it. If not, click on the “+ New” button in the top left corner and select “Google Slides” from the drop-down menu to create a new presentation.
Once you have opened the Google Slide presentation, you will be able to view and edit the slides. It is important to ensure that your presentation is finalized and ready for conversion before proceeding to the next step. Make any necessary edits or adjustments to the content, layout, or design of your slides to ensure that it is exactly how you want it to appear in the PDF document.
Remember to save your changes regularly to avoid losing any progress. You can do this by clicking on the “File” tab in the top left corner of the Google Slides interface and selecting “Save” or by using the keyboard shortcut Ctrl+S (Windows) or Command+S (Mac).
Once you have opened your Google Slide presentation and are satisfied with its content, layout, and design, you are ready to proceed to the next step of downloading it as a PDF.
Step 2: Click on “File” in the top menu
To download your Google Slide presentation as a PDF, you need to access the “File” menu in the top menu bar of the Google Slides interface. This menu contains various options for managing and saving your presentation.
Located at the top left corner of the Google Slides interface, the “File” menu is easily identifiable by its iconic folder symbol. When you click on “File,” a drop-down menu will appear, offering several options for working with your presentation.
In this menu, you will find options such as “New,” “Open,” “Save,” “Print,” and more. However, for our purpose of downloading the presentation as a PDF, we will focus on the relevant options within the “File” menu.
Clicking on “File” will open the drop-down menu, and you can proceed to the next step without making any selections from this menu. However, it is important to note that the options within the “File” menu may differ slightly depending on the version of Google Slides you are using.
Additionally, if you have made any recent changes to your presentation that have not been saved, a small dot will be displayed next to the “File” option in the menu. This serves as a reminder to save your progress before proceeding further.
By accessing the “File” menu, you are now ready to move on to the next step and select the appropriate option that will allow you to download your Google Slide presentation as a PDF document.
Step 3: Select “Download” from the drop-down menu
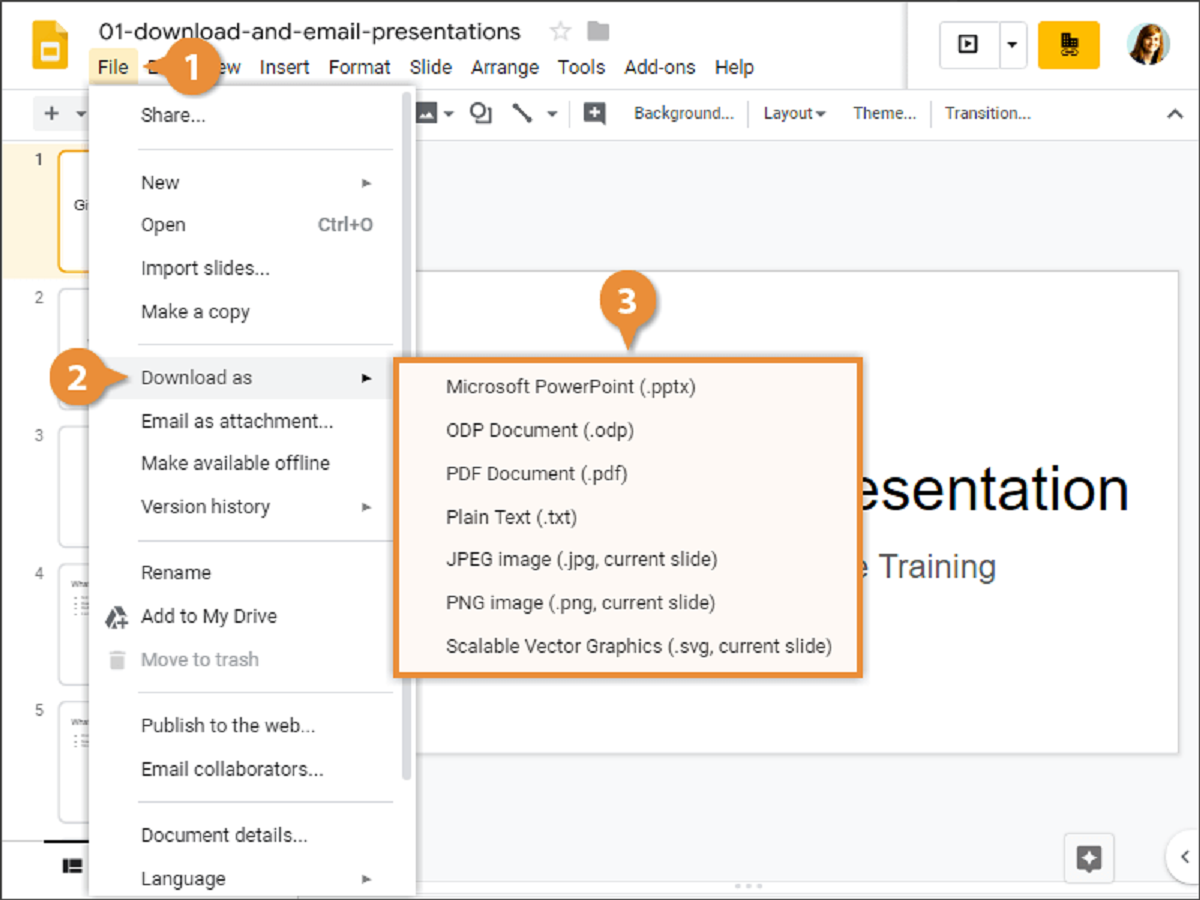
After clicking on the “File” menu in the top left corner of the Google Slides interface, a drop-down menu will appear with various options for managing your presentation. To download your Google Slide as a PDF, you need to select the “Download” option from this menu.
When you click on “Download,” a sub-menu will expand, presenting you with several different download options. These options allow you to choose the desired file format and quality for your download.
In most cases, you will see the following download options: “Microsoft PowerPoint,” “PDF Document,” “JPEG Image,” and “PNG Image.” Since our goal is to download the Google Slide presentation as a PDF, select the “PDF Document” option from the sub-menu.
Once you have selected the “PDF Document” option, the conversion process will begin. Google Slides will convert your presentation into a PDF file format, capturing all the slides, images, text, and formatting that you have created in your Google Slide presentation.
During the conversion process, a progress bar may appear, indicating the status of the conversion. The time it takes to convert your presentation to a PDF may vary depending on the size and complexity of your slides.
It is important to note that the “Download” option in the “File” menu provides a quick and convenient way to download your Google Slide as a PDF. However, if you require more advanced options or customization, such as selecting specific slides to download or adjusting the PDF settings, you can choose the “Download as” option from the “File” menu instead. This will open a dialogue box where you can further customize your download options.
Once the conversion process is complete, you can move on to the next step to further customize the PDF settings if desired or proceed to download the PDF file of your Google Slide presentation.
Step 4: Choose “PDF Document” from the options
When you click on the “Download” option in the drop-down menu of the “File” tab in Google Slides, a sub-menu will appear with a selection of different file format options. To save your Google Slide presentation as a PDF document, you need to choose the “PDF Document” option from this list.
By selecting “PDF Document,” you are indicating to Google Slides that you want to convert your presentation into a PDF file format. This format ensures that the content, formatting, and layout of your slides are preserved and can be viewed by anyone with a PDF reader.
It’s important to note that the availability of file format options may vary depending on the version of Google Slides you are using. However, in most instances, “PDF Document” is a standard and commonly available option for downloading presentations.
Choosing the “PDF Document” option is a crucial step in the process of converting your Google Slide presentation into a PDF file. It ensures that the resulting document is in a format that is widely recognized and compatible with various devices and operating systems.
After selecting “PDF Document” from the options, the conversion process will begin. Google Slides will work its magic, transforming your presentation into a PDF file while retaining the slides, images, text, and formatting that you have created.
During this conversion process, it is important to be patient as it may take a few seconds or longer, depending on the complexity and size of your presentation. If your Google Slide includes high-resolution images or intricate designs, the conversion process might take slightly longer.
Once the conversion is complete, you can proceed to the next step to further customize the PDF settings or simply move on to the final step of downloading the PDF file of your Google Slide presentation.
Step 5: Customize the PDF settings (optional)
After selecting the “PDF Document” option in the previous step, Google Slides will automatically convert your presentation into a PDF file. However, if you wish to customize the PDF settings before downloading the file, you have the option to do so.
To customize the PDF settings, click on the “Options” button located below the file format options in the download sub-menu. This will open a dialogue box where you can make adjustments to the PDF settings according to your preferences.
In the PDF options dialogue box, you can modify various settings such as the layout, quality, and range of slides to be included in the PDF file. For example, you can select whether to include speaker notes, choose the page orientation (portrait or landscape), and adjust the image quality.
Additionally, you can choose whether to include the presentation title, footer with slide numbers, and timestamp in the PDF file. These options can be useful for providing context or additional information in the downloaded PDF.
It’s worth noting that the specific PDF settings available may vary depending on the version of Google Slides you are using. However, most versions provide basic customization options to cater to your specific needs.
Taking the time to customize the PDF settings can help ensure that the resulting document matches your requirements and preferences. However, if you are satisfied with the default settings, you can skip this step and proceed to the final step of downloading the PDF file.
Once you have customized the PDF settings according to your preferences, click on the “OK” or “Download” button in the PDF options dialogue box to save the changes and download the PDF file of your Google Slide presentation.
Step 6: Click on “Download” to save the PDF file
In the final step of downloading your Google Slide presentation as a PDF, you need to click on the “Download” button to save the file to your computer or device. This button is typically located either on the “Download” sub-menu or in the PDF options dialogue box.
After customizing the PDF settings, if applicable, you will be presented with the option to proceed with the download. Clicking on the “Download” button will initiate the download process, and your Google Slide presentation will be saved as a PDF file.
Once you have clicked on the “Download” button, the PDF file will start downloading. The time it takes to complete the download will depend on the size of your presentation and the speed of your internet connection. Be patient as the download progresses, and avoid closing the browser or navigating away from the page until the download is complete.
Once the PDF file has finished downloading, it will be saved to your designated download location on your computer or device. You can then access it and view it using any PDF reader or open it in other compatible software for further editing or sharing.
It’s important to note that the downloaded PDF file will be an exact replica of your Google Slide presentation, including all the slides, images, text, and formatting. The PDF format ensures that your content remains intact and can be easily shared and viewed on various devices and operating systems.
Congratulations! You have successfully downloaded your Google Slide presentation as a PDF file. You can now use this file for sharing, printing, or archiving purposes as desired.
Conclusion
Converting and downloading your Google Slide presentation as a PDF offers numerous benefits in terms of accessibility, compatibility, and preserving the visual integrity of your slides. By following the step-by-step guide outlined in this article, you can easily convert your presentation into a PDF file without the need for any third-party software or plugins.
The process begins by opening your Google Slide presentation and ensuring that it is finalized and ready for conversion. Then, you navigate to the “File” menu and select the “Download” option. From the dropdown menu, choose “PDF Document” as the desired file format. Optionally, you can customize the PDF settings, including layout, quality, and additional elements to include in the PDF file.
Finally, by clicking on the “Download” button, the converted PDF file will be saved to your computer or device. This file can be easily shared with others, printed, or archived for future reference. The PDF format ensures that your presentation remains accessible and the visual elements, including fonts, images, and backgrounds, are preserved.
Downloading your Google Slide presentation as a PDF allows you to share your work with individuals who might not have access to Google Slides. It also provides compatibility across different devices and operating systems, ensuring that your presentation looks the same regardless of the software being used.
Whether you are a student, professional, or teacher, knowing how to download a Google Slide as a PDF is a valuable skill. It allows you to distribute your work in a widely recognized and accessible format, maintaining the originality and appearance of your presentation.
With this guide, you can confidently navigate the process of converting and downloading your Google Slide presentations as PDF files. Now you can enjoy the benefits of easy sharing, consistent formatting, and increased compatibility for all your presentation needs.