Introduction
Adobe Premiere Pro is a powerful and widely-used video editing software that allows users to create professional-grade videos. Whether you’re a beginner or an experienced editor, Premiere Pro offers a range of features and tools to help you turn your creative vision into reality. If you’re looking to download Adobe Premiere Pro and get started with video editing, you’ve come to the right place.
In this guide, we will walk you through the step-by-step process of downloading Adobe Premiere Pro. We will cover everything from visiting the Adobe website to choosing a plan and installing the software on your device. By following these instructions, you’ll be ready to start creating stunning videos in no time.
Adobe offers various subscription plans for Premiere Pro, catering to different needs and budgets. You can choose between a monthly or annual plan, and there are options for individuals, students, and businesses. Once you’ve selected the perfect plan for you, you can proceed with the download and installation process.
It’s important to note that Adobe Premiere Pro is a premium software, meaning you’ll need to purchase a subscription to access its full features. However, Adobe does offer a free trial period, allowing you to test out the software before committing to a subscription. This trial period is a great opportunity to explore Premiere Pro’s capabilities and determine if it’s the right fit for your video editing needs.
So, if you’re ready to take your video editing skills to the next level and start using Adobe Premiere Pro, let’s dive into the step-by-step process of downloading and installing this incredible software.
Step 1: Visit the Adobe website
The first step to download Adobe Premiere Pro is to visit the official Adobe website. Open your preferred web browser and type in “Adobe” in the search bar. Click on the official Adobe website link that appears in the search results.
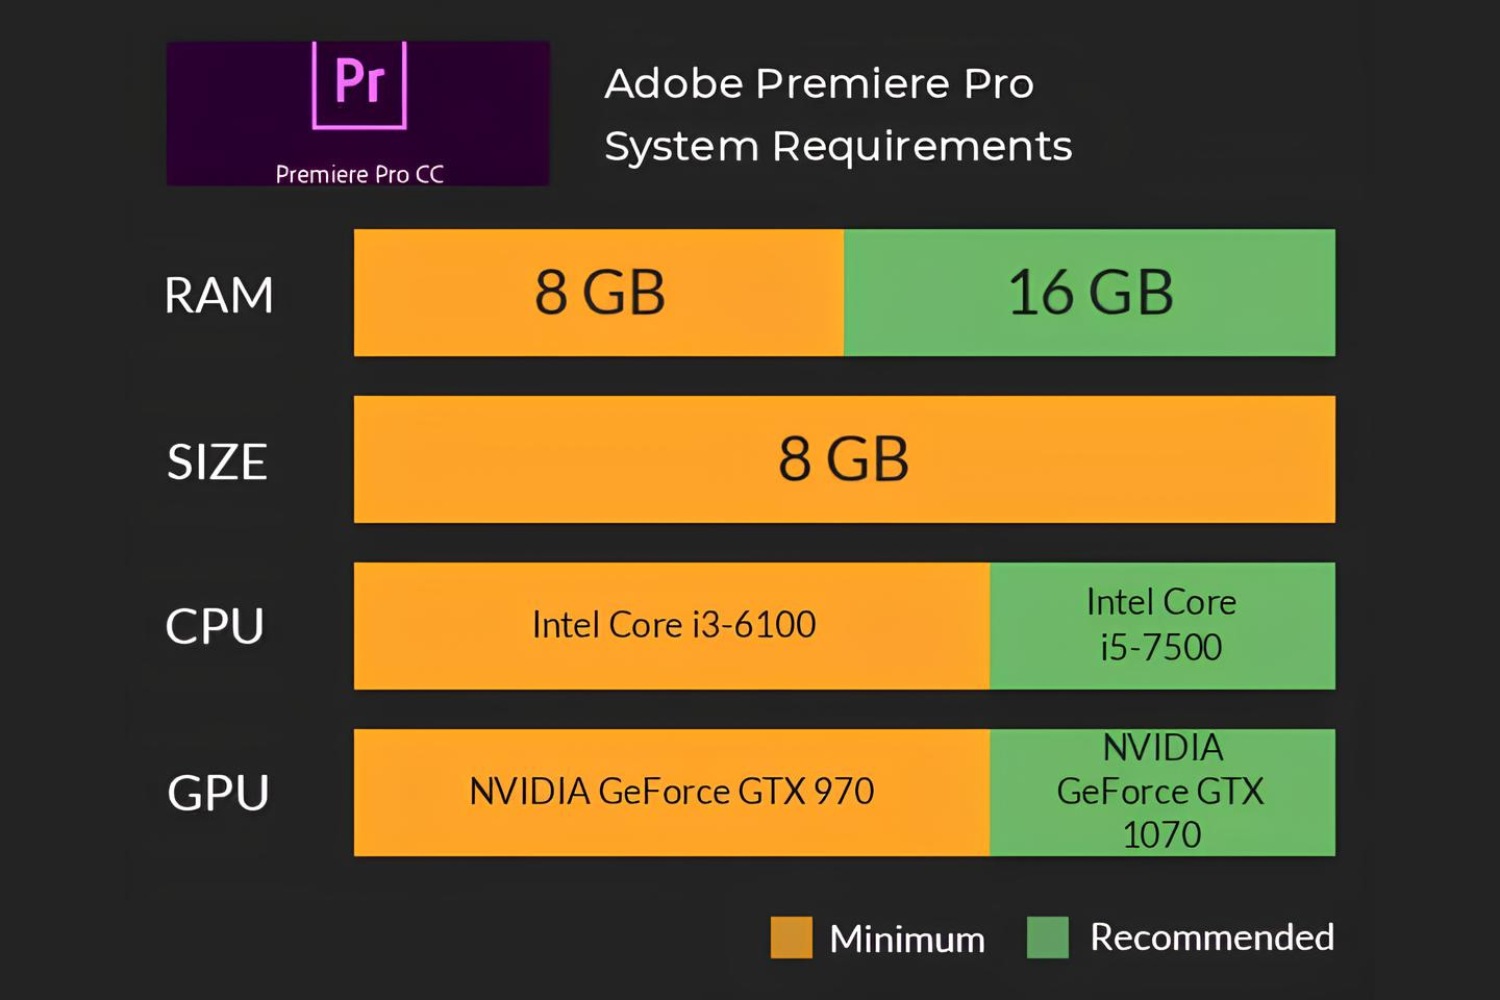
Once you’re on the Adobe website, navigate to the Products section or use the search bar to find Adobe Premiere Pro. Click on the Premiere Pro option to access the product page. Here, you’ll find detailed information about the software, its features, system requirements, and pricing plans.
Take some time to review the information on the product page to ensure that Adobe Premiere Pro meets your requirements and fits your editing needs. If you have any specific questions or concerns, you can also explore the Adobe support section or community forums for further assistance.
When you’re ready to proceed, look for the “Buy now” or “Free trial” button on the product page. Depending on your preference, you can either click on the “Buy now” button to purchase a subscription or click on the “Free trial” button to test out the software before committing to a subscription.
If you choose the free trial option, you’ll be prompted to sign in or create an Adobe account. If you already have an account, simply sign in with your credentials. Otherwise, click on the “Create an account” button and follow the instructions to set up a new account. Having an Adobe account allows you to manage your subscription, access your downloads, and receive important updates from Adobe.
Once you’re signed in or have created a new account, you’ll be redirected to the download page for Adobe Premiere Pro. Here, you may be asked to provide some additional information, such as your name, email address, and country of residence. Fill in the required fields and click on the “Continue” or “Download” button to proceed.
At this stage, you may also need to select your operating system (Windows or macOS) and the language for the software. Make the appropriate selections and ensure that you choose the correct version for your device.
Before proceeding to the next step, ensure that you have a stable internet connection and enough available storage space on your device for the download. It’s also a good idea to disable any unnecessary browser extensions or plugins that could potentially interfere with the download process.
Now that you’ve visited the Adobe website and accessed the download page for Premiere Pro, you’re ready to move on to the next step: setting up an Adobe account.
Step 2: Set up an Adobe account
To proceed with downloading Adobe Premiere Pro, you’ll need to set up an Adobe account. This account will allow you to manage your subscription, access your downloads, and receive important updates from Adobe. Follow the steps below to create your Adobe account:
- On the Adobe website, click on the “Create an account” button if you haven’t already done so during the previous step. Alternatively, if you already have an Adobe account, simply sign in with your credentials.
- Fill out the required information in the registration form. This typically includes your name, email address, and a password for your Adobe account. Make sure to choose a strong password that includes a combination of uppercase and lowercase letters, numbers, and special characters.
- Read and accept the terms and conditions, as well as any privacy policies or data usage statements, if prompted. It’s important to review these documents to understand how Adobe will use and protect your personal information.
- Complete any additional verification steps, such as solving a captcha or receiving a verification code via email or SMS. This step is necessary to ensure the security of your Adobe account and protect it from unauthorized access.
- Once you’ve successfully created your Adobe account, you’ll be redirected to your account dashboard. Here, you can manage your profile information, payment details, and subscription settings. Take some time to explore the various options and customize your account to your liking.
Having an Adobe account not only facilitates the downloading process but also provides you with access to a range of additional Adobe services and benefits. With your account, you can join the Adobe Creative Cloud community, participate in forums, and receive product updates and exclusive offers.
Remember to keep your Adobe account credentials secure and avoid sharing them with anyone. Regularly update your password and enable additional security measures, such as two-factor authentication, to further protect your account from potential security risks.
Now that you’ve set up your Adobe account, you’re ready to move on to the next step: choosing a suitable plan for Adobe Premiere Pro.
Step 3: Choose a Premiere Pro plan
Now that you have your Adobe account set up, it’s time to choose the Adobe Premiere Pro plan that best suits your needs. Adobe offers a range of subscription plans, allowing you to find the one that fits your budget and editing requirements. Follow the steps below to select your Premiere Pro plan:
- On the Adobe website, navigate to the Premiere Pro product page. Here, you’ll find an overview of the software’s features and pricing options.
- Scroll down to the section that displays the available subscription plans. Adobe typically offers plans for individuals, students, and businesses, each with varying features and benefits.
- Click on the “Buy now” or “Select plan” button for the plan that aligns with your needs. Take note of the pricing details and the billing frequency, whether it’s monthly or annual.
- Review the plan’s features and make sure it includes everything you require for your video editing tasks. Consider factors such as storage space, access to other Adobe products, and any additional perks or discounts that may be available with the chosen plan.
- If you’re unsure which plan is right for you, Adobe often provides a comparison chart that highlights the differences between the available options. This can help you make an informed decision based on your specific requirements.
- Once you’ve chosen your plan, click on the “Continue” or “Add to cart” button to proceed to the next step.
In some cases, Adobe may offer promotional discounts or special offers on their subscription plans. Keep an eye out for any ongoing promotions or deals that may be applicable to your chosen plan. These discounts can provide significant savings, especially for long-term commitments.
After selecting your plan, you may be presented with additional customization options. For example, you might have the choice to add Adobe Stock or increase your storage space for an extra fee. Review these options and select the ones that best suit your needs and budget.
Once you’re satisfied with your plan selection and any additional customizations, proceed to the next step to complete the payment process.
Step 4: Complete the payment process
Once you have chosen the Adobe Premiere Pro plan that suits your needs, it’s time to complete the payment process to activate your subscription. Follow the steps below to finalize your purchase and gain access to all the features of Premiere Pro:
- After selecting your plan, you will be directed to the payment page. Here, you may need to review your selected plan and any customizations you made. Double-check the pricing details and ensure that everything is correct before proceeding.
- Fill in the required billing information, including your name, address, and payment details. Adobe accepts various payment methods, such as credit cards and PayPal. Choose the option that is most convenient and secure for you.
- Review and accept the terms and conditions of the subscription. It’s important to read and understand the terms before proceeding with the payment. These terms outline important details, such as the cancellation and refund policies, so be sure to review them carefully.
- Double-check all the provided information for accuracy. Make sure that there are no typos or mistakes in your billing address or payment details, as this could lead to issues with processing your payment.
- Click on the “Complete Purchase” or “Submit” button to finalize the payment. Depending on the payment method you chose, you may be redirected to a third-party payment gateway for secure processing. Follow the instructions provided to complete the transaction.
- Once the payment is successful, you will receive a confirmation email from Adobe. This email will contain important information about your purchase, such as your subscription details and instructions on how to access and download Adobe Premiere Pro.
It’s recommended to keep a copy of the confirmation email for future reference. This email serves as proof of your subscription and contains important details that may be required for troubleshooting or contacting Adobe support, if needed.
Congratulations! You have now successfully completed the payment process for Adobe Premiere Pro. The next step is to proceed with downloading the Premiere Pro installer onto your device.
Step 5: Download Premiere Pro installer
After completing the payment process for Adobe Premiere Pro, it’s time to download the installer onto your device. Follow the steps below to initiate the download and prepare for the installation of Premiere Pro:
- Check your email inbox for the confirmation email from Adobe. Open the email and locate the download link or button provided. Click on the download link to start the download process.
- Alternatively, if you have an Adobe account, you can access your downloads by logging into your account on the Adobe website. Navigate to the “Downloads” or “My Account” section, where you should find a list of available downloads for your purchased software.
- Once you’ve accessed the download page, select the appropriate operating system (Windows or macOS) for your device. This ensures that you download the correct version of Adobe Premiere Pro that is compatible with your operating system.
- Choose the desired language for the software. Adobe offers multiple language options to cater to a global user base. Select the language that you are most comfortable working with.
- Click on the “Download” button to start the download process. The file size of the Premiere Pro installer can be quite large, so ensure that you have a stable internet connection and enough storage space on your device.
- Depending on your web browser and device settings, you may be prompted to choose a location to save the downloaded file. Select a destination on your computer or external storage device where you want to store the installer file.
- Wait for the download to complete. The time required for the download depends on the speed of your internet connection and the size of the installer file.
Once the download is complete, you now have the Premiere Pro installer ready on your device. Before proceeding to the installation process, it’s a good practice to verify the integrity of the downloaded file to ensure there were no errors during the download.
Congratulations! You have successfully downloaded the Adobe Premiere Pro installer. The next step is to install Premiere Pro on your device and get ready to unleash your video editing creativity.
Step 6: Install Premiere Pro on your device
Now that you have downloaded the Adobe Premiere Pro installer onto your device, it’s time to proceed with the installation process. Follow the steps below to install Premiere Pro and get ready to dive into the world of professional video editing:
- Navigate to the location where you saved the Premiere Pro installer file on your device. Double-click on the installer file to run the installation wizard.
- Depending on your operating system, you may be prompted to grant administrative privileges or enter your system password to proceed with the installation. Follow the instructions and provide the necessary permissions as required.
- The installation wizard will guide you through the process. Read the instructions and prompts carefully, and click on the “Next” or “Continue” button to proceed to the next step.
- Review the license agreement and terms of use presented during the installation process. Accept the terms if you agree to them to continue with the installation.
- Choose the installation location for Adobe Premiere Pro. By default, the software will be installed in the recommended location. If you prefer to install it in a different folder or drive, you can specify the desired location.
- Select any additional components or features you want to install along with Premiere Pro. Adobe may provide optional software or plugins that can enhance your editing experience. Carefully review the options and select the ones you want to include in the installation.
- Wait for the installation process to complete. This may take a few minutes, depending on your system’s performance and the selected components.
- Once the installation is finished, you’ll see a confirmation message. Click on the “Finish” or “Close” button to exit the installation wizard.
Congratulations! You have successfully installed Adobe Premiere Pro on your device. The software is now ready to be launched and used for all your video editing needs. Take a moment to explore the program and familiarize yourself with its interface before diving into your first editing project.
It’s worth noting that Adobe occasionally releases updates and feature enhancements for Premiere Pro. These updates can improve performance, fix bugs, and introduce new functionalities. It’s recommended to regularly check for updates in the Adobe Creative Cloud app and install them to ensure that you have the latest version of Premiere Pro with all the latest features and improvements.
With Adobe Premiere Pro installed on your device, you’re all set to unleash your creativity and bring your video editing ideas to life. The next step is to launch Premiere Pro and start creating captivating videos.
Step 7: Launch Premiere Pro and start using it
Congratulations! You have installed Adobe Premiere Pro on your device. Now it’s time to launch the software and start your video editing journey. Follow the steps below to open Premiere Pro and begin exploring its powerful features:
- Locate the Premiere Pro icon on your desktop or in the application folder on your device. Double-click on the icon to launch the software.
- As Premiere Pro launches, you may be prompted to sign in to your Adobe account. Enter your account credentials and click on the “Sign In” button.
- If you have multiple Adobe Creative Cloud applications installed, you may see a launcher screen with a list of available programs. Select Adobe Premiere Pro from the list to open the software.
- Once Premiere Pro opens, you’ll be greeted with the welcoming splash screen. Take a moment to familiarize yourself with the screen and the various options and resources available.
- Before you start your first project, it’s important to set up your workspace according to your preference. Premiere Pro offers different workspace layouts tailored for different editing workflows. You can choose from the default workspaces or customize your own. Explore the various panels, options, and tools within the software to find the most comfortable layout for your editing needs.
- Now that you’re in the Premiere Pro interface, you can import your media files by clicking on “File” and selecting “Import” or by using the keyboard shortcut (Cmd+I for macOS or Ctrl+I for Windows). Browse your computer or connected storage devices to select the media files you want to work with.
- Once your media files are imported, you can start creating your project by adding clips to the timeline, trimming them, adding transitions, applying effects, adjusting the audio, and much more. Premiere Pro offers a wide range of tools and features to help you unleash your creativity and achieve your desired video editing result.
- Take some time to explore the various menus, options, and panels within Premiere Pro. Familiarize yourself with the different editing tools and functionalities available. Adobe provides comprehensive guides, tutorials, and resources on their website to help you master Premiere Pro and make the most out of its capabilities. Don’t hesitate to refer to these resources whenever you need assistance or want to learn more.
Remember, video editing is a creative process, and Premiere Pro provides you with the tools to bring your vision to life. Experiment with different effects, transitions, and techniques to add your personal touch to your videos. Don’t be afraid to try new things and learn from your experience.
Now that you have launched Adobe Premiere Pro, it’s time to let your creativity flow and create amazing videos. Enjoy your editing journey and have fun exploring all the possibilities that Premiere Pro has to offer!
Conclusion
Congratulations on successfully downloading and installing Adobe Premiere Pro! You’ve completed all the necessary steps to get started with this powerful video editing software. By visiting the Adobe website, setting up an Adobe account, choosing a suitable plan, completing the payment process, downloading the Premiere Pro installer, installing the software on your device, and launching Premiere Pro, you are now ready to unleash your creativity and bring your video editing ideas to life.
Adobe Premiere Pro offers a wide range of features and tools to help you create professional-grade videos. From importing media files to applying effects, transitions, and audio enhancements, Premiere Pro provides you with the flexibility and control you need to produce high-quality videos.
As you continue your journey with Premiere Pro, take advantage of the various resources available, such as tutorials, guides, and the Adobe Creative Cloud community. These resources can help you enhance your skills and discover new techniques to take your video editing to the next level.
Remember, video editing is a creative process, and Adobe Premiere Pro is just a tool to assist you in bringing your vision to life. Don’t be afraid to experiment, try new things, and learn from your experience. With practice and dedication, you can master Premiere Pro and create captivating videos that resonate with your audience.
Now that you’re equipped with Adobe Premiere Pro, let your imagination run wild and start creating remarkable videos. Enjoy the journey and embrace the endless possibilities that await you in the world of video editing. Wishing you all the best in your video editing endeavors!