Introduction
Zooming is a crucial aspect of video editing, as it allows you to focus on specific details and adjust the scale of your content. In Adobe Premiere Pro, the leading video editing software used by professionals, there are various methods to zoom in and out seamlessly across the timeline, program monitor, and individual clips. Whether you want to emphasize a critical moment, create dramatic effects, or enhance the visibility of audio waveforms, understanding how to effectively zoom in Premiere Pro is essential.
Throughout this tutorial, we will walk you through the different ways to zoom in on Premiere Pro, step by step. We will explain the functionalities of the zoom tool available within the software and provide you with helpful keyboard shortcuts and techniques to optimize your editing workflow. By the end, you will have a comprehensive understanding of the various zooming options and be able to apply them to your video editing projects.
So, if you’re ready to level up your editing skills and take full control over the zooming capabilities in Premiere Pro, let’s dive in and explore the fascinating world of zooming!
Understanding the Zoom Tool
Before we delve into the different zooming techniques, it’s essential to understand the basics of the zoom tool in Adobe Premiere Pro. The zoom tool allows you to adjust the scale of your timeline, program monitor, and individual clips, making it easier to work with intricate details and achieve the desired effect.
In Premiere Pro, you can access the zoom tool by selecting it from the toolbar or by using the keyboard shortcut “Z”. Once selected, you can click and drag in the timeline or program monitor to zoom in and out. You can also utilize the scroll wheel on your mouse to zoom in and out quickly.
The zoom tool works in conjunction with the playhead or the current time indicator (CTI). This means that when you zoom in or out, the CTI will remain in the center of the view, allowing you to precisely navigate and edit your footage.
Furthermore, the zoom tool offers different zoom levels or magnifications, represented by percentages. These percentages indicate the scale of the view you have on your timeline or program monitor. For instance, 100% zoom displays your footage at its original size, while 50% zoom reduces the scale by half.
Understanding the capabilities of the zoom tool and how it interacts with the timeline and program monitor is essential for executing precise edits and achieving your desired visual effect. Now that you have a solid grasp of the basics, let’s explore the different methods of zooming in Premiere Pro.
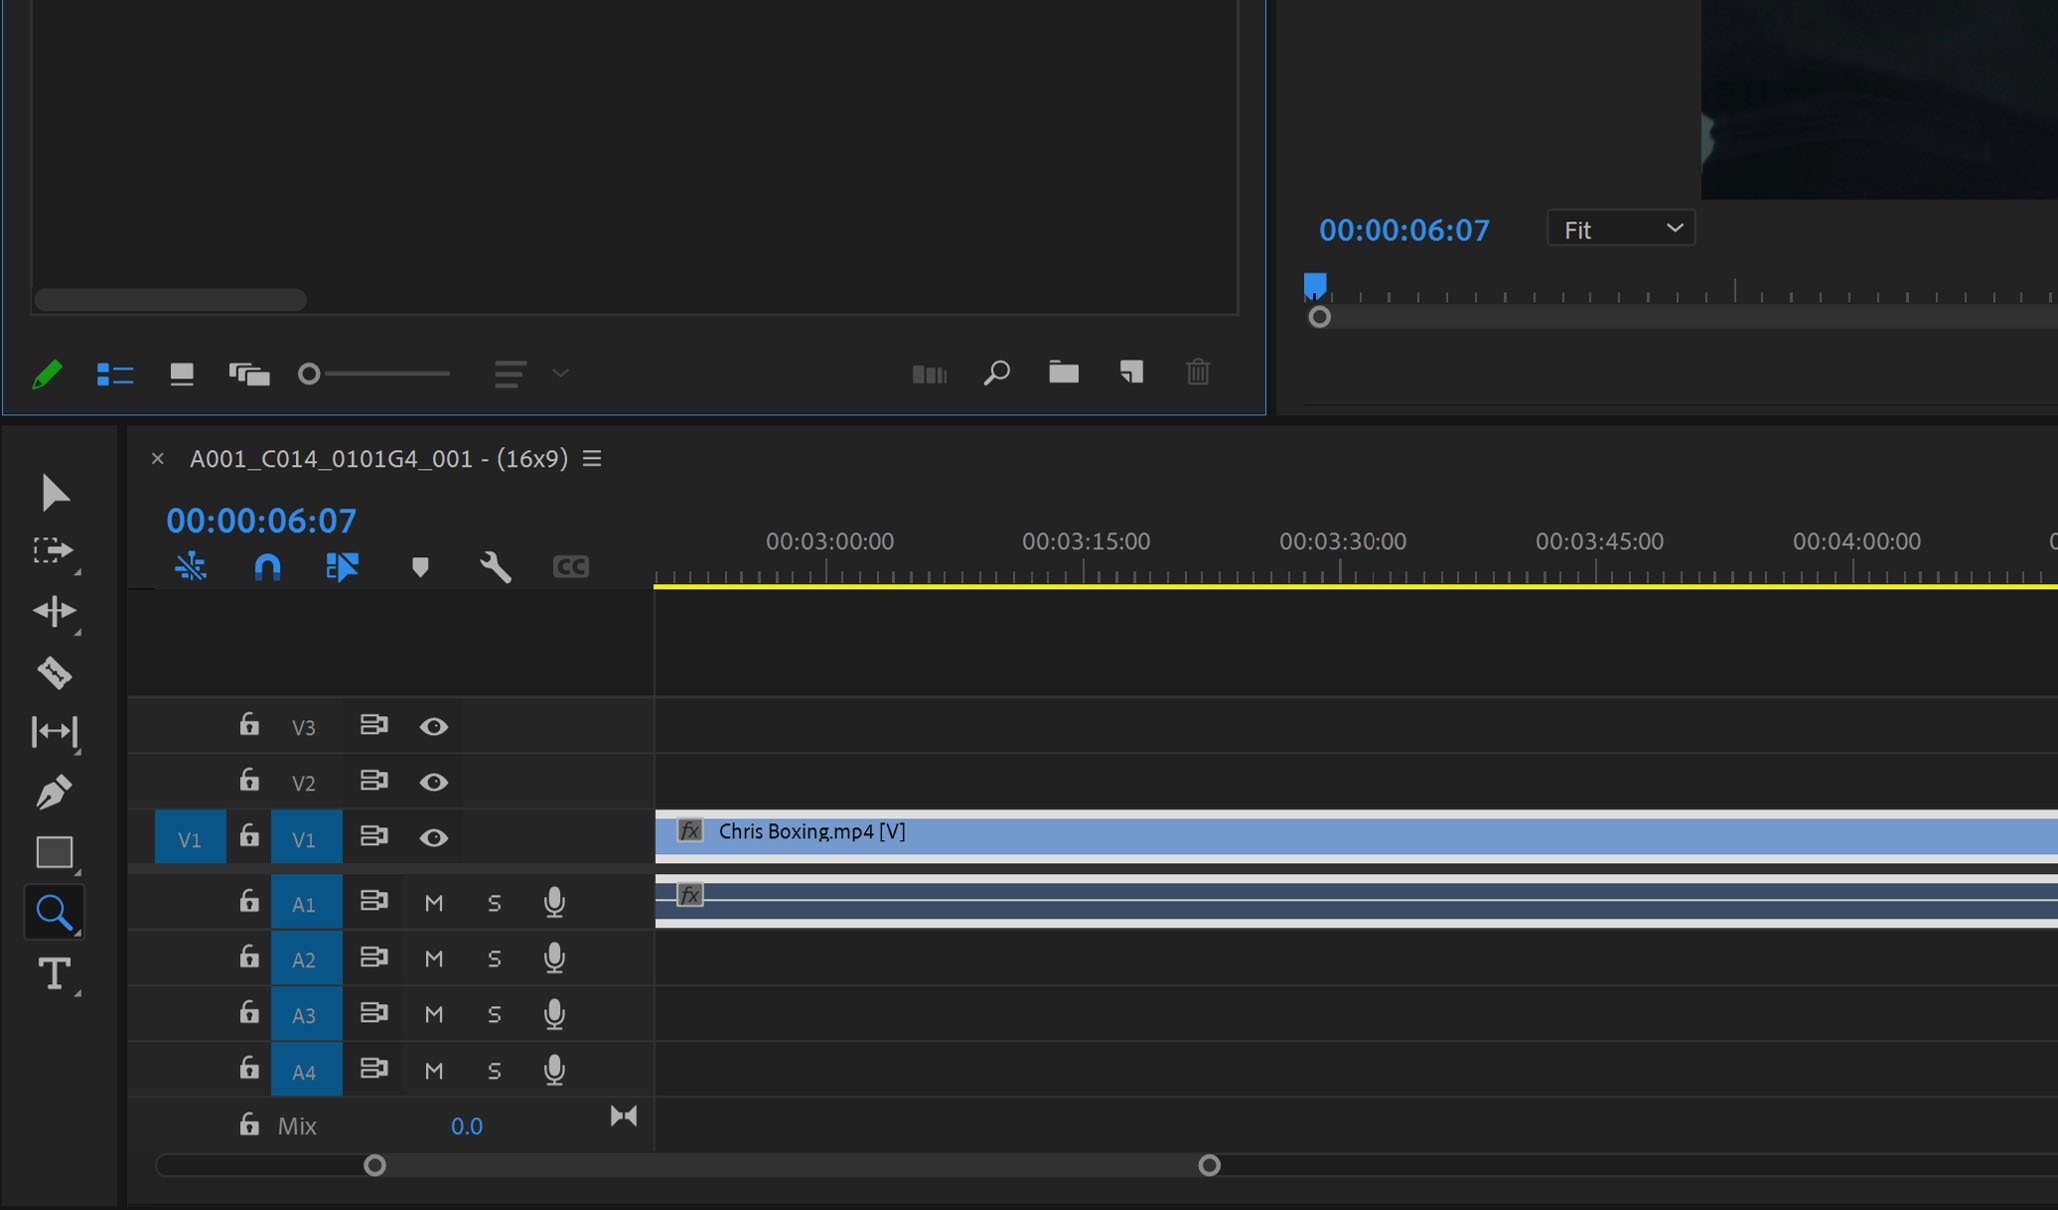
Zooming in and out on the Timeline
The timeline in Adobe Premiere Pro is where you arrange and edit your footage, and being able to zoom in and out of it effectively is crucial for precise editing. Fortunately, Premiere Pro offers various techniques to adjust the scale of your timeline and focus on specific details.
One simple way to zoom in and out on the timeline is by using the zoom slider located at the bottom-right corner of the timeline panel. Dragging the slider to the right zooms in, making the timeline elements appear larger and allowing you to see finer details. Conversely, dragging it to the left zooms out, making the elements smaller and enabling you to see a broader view of your timeline.
In addition to the zoom slider, Premiere Pro provides keyboard shortcuts to adjust the timeline zoom quickly. For example, pressing the “+” key on your keyboard zooms in, while pressing the “-” key zooms out. This enables you to navigate through your timeline efficiently and focus on specific sections.
If you want to zoom in on a particular portion of your timeline, you can use the “Zoom to Sequence” button located next to the zoom slider. This feature automatically adjusts the zoom level to fit the selected portion of your sequence, providing a detailed view of that specific area.
Furthermore, Premiere Pro allows you to use the “Zoom to Frame” feature by right-clicking on a specific frame in the timeline and selecting “Zoom to Frame” from the context menu. This action instantly adjusts the timeline zoom level, ensuring that the selected frame fills the program monitor and allowing you to analyze it closely.
By utilizing these zooming techniques on the timeline, you can precisely edit your footage, adjust keyframes accurately, and ensure a smooth workflow in Adobe Premiere Pro.
Zooming in and out on the Program Monitor
When editing in Adobe Premiere Pro, having the ability to zoom in and out on the program monitor is essential for scrutinizing your footage and making precise adjustments. Thankfully, Premiere Pro offers several intuitive methods to control the zoom level on the program monitor.
One convenient way to zoom in and out on the program monitor is by using the zoom slider located at the bottom-left corner of the program monitor panel. Similar to the timeline zoom slider, you can drag it to the right to zoom in, making the content larger and allowing you to examine finer details. Conversely, dragging it to the left zooms out, providing a wider view of your content.
In addition to the zoom slider, Premiere Pro also provides keyboard shortcuts to control the program monitor zoom. Pressing the “+” key zooms in, while pressing the “-” key zooms out. These shortcuts allow you to adjust the scale quickly and navigate through your footage efficiently.
If you need to zoom in on a specific area of your footage, you can use the zoom tool located in the toolbar or press the “Z” key to activate it. With the zoom tool selected, simply click and drag on the program monitor to define the area you want to zoom in on. This enables you to closely analyze specific sections of your video and make precise adjustments.
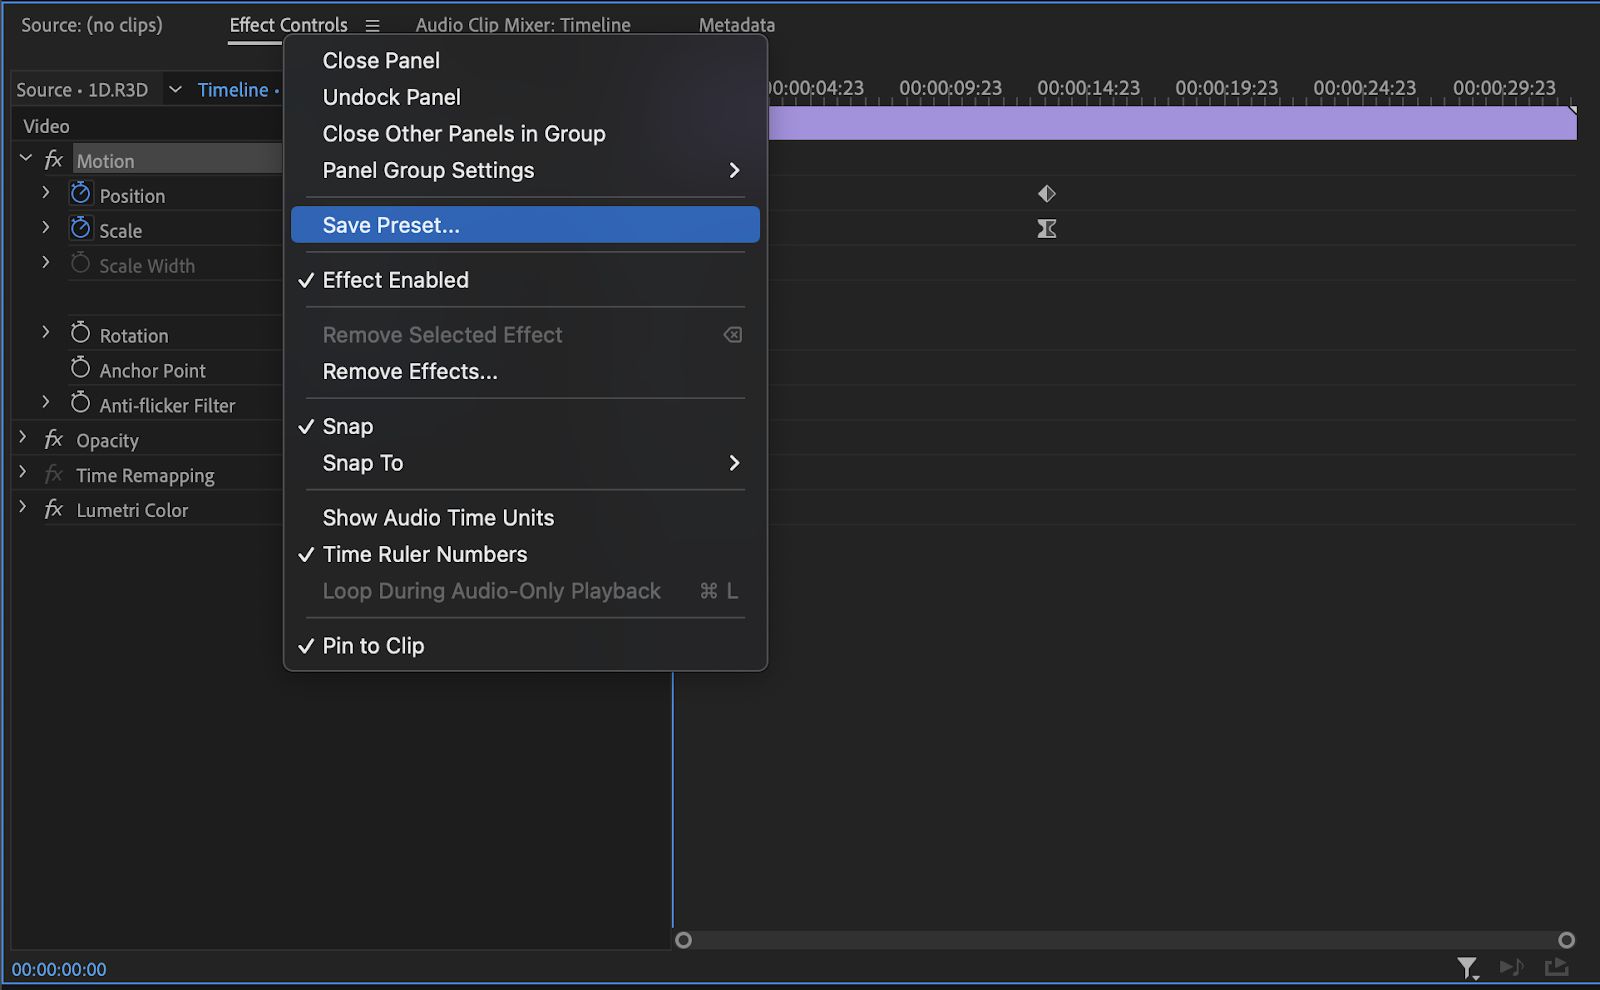
Another helpful feature in Premiere Pro is the ability to create keyframes to control the program monitor zoom over time. By enabling the stopwatch icon next to the Scale parameter in the Effects Controls panel, you can set keyframes at different points in your timeline to create smooth zoom animations on the program monitor.
Whether you’re fine-tuning your composition, checking for imperfections, or analyzing specific details, being able to zoom in and out on the program monitor in Premiere Pro allows you to maintain control over your editing process and achieve the desired visual outcome.
Using Keyboard Shortcuts for Zooming
In Adobe Premiere Pro, utilizing keyboard shortcuts can significantly speed up your editing workflow. When it comes to zooming, Premiere Pro offers a range of keyboard shortcuts that allow you to quickly adjust the zoom level without the need to navigate through menus or panels.
To zoom in on your footage, there are a couple of useful keyboard shortcuts you can use. Pressing the “=” key on your keyboard zooms in, making the content appear larger in the timeline, program monitor, or any other view. If you prefer a more precise zoom, you can use the “[” key to zoom in incrementally.
Conversely, if you want to zoom out, the “-” key is your friend. Simply press it, and the content will become smaller in scale. Similarly, you can use the “]” key to zoom out incrementally and get a broader view.
While these basic keyboard shortcuts are handy, Premiere Pro also offers advanced shortcuts for even more precise control over zooming. Holding down the Alt key (Option key on Mac) while scrolling the mouse wheel allows you to zoom in and out of the timeline or program monitor at a finer granularity. This enables you to navigate through your footage and make minute adjustments with ease.
It’s worth noting that when using keyboard shortcuts for zooming in Premiere Pro, the focus is on the selected panel. For instance, if the timeline panel is active, pressing the keyboard shortcuts will zoom in or out on the timeline specifically.
By incorporating these keyboard shortcuts into your editing workflow, you can efficiently adjust the zoom level and maintain a seamless and uninterrupted creative process. They provide an intuitive and quick way to navigate through your footage, focusing on critical details and achieving your desired visual impact.
Zooming in on Individual Clips
When working with individual clips in Adobe Premiere Pro, zooming in allows you to focus on specific details within the footage and make precise edits. Premiere Pro offers several methods to zoom in on individual clips, allowing for enhanced control and customization.
One simple way to zoom in on a specific clip is by selecting it in the timeline and using the zoom slider located at the bottom-right corner of the timeline panel. Dragging the slider to the right will zoom in on the selected clip, displaying it at a larger scale and enabling you to work with finer details. Conversely, dragging the slider to the left will zoom out, providing a broader view of the timeline.
In addition to using the zoom slider, Premiere Pro provides keyboard shortcuts for easy zooming on individual clips. By pressing the “+” key on your keyboard, you can zoom in on the selected clip, while pressing the “-” key will zoom out. These shortcuts are particularly helpful when you need to make precise adjustments or examine specific sections of a clip.
If you prefer a more visual approach to zooming, Premiere Pro offers two additional methods: using the scale parameter and the motion effect. By adjusting the scale parameter of a clip, you can change its size directly in the program monitor. Increasing the scale value will effectively zoom in on the clip, making it larger and more prominent in the frame. Decreasing the scale value will have the opposite effect, allowing you to zoom out and display more of the surrounding content.
Alternatively, you can use the motion effect to zoom in and out on a clip. By applying the motion effect to a clip and adjusting the scale property within the effects control panel, you can create smooth and customized zoom animations. Using keyframes, you can control the amount and timing of the zoom effect, adding a dynamic and professional touch to your video editing.
With these various methods, Premiere Pro empowers you to zoom in and out on individual clips, providing the flexibility and control needed for precise editing. Experiment with each technique to find the one that best fits your editing style and achieves your desired visual impact.
Using the Scale Parameter to Zoom on Clips
The scale parameter in Adobe Premiere Pro is a powerful tool that allows you to adjust the size of individual clips, effectively zooming in or out on specific sections. By manipulating the scale parameter, you can customize the zoom level of a clip, creating visually engaging effects and emphasizing important details within your footage.
To access the scale parameter, select the clip you want to zoom in on in the timeline, then navigate to the effects control panel. In the motion section, you will find the scale property. Adjusting the scale value will directly impact the size of the clip in the program monitor.
To zoom in on a clip, increase the scale value. As you increase the scale, the clip will appear larger in the frame, allowing you to focus on specific details. This technique is particularly useful when you want to emphasize a particular element or highlight a significant moment within your footage.
Conversely, if you want to zoom out on a clip and display more of the surrounding content, decrease the scale value. This will scale down the clip, giving you a wider view and enabling you to showcase the context in which the clip resides.
One advantage of using the scale parameter to zoom on clips is the ability to keyframe the changes. By setting keyframes at specific points in the timeline and adjusting the scale value accordingly, you can create smooth and seamless zoom animations. This allows you to gradually transition from a wide shot to a close-up or vice versa, adding a dynamic and professional touch to your video editing.
Additionally, combining the scale parameter with other effects and techniques can enhance the zoom effect even further. For example, applying a motion blur effect can add realism and smoothness to the zoom animation, giving it a natural and polished look.
By utilizing the scale parameter in Premiere Pro, you have the creative freedom to zoom in and out on clips, emphasizing important elements, and enhancing the storytelling within your videos. Experiment with different scale values and keyframe adjustments to achieve the desired visual impact and create captivating and engaging content.
Using the Motion Effect to Zoom on Clips
The motion effect in Adobe Premiere Pro offers a versatile and dynamic way to zoom in and out on clips, creating smooth and engaging zoom animations. By applying the motion effect and adjusting keyframes, you can customize the zoom level, timing, and style, adding a professional touch to your video editing.
To access the motion effect, select the desired clip in the timeline and navigate to the effects control panel. Under the motion section, you will find various properties, including position, scale, and rotation. Adjusting the scale property within the motion section allows you to control the zoom effect.
Start by applying the motion effect to the clip. You can do this by clicking on the stopwatch icon next to the scale property, which enables keyframing. Keyframes are markers that define a specific value for a property at a particular point in time.
To create a zoom animation, set the initial scale value at the beginning of the clip. This will be the starting point of your zoom effect. Then, move the playhead to a later point in the timeline where you want the zoom to reach its maximum level. Increase the scale value to the desired zoom level for that specific moment.
By setting keyframes at different points in the timeline and adjusting the scale value, you can create smooth transitions between zoom levels. For instance, you can start with a wide shot, gradually zoom in on a subject or detail, and later zoom out to reveal the broader context.
Additionally, Premiere Pro offers various easing options for keyframes, allowing you to control the acceleration and deceleration of the motion effect. This means you can create gentle and gradual zooms, or more abrupt and dynamic zoom animations, depending on the mood and style you want to achieve.
Don’t forget that you can also add other effects or adjustments in conjunction with the motion effect to enhance the zoom animation. For example, applying a motion blur effect can add a sense of realism and smoothness to the zoom, making it more visually appealing.
By leveraging the motion effect in Premiere Pro, you can bring your clips to life and create engaging zoom animations. Experiment with different keyframe placements, scale values, and easing options to achieve the desired visual impact and make your videos more dynamic and captivating.
Zooming in on Audio Waveforms
Zooming in on audio waveforms in Adobe Premiere Pro allows you to closely analyze and edit the audio of your video project. By zooming in, you can identify specific sections, remove background noise, adjust volume levels, and fine-tune the audio to create a more polished and professional result.
In Premiere Pro, the audio waveform represents the graphical representation of the audio tracks in your timeline. It displays the intensity and variation of the audio over time, making it easier to identify peaks, gaps, and other pertinent details.
To zoom in on the audio waveforms, you can use the zoom slider located at the bottom-right corner of the timeline panel. Dragging the slider towards the right will zoom in on the waveforms, allowing you to see more details and work with greater precision. Conversely, dragging the slider towards the left will zoom out, providing a broader view of the audio waveforms.
In addition to the zoom slider, Premiere Pro offers keyboard shortcuts to adjust the zoom level of the audio waveforms. Pressing the “+” key will zoom in, while pressing the “-” key will zoom out. These shortcuts are particularly useful when you need to make fine adjustments or focus on specific sections of the audio.
Another way to zoom in on the audio waveforms is by using the zoom tool. Activate the zoom tool by selecting it from the toolbar or pressing the “Z” key. With the zoom tool selected, click and drag over the audio waveforms in the timeline to zoom in on the selected area. This provides a more detailed view, allowing you to precisely analyze and edit the desired sections.
By zooming in on the audio waveforms, you gain better control over the nuances of the audio. You can isolate problematic sections for noise reduction, adjust precise volume levels, or apply effects with accuracy. This level of control ensures that your audio is clean, well-balanced, and enhances the overall quality of your video.
Utilize the zooming techniques available in Premiere Pro to focus on the audio waveforms, identify imperfections, and implement targeted adjustments. With attention to detail, your audio will complement your visuals and create a cohesive and immersive viewing experience.
Adjusting the Size of the User Interface
In Adobe Premiere Pro, the ability to adjust the size of the user interface provides a customizable and comfortable editing experience. Whether you want to optimize your workspace for better visibility or accommodate different monitor sizes, Premiere Pro offers flexible options to resize and arrange the various panels and windows.
To adjust the size of the user interface, start by locating the divider lines between panels. These dividers can be found between the different sections of the interface, such as the project panel, timeline panel, program monitor, and effects control panel.
To increase the size of a specific panel, place your cursor on the divider line next to it. Your cursor will change to a double-headed arrow. Click and drag the divider to the desired position, expanding the size of the selected panel.
If you want to decrease the size of a panel, follow the same process. Place your cursor on the divider line and click and drag it towards the desired direction to make the panel smaller. This allows you to allocate more space to other panels or focus on specific areas of your editing workflow.
In addition to adjusting the size of individual panels, you can also rearrange them to create a personalized workspace. Click and drag the title bar of a panel to move it to a different location within the interface. This way, you can organize your workspace according to your preference and optimize your editing efficiency.
Another useful feature for adjusting the size of the user interface in Premiere Pro is the ability to use multiple monitors. If you have multiple monitors connected to your system, you can undock panels and move them to the secondary monitor, providing more screen real estate for your editing workspace.
By resizing and arranging the user interface panels in Adobe Premiere Pro, you can create a workspace that suits your needs and preferences. Whether you prioritize visibility, efficiency, or customization, taking advantage of these options allows you to optimize your editing workflow and enhance your overall editing experience.
Exploring Additional Zooming Options and Preferences
In addition to the standard zooming techniques in Adobe Premiere Pro, there are additional options and preferences to further enhance your zooming capabilities and customize your editing workflow. These features provide flexibility and control, allowing you to fine-tune your edits and achieve the desired visual impact.
One such option is the ability to zoom to frame size. Right-clicking on a clip in the timeline and selecting “Zoom to Frame Size” automatically adjusts the scale of the clip to fit the program monitor. This is especially useful when working with footage of different resolutions or when you want to ensure that the clip fills the screen perfectly.
Premiere Pro also offers the option to enable the High-Quality Playback setting. By going to the playback preferences, you can check the box to enable High-Quality Playback. This ensures that the program monitor displays your footage in optimal quality, especially when zoomed in during playback. However, note that this may impact the real-time performance, so it’s essential to consider the hardware specifications of your computer.
Another preference to explore is the option to enable or disable the zoom indicator. The zoom indicator displays the current zoom percentage when you are zooming in or out. You can find this option in the general preferences. Enabling the zoom indicator provides a visual reference, allowing you to easily track and adjust the zoom level as you work.
Furthermore, Premiere Pro has a feature called “Zoom Percentage Snapping.” When enabled, it snaps the zoom level to default percentage values, such as 100%, 200%, and 400%. This can be beneficial when you want to quickly toggle between certain zoom levels without the need to manually adjust the zoom slider or scale parameter.
Lastly, you can customize the keyboard shortcuts for zooming to suit your preferences. By going to the keyboard shortcuts preferences, you can assign your preferred keys to zoom in, zoom out, or other zooming functions. This allows you to create a personalized editing workflow that aligns with your editing style and habits.
By exploring these additional zooming options and preferences in Adobe Premiere Pro, you can enhance your editing capabilities and tailor the software to suit your specific needs. Take the time to experiment with these features and find the settings that elevate your editing workflow and help you achieve your desired results.
Conclusion
Mastering the art of zooming in Adobe Premiere Pro is essential for any video editor looking to enhance their storytelling and create visually captivating content. By understanding the various zooming techniques available within the software and implementing them effectively, you can draw attention to important details, create dynamic transitions, and deliver a polished final product.
Throughout this tutorial, we explored the different methods of zooming in Premiere Pro, including the use of the zoom tool, adjusting the scale parameter, applying the motion effect, and zooming on audio waveforms. Each method provides unique opportunities for enhancing your video editing process and achieving the desired visual impact.
We also discussed the importance of using keyboard shortcuts, adjusting the size of the user interface, and exploring additional zooming options and preferences. These features, when utilized effectively, can significantly improve your editing workflow, allowing for a more intuitive and tailored experience.
Remember, zooming is not just about getting closer to the subject; it’s about conveying emphasis, creating dramatic effects, and guiding the viewer’s attention. Understanding when and how to use zooming techniques can elevate your storytelling and bring your vision to life on screen.
As you continue to explore and experiment with different zooming techniques in Adobe Premiere Pro, always keep in mind the balance between creative expression and maintaining a seamless and enjoyable viewer experience. Strive to create impactful visual moments without overwhelming or distracting the audience.
So, whether you’re a seasoned professional or just starting out, embrace the power of zooming in Adobe Premiere Pro. Let your creativity soar as you zoom in on the details, zoom out for a broader perspective, and craft compelling stories that captivate your viewers.