Introduction
Welcome to the world of Near Field Communication (NFC) technology! If you’re an iPhone user looking to explore the exciting possibilities of programming NFC tags, you’ve come to the right place. In this article, we will guide you through the process of programming NFC tags with an iPhone, providing you with the knowledge and tools to unlock the potential of this innovative technology.
But first, you might be wondering, what exactly is NFC? NFC is a short-range wireless communication technology that allows devices, such as smartphones and tablets, to establish contactless communication with other compatible devices or tags when they come into close proximity. This technology is commonly used for a variety of applications, including mobile payments, contactless ticketing, data transfer, and much more.
Now, you might be thinking, how does NFC work on an iPhone? Well, Apple has integrated NFC functionality into their iPhones, starting from iPhone 7 and later models. This means that iPhone users can take advantage of NFC technology for a wide range of applications, including programming NFC tags.
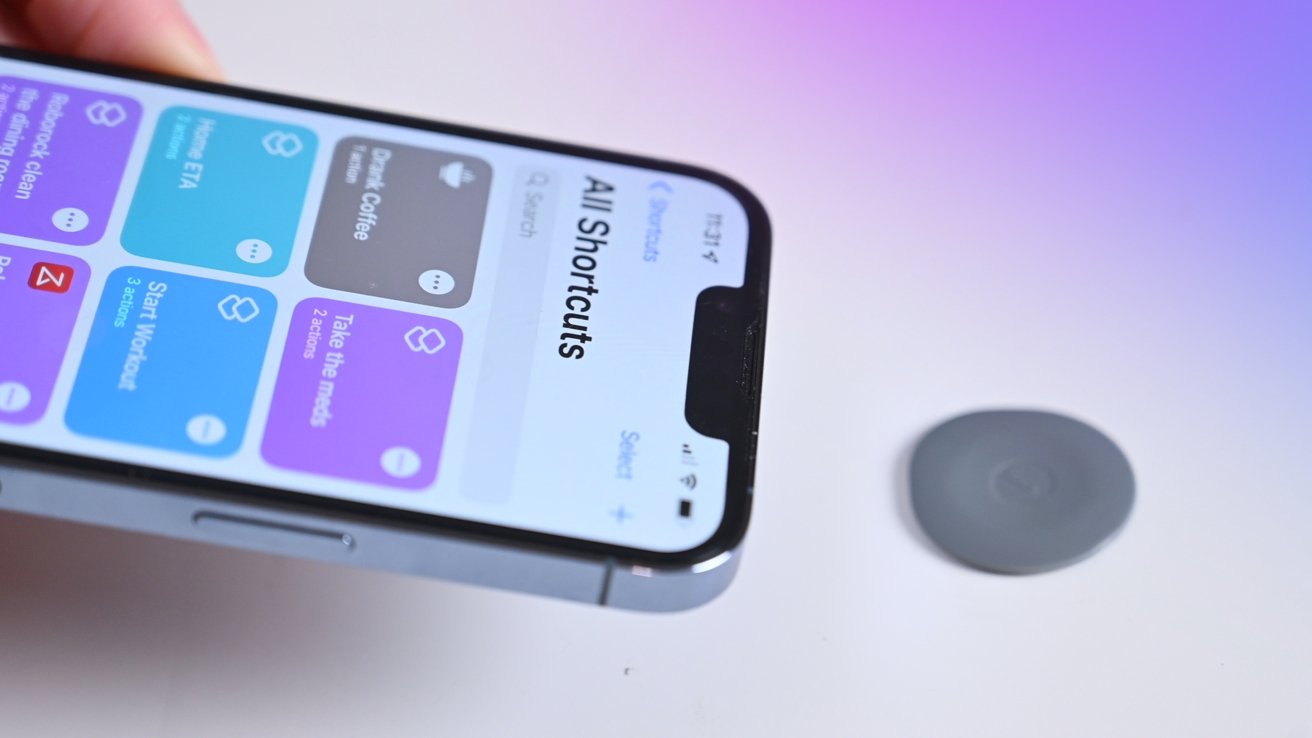
So, what are NFC tags exactly? NFC tags are small, unpowered devices that contain a programmable microchip and an antenna. They can store information, such as URLs, contact information, or even perform specific actions when tapped by an NFC-enabled device. By programming NFC tags, you can customize their functionality to meet your specific needs, opening up a world of possibilities.
Now that you have a basic understanding of NFC and NFC tags, let’s delve into the process of programming NFC tags with your iPhone. Don’t worry if you’re not a tech guru – we’ll guide you through each step, making it easy for anyone to get started.
What is NFC?
Near Field Communication (NFC) is a wireless communication technology that enables devices to establish a connection simply by bringing them into close proximity. It operates in the frequency range of 13.56 MHz and allows for the exchange of data between devices over short distances. NFC technology finds its applications in various industries, including mobile payments, transportation, healthcare, and marketing.
NFC operates on the principle of electromagnetic induction, where two devices communicate by generating an electromagnetic field. When an NFC-enabled device, such as a smartphone or tablet, comes within a few centimeters of another NFC device or tag, data can be transferred between them. This close proximity requirement ensures secure and reliable communication.
NFC technology is based on three primary modes of operation:
- Reader/Writer Mode: In this mode, an NFC device, such as a smartphone, acts as the reader and writer. It can read information from NFC tags and write data onto them. This mode enables NFC-enabled devices to interact with a wide range of applications, such as mobile payments and ticketing.
- Card Emulation Mode: In card emulation mode, the NFC device simulates a smart card, allowing it to be used for tasks such as contactless payments and access control. By emulating a traditional contactless card, users can tap their devices on compatible readers for seamless transactions.
- Peer-to-Peer Mode: Peer-to-peer mode enables two NFC-enabled devices, such as smartphones, to establish a direct connection to exchange data. This mode is used for applications like file sharing, instant messaging, and device pairing.
NFC tags are an essential component of NFC technology. These are small, unpowered devices that contain a microchip and an antenna. NFC tags can store various types of information, such as URLs, plain text, contact details, or even perform specific actions when tapped by an NFC-enabled device. They can be embedded in stickers, keychains, cards, or other formats, making them versatile and easy to use. NFC tags can be easily programmed and personalized to suit specific applications or user preferences.
With the growing adoption of NFC technology and the increasing number of NFC-enabled devices in the market, the potential applications continue to expand. From making secure, touchless payments to accessing public transportation with a simple tap, NFC offers convenience, efficiency, and enhanced user experiences.
How does NFC work on an iPhone?
Apple introduced NFC capabilities to its iPhone lineup starting with the iPhone 7 and iPhone 7 Plus models. Since then, NFC has become a standard feature in newer iPhone models. This integration enables iPhone users to take advantage of NFC technology for various applications, including contactless payments, ticketing, and data exchange.
On an iPhone, NFC operates in a similar fashion to other NFC-enabled devices. However, Apple implements certain restrictions to ensure the security and privacy of its users’ data. Here’s a breakdown of how NFC works on an iPhone:
NFC Chip: iPhones are equipped with an NFC chip, which allows them to communicate with other NFC devices or tags. This chip is responsible for generating the electromagnetic field required for communication and processing the data exchanged between devices.
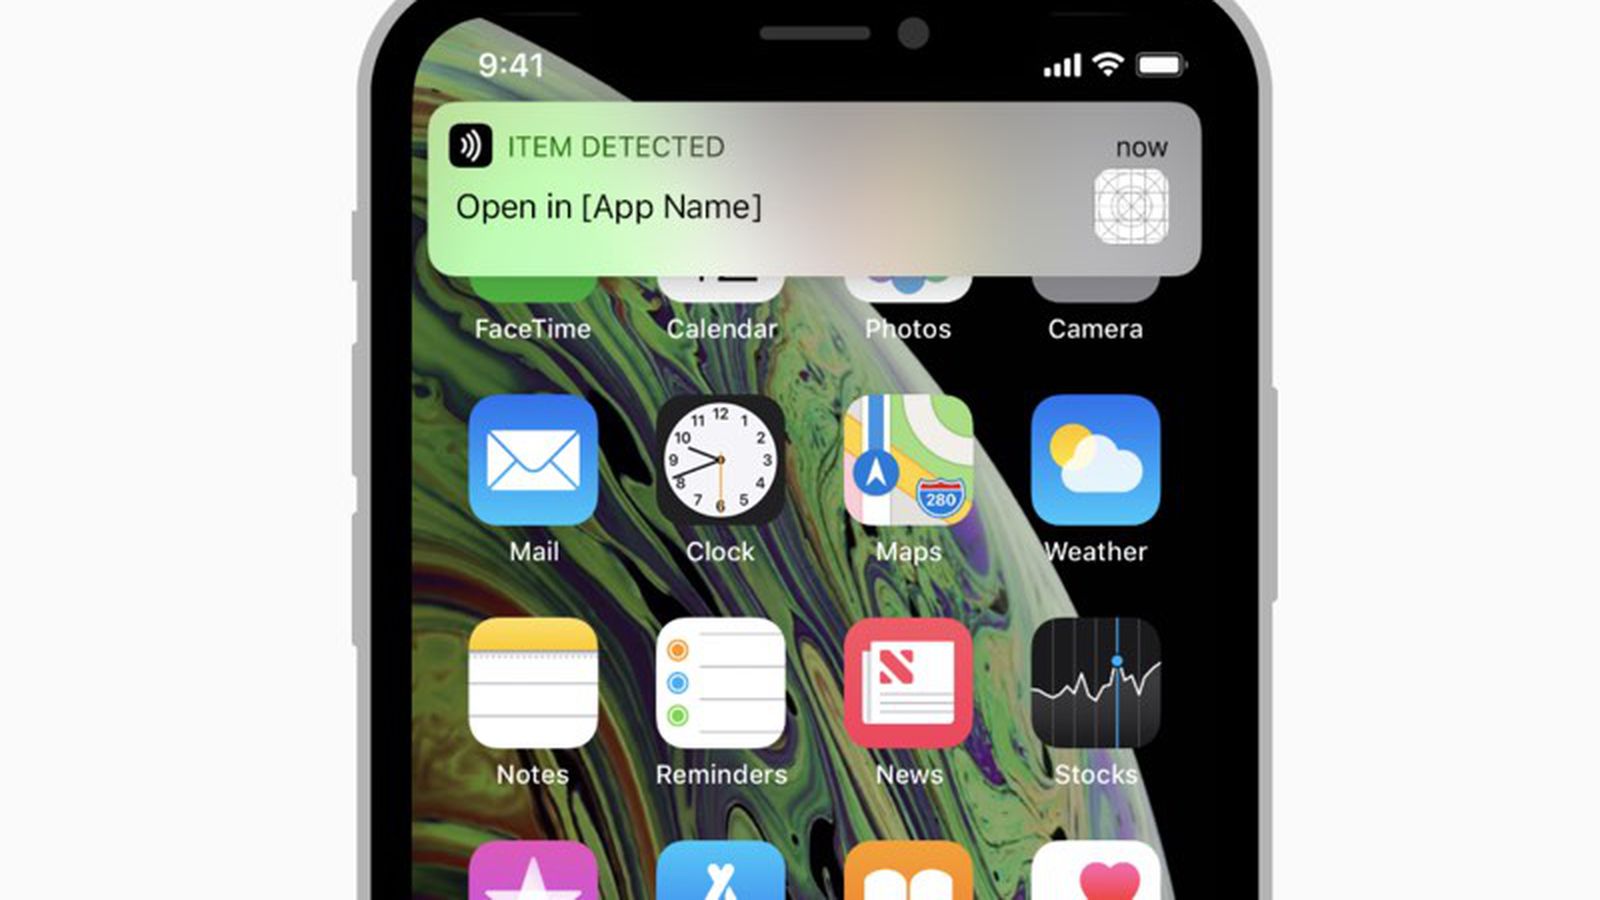
Background NFC Scanning: Starting from iPhone XS and newer models, Apple introduced background NFC scanning. This means that the iPhone can detect and read NFC tags without the need for a specific app or user interaction. It enables quick access to information or actions associated with an NFC tag by simply tapping the iPhone on the tag.
Restricted NFC Mode: Apple restricts the use of NFC technology on iPhones to specific functionalities and applications. Currently, limited access is granted to third-party developers for reading NFC tag data, mainly through the Core NFC framework. This framework allows developers to build apps that can read certain types of NFC tags, such as URLs, contact information, or text-based data.
Apple Pay and Wallet: Perhaps the most widely used NFC feature on iPhones is Apple Pay, Apple’s mobile payment service. With Apple Pay, users can securely make contactless payments by holding their iPhone near an NFC-enabled payment terminal. The NFC technology integrated into the iPhone enables the secure transmission of payment credentials, providing a convenient and secure way to complete transactions.
In summary, NFC works on an iPhone through its NFC chip, enabling contactless communication with other devices or NFC tags. While Apple imposes certain restrictions on NFC usage, iPhone users can still take advantage of NFC technology for a variety of applications, such as reading NFC tags and making secure mobile payments with Apple Pay.
Understanding NFC Tags
NFC tags are small, unpowered devices that contain a programmable microchip and an antenna. These tags leverage Near Field Communication (NFC) technology to enable seamless communication with NFC-enabled devices, such as smartphones or tablets, when they come into close proximity.
Here are some key aspects to understand about NFC tags:
Construction: NFC tags are typically constructed as adhesive stickers, keychain fobs, or cards. They are compact and lightweight, making them easy to carry and attach to various surfaces or objects.
Memory Capacity: The memory capacity of NFC tags can vary, ranging from a few kilobytes to several megabytes. This determines the amount of data that can be stored on the tag, such as URLs, contact information, or custom actions.
Read/Write Functionality: NFC tags can be both read from and written to by NFC-enabled devices. This allows for versatile applications, as the content on the tag can be modified or updated as needed.
Types of NFC Tags: NFC tags come in different forms, including Type 1 to Type 5 tags. Each type has its own specifications in terms of memory capacity, data transfer speeds, and compatibility with different devices. The choice of NFC tag depends on the specific requirements of the intended application.
NFC Forum Standards: The NFC Forum, an industry consortium, has developed standards for NFC tags to ensure interoperability and compatibility across different devices and applications. These standards define the data formats, communication protocols, and functionality of NFC tags, enabling seamless integration and usage.
Customizability: One of the key advantages of NFC tags is their programmable nature. Users can customize the content and behavior of the tag according to their specific needs. For example, an NFC tag can be programmed to launch a specific app, connect to Wi-Fi networks, or trigger a specific action like sending an SMS or making a phone call.
Application Possibilities: NFC tags have a wide range of applications in various industries. They can be used for contactless payments, access control systems, interactive marketing campaigns, inventory management, transportation ticketing, and much more. The versatility and programmability of NFC tags make them suitable for diverse use cases.
Overall, understanding NFC tags is essential for harnessing the power of NFC technology. By utilizing these programmable tags, users can enhance convenience, enable seamless interactions, and unlock a multitude of possibilities across different applications and industries.
Getting Started with Programming NFC Tags on iPhone
Are you ready to dive into the exciting world of programming NFC tags with your iPhone? Here’s a step-by-step guide to help you get started:
Step 1: Download an NFC Tag Writing App: Start by downloading an NFC tag writing app from the App Store. There are several reliable apps available, such as NFC Tools, NXP TagWriter, or Simply NFC. Choose one that suits your needs and has good user reviews.
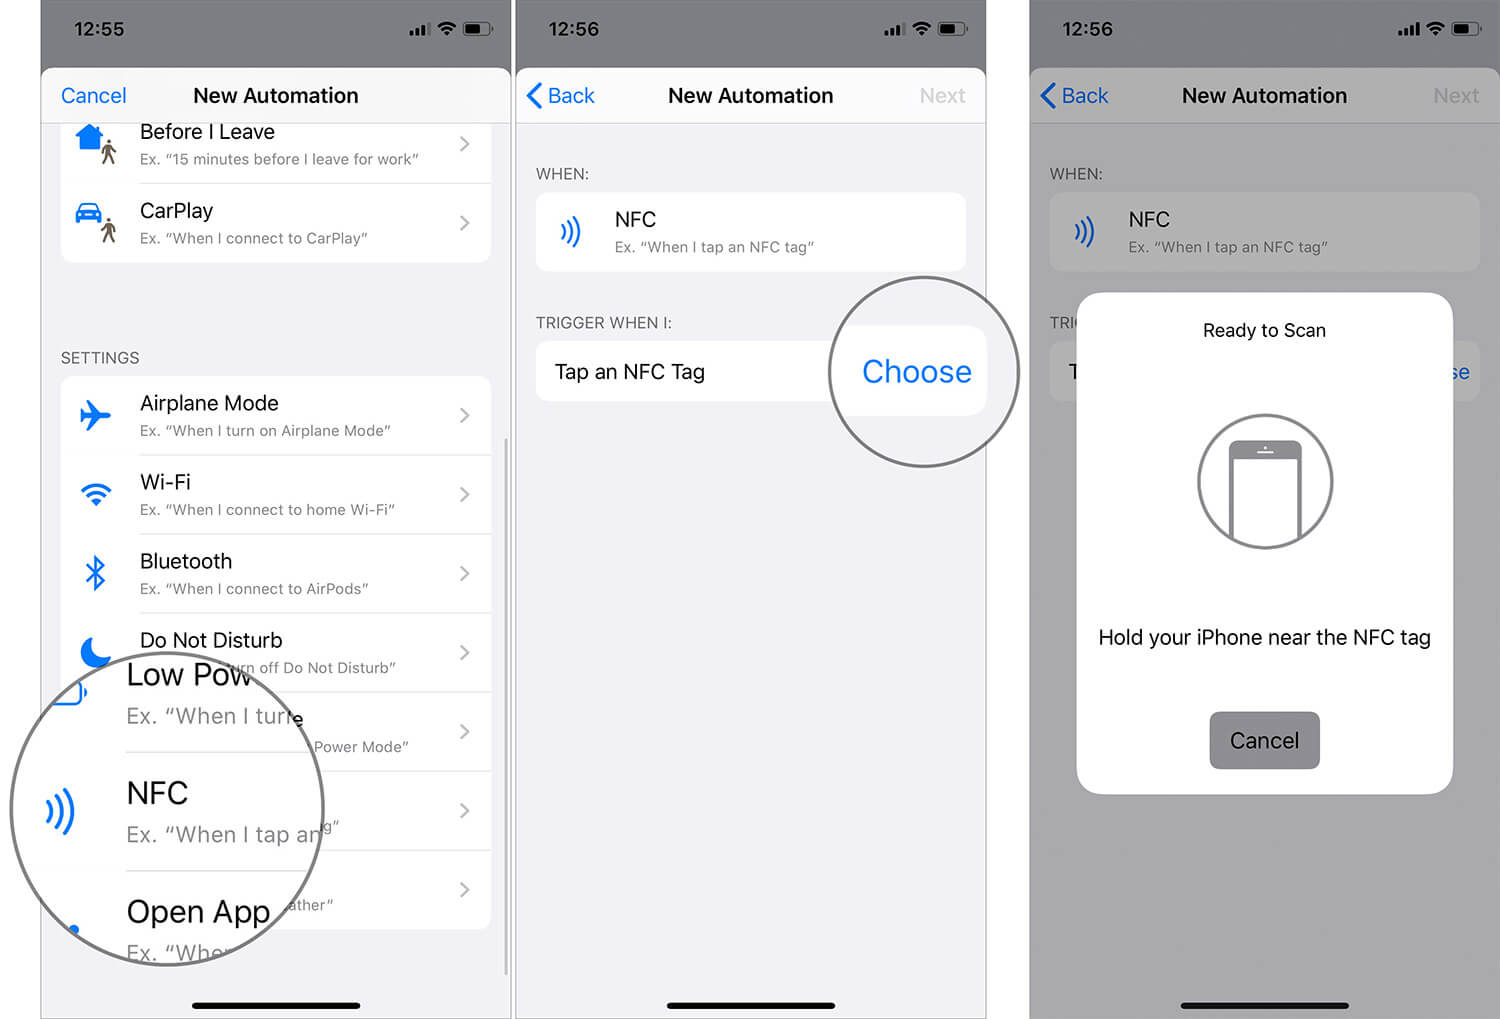
Step 2: Enable NFC in Your iPhone Settings: Open the Settings app on your iPhone and navigate to “NFC” or “Wallet & Apple Pay” settings. Make sure that the “NFC” feature is enabled. This will enable your iPhone to detect and interact with NFC tags.
Step 3: Launch the NFC Tag Writing App: Open the NFC tag writing app that you downloaded in Step 1. The app will guide you through the process of programming your NFC tag.
Step 4: Choose the Action for Your NFC Tag: In the NFC tag writing app, you will be presented with different actions or functionalities that you can assign to your NFC tag. These could include opening a website, launching an app, making a phone call, sending a text message, or even setting up a Wi-Fi connection. Select the action that you want your NFC tag to perform when it is read by an NFC-enabled device.
Step 5: Customize the Tag’s Content: Depending on the selected action, you may have the option to customize the content of the NFC tag. For example, if you chose to open a website, enter the URL of the website you want to associate with the tag. Similarly, if you selected to make a phone call, enter the desired phone number.
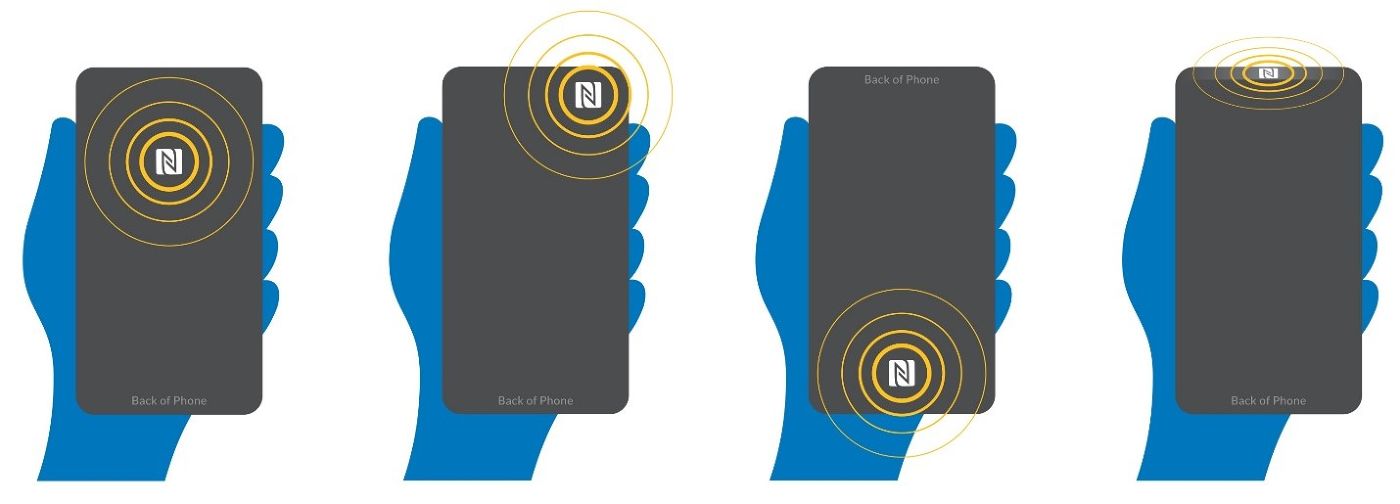
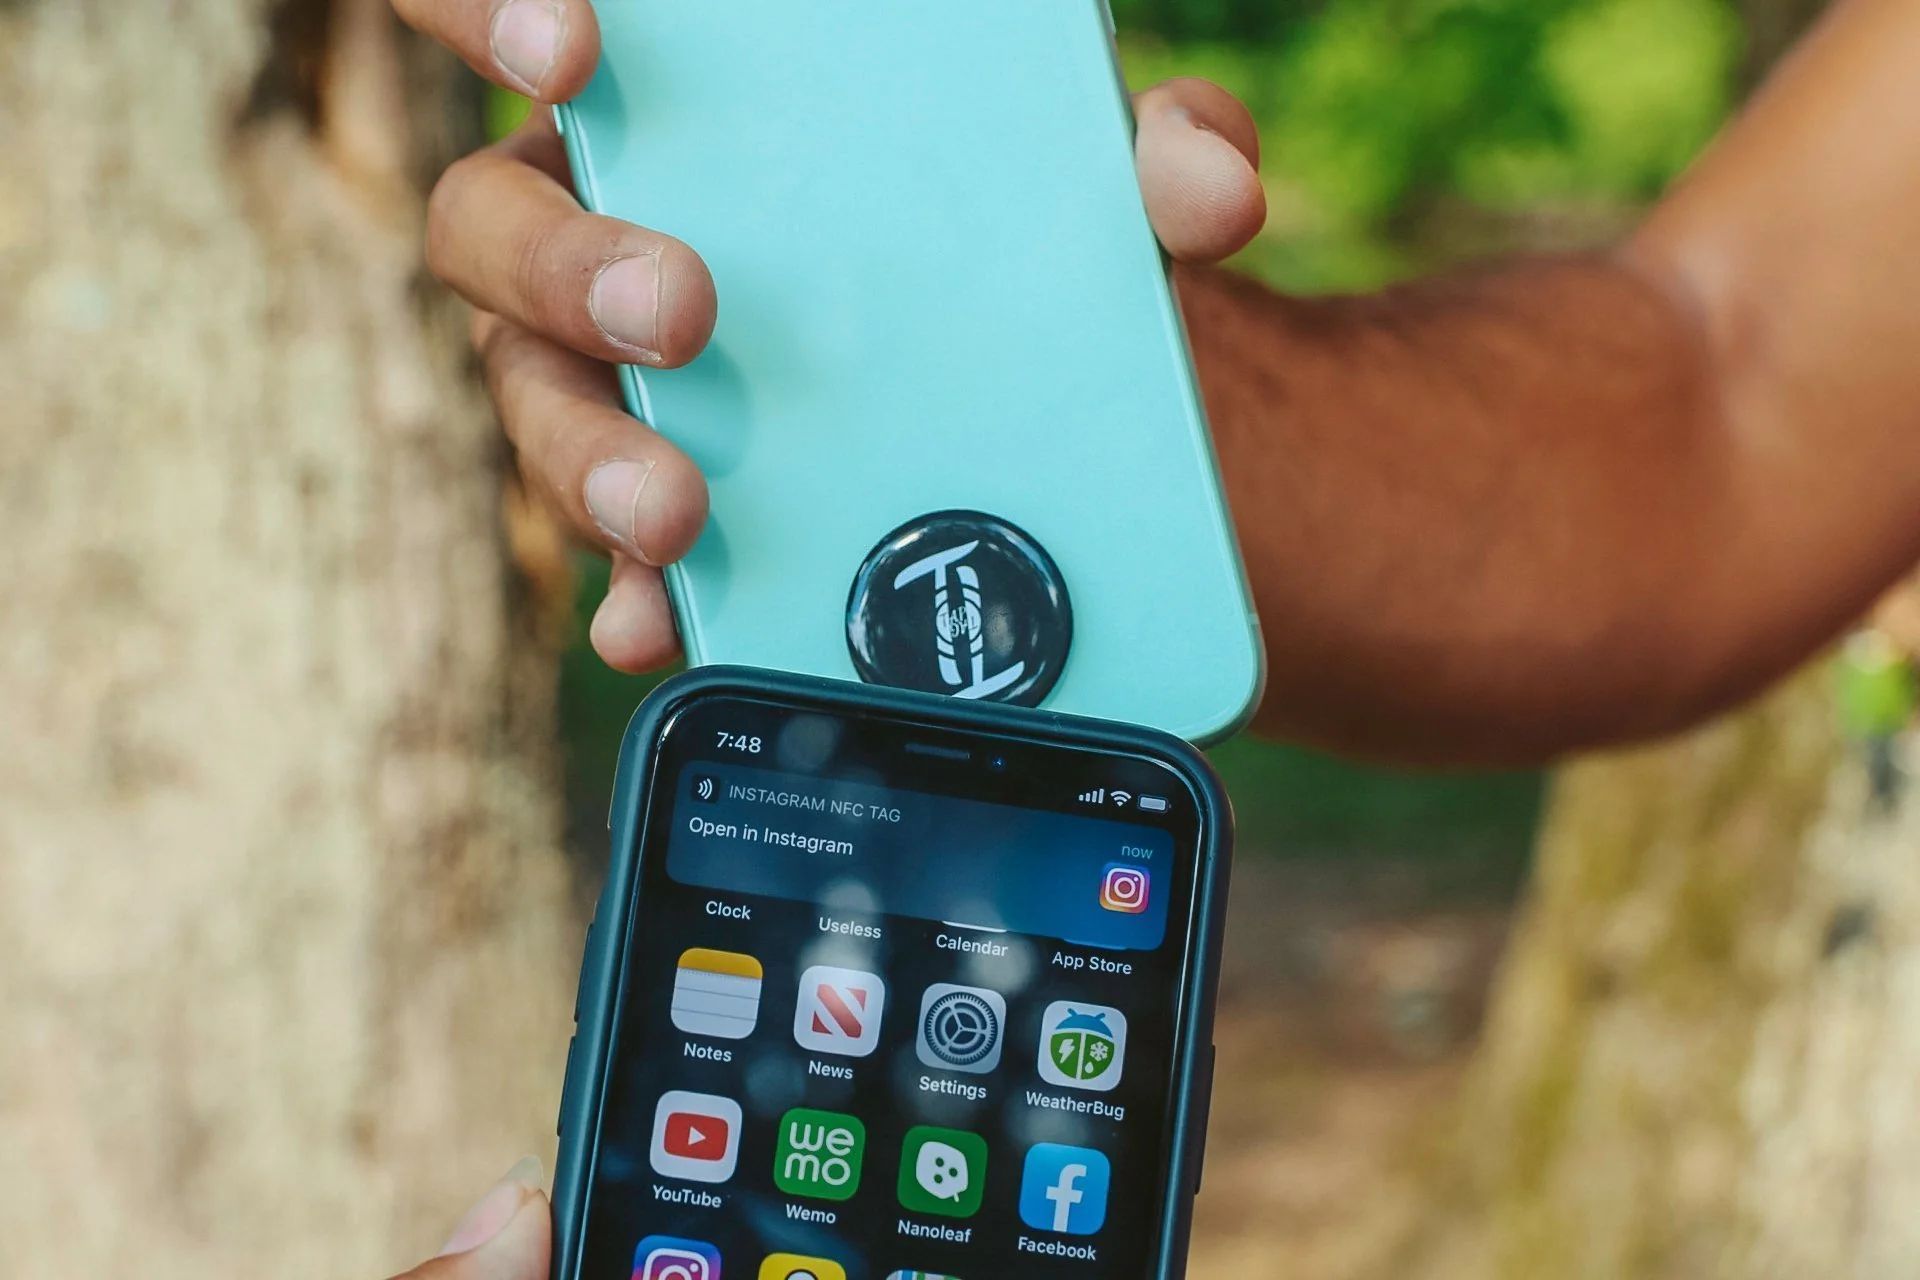
Step 6: Write the Data to the NFC Tag: Once you have chosen the action and customized the tag’s content, follow the instructions in the app to write the data to the NFC tag. Typically, this involves tapping the NFC tag against the back of your iPhone, ensuring that the tag’s antenna is in close proximity to the iPhone’s NFC chip.
Step 7: Test the Programmed NFC Tag: After writing the data to the NFC tag, it’s time to test its functionality. Tap your iPhone on the programmed NFC tag and see if it performs the desired action. For example, if you programmed it to open a website, the website should open in your iPhone’s browser.
By following these steps, you can start programming NFC tags with your iPhone. Whether you want to create custom shortcuts, automate tasks, or enhance user experiences, programming NFC tags offers endless possibilities and makes your iPhone even more powerful and versatile.
Step 1: Download an NFC Tag Writing App
Before you can start programming NFC tags with your iPhone, you’ll need to download an NFC tag writing app from the App Store. These apps offer a user-friendly interface that allows you to easily program and customize the functionality of your NFC tags. Here’s how you can go about it:
1. Open the App Store: Locate the App Store icon on your iPhone’s home screen and tap on it to launch the App Store.
2. Search for NFC Tag Writing Apps: In the search bar at the top of the App Store, type in keywords such as “NFC tag writer” or “NFC programming app.” This will display a list of relevant apps that you can choose from.
3. Review App Ratings and Reviews: When browsing through the list of NFC tag writing apps, take a moment to review the ratings and read user reviews. This will give you a sense of the app’s reliability, ease of use, and overall user satisfaction.
4. Select an App: Once you have evaluated the options, choose an NFC tag writing app that best fits your needs and preferences. Consider factors such as the app’s features, user interface, compatibility with your iPhone model, and any additional functionalities it may offer.
5. Tap the “Get” or “Download” Button: Once you’ve made your selection, tap the “Get” or “Download” button next to the app’s name. If prompted, enter your Apple ID password or verify your identity using Touch ID or Face ID to initiate the download and installation process.
6. Wait for the App to Download and Install: After tapping the “Get” or “Download” button, the app will begin to download onto your iPhone. The download time may vary depending on the app’s size and your internet connection speed. Once the download is complete, the app will automatically install, and the app icon will appear on your home screen.
7. Open the NFC Tag Writing App: Locate the newly installed NFC tag writing app on your iPhone’s home screen and tap on its icon to launch the app.
Once you have downloaded and installed an NFC tag writing app, you are ready to move on to the next steps in programming your NFC tags with your iPhone. These apps provide an intuitive and straightforward interface that will guide you through the process of customizing and programming the functionality of your NFC tags.
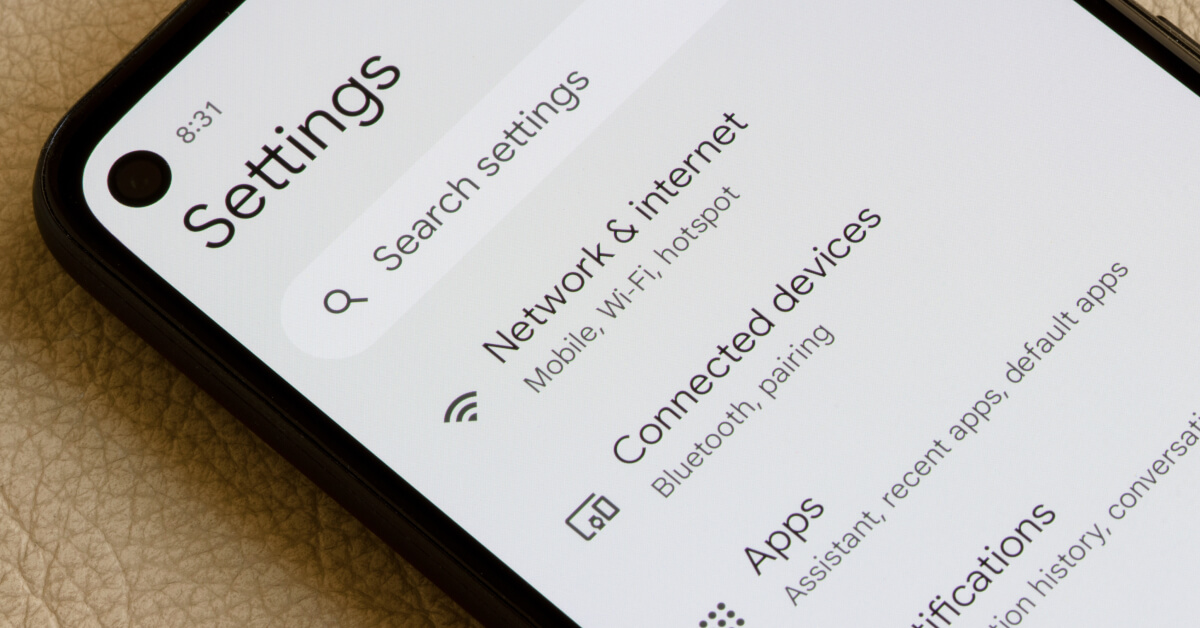
Step 2: Enable NFC in Your iPhone Settings
In order to use NFC on your iPhone and interact with NFC tags, you need to ensure that NFC functionality is enabled in your iPhone settings. Here’s how to enable NFC on your iPhone:
1. Open the Settings App: Locate the Settings app on your iPhone’s home screen and tap on it to open the device’s settings.
2. Navigate to the NFC Settings: Scroll through the settings menu and look for the option labeled “NFC” or “Wallet & Apple Pay.” Tap on it to access the NFC settings.
3. Enable the NFC Functionality: On the NFC settings page, you should see an option to enable or disable the NFC functionality. Make sure the toggle switch next to “NFC” is turned on or in the “green” position. This will enable NFC functionality on your iPhone.
4. Adjust Apple Pay Settings (if needed): Depending on your iPhone model and iOS version, you may also see an option to set up or manage Apple Pay. If needed, you can configure your Apple Pay settings, add payment cards, and set your preferred default card.
5. Exit the Settings App: Once you have enabled NFC functionality and adjusted any related settings, exit the Settings app by pressing the home button or using the gesture appropriate for your iPhone model.
With NFC enabled in your iPhone settings, your device can now detect and interact with NFC tags. Enabling NFC allows your iPhone to establish contactless communication with NFC-enabled devices or tags when they come into close proximity.
Note: It’s important to note that not all iPhone models support NFC functionality. To use NFC, your iPhone must be an iPhone 7 or later model. Additionally, certain functionalities may be restricted based on your location and the specific regulations or restrictions in your region.
Now that you have enabled NFC on your iPhone, you are one step closer to programming NFC tags and unlocking their full potential with your device.
Step 3: Launch the NFC Tag Writing App
Now that you have downloaded an NFC tag writing app and enabled NFC functionality on your iPhone, it’s time to launch the app and begin programming your NFC tags. Here’s how you can do it:
1. Locate the NFC Tag Writing App: Find the icon of the NFC tag writing app on your iPhone’s home screen. It may be labeled with the app’s name or a specific logo related to NFC.
2. Tap the App Icon: Tap on the app icon to launch the NFC tag writing app. This will open the app’s interface, where you can begin the programming process.
3. Familiarize Yourself with the App: Once the app is launched, take a moment to familiarize yourself with its interface. Explore the various options and features available within the app to get a better understanding of how to use it.
4. Grant Necessary Permissions: The first time you launch the app, you may be prompted to grant certain permissions, such as access to your NFC hardware or storage. Follow the on-screen instructions and grant the necessary permissions to ensure the app can interact with your iPhone and NFC tags effectively.
5. Follow App Instructions: To start programming an NFC tag, follow the instructions provided by the app. The app will guide you through the process of customizing the functionality of your NFC tags and assigning specific actions or content to them.
6. Make Use of App Features: Depending on the NFC tag writing app you have chosen, you may have access to additional features and settings. Explore these features, such as tag organization, tag history, or advanced customization options, to make the most out of your NFC tag programming experience.
7. Exit the App: Once you have programmed your NFC tag or if you want to take a break, simply exit the app by pressing the home button or using the appropriate gesture for your iPhone model.
By launching the NFC tag writing app on your iPhone, you have taken an important step toward programming your NFC tags. The app’s user-friendly interface and guided instructions will help you effectively customize the functionality of your NFC tags to suit your specific needs and preferences.
Now that you have launched the app, it’s time to move on to the next step in the NFC tag programming process.
Step 4: Choose the Action for Your NFC Tag
After launching the NFC tag writing app on your iPhone, the next step in programming your NFC tag is to choose the action or functionality you want the tag to perform. This action will determine the behavior that occurs when an NFC-enabled device, such as your iPhone, interacts with the programmed NFC tag. Follow these steps to select the desired action:
1. Explore the Action Options: Within the NFC tag writing app, you will typically find a list of available actions or functionalities that you can assign to your NFC tag. These actions can vary depending on the app and its capabilities. Common actions include opening a website, launching an app, making a phone call, sending a text message, or connecting to a Wi-Fi network.
2. Consider Your Use Case: Think about how you plan to use the NFC tag and what action would be most beneficial for that particular use case. For example, if you want to provide quick access to information, setting the action to open a website or display contact details might be appropriate. If the tag is for personal use, you could assign it an action related to your daily routine, such as setting an alarm or launching a specific playlist.
3. Select the Action: Once you have decided on the desired action, navigate through the options in the app and select the corresponding action. This may involve tapping on the action or selecting it from a dropdown menu.
4. Customize Action Parameters (if applicable): Depending on the chosen action, you may have the opportunity to further customize its parameters. For example, if you selected the action to make a phone call, you might need to enter the desired phone number. If you chose to open a website, you would input the URL of the website you want the tag to open when scanned.
5. Save the Action: Once you have specified the action and any necessary parameters, save the settings within the NFC tag writing app. This will ensure that the programmed NFC tag will perform the selected action when an NFC-enabled device interacts with it.
By choosing the action for your NFC tag, you are tailoring its functionality to meet your specific needs and preferences. Whether it’s providing quick access to information, automating tasks, or enhancing user experiences, selecting the appropriate action sets the stage for the potential that NFC technology offers.
Now that you have chosen the action for your NFC tag, it’s time to move on to the next step and customize its content.
Step 5: Customize the Tag’s Content
Once you have chosen the desired action for your NFC tag in the NFC tag writing app, the next step is to customize the content of the tag. The content refers to the specific information or data that you want the NFC tag to carry or trigger when it is scanned or tapped by an NFC-enabled device. Follow these steps to customize the content of your NFC tag:
1. Access Content Customization Options: Within the NFC tag writing app, navigate to the section that allows you to customize the content of the NFC tag. This section may be labeled as “Content,” “Data,” or a similar term, depending on the app.
2. Define the Content Type: Depending on the chosen action, the content type can vary. For example, if the action is to open a website, you will need to input the URL of the website. If the action is to make a phone call, you will need to enter the phone number. Determine the type of content required for the action and proceed accordingly.
3. Enter the Content: Input the specific content that corresponds to the chosen action. This can include text, numbers, or URLs, depending on the nature of the action and the capabilities of the NFC tag writing app. Take your time to enter the content accurately.
4. Customize Additional Parameters (if applicable): Depending on the NFC tag writing app, you may have the opportunity to further customize additional parameters related to the content of the tag. For example, you might be able to specify a custom name for the NFC tag or define specific data structures for more complex actions.
5. Save or Apply the Content: Once you have entered and customized the content, save or apply the changes within the NFC tag writing app. This ensures that the programmed NFC tag carries the desired content when it is scanned or tapped by an NFC-enabled device.
By customizing the content of your NFC tag, you are tailoring it to meet your specific requirements. This allows you to provide relevant information, automate processes, or trigger specific actions when the NFC tag is interacted with. Each NFC tag can be uniquely programmed to carry different content, enabling you to create a personalized and versatile experience.
Now that you have customized the content of your NFC tag, it’s time to move on to the next step and write the data to the NFC tag itself.
Step 6: Write the Data to the NFC Tag
After customizing the content of your NFC tag, the next step is to write the data onto the tag itself. Writing the data involves transferring the programmed information from your iPhone to the NFC tag using the NFC tag writing app. Here’s how you can write the data to the NFC tag:
1. Prepare the NFC Tag: Ensure that the NFC tag is within close range of your iPhone and ready to be written. The tag should be free from any obstruction and positioned in a way that allows for easy access.
2. Activate the Writing Process: Within the NFC tag writing app, locate the option or button to initiate the writing process. This may be labeled as “Write,” “Program,” or similar terms, depending on the app’s interface.
3. Follow On-Screen Instructions: Follow the on-screen instructions provided by the NFC tag writing app to proceed with the writing process. These instructions may include specific actions, such as tapping your iPhone to the NFC tag or bringing the tag in close proximity to your iPhone’s NFC chip.
4. Wait for the Writing Process: Once you have initiated the writing process, allow some time for the NFC tag writing app to transfer the programmed data onto the NFC tag. Be patient and avoid moving your iPhone or the NFC tag during this process to ensure successful data transfer.
5. Verify Successful Writing: Once the writing process is completed, the NFC tag writing app may display a confirmation message indicating successful data transfer. Double-check that the programmed content appears correctly on the NFC tag. If necessary, you can repeat the writing process to ensure accurate data transfer.
6. Safely Remove the NFC Tag: After confirming successful data transfer, safely detach or move the NFC tag away from your iPhone. Ensure that the writing process is fully complete before removing the NFC tag to avoid any data loss or corruption.
By writing the data to the NFC tag, you are finalizing the programming process and making the programmed action, content, or functionality available for future use. The NFC tag is now ready to be scanned, tapped, or interacted with by NFC-enabled devices, unleashing its intended purpose.
Now that you have successfully written the data to the NFC tag, it’s time to move on to the next step and test the functionality of the programmed NFC tag.
Step 7: Test the Programmed NFC Tag
After writing the data onto the NFC tag, the final step is to test the functionality of the programmed tag. This step allows you to ensure that the desired action or content is triggered when an NFC-enabled device interacts with the tag. Here’s how you can test the programmed NFC tag:
1. Prepare Your iPhone: Ensure that NFC is still enabled in your iPhone settings. Make sure the NFC tag writing app is closed, and your iPhone is unlocked and ready for testing.
2. Position the NFC Tag: Place or position the programmed NFC tag in a way that allows for easy access and interaction with your iPhone’s NFC chip. Ensure that no obstructions are blocking the tag from being read by your iPhone.
3. Tap Your iPhone: With the programmed NFC tag in place, gently tap your iPhone against the NFC tag. Ensure that the NFC antenna of your iPhone comes into close proximity with the NFC tag’s antenna.
4. Observe the Result: Pay attention to the action or behavior of your iPhone when it interacts with the NFC tag. Depending on the programmed content, the result may be instantaneous or require a short delay. For example, if the programmed action is to open a website, the website should open in your iPhone’s browser.
5. Verify Accuracy: Once the action has been triggered, verify that the result aligns with your expectations. Check for any discrepancies or errors in the displayed content, action performed, or information retrieved from the NFC tag.
6. Repeat if Necessary: If the result is not as expected, you may need to revisit the programming process. Repeat the steps to ensure that the data is correctly written onto the NFC tag and that the desired action or content is programmed accurately.
Testing the programmed NFC tag allows you to validate that the intended functionality is successfully achieved. It enables you to identify any issues and make adjustments as needed, ensuring that the NFC tag operates as desired when used with compatible NFC-enabled devices.
Now that you have tested the programmed NFC tag and confirmed its functionality, you can confidently utilize it for your specific purposes, whether it’s for quick information access, automation of tasks, or enhancing user experiences.
Conclusion
Congratulations! You have successfully learned how to program NFC tags with your iPhone. By following the step-by-step guide outlined in this article, you have gained the knowledge and skills to harness the power of NFC technology and customize the functionality of NFC tags to suit your needs.
NFC technology offers a wide range of possibilities, from contactless payments and access control to information sharing and automation of tasks. With your iPhone’s NFC capabilities and the right NFC tag writing app, you can unleash the potential of NFC tags and enhance your daily routines, streamline processes, and provide seamless user experiences.
Throughout the process, you have understood the basics of NFC, how NFC works on an iPhone, the importance of NFC tags, and the steps involved in programming these tags. From downloading an NFC tag writing app to enabling NFC in your iPhone settings, customizing the content, writing data onto the NFC tag, and testing its functionality, each step has contributed to creating personalized, interactive experiences.
Remember, the programming options for NFC tags are vast. You can assign actions like opening websites, launching apps, making phone calls, sending text messages, and much more. Tailor the NFC tags to your specific needs and explore the possibilities that NFC technology brings.
By continuing to explore NFC technology and its applications, you can unlock even more exciting capabilities. Stay updated with the latest developments in NFC, new app releases, and advancements in the ecosystem to make the most out of this innovative technology.
Now it’s time to apply your newfound knowledge and experiment with programming NFC tags on your iPhone. Whether you use them for personal use, professional applications, or to simplify everyday tasks, NFC tags offer you a gateway to a world of convenience and customization.