Introduction
Welcome to the world of online payments! In today’s digital age, having a PayPal account can greatly simplify your online transactions. Whether you’re buying products or services, sending money to family and friends, or even running an e-commerce business, PayPal is a trusted and secure platform that allows you to make and receive payments with ease.
In this step-by-step guide, we will walk you through the process of creating a PayPal account. Don’t worry, it’s a simple and straightforward process that can be completed in just a few minutes. By the end of this guide, you’ll have your very own PayPal account and be ready to start using it for all your online payment needs.
Before we dive in, it’s important to note that PayPal offers different types of accounts based on your specific needs. Whether you’re an individual looking for a personal account or a business owner needing a merchant account, PayPal has options to suit everyone.
So, if you’re ready to get started on your way to hassle-free online transactions, let’s jump right in and create your PayPal account!
Step 1: Go to the PayPal website
The first step in creating a PayPal account is to navigate to the official PayPal website. Open your preferred web browser and type in the URL: www.paypal.com. You’ll be directed to the PayPal homepage, where you can begin the account creation process.
Once you’re on the PayPal homepage, take a moment to familiarize yourself with the various options and features available. PayPal offers a range of services beyond just payment processing, including invoicing, fundraising, and even a PayPal debit card.
When you’re ready to start creating your account, locate the “Sign Up” button. This button is typically found in the top-right corner of the PayPal homepage or prominently displayed on the page.
Clicking on the “Sign Up” button will take you to the account creation page, where you’ll be prompted to choose the type of PayPal account you want to create. As mentioned earlier, PayPal offers personal accounts for individuals and business accounts for merchants. Choose the account type that best suits your needs.
Once you’ve made your selection, you’ll be one step closer to having your very own PayPal account. In the next step, we will guide you through the process of entering your personal information to complete the account setup.
Step 2: Click on “Sign Up”
After you’ve arrived at the PayPal website, the next step to create your account is to click on the “Sign Up” button. This button is usually located in the top-right corner of the PayPal homepage or prominently displayed on the page.
When you click on the “Sign Up” button, you’ll be directed to the account creation page where you can begin entering your information. PayPal will guide you through the process step by step, ensuring that you provide all the necessary details to set up your account.
Before you proceed, it’s a good idea to have the required information on hand. PayPal will ask for your full name, email address, and password. Make sure to choose a strong and unique password to protect your account.
Additionally, PayPal may require you to confirm that you are at least 18 years old and agree to their Terms and Conditions. It’s important to carefully read through the terms and conditions before proceeding.
Once you’ve filled in the required information and agreed to the terms, you can click on the “Next” or “Continue” button to move on to the next step. PayPal will then proceed to verify the information you’ve provided and guide you through the remaining steps to complete the account setup.
Remember, creating a PayPal account is free of charge, and you don’t need to make any initial deposits. PayPal only charges fees for certain transactions, such as receiving payments for goods and services or making international transfers. Make sure to review PayPal’s fee structure if you plan on using your account for these purposes.
Now that you know how to click on “Sign Up” and begin the account creation process, let’s move on to the next step and choose the account type that best fits your needs.
Step 3: Choose your account type
Once you’ve clicked on the “Sign Up” button and entered your basic information, it’s time to choose the type of PayPal account you want to create. PayPal offers two main types of accounts: personal accounts and business accounts.
If you’re creating a PayPal account for personal use, such as making online purchases or sending money to friends and family, you’ll want to select the “Personal Account” option. Personal accounts are free to create and are ideal for individuals who want a simple and convenient way to manage their online payments.
On the other hand, if you’re a business owner or plan to use PayPal for commercial purposes, you’ll want to select the “Business Account” option. Business accounts offer additional features and tools designed to meet the needs of merchants. With a business account, you can accept debit and credit card payments, create and send invoices, and even integrate PayPal into your online store.
During the selection process, PayPal may ask for additional details based on the account type you choose. For example, if you select a business account, PayPal may require you to provide your business name, address, and phone number.
It’s important to choose the right account type based on your specific needs. If you’re unsure which account type is right for you, PayPal provides detailed information on their website to help you make an informed decision. You can also contact their customer support for additional assistance.
Once you’ve selected the account type that best fits your needs, proceed to the next step to enter your personal information and complete the account setup process.
Now that you know how to choose the right account type, let’s move on to the next step: entering your personal information.
Step 4: Enter your personal information
After choosing your desired account type, the next step in creating your PayPal account is to enter your personal information. PayPal requires certain details to verify your identity and ensure the security of your account.
The information you’ll need to provide includes:
- Your full name: Enter your legal first name and last name as they appear on your official identification documents.
- Your email address: This will be the primary email associated with your PayPal account. Make sure to enter a valid email address that you have access to.
- Your password: Choose a strong and secure password that includes a combination of letters, numbers, and special characters. This password will be used to log into your PayPal account, so it’s important to keep it confidential.
In addition to these basic details, PayPal may also require additional personal information depending on your account type and location. This can include your address, phone number, and date of birth. Providing accurate and up-to-date information is crucial for smooth account verification and future transactions.
It’s important to note that PayPal takes the security of your personal information seriously. They utilize encryption technology and adhere to strict privacy policies to protect your data. It is recommended to review PayPal’s privacy policy to understand how your information will be handled.
Once you’ve entered all the required information, review it carefully to ensure its accuracy. Any errors or inconsistencies may result in delays or complications in the account creation process. When you’re satisfied, click the “Next” or “Continue” button to proceed to the next step.
Now that you’ve entered your personal information, let’s move on to the next step and add your bank account or card to your PayPal account.
Step 5: Add your bank account or card
After entering your personal information and creating your PayPal account, the next step is to link a bank account or card to your account. This will allow you to make payments, receive funds, and withdraw money from your PayPal balance.
To add a bank account or card, follow these steps:
- Select the “Wallet” option in your PayPal account. This is usually located in the top menu or a prominent area of the page.
- Click on the “Link a bank account” or “Link a card” button.
- Follow the prompts to provide the required details for the bank account or card you wish to link.
- Verify your bank account or card by following the instructions provided by PayPal. This may involve confirming small deposits or providing additional documentation.
Linking a bank account allows you to transfer funds between your PayPal account and your bank, as well as make electronic funds transfers. Alternatively, linking a card allows you to make payments directly from the card or receive funds into your PayPal account.
When adding a bank account or card, it’s important to ensure that the information you provide is accurate and up to date. Any errors or discrepancies may result in failed transactions or delays in accessing your funds.
Keep in mind that PayPal prioritizes the security of your financial information. They employ encryption technology and adhere to strict privacy policies to protect your sensitive data. You can review PayPal’s privacy policy and security measures on their website for more information.
Once you’ve successfully linked a bank account or card to your PayPal account, you’ll be able to manage your finances and conduct transactions with ease. In the next step, we’ll guide you through the process of confirming your email address to ensure the security of your PayPal account.
Step 6: Confirm your email address
After adding your bank account or card to your PayPal account, the next step is to confirm your email address. This is an important security measure that ensures you have control over the email associated with your account.
To confirm your email address, follow these simple steps:
- Log in to your PayPal account using your email address and password.
- Check your email inbox for a message from PayPal.
- Open the email and click on the provided link to confirm your email address.
- You will be redirected to the PayPal website, where a confirmation message will appear.
Confirming your email address helps protect your PayPal account from unauthorized access and allows you to receive important notifications regarding your account activity, transactions, and security updates.
If you do not receive the confirmation email from PayPal, make sure to check your spam or junk folder. If you still cannot locate the email, you can request a new confirmation email through your PayPal account settings.
Remember, it is essential to keep your email address updated and secure. If you change your email address at any time, make sure to update it in your PayPal account settings to ensure uninterrupted access to your account and receive important notifications.
Now that you have successfully confirmed your email address, you’re one step closer to fully utilizing your PayPal account. In the next step, we’ll discuss the optional process of setting up two-factor authentication for enhanced account security.
Step 7: Set up two-factor authentication (optional)
Two-factor authentication (2FA) is an additional layer of security that you can enable for your PayPal account. It adds an extra step to the login process, ensuring that only authorized individuals can access your account.
To set up two-factor authentication for your PayPal account, follow these steps:
- Log in to your PayPal account using your email address and password.
- Click on the “Settings” or “Security” tab, usually located in the top menu or navigation bar.
- Look for the 2FA or two-factor authentication settings and select the option to enable it.
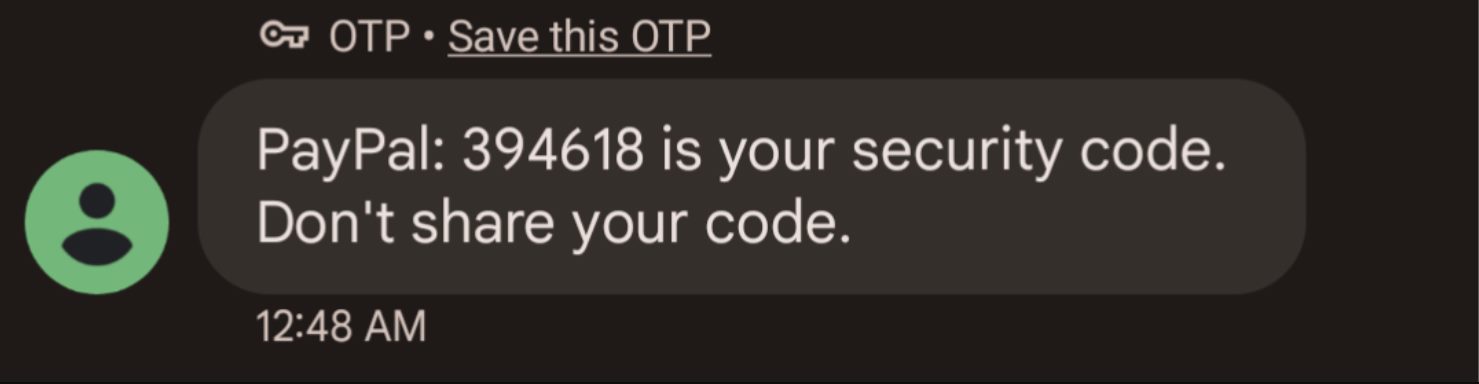
- Choose the authentication method you prefer, such as receiving a verification code via SMS or using an authentication app.
- Follow the prompts to complete the setup process, which may include verifying your phone number or scanning a QR code.
Once two-factor authentication is enabled, whenever you log in to your PayPal account, you will need to enter a unique verification code in addition to your password. This code can be sent to your mobile device via SMS or generated by an authentication app installed on your smartphone.
Enabling two-factor authentication adds an extra layer of protection to your PayPal account, reducing the risk of unauthorized access and potential fraudulent activities.
Keep in mind that if you choose to enable two-factor authentication, you will need to have your mobile device or authentication app with you whenever you log in to your PayPal account.
While enabling two-factor authentication is optional, it is highly recommended to enhance the security of your PayPal account, especially if you engage in frequent online transactions or store financial information.
In the next step, we’ll discuss the optional process of verifying your phone number, which can further enhance the security of your PayPal account.
Step 8: Verify your phone number (optional)
Verifying your phone number is an additional step you can take to enhance the security of your PayPal account. By linking and verifying your phone number, you can receive important notifications, alerts, and account updates directly to your mobile device.
To verify your phone number, follow these steps:
- Log in to your PayPal account using your email address and password.
- Click on the “Settings” or “Security” tab, usually located in the top menu or navigation bar.
- Look for the “Phone” or “Mobile” settings and select the option to add or verify your phone number.
- Enter your phone number, including the country code, and click on the button to send a verification code.
- Check your phone for a text message containing the verification code.
- Enter the verification code on the PayPal website to complete the verification process.
Verifying your phone number helps ensure that you receive important account-related information and notifications in a timely manner. It is also an additional security measure that can help protect against unauthorized access to your PayPal account.
Once your phone number is verified, you can choose to receive various types of notifications, such as transaction alerts, password reset requests, and account updates. This will help you stay informed about the activity on your PayPal account.
Keep in mind that while verifying your phone number is optional, it is highly recommended to enable this feature for enhanced account security.
It’s important to ensure that the phone number you provide is accurate and up to date. If you change your phone number, make sure to update it in your PayPal account settings to continue receiving important notifications.
In the next step, we’ll discuss how to customize your account settings to further personalize your PayPal experience.
Step 9: Customize your account settings
Once you’ve created your PayPal account and completed the necessary verification steps, it’s time to customize your account settings to tailor your PayPal experience to your preferences.
To customize your account settings, follow these steps:
- Log in to your PayPal account using your email address and password.
- Click on the “Settings” or “Profile” tab, typically located in the top menu or navigation bar.
- Review the various settings available and select the options that suit your needs.
- Some settings you may want to consider customizing include:
- Payment preferences: Choose how you want to receive payments and set your default currency.
- Notification preferences: Select the type of notifications you wish to receive and how you want to be notified (via email, SMS, or both).
- Security settings: Review and update your account security options, such as changing your password or adding security questions.
- Privacy settings: Adjust your privacy preferences, such as controlling who can see your name when sending or receiving payments.
- Click on the “Save” or “Update” button to apply your changes.
Customizing your account settings allows you to personalize your PayPal experience and ensure that it aligns with your preferences and needs. It also gives you greater control over the security and privacy of your account.
It’s a good idea to periodically review your account settings to make sure they still reflect your preferences. As your needs change or new features become available, you may want to adjust your settings accordingly.
By customizing your account settings, you can optimize your PayPal usage and have a seamless and convenient experience when making and receiving payments.
In the next step, we’ll discuss how to link your PayPal account to various online services to streamline your online transactions.
Step 10: Link your PayPal account to online services
Now that you have your PayPal account set up and customized to your liking, it’s time to connect it to various online services to streamline your online transactions. By linking your PayPal account to these services, you can enjoy a seamless and convenient payment experience.
Here are some common online services you can link your PayPal account to:
- E-commerce platforms: If you run an online store or sell products on platforms like Shopify or WooCommerce, integrating PayPal as a payment option allows customers to easily make purchases using their PayPal account.
- Marketplace platforms: Websites like eBay and Etsy offer PayPal as a payment method, making it effortless for buyers to make secure transactions.
- Subscription-based services: Many subscription-based services, such as streaming platforms or software providers, allow you to link your PayPal account for recurring payments, ensuring a seamless billing experience.
- Mobile payment apps: Some mobile payment apps, such as Venmo or Cash App, offer integration with PayPal, making it simple to send or receive money between different platforms.
To link your PayPal account to these services, the process may vary slightly. Typically, you’ll need to navigate to the respective platform’s settings or payment options, select PayPal as the preferred method, and enter your PayPal login details or API credentials.
By connecting your PayPal account to these online services, you can enjoy the benefits of fast and secure transactions, simplified checkout experiences, and trusted payment processing.
Remember to review the terms and fees associated with using PayPal on these platforms, as there may be specific guidelines or charges that apply.
Now that you’ve learned how to link your PayPal account to various online services, you’re ready to enjoy the convenience and flexibility of making and receiving payments effortlessly.
Congratulations on successfully setting up your PayPal account!
Conclusion
Congratulations! You have successfully created your PayPal account and completed the necessary steps to set it up according to your preferences. Now, you have a convenient and secure platform for making and receiving online payments.
Throughout this guide, we walked you through the step-by-step process of creating a PayPal account. From visiting the PayPal website to linking your bank account or card, verifying your email address, and customizing your account settings, each step was crucial in getting your PayPal account up and running.
By following these steps, you have gained access to a wide range of benefits and features offered by PayPal. Whether you’re an individual looking to make simple online purchases or a business owner aiming to streamline your payment processes, PayPal provides a user-friendly and trustworthy platform for your needs.
Remember, as you continue to use your PayPal account, it’s essential to stay vigilant and follow best practices for online security. Regularly review your account activity, set strong and unique passwords, be cautious of phishing attempts, and keep your contact information up to date.
Should you have any further questions or need assistance, PayPal offers a comprehensive customer support system to help address your concerns. Visit the PayPal website or refer to their documentation for more information.
Thank you for choosing PayPal as your preferred online payment service. Enjoy the convenience, security, and flexibility that comes with having a PayPal account!