Introduction
Welcome to the world of Splitwise! Managing shared expenses with friends, family, or roommates has never been easier. Splitwise is an online platform that simplifies the process of splitting bills and keeping track of who owes what. Whether you’re planning a group trip, splitting rent and utilities, or going out for dinner with friends, Splitwise provides a seamless and convenient way to manage shared expenses.
In this guide, we will walk you through the process of entering an itemized bill in Splitwise. By following these step-by-step instructions, you’ll be able to accurately record all the details of the bill and ensure that everyone pays their fair share.
Splitwise allows you to create and join various groups to keep track of expenses with different people. You can also add individual expenses for one-on-one transactions. Once you’ve created a group or selected an individual expense, you can begin adding itemized bills to accurately track specific costs within the group or individual expense.
Whether you’re a newcomer to Splitwise or an experienced user looking for a refresher, this guide will provide you with all the information you need to efficiently enter an itemized bill in Splitwise. So let’s get started with the step-by-step process!
Step 1: Open Splitwise
To begin entering an itemized bill in Splitwise, you first need to open the Splitwise app or go to the Splitwise website on your computer.
If you’re using the app, simply locate the Splitwise icon on your smartphone and tap to open it. If you’re using the website, open your preferred internet browser and enter “www.splitwise.com” in the address bar. Hit enter, and the Splitwise homepage will load.
If you don’t already have a Splitwise account, you’ll need to sign up. Click on the “Sign up” button and follow the instructions to create an account using your email address or by linking your social media accounts such as Facebook or Google.
If you already have a Splitwise account, you can directly log in using your registered email address and password. Once logged in, you will be directed to the Splitwise dashboard, where you can see an overview of your groups and expenses.
If you’re using the app, you’ll typically see a list of your groups and expenses right on the app’s main screen. If you’re using the website, you can navigate to the desired group or individual expense by clicking on the respective links from the dashboard.
Opening Splitwise is the first step in entering an itemized bill. Once you are successfully logged in and have accessed the desired group or individual expense, you can proceed to the next step to add a bill.
Step 2: Select the Group or Individual Expense
After opening Splitwise and logging in, the next step is to select the group or individual expense to which you want to add the itemized bill.
If you’re part of multiple groups on Splitwise, you’ll see a list of your groups on the main screen. Scroll through the list and find the group that corresponds to the bill you want to add. Click on the group to enter the group page.
If you’re adding an itemized bill to an individual expense, you can select the individual expense directly from the dashboard by clicking on the corresponding link or icon.
If you’re using the app, you can swipe left or right on the main screen to access your different groups or individual expenses. Alternatively, you can use the navigation menu or search bar to quickly find and select the desired group or individual expense.
Selecting the correct group or individual expense is crucial to ensure that the bill is accurately recorded and attributed to the correct participants. Make sure to double-check that you’ve chosen the right group or individual expense before proceeding to the next step.
By selecting the appropriate group or individual expense, you’ll be directed to the respective page where you can view all the shared expenses and transaction history within that particular group or individual expense.
Once you’ve selected the group or individual expense, you’re ready to move on to the next step and add the bill details.
Step 3: Click on “Add bill” button
After selecting the desired group or individual expense, it’s time to click on the “Add bill” button to begin entering the details of the itemized bill.
On both the Splitwise app and website, the “Add bill” button is usually prominently displayed on the group or individual expense page. Look for a button or icon that says “Add bill” and click on it.
In the app, the “Add bill” button is generally located at the bottom of the screen, while on the website, you may find it towards the top or side of the page, depending on the layout.
When you click on the “Add bill” button, a new form or dialog box will appear that allows you to enter the specific details of the bill.
The form typically includes fields such as:
- Date: Enter the date on which the bill was incurred. This helps to accurately track the timeline of expenses.
- Description: Provide a brief description or title for the bill to help easily identify it later.
- Category: Choose a relevant category for the expense, such as food, utilities, rent, etc. This makes it easier to organize and filter expenses.
- Receipt: If you have a digital copy of the receipt, you can upload it to attach it to the bill. This is optional but can be helpful for reference.
By clicking on the “Add bill” button, you are initiating the process of entering the bill details. Make sure to accurately fill in the required fields to provide a comprehensive record of the itemized bill.
Once you have successfully clicked on the “Add bill” button and filled in the necessary information, you’re ready to proceed to the next step of adding items to the bill.
Step 4: Fill in the details of the bill
Now that you’ve clicked on the “Add bill” button, it’s time to fill in the details of the itemized bill in Splitwise. By providing accurate information, you’ll be able to track and split the expenses correctly.
The form or dialog box that appears after clicking the “Add bill” button will have several fields to enter the bill details. Here are some common fields you may encounter:
- Date: Input the date when the bill was incurred. This helps in organizing expenses by timeline.
- Description: Give a brief but descriptive title or description for the bill. This helps in quickly identifying the expense.
- Category: Choose the relevant category for the bill, such as groceries, transportation, or entertainment. This aids in organizing and filtering expenses based on different categories.
- Receipt: If you have a digital copy of the bill receipt, you can attach it to the itemized bill. This is optional but can be useful for future reference.
Additionally, depending on the Splitwise version you are using, there may be other fields to fill in, such as tax amount, currency, and location. Fill in the required fields accurately to ensure the bill is recorded correctly.
Take your time to go through each field and provide the necessary details. Double-check the information before moving on to the next step to avoid any errors.
Splitwise provides a user-friendly interface that makes it easy to fill in the details of the bill. The form is designed to capture essential information, ensuring that you have a comprehensive record of the itemized bill.
Once you have filled in the necessary details, you’re ready to advance to the next step of adding items to the bill.
Step 5: Add items to the bill
After filling in the basic details of the bill, the next step is to add items to the bill in Splitwise. This allows you to break down the total cost into individual expenses or specific items.
To add items to the bill, look for an “Add item” button or a similar option on the bill form. Click on it, and a new field or form will appear where you can enter the details of each item.
For each item, you’ll typically see fields to input the following information:
- Item Name: Provide a descriptive name or title for the item.
- Quantity: Enter the number of units for the item. This could refer to the quantity of a particular product or the number of servings for a shared expense.
- Price: Input the cost of each unit or the total price of the item.
- Notes: Add any additional notes or details about the item, such as specific specifications or variations.
By adding items to the bill, you are itemizing the expenses, making it easier to track individual costs and split them accurately among the participants.
If you have multiple items to add to the bill, simply click on the “Add item” button again and repeat the process for each item. Splitwise allows you to add as many items as needed to create a comprehensive breakdown of the expenses.
Ensure that the details for each item are entered correctly to avoid any discrepancies later on. Take your time to double-check the information before proceeding to the next step.
Once you have added all the items to the bill, you’re ready to move on to the next step of entering the amount and selecting who paid for the bill.
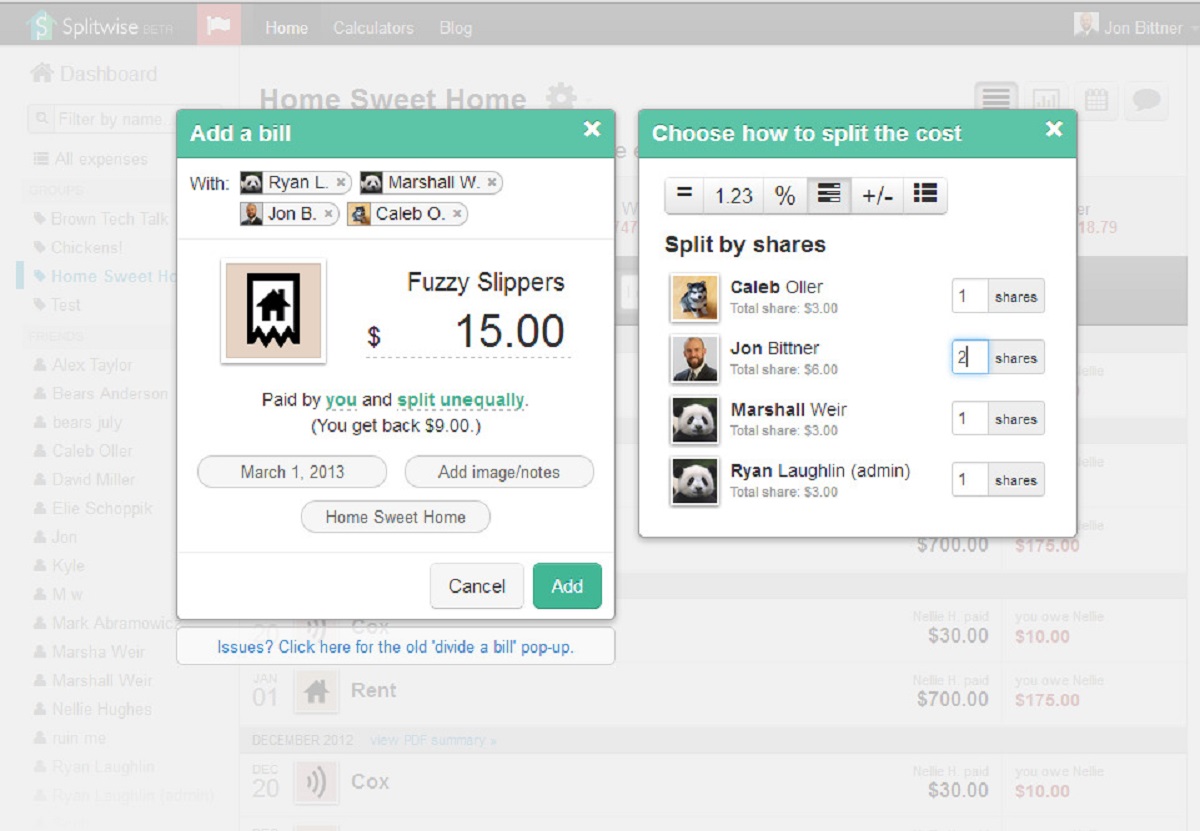
Step 6: Enter the amount and select who paid
Now that you have added all the items to the bill, it’s time to enter the total amount of the bill and select who paid for it in Splitwise.
In the bill form, you’ll find a field where you can input the total amount of the bill. This is the sum of all the individual item costs that you have entered previously.
Input the correct total amount to ensure accurate calculations and splitting of expenses among the participants. Double-check the amount to avoid any errors.
In addition to entering the amount, you’ll also need to specify who paid for the bill. Typically, there will be an option to choose from the list of participants in the group or individual expense.
Select the appropriate person or people who paid for the bill. Splitwise allows you to select multiple participants if the bill was split among several individuals. This ensures that the expenses are distributed correctly among the participants.
If the bill was paid by you, make sure to include yourself in the list of people who paid. If someone else paid the bill on your behalf, select their name as the payer.
By entering the amount and selecting who paid for the bill, you’re providing crucial information for accurately tracking and splitting the expenses within Splitwise.
Once you have entered the amount and selected the payer(s), you’re ready to proceed to the next step of assigning the items to the appropriate people.
Step 7: Assign the items to the appropriate people
After entering the total amount and specifying who paid for the bill, the next step is to assign the items to the appropriate people in Splitwise.
On the bill form, you’ll typically find a list of all the items you added earlier. For each item, you can assign it to the individuals who are responsible for paying for that specific item.
To assign the items, find the checkboxes or dropdown menus next to each item. Select the name(s) of the person or people who are responsible for that particular item. You can assign different people to different items based on who consumed or benefited from them.
By assigning the items to the appropriate people, Splitwise accurately tracks individual expenses and ensures that each participant is responsible for paying their fair share.
If there are items that need to be split equally among all participants, you can select the option to divide the cost equally. Splitwise will then distribute the expense evenly among everyone involved.
Double-check the assignment of items to verify that each item is correctly accounted for and assigned to the appropriate individuals.
In case you made a mistake in assigning an item, you can simply uncheck or change the assigned person and reassign it to the correct individual.
Once you have assigned all the items to the appropriate people, you’re ready to move on to the final step of saving the bill.
Step 8: Save the bill
After entering all the necessary details, assigning items, and ensuring the accuracy of the bill in Splitwise, it’s time to save the bill and finalize the recording of the expenses.
On the bill form, you’ll typically find a “Save” or “Submit” button. Click on this button to save the bill and add it to the group or individual expense’s transaction history.
By saving the bill, Splitwise will record the details of the itemized bill, including the total amount, items, and the assigned individuals. The bill will be added to the transaction history of the respective group or individual expense, allowing all participants to see and track the expenses.
After saving the bill, you’ll typically be redirected back to the group or individual expense page, where you can view the updated list of expenses and transactions.
Once the bill is saved, Splitwise will automatically calculate and update the balances among the participants based on the assigned items and who paid for the bill.
It’s important to review and verify the saved bill, ensuring that all the information is correct and accurate. If you notice any mistakes or need to make any adjustments, Splitwise allows you to edit or delete the bill within a certain timeframe, depending on your settings and permissions.
Now that you have successfully saved the bill, all participants can view, track, and settle their shared expenses in accordance with the recorded items and amounts in Splitwise.
Congratulations! You have completed the process of entering an itemized bill in Splitwise.
Conclusion
Entering an itemized bill in Splitwise is a straightforward process that ensures accurate tracking and splitting of expenses among participants. By following the step-by-step instructions outlined in this guide, you can effectively record the details of the bill, assign items to the appropriate individuals, and save the bill for easy reference and settlement.
Splitwise provides a user-friendly platform that simplifies the management of shared expenses, whether you’re part of a group or have individual expenses. With features like itemized bills, assigning costs, and tracking balances, Splitwise streamlines the process of managing finances among friends, family, or roommates.
Remember, when entering the bill details, be meticulous in filling out the information accurately. Double-check each step, from selecting the group or individual expense to assigning items and saving the bill. This ensures that everyone pays their fair share and avoids any misunderstandings or discrepancies.
Splitwise is a powerful tool for maintaining transparency, settling debts, and promoting financial harmony within shared expenses. It eliminates the need for manual calculations and mitigates the potential for conflicts or misunderstandings among the participants.
So, whether you’re planning a group trip, splitting rent and utilities, or going out for a meal with friends, Splitwise is your go-to platform for effortless expense management. Start using Splitwise today and experience the convenience and peace of mind that comes with accurate and organized shared expense tracking.