Introduction
Welcome to this helpful guide on how to check your transaction history on Cash App. Cash App is a popular mobile payment app that allows you to send and receive money from friends, family, or even businesses conveniently. Keeping track of your transaction history is essential for monitoring your financial activities and ensuring that all your payments are accounted for.
In this article, we will walk you through the step-by-step process of accessing and reviewing your transaction history on Cash App. Whether you need to verify a specific payment, track your spending habits, or simply stay on top of your financial records, this guide will provide you with all the necessary information to effortlessly navigate through your transaction history.
Checking your transaction history on Cash App is a straightforward process that can be done using your mobile device. You can easily access details about your payments, including the recipient, date, and amount of each transaction. Additionally, Cash App allows you to filter or search for specific transactions, making it even more convenient to find the details you need.
Furthermore, if you wish to keep a record of your transaction history outside of the app, Cash App also provides the option to export your transaction data. This feature is especially useful if you need to share your transaction details with your financial advisor, accountant, or for personal record-keeping purposes.
Now, let’s dive into the step-by-step process of checking your transaction history on Cash App. By the end of this guide, you’ll have all the knowledge you need to effortlessly review and manage your transactions on the app.
Step 1: Open the Cash App
To begin, open the Cash App on your mobile device. Ensure that you have the latest version of the app installed to access all the features and updates. The Cash App is available for both iOS and Android devices and can be easily found in the respective app stores.
Once you have located the Cash App on your device, tap on the app icon to open it. The app will then load and take you to the login or sign-up screen. If you already have an account, enter your login credentials to access your Cash App account. If you are new to Cash App, you can create a new account easily by following the sign-up instructions provided on the screen.
Once you have successfully logged in or signed up, you will be directed to the home screen of the Cash App. This is where you can access various features, including checking your transaction history.
If you are using Cash App for the first time, take a moment to familiarize yourself with the layout and menu options available. You will find a navigation bar at the bottom of the screen with tabs such as “Home,” “Activity,” “Cash,” and “Investing.” The “Activity” tab is where you can access your transaction history and review all your previous payments and transactions.
Now that you have opened the Cash App and are ready to explore your transaction history, let’s move on to the next step.
Step 2: Navigate to the Account Tab
After opening the Cash App, the next step is to navigate to the Account tab. The Account tab allows you to access various settings and information related to your Cash App account, including your transaction history.
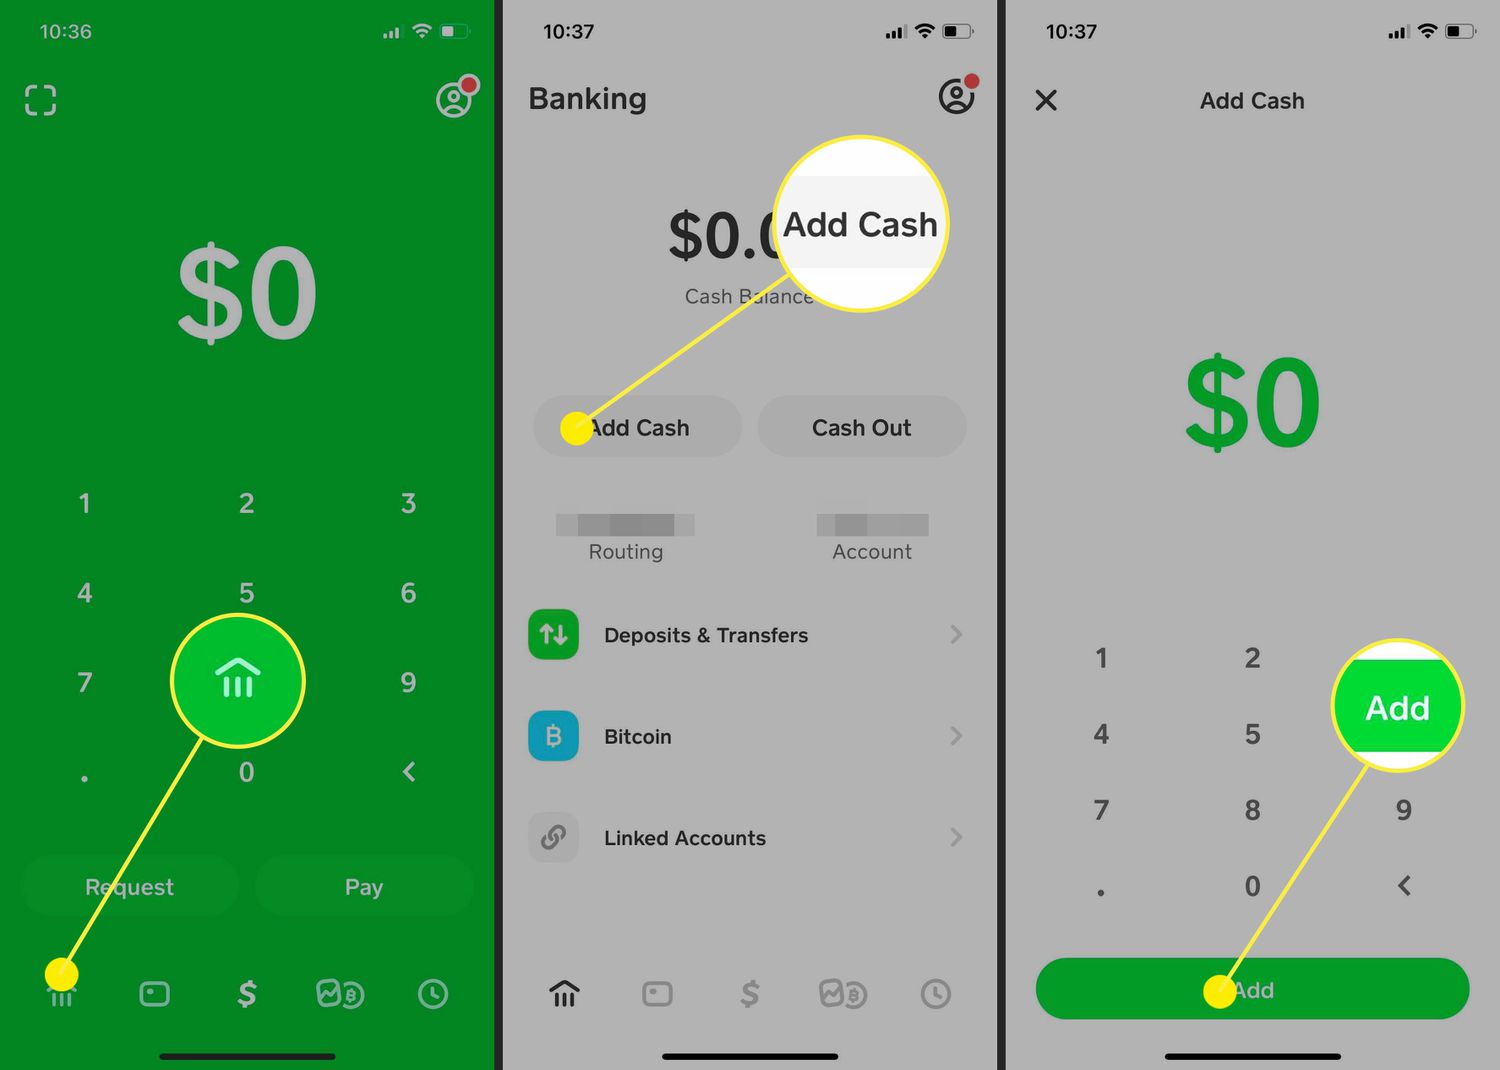
To access the Account tab, look for the icon that resembles a person’s silhouette or initials. This icon is usually located in the upper-right corner of the screen, but the exact placement may vary depending on the version of the app and your device.
Once you have located the Account icon, tap on it to enter the Account section. This will take you to a screen where you can manage different aspects of your Cash App account, such as your profile settings, linked bank accounts, and your transaction history.
Inside the Account section, you might find sub-tabs or additional options that allow you to further customize your account settings. These options can include details such as Security & Privacy, Notifications, and Linked Accounts. However, for the purpose of accessing your transaction history, we will focus on the main screen of the Account tab.
Now that you have successfully navigated to the Account tab, you are one step closer to checking your transaction history on Cash App. In the next step, we will explore how to access and view your transactions.
Step 3: Access the Transaction History
Now that you’re in the Account tab of your Cash App, it’s time to access your transaction history. Within the Account section, you’ll find a list of options related to your account settings and information. Look for a sub-tab or button labeled “Transactions” or “Transaction History.”
Tapping on the “Transactions” or “Transaction History” option will lead you to a screen that displays all of your past transactions on Cash App. This screen provides an overview of your transaction history, including details such as the date, time, recipient, and amount of each transaction.
Depending on the number of transactions you have made, it is possible that not all transactions will be displayed on one screen. In such cases, Cash App typically shows a limited number of the most recent transactions first. To view older transactions, you can scroll down or use the provided navigation options to access additional pages of your transaction history.
Now that you have successfully accessed your transaction history on Cash App, let’s move on to the next step to learn how to view and analyze your transactions.
Step 4: View the Transactions
Once you have accessed your transaction history on Cash App, you are ready to view and analyze your transactions. The transaction history screen provides a clear and organized view of all your transactions, allowing you to easily review and track your financial activities.
Each transaction is typically displayed as a separate entry on the screen, with relevant information such as the date, time, recipient or sender, and the amount of the transaction. This information helps you to identify specific transactions and understand the flow of money in and out of your Cash App account.
Scroll through the transaction history screen to view all your transactions. Depending on the number of transactions you have made, it may take some time to reach the earliest entries. Cash App usually displays the most recent transactions at the top of the screen for easy access.
As you review your transactions, you may notice that certain entries have additional details or icons associated with them. For instance, transactions involving a refund may be marked with a circular arrow symbol, while transactions associated with purchases made using your Cash Card may have the Cash Card logo. These additional indicators can provide you with valuable insights into the nature of the transactions.
Moreover, if you tap on a specific transaction, you may be able to view more detailed information about that transaction. This can include the transaction ID, a receipt or invoice, and any notes or details you or the recipient added during the transaction process.
By carefully reviewing your transaction history, you can gain a better understanding of your financial activities and identify any discrepancies or unauthorized transactions that may require further investigation.
Now that you know how to view your transactions on Cash App, let’s move on to the next step to learn how to filter or search for specific transactions.
Step 5: Filter or Search for Specific Transactions
Cash App provides useful functionalities that allow you to filter or search for specific transactions within your transaction history. This feature comes in handy when you need to locate a particular payment, track specific types of transactions, or review a specific time frame of your financial activities.
To filter your transaction history on Cash App, look for the filter icon or option, which is typically represented by a funnel or a funnel-shaped symbol. Tapping on this filter icon will open a menu that allows you to customize your transaction view based on various criteria.
Common filtering options may include filtering by specific dates, transaction types (such as payments or refunds), or even specific contacts or recipients. Depending on the Cash App version, you may also have additional criteria available for filtering, such as filtering by specific payment categories or amounts.
Select your desired filter criteria and apply them to your transaction history. Cash App will then refresh the screen, showing you only the transactions that meet the selected criteria. This can help you quickly find the transactions you’re looking for without having to scroll through your entire transaction history.
If you prefer a more targeted search, Cash App also allows you to search for specific transactions using keywords or terms. Look for the search icon, typically represented by a magnifying glass, and tap on it to open the search bar. Enter the relevant keywords or terms related to the transaction you want to find and tap “Search.”
Cash App will display the search results, showing you the transactions that match your search query. This feature is particularly useful when you have a large number of transactions and need to locate a specific payment or transaction quickly.
By taking advantage of the filtering and search capabilities, you can efficiently navigate through your transaction history on Cash App and find the information you need without hassle.
Now that you know how to filter or search for specific transactions, let’s move on to the next step, which will guide you on exporting your transaction history.
Step 6: Export the Transaction History
Cash App offers the convenient option to export your transaction history, allowing you to generate a record of your financial activities outside of the app. Exporting your transaction history can be useful for personal record-keeping, tax purposes, or sharing your transaction details with a financial advisor or accountant.
To export your transaction history on Cash App, navigate to the transaction history screen where all your transactions are listed. Look for the export or download icon, usually represented by an arrow pointing downwards or a box with an arrow pointing out of it.
Tap on the export or download icon, and Cash App will provide you with options for exporting your transaction history. These options may include exporting as a CSV file, which can be opened and viewed in spreadsheet applications such as Microsoft Excel or Google Sheets, or as a PDF file, which provides a more polished and printable format.
Select your desired export format and follow the prompts to complete the export process. Depending on your device and the selected format, the exported file may be saved on your device or sent to an email address associated with your Cash App account.
Once you have exported your transaction history, you can access the file from your device’s file manager or email app, depending on where the file was saved. From there, you can open and view the transaction history in the desired format, making it easier to analyze, organize, or share as needed.
Remember to securely store the exported file and keep it protected, as it contains sensitive financial information. Consider using password protection or encryption methods to ensure the privacy and security of your transaction history.
With the ability to export your transaction history, Cash App provides you with the flexibility to maintain and manage your financial records outside of the app, giving you peace of mind and the convenience of accessing your transaction details whenever and wherever you need them.
Congratulations! You have now successfully learned how to check, view, filter, search, and export your transaction history on Cash App. By following these steps, you can stay on top of your financial activities and ensure the accuracy and completeness of your records.
Now you have all the knowledge you need to navigate through your transaction history on Cash App with ease. Use this information to keep track of your payments, monitor your spending habits, and maintain a clear financial record—all within the convenience of the Cash App.
Conclusion
In this comprehensive guide, we have explored the step-by-step process of checking your transaction history on Cash App. By following these steps, you can easily access and review your past transactions, making it convenient to track your financial activities and maintain accurate records.
We started by opening the Cash App and navigating to the Account tab, where we accessed the transaction history. From there, we learned how to view the transactions, reviewing the details of each payment and gaining insights into our financial activities.
Furthermore, we discovered how to filter or search for specific transactions, allowing us to quickly locate payments based on dates, recipient names, or other relevant criteria. This feature is incredibly useful in managing and organizing a large number of transactions.
Lastly, we explored the option of exporting our transaction history from Cash App, enabling us to generate a record of our financial activities for personal record-keeping, tax purposes, or sharing with professionals like financial advisors or accountants.
By regularly checking and reviewing your transaction history on Cash App, you can stay informed about your financial activities, detect any inaccuracies or discrepancies, and make more informed decisions about your spending habits.
Now that you have a clear understanding of how to navigate your transaction history on Cash App, you can confidently manage your finances and utilize the app to its fullest potential.
Remember to keep your Cash App account secure by using strong passwords, enabling security features like two-factor authentication, and regularly monitoring your transactions for any suspicious activity.
We hope this guide has been helpful in providing you with the necessary knowledge and tools to access and manage your transaction history on Cash App successfully. Enjoy the hassle-free experience of tracking your payments and maintaining accurate financial records with Cash App!