Introduction
Welcome to our guide on how to add XRP to Metamask! If you’ve been exploring the world of cryptocurrencies, you’ve likely come across XRP, one of the most established and popular digital assets in the market. Metamask, on the other hand, is a widely used wallet that allows users to securely store, manage, and interact with various cryptocurrencies.
In this article, we’ll walk you through the process of adding XRP to your Metamask wallet, enabling you to have seamless access to your XRP funds while benefiting from the features offered by Metamask.
Whether you’re a seasoned cryptocurrency user or new to the world of digital assets, this guide will provide you with step-by-step instructions to set up and manage XRP within your Metamask wallet. So, let’s dive in and get started!
Note: This guide assumes you already have a basic understanding of cryptocurrencies and have a Metamask wallet installed on your device. If you’re new to cryptocurrencies or Metamask, we recommend familiarizing yourself with the fundamentals before proceeding.
What is XRP?
XRP is a digital asset and cryptocurrency that was created by Ripple Labs. It is designed to facilitate fast, low-cost international money transfers and is often referred to as Ripple. Unlike traditional cryptocurrencies like Bitcoin, XRP does not rely on a blockchain but operates on a separate technology called the Ripple protocol consensus algorithm (RPCA).
One of the key features that sets XRP apart is its high scalability. The network has the capacity to handle a massive number of transactions in a short period of time, making it ideal for financial institutions and cross-border payments. The consensus protocol used by XRP allows for faster transaction settlements compared to other digital assets.
XRP is also often associated with RippleNet, a global network of financial institutions that use Ripple’s technology to facilitate seamless cross-border transactions. RippleNet enables banks and payment providers to connect and transact with each other using XRP as a bridge currency, eliminating the need for traditional correspondent banking relationships.
Another unique aspect of XRP is its limited supply. Unlike Bitcoin, which has a maximum supply of 21 million coins, XRP has a total supply of 100 billion coins. However, the majority of these coins are held by Ripple Labs, the company behind XRP, which has sparked some debates and criticism within the cryptocurrency community.
Overall, XRP offers a unique value proposition in the world of digital assets, with its fast transaction speeds, low fees, and potential for streamlining cross-border transactions. As you navigate the process of adding XRP to Metamask, it’s important to have a clear understanding of its purpose and how it differs from other cryptocurrencies.
What is Metamask?
Metamask is a popular browser extension wallet that allows users to manage their digital assets, interact with decentralized applications (dApps), and securely store cryptocurrencies. It functions as a bridge between users and the Ethereum blockchain, offering a user-friendly and convenient way to access the world of decentralized finance (DeFi).
Essentially, Metamask acts as a digital wallet that enables users to connect to decentralized applications and interact with the Ethereum network. It provides a secure and convenient way to store and manage Ethereum-based tokens, such as ERC-20 and ERC-721 tokens.
One of the key advantages of using Metamask is its compatibility with various web browsers. Whether you use Chrome, Firefox, Brave, or any other browser that supports browser extensions, you can easily install and set up Metamask to start managing your digital assets.
Metamask also offers a simple user interface that allows users to send and receive cryptocurrencies, view transaction history, and connect with dApps seamlessly. It provides a way for users to participate in token sales, interact with decentralized exchanges, and engage with the growing ecosystem of decentralized applications.
Security is a top priority for Metamask, and the wallet includes measures to protect user funds. These include encrypted private keys stored locally on the user’s device, the ability to set up a password for additional security, and the option to create multiple accounts within the wallet.
In recent years, Metamask has become an essential tool for Ethereum users, enabling them to unlock the full potential of the decentralized web. It has grown in popularity due to its user-friendly interface and seamless integration with the Ethereum network.
As we explore how to add XRP to Metamask, it’s important to understand the capabilities and features that make Metamask a trusted and widely used wallet in the cryptocurrency community.
Setting up a Metamask Wallet
If you don’t already have a Metamask wallet, the first step is to set it up on your preferred web browser. Follow these simple steps to create your Metamask wallet:
- Open your web browser and go to the Metamask website (https://metamask.io).
- Click on the “Get Chrome Extension” or “Get Firefox Extension” button, depending on your browser.
- Click “Add to Chrome” or “Add to Firefox” to begin the installation process.
- Once installed, click on the Metamask icon in your browser’s extension toolbar.
- A welcome page will appear. Click on the “Create a Wallet” button.
- Read and accept the Terms of Use and Privacy Notice.
- Create a strong password for your wallet. Make sure it’s something you can remember, but also difficult for others to guess.
- Click on “Create” to proceed.
- You’ll be presented with a sequence of 12 randomly generated words. These are your wallet’s recovery phrase. Write them down in the correct order and keep them in a safe place. This recovery phrase is crucial for restoring your wallet if you ever lose access to it.
- Confirm and verify your recovery phrase by selecting the words in the correct order. This ensures that you have properly written down the recovery phrase.
- Once verified, your Metamask wallet will be created, and you’ll be directed to the wallet’s main interface.
It’s important to note that your Metamask wallet is unique to your browser and device. If you use multiple browsers or devices, you’ll need to install Metamask and set up your wallet on each one individually.
Now that you have successfully set up your Metamask wallet, you’re ready to proceed to the next steps of adding the XRP network and importing XRP into your wallet.
Adding the XRP Network to Metamask
By default, Metamask supports the Ethereum network. However, in order to add XRP to your Metamask wallet, you’ll need to configure it to work with the XRP network. Follow these steps to add the XRP network to your Metamask:
- Open your Metamask wallet by clicking on the extension icon in your web browser’s toolbar.
- Click on the account avatar in the top-right corner of the wallet interface and select “Settings” from the dropdown menu.
- In the “Settings” menu, click on “Networks” in the left-hand sidebar.
- Scroll down and click on “Add Network” to create a custom network.
- In the “New Network” form, enter the following details for the XRP network:
- Network Name: Enter a descriptive name for the network, such as “XRP” or “Ripple”.
- New RPC URL: Enter the RPC URL for the XRP network. You can find this information on the official XRP documentation or by consulting reliable sources.
- Chain ID: Leave this field blank.
- Symbol: Enter “XRP”.
- Block Explorer URL: Enter the URL for the XRP block explorer. This will allow you to view transaction details on the XRP network.
- Click on the “Save” button to add the XRP network to Metamask.
Once you’ve added the XRP network to Metamask, you’ll be able to view your XRP balance and interact with XRP-based applications within your wallet. However, before you can do that, you’ll need to import your XRP funds into your Metamask wallet.
In the next section, we’ll guide you through the process of importing XRP to your Metamask wallet so that you can start managing your XRP assets conveniently within the Metamask interface.
Importing XRP to Metamask
Now that you have added the XRP network to your Metamask wallet, it’s time to import your XRP funds so that you can manage them within Metamask. Follow these steps to import XRP into your Metamask wallet:
- Make sure you have the XRP wallet address or the private key associated with your XRP funds. You will need this information to import your XRP into Metamask.
- Open your Metamask wallet by clicking on the extension icon in your web browser’s toolbar.
- In the Metamask interface, click on the account avatar in the top-right corner and select “Import Account” from the dropdown menu.
- You will be presented with two options: “Seed phrase” or “Private Key”. Choose the option that corresponds to the information you have for your XRP funds.
- If you selected “Seed phrase”, enter your XRP wallet’s recovery phrase in the designated field. If you selected “Private Key”, enter your XRP wallet’s private key.
- Click on the “Import” button to initiate the import process.
- Metamask will verify the provided information and import your XRP funds into your wallet. This may take a few moments, so please be patient.
- Once the import process is complete, you will see your XRP balance and transaction history within your Metamask wallet.
It’s important to note that importing XRP into Metamask does not transfer your XRP funds to a new wallet. Instead, it allows you to manage and interact with your XRP assets using the Metamask interface alongside your Ethereum-based tokens.
With your XRP imported into Metamask, you can now conveniently monitor your XRP holdings, send and receive XRP transactions, and explore various XRP-based decentralized applications directly from your Metamask wallet interface.
In the following section, we’ll discuss how to effectively manage your XRP funds within Metamask and make the most of the features and functionalities it offers.
Managing XRP in Metamask
Now that you have successfully imported XRP into your Metamask wallet, let’s explore how you can effectively manage your XRP funds within the Metamask interface:
Viewing XRP Balance: Open your Metamask wallet by clicking on the extension icon in your web browser’s toolbar. You will see your XRP balance displayed alongside any other Ethereum-based tokens you may have in your wallet.
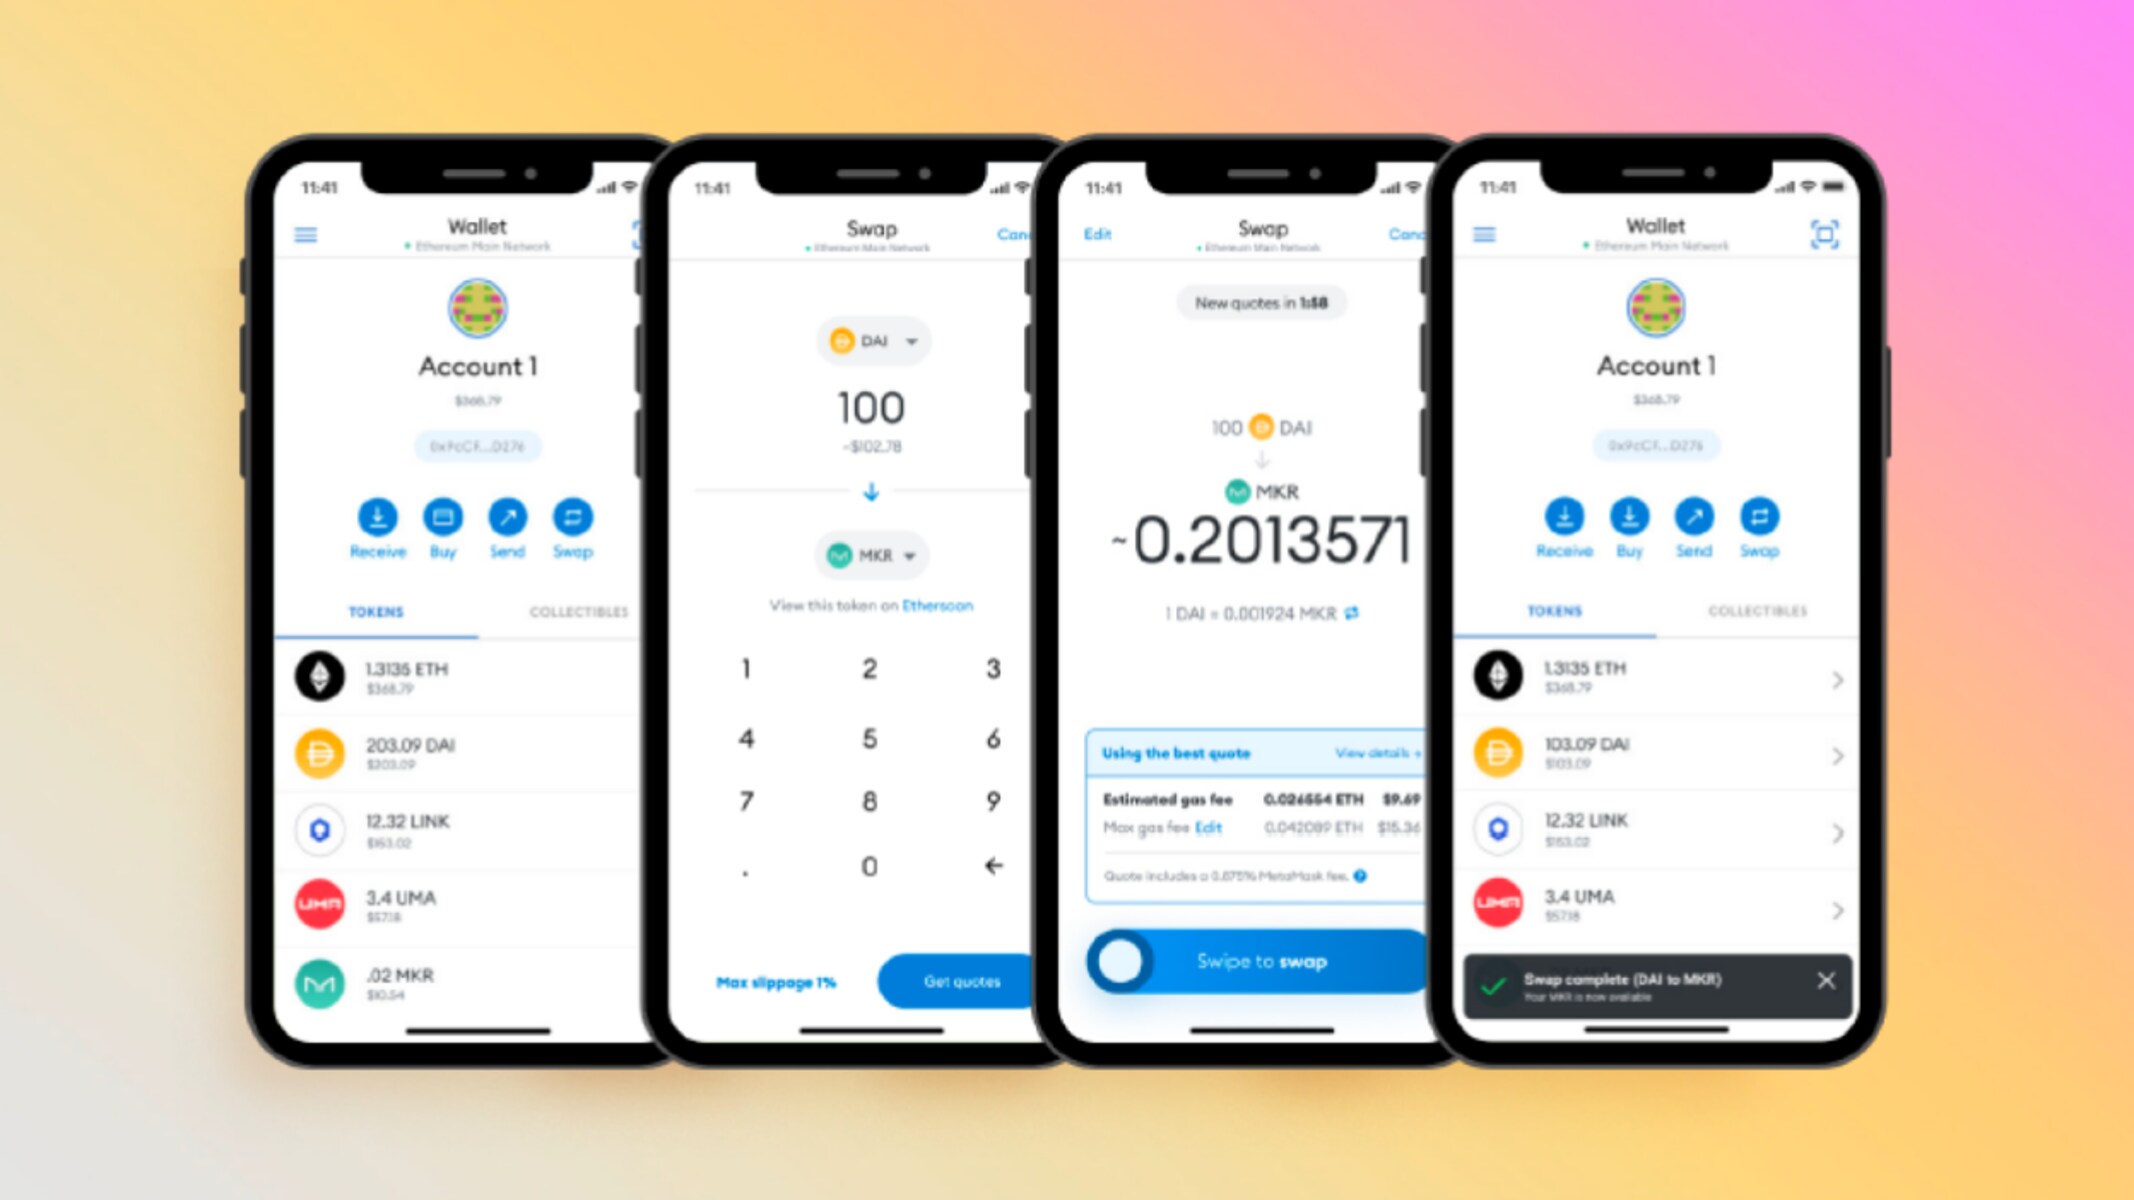
Sending XRP: To send XRP to another wallet or address, click on the “Send” button within the Metamask interface. Enter the recipient’s XRP wallet address, specify the amount you want to send, and review the transaction details before confirming the transaction.
Receiving XRP: To receive XRP, click on the “Receive” button within the Metamask interface. You will be provided with an XRP wallet address that you can share with others. Make sure to double-check the address before sharing it to ensure accuracy.
Exploring XRP dApps: Metamask allows you to connect and interact with various decentralized applications (dApps) built on top of the Ethereum network. While XRP is not native to Ethereum, you can still explore Ethereum-based dApps within Metamask. Keep in mind that not all Ethereum dApps will be compatible with XRP functionality.
Monitoring XRP Transactions: Metamask provides a transaction history tab where you can view the details of all your XRP transactions, including the date, time, amount, and transaction status. This allows you to track the movement of your XRP funds and keep an eye on your transaction history.
Managing Account Security: Metamask offers various security features to protect your XRP and other assets. You can set up a password to secure access to your wallet, enable two-factor authentication (2FA), and back up your wallet’s recovery phrase. It is crucial to implement these security measures to safeguard your funds.
Remember, while you can manage your XRP within Metamask, the underlying technology is still the XRP network, not the Ethereum network. This means that the XRP transactions conducted within Metamask are processed on the XRP network, not on Ethereum.
By effectively managing your XRP within Metamask, you can enjoy the convenience of accessing and interacting with your XRP funds alongside your Ethereum-based assets.
In the next section, we will wrap up this guide, providing you with a summary of the key points we covered, and some final thoughts on adding XRP to Metamask.
Conclusion
Congratulations! You have successfully learned how to add XRP to Metamask, allowing you to manage your XRP funds alongside your Ethereum-based assets. By following the steps outlined in this guide, you have set up a Metamask wallet, added the XRP network, imported your XRP funds, and explored how to effectively manage your XRP within Metamask.
XRP, with its fast transaction speeds and low fees, offers a unique value proposition in the cryptocurrency space. Integrating XRP into Metamask opens up new possibilities for seamless access to your XRP funds and the ability to interact with XRP-based applications within the Ethereum ecosystem.
Remember to practice good security measures to protect your Metamask wallet and XRP funds. Set up strong passwords, enable two-factor authentication (2FA), and keep your recovery phrase in a safe place.
As the world of cryptocurrencies continues to evolve, it’s exciting to see the integration of different digital assets and networks within platforms like Metamask. This integration provides users with a seamless experience, allowing them to manage their diverse portfolios in one place.
We hope this guide has been helpful in your journey to add XRP to Metamask. Feel free to refer back to this guide as a reference whenever needed.
Happy managing and exploring your XRP assets in Metamask!