What is Ethereum Metamask
Ethereum Metamask is a browser extension that allows users to interact with the Ethereum blockchain and decentralized applications (DApps) directly from their web browsers. It acts as a digital wallet, providing users with secure storage for their Ethereum and other ERC-20 tokens. Metamask is compatible with major browsers such as Chrome, Firefox, and Brave, making it easily accessible to a wide range of users.
At its core, Metamask provides a simple and intuitive interface for managing Ethereum assets and interacting with the Ethereum ecosystem. It enables users to send and receive Ethereum, view their transaction history, and interact with various DApps seamlessly. Metamask acts as a bridge between the traditional internet and the decentralized web, creating a smooth experience for users who want to participate in the world of blockchain technology.
One of the key features of Metamask is its ability to securely store private keys locally on the user’s device. This means that users have full control over their funds and are not reliant on a centralized exchange or third-party custodian. Additionally, Metamask has integrated hardware wallet support, allowing users to connect their Ledger or Trezor devices for enhanced security.
Metamask also supports the creation and management of multiple Ethereum wallets, providing users with the flexibility to organize their assets and maintain separate wallets for different purposes. This is particularly useful for those who want to segregate their personal and business transactions or participate in multiple decentralized finance (DeFi) protocols.
Furthermore, Ethereum Metamask offers a developer-friendly environment that simplifies the process of building and testing DApps. It allows developers to switch between different Ethereum networks, such as the mainnet, testnets, and local development networks, facilitating the smooth deployment and debugging of smart contracts.
In summary, Ethereum Metamask is a powerful tool that revolutionizes the way users interact with the Ethereum blockchain. Its user-friendly interface, secure wallet storage, and seamless integration with DApps make it an essential extension for anyone interested in participating in the decentralized web.
Why should you use Metamask for Ethereum?
Metamask offers numerous advantages and benefits that make it the go-to choice for Ethereum users. Here are some compelling reasons why you should use Metamask:
1. Easy Access to Ethereum: Metamask is a user-friendly and convenient way to access the Ethereum blockchain. With just a few clicks, you can connect your Metamask wallet to your browser and start interacting with Ethereum and DApps right away.
2. Enhanced Security: Metamask provides a secure environment for managing your Ethereum assets. Your private keys are stored locally on your device, reducing the risk of potential hacks or security breaches associated with centralized exchanges.
3. Seamless DApp Integration: Metamask seamlessly integrates with a wide range of decentralized applications on the Ethereum blockchain. It makes interacting with DApps as simple as clicking a button, allowing you to participate in various decentralized finance protocols, NFT marketplaces, and other innovative projects.
4. Multiple Wallet Management: Metamask allows you to create and manage multiple Ethereum wallets within a single interface. This enables you to organize your funds and transactions more efficiently, whether you prefer to keep personal and business assets separate or participate in different DeFi projects.
5. Hardware Wallet Support: Metamask has integrated support for popular hardware wallets like Ledger and Trezor. This additional layer of security ensures that your private keys never leave the hardware device, providing peace of mind for users who prioritize the protection of their funds.
6. Cross-Browser Compatibility: Metamask is compatible with major web browsers such as Chrome, Firefox, and Brave. This wide compatibility allows users to access their Ethereum wallets and DApps from their preferred browser, regardless of the operating system they use.
7. Developer-Focused Features: Metamask offers a range of tools and features that are tailored to developers building on the Ethereum blockchain. With the ability to switch between different Ethereum networks and seamless integration with development environments, Metamask streamlines the development and testing process for DApps and smart contracts.
8. Constant Updates and Improvements: The Metamask team is actively working on improving the user experience and adding new features. Regular updates and enhancements ensure that users have access to the latest advancements in Ethereum technology.
In summary, Metamask provides a user-friendly, secure, and feature-rich environment for interacting with Ethereum and DApps. Its ease of use, enhanced security measures, multiple wallet management, and developer-focused features make it the ideal choice for anyone looking to leverage the power of the Ethereum blockchain.
Installing and Setting Up Metamask
Installing and setting up Metamask is a straightforward process that enables you to start using Ethereum and decentralized applications (DApps) in no time. Follow these steps to install and set up Metamask:
Step 1: Choose a Compatible Browser: Metamask is compatible with popular web browsers such as Chrome, Firefox, and Brave. Ensure that you have one of these browsers installed on your device before proceeding.
Step 2: Install the Metamask Extension: Open your preferred browser and visit the official Metamask website. Locate and click on the “Get Chrome/Firefox/Brave Extension” button, depending on your browser. This will redirect you to the appropriate extension store for download. Follow the on-screen instructions to install Metamask.
Step 3: Create a New Wallet: Once the Metamask extension is installed, you will see the Metamask fox icon in your browser toolbar. Click on the icon to launch the extension. On the welcome screen, click “Get Started” and then “Create a Wallet”.
Step 4: Set a Strong Password: Choose a strong and unique password for your Metamask wallet. This password will be required every time you want to unlock and access your wallet.
Step 5: Secret Backup Phrase: Metamask will then provide you with a secret backup phrase. This phrase is crucial for recovering your wallet in case of device loss or theft. Write down the backup phrase and keep it in a secure place. Do not share it with anyone.
Step 6: Confirm the Backup Phrase: Metamask will ask you to confirm the backup phrase by selecting the words in the correct order. This helps ensure that you have correctly recorded the backup phrase. Confirm the phrases and proceed.
Step 7: Congratulations, You’re Ready: After confirming the backup phrase, Metamask will notify you that your wallet has been successfully set up. You can now start using Metamask to manage your Ethereum and interact with DApps.
Step 8 (Optional): Connect a Hardware Wallet: If you have a hardware wallet such as Ledger or Trezor, you can connect it to Metamask for added security. Follow the instructions provided by Metamask to connect and set up your hardware wallet.
Step 9 (Optional): Import an Existing Wallet: If you already have an Ethereum wallet, you can import it into Metamask by selecting the “Import Wallet” option during the setup process. Enter the private key or JSON file associated with your existing wallet to import it into Metamask.
With Metamask installed and set up, you can now seamlessly manage your Ethereum assets, interact with DApps, and explore the world of decentralized finance.
Understanding the Metamask User Interface
The Metamask user interface (UI) is designed to provide a user-friendly and intuitive experience for managing your Ethereum assets and interacting with decentralized applications (DApps). Let’s take a closer look at the various components of the Metamask UI:
1. Account Overview: The account overview section displays a summary of your Ethereum wallet. It shows your account balance, the Ethereum address associated with your wallet, and the network you are currently connected to.
2. Transaction History: The transaction history tab provides a list of your recent Ethereum transactions. It includes details such as the transaction amount, destination address, and status (pending, confirmed, or failed).
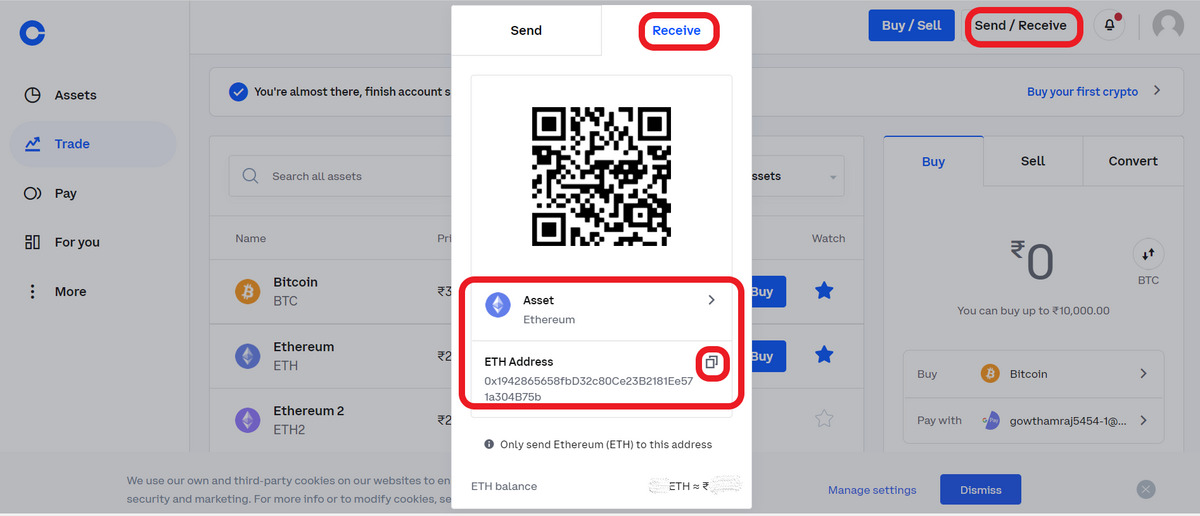
3. Send and Receive: The send and receive tabs allow you to send and receive Ethereum and other ERC-20 tokens. You can enter the recipient’s address, specify the amount to send, and include an optional message. This section also provides a QR code for convenient scanning when receiving funds.
4. DApp Interaction: Metamask integrates seamlessly with DApps on the Ethereum blockchain. When you visit a DApp-enabled website, Metamask automatically detects the DApp and displays relevant information and actions. This can include connecting your wallet, authorizing transactions, or interacting with specific features of the DApp.
5. Network Selection: Metamask allows you to switch between different Ethereum networks. The network selection dropdown menu lets you choose between the mainnet (the live Ethereum network), testnets (simulation networks for development and testing), and custom networks.
6. Settings: The settings section provides additional configuration options for customizing your Metamask experience. Here, you can manage account details, adjust security settings, import and export wallets, and connect hardware wallets for added security.
7. Security Indicators: Metamask includes several security indicators to help you identify safe and trusted websites. A lock icon indicates that the website is secured with HTTPS, while a green checkmark signifies that the website has been verified by the ENS (Ethereum Name Service).
8. Metamask Fox Icon: The Metamask fox icon serves as a visual indicator that Metamask is installed and active in your browser. Clicking on the fox icon opens the Metamask UI and gives you access to your wallet and account settings.
By familiarizing yourself with the various components of the Metamask UI, you can easily navigate and leverage the features and functionalities that Metamask offers. Whether it’s managing your Ethereum assets, interacting with DApps, or customizing your settings, the Metamask UI simplifies your Ethereum experience.
How to Create a New Ethereum Wallet in Metamask
Creating a new Ethereum wallet in Metamask is a straightforward process that allows you to securely store and manage your Ethereum assets. Follow these steps to create a new wallet:
Step 1: Launch Metamask: Click on the Metamask fox icon in your browser toolbar to launch the Metamask extension. If this is your first time using Metamask, you will be prompted to set up a wallet. Otherwise, click on the account icon in the top right corner and select “Create Account” from the drop-down menu.
Step 2: Set a Strong Password: Choose a strong and unique password for your new wallet. This password will be required every time you want to unlock and access your wallet, so make sure to remember it or keep it in a secure place.
Step 3: Backup Your Secret Phrase: Metamask will generate a secret backup phrase for your wallet. This phrase consists of 12 or 24 randomly generated words that act as a backup and recovery mechanism for your wallet. Write down the backup phrase in the correct order and store it in a safe and secure place. This phrase is essential for recovering your wallet if you lose access to your device.
Step 4: Confirm Your Secret Phrase: Metamask will ask you to confirm your secret backup phrase by selecting the words in the correct order. This step ensures that you have correctly recorded and stored the backup phrase. Confirm the words to proceed.
Step 5: Congratulations, Your Wallet is Created: After successfully confirming your backup phrase, Metamask will notify you that your new wallet has been created. You can now use your wallet to store and manage Ethereum and interact with decentralized applications.
Step 6 (Optional): Connect a Hardware Wallet: If you own a hardware wallet like Ledger Nano S or Trezor, you can connect it to Metamask for additional security. Follow the instructions provided by Metamask to connect and set up your hardware wallet.
Remember to keep your password and secret backup phrase safe and confidential. Losing your password or exposing your backup phrase can result in permanent loss of access to your funds. It’s also a good practice to periodically back up your wallet by exporting the JSON file associated with your wallet or printing a hard copy of your secret backup phrase.
By creating a wallet in Metamask, you gain full control over your Ethereum assets and can conveniently manage and interact with the Ethereum blockchain and decentralized applications.
Importing an Existing Ethereum Wallet into Metamask
If you already have an existing Ethereum wallet, you can easily import it into Metamask to conveniently manage your assets and interact with decentralized applications (DApps). Follow these steps to import your wallet into Metamask:
Step 1: Launch Metamask: Click on the Metamask fox icon in your browser toolbar to launch the Metamask extension. If you haven’t set up a wallet yet, you will be prompted to do so. Click on the account icon in the top right corner and select “Import Account” from the drop-down menu.
Step 2: Import Your Wallet: Metamask gives you two options to import your existing wallet: private key or JSON file. Choose the option that applies to your situation.
If you have a private key: Select the “Import using private key” option and enter your wallet’s private key in the designated field. Make sure you have the correct and complete private key as it grants access to your funds.
If you have a JSON file: Select the “Import using JSON file” option and click on the “Upload JSON File” button. Locate and select the JSON file associated with your existing wallet. You may need to enter the password you used to encrypt the JSON file if prompted.
Step 3: Verify and Import: After entering the private key or uploading the JSON file, Metamask will verify its authenticity and integrity. Once the verification is complete, click on the “Import” button to import your existing wallet into Metamask.
Step 4: Access Your Imported Wallet: You will see a notification confirming that your wallet has been imported successfully. Your imported wallet will now be visible in your Metamask account list, and you can access and manage it just like any other wallet in Metamask.
It’s worth noting that importing an existing wallet into Metamask grants the extension access to your wallet’s private keys. Ensure that you are importing from a trusted and secure source. If you’re unsure about the legitimacy or safety of your private key or JSON file, consider creating a new wallet instead.
By importing your existing Ethereum wallet into Metamask, you can conveniently manage all your Ethereum assets and interact with DApps within the Metamask user interface.
Adding Ethereum Tokens to Your Metamask Wallet
Metamask allows you to manage not only Ethereum (ETH) but also a wide range of ERC-20 tokens within your wallet. By adding Ethereum tokens to your Metamask wallet, you can keep track of and transact with your favorite tokens alongside your ETH. To add Ethereum tokens to your Metamask wallet, follow these steps:
Step 1: Open Metamask: Click on the Metamask fox icon in your browser toolbar to open the Metamask extension. Make sure you are logged in and have selected the Ethereum network that supports the token you want to add.
Step 2: Go to the “Assets” Tab: In the Metamask window, click on the “Assets” tab at the top of the interface. This tab displays all your existing tokens and provides options to add new tokens.
Step 3: Click on “Add Token”: Under the “Assets” tab, you will find an “Add Token” button. Click on it to open the token addition interface.
Step 4: Choose a Token Type: Metamask provides options to add tokens via three methods: “Custom Token,” “Search Token,” and “Paste Token Contract Address.” Choose the method that best suits your needs.
– Custom Token: If the token you want to add is not in the default token list, select “Custom Token.” You will need to enter the token contract address, token symbol, and decimals. These details can usually be found on the token’s official website or through reputable token trackers.
– Search Token: If the token you want to add is popular and supported by Metamask, you can enter its name or symbol in the search bar. Metamask will display a list of matching tokens, and you can select the appropriate one to add it to your wallet.
– Paste Token Contract Address: If you have the contract address for the token, select “Paste Token Contract Address” and enter the contract address. Metamask will automatically populate the token symbol and decimals if it recognizes the token.
Step 5: Confirm the Token: After filling in the necessary details, click on the “Next” or “Add Token” button to confirm the addition of the token to your wallet.
Step 6: View and Manage Your Tokens: Once the token is added, you will be able to view and manage it in the “Assets” tab of your Metamask wallet. You can check your token balance, send tokens, or receive them just like you would with Ethereum.
It’s important to note that adding a token to your Metamask wallet does not mean you own the token. It simply allows your wallet to display and interact with the token on the Ethereum blockchain. Ensure that you only add tokens from trusted sources and verify the contract address to avoid any potential scams or fraudulent tokens.
By adding Ethereum tokens to your Metamask wallet, you can easily keep track of and manage your token holdings alongside your Ethereum (ETH) assets, providing a seamless and convenient experience for all your cryptocurrency needs.
Sending and Receiving Ethereum using Metamask
Metamask serves as a secure and convenient wallet for managing your Ethereum (ETH) assets. With Metamask, you can easily send and receive ETH transactions right from your browser. Follow these steps to send and receive Ethereum using Metamask:
Sending Ethereum:
Step 1: Open Metamask and Unlock Your Wallet: Click on the Metamask fox icon in your browser toolbar to open the extension. Unlock your wallet by entering your password.
Step 2: Select “Send”: Once your wallet is unlocked, click on the “Send” tab in the Metamask window.
Step 3: Enter Recipient Address: In the “Send” tab, enter the Ethereum address of the recipient in the “To” field. Ensure that the address is correct to avoid sending funds to the wrong account.
Step 4: Specify Amount and Gas Fee: Enter the amount of Ethereum you want to send in the “Amount” field. You can also adjust the gas fee (transaction fee) based on your preferences and network congestion.
Step 5: Review and Confirm: Take a moment to review the transaction details, including the recipient address, amount, and gas fee. Once you’re satisfied, click on the “Next” or “Confirm” button to initiate the transaction.
Step 6: Approve and Complete the Transaction: Metamask will prompt you to approve the transaction by clicking on the “Confirm” button again. Confirming the transaction will initiate the transfer of Ethereum to the recipient’s address. Wait for the transaction to be confirmed on the blockchain.
Receiving Ethereum:
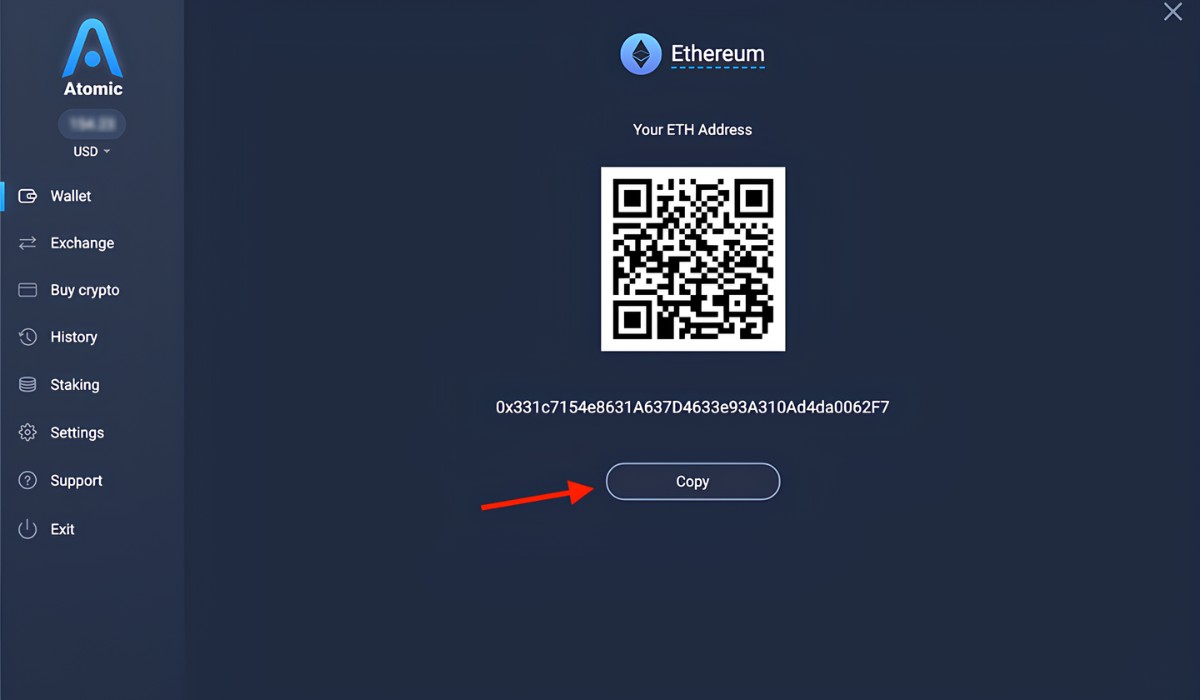
Step 1: Share Your Ethereum Address: To receive Ethereum, simply share your Ethereum address with the sender. You can find your Ethereum address by clicking on the account icon in the top right corner of the Metamask window and selecting the account with the desired Ethereum address.
Step 2: Verify Transaction: Once the sender initiates the transaction, Metamask will display a notification to confirm the incoming transaction. Verify the transaction details, including the sender’s address and the amount of Ethereum being sent.
Step 3: Accept the Transaction: If the transaction details are correct and you want to accept the Ethereum, click on the “Accept” or “Confirm” button to complete the transaction.
Step 4: Wait for Confirmation: The Ethereum transaction may take some time to be confirmed on the blockchain. You can track the progress by checking the transaction history in the Metamask interface.
It is essential to double-check the recipient’s address before sending Ethereum to ensure that you are sending funds to the intended recipient. Additionally, consider the current network congestion and adjust the gas fee accordingly to ensure timely processing of your transaction.
With Metamask, sending and receiving Ethereum is a straightforward process, providing you with full control over your ETH assets and facilitating easy transactions within the Ethereum network.
Interacting with Decentralized Applications (DApps) using Metamask
Metamask not only serves as a secure Ethereum wallet but also allows you to seamlessly interact with various decentralized applications (DApps) built on the Ethereum blockchain. With Metamask, you can access and engage with a wide range of DApps, including decentralized finance (DeFi) platforms, non-fungible token (NFT) marketplaces, and more. Here’s how you can interact with DApps using Metamask:
Step 1: Open Metamask and Unlock Your Wallet: Click on the Metamask fox icon in your browser toolbar to open the extension. Unlock your wallet by entering your password.
Step 2: Visit a DApp-Enabled Website: To interact with a specific DApp, visit a website that supports the DApp. These websites often have dedicated sections or buttons to connect your Metamask wallet.
Step 3: Connect Your Metamask Wallet: Within the DApp-enabled website, look for options to connect or authorize your Metamask wallet. This step establishes a secure connection between the DApp and your wallet.
Step 4: Confirm Wallet Authorization: After clicking on the connect or authorize button, Metamask will prompt you to confirm the authorization request. Review the details carefully and click on the “Connect” or “Confirm” button to authorize the DApp to access your wallet.
Step 5: Interact with the DApp: Once your wallet is connected, you can begin interacting with the DApp’s features and functionalities. This may include actions such as trading tokens, lending and borrowing funds, creating or participating in NFT sales, or playing blockchain-based games.
Step 6: Approve Transactions: Some actions within DApps might require approval of specific transactions. Metamask will notify you when a transaction requires your approval. Review the transaction details, such as token amounts or contract interactions, and confirm the transaction by clicking on the “Confirm” or “Accept” button.
Step 7: Monitor and Review Transactions: You can monitor the status of your transactions within the DApp and in the Metamask transaction history. Metamask provides transaction details, including the transaction hash, gas fees, and confirmation status.
By using Metamask to interact with DApps, you can enjoy the benefits of decentralized technologies while maintaining control over your funds and the security of your transactions. Whether you’re exploring decentralized finance, engaging with NFTs, or participating in other innovative projects, Metamask empowers you to seamlessly connect and transact within the decentralized ecosystem.
Customizing Your Metamask Settings
Metamask offers a range of customization options that allow you to tailor your experience and optimize the functionality of your Ethereum wallet. By customizing your Metamask settings, you can enhance security, manage account details, and fine-tune your interaction with the Ethereum ecosystem. Here are some settings you can customize within Metamask:
1. Security Settings:
- Password and Biometric Authentication: You can set or modify the password required to unlock your Metamask wallet. Additionally, you can enable or disable biometric authentication, such as fingerprint or facial recognition, if your device supports these features.
- Auto-Lock Timer: Metamask allows you to define the duration after which your wallet automatically locks when left idle. This feature helps prevent unauthorized access to your wallet if you forget to manually lock it.
- Privacy Mode: By enabling privacy mode, Metamask will no longer automatically detect and notify about DApp interactions, which can enhance privacy and limit exposure to potentially malicious DApps.
2. Account Details:
- Account Name and Identicon: You can personalize your account by giving it a unique name and choosing an avatar from the available identicons. This makes it easier to identify and manage multiple accounts within Metamask.
- Account Export: Metamask allows you to export your account information, including private key, mnemonic phrase, or JSON file. It is crucial to keep these sensitive details secure and only export them when necessary.
3. Networks and RPC:
- Network Selection: Besides the Ethereum mainnet, Metamask supports various test networks and custom networks. You can add, manage, and switch between different networks as per your development or exploration requirements.
- Custom RPC: If you are connected to a custom Ethereum network, you can configure the RPC (Remote Procedure Call) endpoint, including the URL, chain ID, and network name.
4. Advanced Settings:
- Gas Fee Customization: You have the option to manually adjust the gas fees for your transactions based on your desired speed and cost. Metamask also provides recommendations for gas fees depending on network conditions.
- Security Warnings: Metamask can display additional warnings and confirmations for potentially risky transactions and interactions with unknown contracts. These warnings serve as an extra layer of caution and allow you to review and confirm critical actions.
- Experimental Features: Metamask occasionally introduces experimental features that are still under development. You can enable or disable these features to explore upcoming functionalities but keep in mind that they might carry potential risks.
By customizing your Metamask settings, you can adapt the wallet to your specific preferences, requirements, and security practices. It is essential to make informed decisions while customizing settings and regularly review and update them to align with your evolving needs within the Ethereum ecosystem.
Tips and Tricks for Using Ethereum Metamask Effectively
Metamask is a powerful tool that allows you to securely manage your Ethereum assets and interact with decentralized applications (DApps) on the Ethereum blockchain. To make the most out of your Metamask experience, here are some tips and tricks to consider:
1. Keep Your Software Up to Date: Regularly check for updates to ensure you have the latest version of Metamask. Updates often include bug fixes, security enhancements, and new features that enhance the overall performance and functionality of the wallet.
2. Protect Your Wallet and Private Keys: Safeguarding your wallet and private keys is crucial for maintaining the security of your funds. Use strong and unique passwords, enable biometric authentication if available, and keep your backup phrase or JSON file in a secure location offline. Be cautious of phishing attempts and only enter your wallet details on trusted and verified websites.
3. Double-Check Transaction Details: Before confirming any transaction, carefully review the recipient address, transaction amount, and gas fee to ensure accuracy. Mistakes in transaction details may result in irreversible loss of funds.
4. Use Hardware Wallet Integration: If you have a hardware wallet like Ledger or Trezor, consider connecting it to Metamask for additional security. This integration ensures that your private keys never leave the secure hardware device, mitigating the risk of potential hacks or theft.
5. Explore DApps and DeFi Projects: Metamask opens the door to a multitude of DApps and decentralized finance (DeFi) projects. Explore various DApps for trading, lending, borrowing, staking, or participating in NFT marketplaces. Stay up to date with the latest developments and conduct thorough research before engaging with any DApp.
6. Be Mindful of Gas Fees: Gas fees are a vital aspect of Ethereum transactions. Keep an eye on the network congestion and fluctuating gas prices to determine optimal gas fee settings for your transactions. Consider using gas fee prediction tools or adjusting gas fees for speed and cost efficiency.
7. Customize Your Token List: Metamask allows you to customize the list of tokens displayed in your wallet. Prioritize tokens you frequently use or track by manually adding them to your token list. This customization can help you manage your portfolio more effectively.
8. Follow Reputable Sources for Updates: Stay informed about the latest news, updates, and security advisories related to Metamask and Ethereum. Follow official Metamask channels, Ethereum community forums, and reputable sources to stay ahead of potential vulnerabilities and emerging trends.
9. Backup and Export Your Wallet Regularly: Make periodic backups of your wallet by exporting the JSON file or recording your secret backup phrase. Keep multiple copies of your backups in secure offline locations. Regularly test your backup procedures to ensure they are accurate and accessible in case of emergencies.
10. Join the Metamask Community: Engage with the Metamask community and participate in forums, social media groups, and developer communities. Interacting with the community can help you stay updated, learn new tips, and address any questions or issues you may encounter.
By implementing these tips and tricks, you can optimize your Metamask experience, enhance the security of your wallet, and make the most out of your interactions within the Ethereum ecosystem.