Introduction
Are you eager to transfer the captivating videos captured on your Canon camcorder to your computer for editing, sharing, or safekeeping? Whether you're a budding filmmaker, a passionate vlogger, or a family documentarian, the process of transferring videos from your Canon camcorder to your computer is an essential skill to master. This guide will walk you through the various methods to seamlessly transfer your videos, empowering you to unleash your creativity and share your visual stories with the world.
Transferring videos from your Canon camcorder to your computer not only allows you to free up space on your camcorder's memory card but also provides a convenient way to edit and organize your footage. By following the steps outlined in this guide, you will gain the confidence to effortlessly transfer your videos, opening up a world of possibilities for editing, archiving, and sharing your precious moments.
Whether you prefer the convenience of a USB cable, the flexibility of a memory card reader, or the feature-rich Canon software, this guide will equip you with the knowledge to choose the method that best suits your needs. So, grab your Canon camcorder, fire up your computer, and let's dive into the exciting world of video transfer!
Step 1: Connect Your Canon Camcorder to Your Computer
Before embarking on the video transfer process, it’s crucial to establish a physical connection between your Canon camcorder and your computer. This step serves as the foundation for the seamless transfer of your captivating video footage. Here’s how to get started:
- Locate the USB Cable: Begin by locating the USB cable that was included with your Canon camcorder. This cable is essential for establishing a direct connection between your camcorder and your computer.
- Power On Your Camcorder: Ensure that your Canon camcorder is powered on and in the appropriate mode for data transfer. Refer to your camcorder’s manual to identify the correct mode for connecting to a computer.
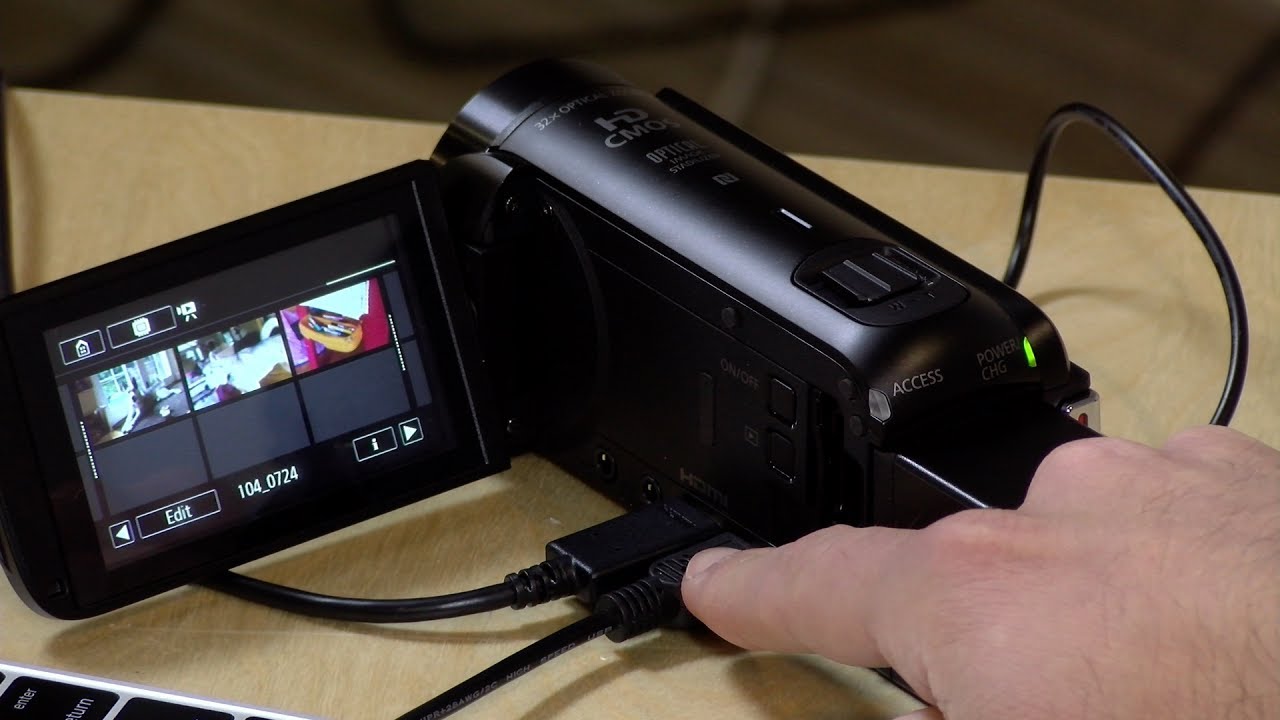
- Connect the USB Cable: With your camcorder powered on, carefully connect one end of the USB cable to the designated port on your camcorder. Next, connect the other end of the cable to an available USB port on your computer. The computer should recognize the connected camcorder as a removable storage device.
- Wait for Recognition: Once the USB cable is connected, allow your computer a few moments to recognize the connected camcorder. Depending on your computer’s operating system, you may see a notification or prompt indicating the successful connection of the camcorder.
By successfully establishing a connection between your Canon camcorder and your computer, you have laid the groundwork for the subsequent steps in the video transfer process. With this physical link in place, you are now ready to explore the various methods for transferring your captivating videos to your computer.
Step 2: Transfer Videos Using Canon Software
Canon provides user-friendly software that facilitates the seamless transfer of videos from your camcorder to your computer. By leveraging Canon’s dedicated software, you can efficiently manage and transfer your video footage with ease. Here’s a step-by-step guide to using Canon software for video transfer:
- Install Canon Software: Begin by installing the Canon software that is compatible with your camcorder model. This software is typically provided on a CD or can be downloaded from Canon’s official website. Follow the installation instructions to set up the software on your computer.
- Connect Your Camcorder: With the Canon software installed, connect your camcorder to your computer using the provided USB cable, as outlined in Step 1. Ensure that your camcorder is powered on and in the correct mode for data transfer.
- Launch the Canon Software: Once your camcorder is connected, launch the Canon software on your computer. The software should detect the connected camcorder and display the available video footage for transfer.
- Select and Transfer Videos: Within the Canon software interface, you can browse the videos stored on your camcorder and select the ones you wish to transfer. Utilize the software’s transfer function to initiate the seamless transfer of your selected videos to your computer’s storage.
- Organize and Archive: After the transfer process is complete, take advantage of the software’s organizational features to categorize and archive your video footage. This step ensures that your videos are easily accessible for editing, sharing, or future viewing.
By utilizing Canon’s dedicated software, you can streamline the video transfer process and take advantage of the software’s additional features for managing and organizing your video library. This method offers a user-friendly interface and a seamless workflow for transferring your captivating videos from your Canon camcorder to your computer.
Step 3: Transfer Videos Using a Memory Card Reader
Utilizing a memory card reader provides an efficient and versatile method for transferring videos from your Canon camcorder to your computer. This approach allows you to directly access the video files stored on the camcorder’s memory card, enabling seamless transfer and management. Here’s how to transfer videos using a memory card reader:
- Remove the Memory Card: Begin by removing the memory card from your Canon camcorder. Most modern camcorders use SD or microSD memory cards, which are widely compatible with memory card readers.
- Insert the Memory Card into the Reader: Insert the memory card into the appropriate slot on the memory card reader. If your computer or laptop is equipped with a built-in card reader, simply insert the memory card into the corresponding slot.
- Connect the Card Reader to Your Computer: Once the memory card is inserted into the reader, connect the card reader to an available USB port on your computer. The computer will recognize the inserted memory card as a removable storage device.
- Access and Transfer Videos: Open the file explorer or designated media management software on your computer to access the contents of the memory card. Navigate to the folder containing your video files and select the videos you wish to transfer. Copy the selected videos to your computer’s storage to initiate the transfer process.
- Eject the Memory Card: After the transfer is complete, safely eject the memory card from the card reader. This ensures that the data transfer is finalized, and the memory card can be safely removed from the reader.
By leveraging a memory card reader, you can swiftly transfer your captivating videos from your Canon camcorder’s memory card to your computer, bypassing the need for direct camcorder-to-computer connections. This method offers flexibility and convenience, making it an ideal choice for users who prefer a straightforward and direct approach to video transfer.
Step 4: Transfer Videos Using a USB Cable
Transferring videos from your Canon camcorder to your computer using a USB cable provides a direct and reliable method for managing your video footage. By establishing a physical connection between your camcorder and computer, you can seamlessly transfer your captivating videos with ease. Here’s a comprehensive guide to transferring videos using a USB cable:
- Locate the USB Cable: Begin by locating the USB cable that was provided with your Canon camcorder. This cable is designed to facilitate data transfer between your camcorder and your computer.
- Connect Your Camcorder: Power on your Canon camcorder and connect one end of the USB cable to the designated port on your camcorder. Next, connect the other end of the cable to an available USB port on your computer.
- Select Data Transfer Mode: Depending on your camcorder model, you may need to select the appropriate data transfer mode on the camcorder. This mode enables the camcorder to establish a data connection with your computer and allows access to the stored video files.
- Access Video Files: Once the connection is established, your computer should recognize the connected camcorder as a removable storage device. Navigate to the camcorder’s storage using the file explorer on your computer to access the video files stored on the device.
- Transfer Videos: Select the videos you wish to transfer and copy them to your computer’s storage. This process initiates the seamless transfer of your captivating videos from the camcorder to your computer, allowing you to organize and edit the footage as desired.
By utilizing a USB cable for video transfer, you can confidently manage and transfer your video footage, leveraging the direct connection between your Canon camcorder and your computer. This method offers a straightforward and efficient workflow, empowering you to curate and organize your videos with ease.
Conclusion
Mastering the art of transferring videos from your Canon camcorder to your computer opens up a world of possibilities for editing, archiving, and sharing your captivating footage. Whether you opt for the convenience of a USB cable, the versatility of a memory card reader, or the feature-rich Canon software, each method offers a seamless way to transfer your videos with ease.
By following the step-by-step guides outlined in this article, you have gained valuable insights into the various methods for video transfer, empowering you to choose the approach that best aligns with your preferences and workflow. Whether you are a creative enthusiast, a professional videographer, or a family historian, the ability to effortlessly transfer your videos enhances your storytelling capabilities and preserves cherished memories.
As you embark on your video transfer journey, consider the unique advantages offered by each method. The direct connection facilitated by a USB cable, the flexibility of a memory card reader, and the user-friendly interface of Canon software provide you with the tools to curate and manage your video library with precision.
With your videos safely transferred to your computer, you are now poised to embark on the exciting process of editing, organizing, and sharing your visual stories. Whether you are crafting cinematic masterpieces, documenting precious family moments, or sharing your passions with the world, the seamless transfer of videos from your Canon camcorder to your computer paves the way for limitless creativity and expression.
Embrace the power of video transfer as a gateway to unleashing your creativity and preserving the moments that matter most. With these methods at your disposal, you are well-equipped to embark on a seamless and rewarding video transfer journey, bringing your visual narratives to life with confidence and ease.