Introduction
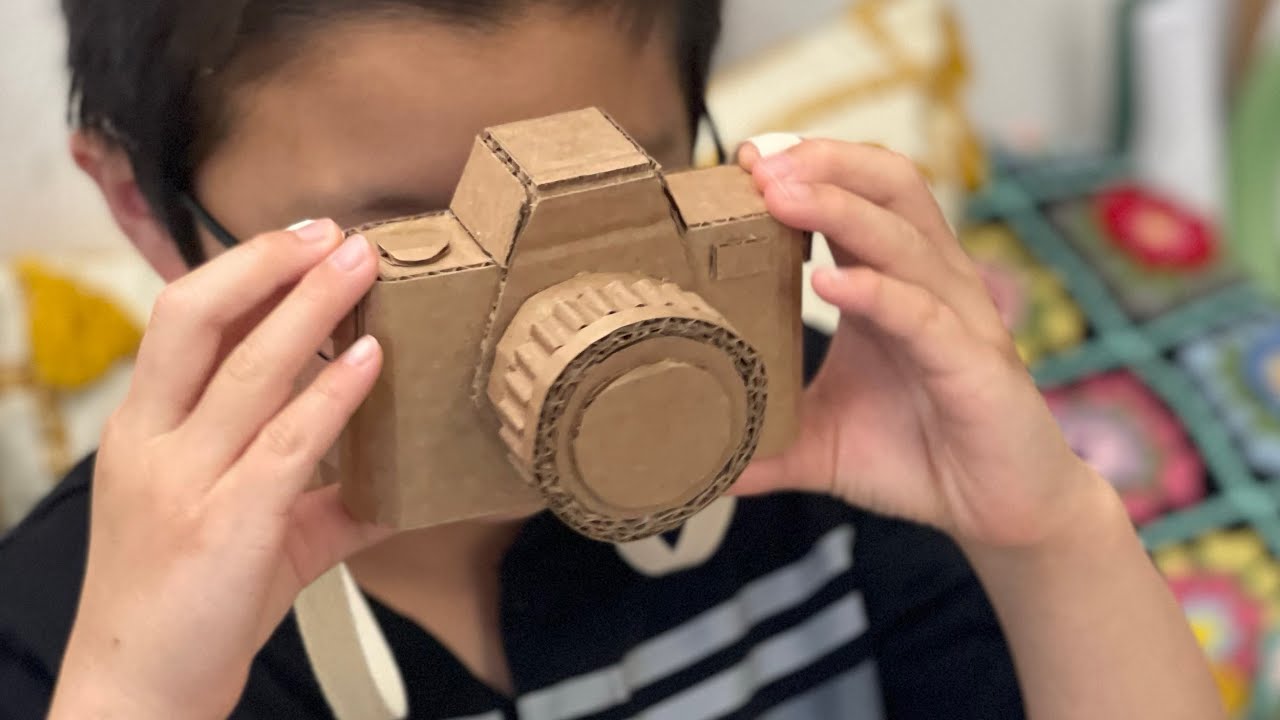
So, you want to capture some amazing moments on camera, but you don't have a camcorder? No worries! With a little creativity and some basic materials, you can make your very own cardboard camcorder. This fun and simple DIY project will not only give you a functional camera but also provide a great opportunity to unleash your artistic side by customizing it to your liking.
Creating a cardboard camcorder is an enjoyable way to explore your imagination and technical skills. It's a fantastic hands-on project for both kids and adults, offering an engaging way to learn about the mechanics of a camcorder while fostering creativity. Plus, the end result is not just a toy; it's a fully functional prop that can be used for filming your own creative projects or simply for fun.
In this guide, we'll walk you through the step-by-step process of creating your very own cardboard camcorder. From gathering the necessary materials to assembling and decorating your camcorder, you'll learn everything you need to know to bring this DIY project to life. Get ready to embark on an exciting journey of crafting and creativity as we dive into the world of cardboard camcorders. So, grab your scissors, glue, and cardboard, and let's get started on this thrilling adventure!
Materials Needed
Before you embark on this exciting cardboard camcorder project, it’s essential to gather all the necessary materials. Here’s a list of items you’ll need to bring your DIY camcorder to life:
- Cardboard: This will serve as the main material for constructing the body of the camcorder. You’ll need sturdy cardboard to ensure the durability of your creation.
- Scissors: A good pair of scissors will be essential for cutting the cardboard into the desired shapes and sizes.
- Glue or Tape: To assemble the various parts of the camcorder, you’ll need a reliable adhesive such as glue or tape.
- Marker or Pen: You’ll use this to trace and mark the cardboard before cutting, ensuring precision in your measurements.
- Plastic Lens: Look for a small plastic lens that can be used as the camera lens for your cardboard camcorder.
- Small Mirror: This will be used to create the viewfinder for your camcorder, allowing you to see what the camera is recording.
- Small Recording Device: You’ll need a small device capable of recording video, such as a smartphone or a small camera, to complete the functionality of your cardboard camcorder.
- Decorative Materials: Optional decorative items such as stickers, markers, or paint to personalize and customize the appearance of your camcorder.
Once you have all these materials gathered, you’ll be well-equipped to begin the exciting process of crafting your very own cardboard camcorder. With these simple items in hand, you’re ready to unleash your creativity and bring your DIY project to life.
Cutting and Assembling the Cardboard Pieces
Now that you’ve gathered all the necessary materials, it’s time to dive into the construction process. Follow these steps to cut and assemble the cardboard pieces into the basic structure of your camcorder:
- Prepare the Template: Start by sketching out a template for the main body of the camcorder on the cardboard. This will include the front, back, and sides of the camcorder, as well as a space for the lens and viewfinder.
- Cut Out the Pieces: Use your scissors to carefully cut out the various pieces according to the template. Take your time to ensure precision in cutting, as this will impact the overall appearance and functionality of the camcorder.
- Assemble the Body: Begin assembling the pieces by using glue or tape to join the front, back, and sides of the camcorder together. Ensure that the pieces are securely attached and that the structure is stable.
- Create the Viewfinder Slot: Cut a small rectangular slot in the cardboard to accommodate the mirror, which will serve as the viewfinder. This slot should be positioned in a way that allows you to comfortably view the reflected image through the viewfinder.
- Secure the Viewfinder: Place the small mirror inside the slot, ensuring that it is positioned at the correct angle to reflect the image from the lens. Use glue to secure the mirror in place.
As you progress through these steps, you’ll begin to see the cardboard pieces come together to form the basic structure of your camcorder. The cutting and assembling phase is crucial, as it sets the foundation for the functional and aesthetic aspects of your DIY creation. Take your time and pay attention to detail to ensure a well-crafted result.
Adding the Lens and Viewfinder
With the basic structure of the cardboard camcorder in place, it’s time to focus on adding the essential components that will bring functionality to your DIY creation. Follow these steps to incorporate the lens and viewfinder into your cardboard camcorder:
- Position the Lens: Determine the ideal placement for the plastic lens on the front of the camcorder. This will serve as the camera lens through which you’ll capture your footage. Use a marker to outline the area where the lens will be inserted.
- Cut the Lens Hole: Carefully cut out the marked area to create a precise opening for the lens. Take your time with this step to ensure that the lens fits securely and aligns properly with the recording device.
- Secure the Lens: Once the opening is ready, insert the plastic lens and use glue to secure it in place. Ensure that the lens is positioned accurately and that it allows for clear and unobstructed recording.
- Adjust the Viewfinder: With the lens in place, adjust the position of the small mirror inside the viewfinder slot to ensure that it reflects the image captured by the lens. This adjustment is crucial for achieving a clear and accurate view through the viewfinder.
- Test the Functionality: Before proceeding, test the functionality of the lens and viewfinder by looking through the viewfinder and verifying that the image from the lens is reflected correctly. Make any necessary adjustments to ensure optimal performance.
As you complete these steps, your cardboard camcorder will begin to take on the appearance and functionality of a real camcorder. The addition of the lens and viewfinder brings your DIY creation one step closer to being a fully operational recording device. With these components in place, you’re ready to move on to the next phase of the project and bring your cardboard camcorder to life.
Attaching the Recording Device
Now that the structural and functional elements of your cardboard camcorder are in place, it’s time to integrate the recording device that will capture your videos. Whether it’s a smartphone, a small camera, or another recording device, follow these steps to securely attach it to your DIY camcorder:
- Select the Mounting Location: Determine the ideal placement for the recording device on the cardboard camcorder. This location should provide easy access to the device’s controls and ensure that the lens aligns properly with the opening in the cardboard.
- Create a Secure Mount: Using a combination of glue, tape, or other suitable fasteners, create a secure mount for the recording device on the camcorder. Ensure that the device fits snugly and is held firmly in place to prevent any movement during use.
- Align the Lens: Once the recording device is mounted, verify that its lens aligns perfectly with the plastic lens on the cardboard camcorder. This alignment is crucial for capturing clear and focused footage without any obstructions.
- Test the Setup: Before finalizing the attachment, conduct a test to ensure that the recording device functions properly while integrated with the cardboard camcorder. Check the view through the viewfinder and verify that the device can record video without any hindrances.
- Secure Any Loose Cables: If the recording device requires any cables for charging or data transfer, secure them neatly along the camcorder’s body to prevent tangling or interference with the recording process.
By following these steps, you’ll successfully integrate the recording device into your cardboard camcorder, transforming it into a fully functional and versatile tool for capturing videos. With the recording device securely attached, you’re now ready to put your DIY camcorder to the test and unleash your creativity through the lens of your handmade creation.
Decorating Your Cardboard Camcorder
With the functional aspects of your cardboard camcorder in place, it’s time to unleash your creativity and personalize its appearance. Decorating your DIY creation not only adds a touch of personality but also makes it visually appealing. Follow these steps to add flair and individuality to your cardboard camcorder:
- Choose a Theme: Decide on a theme or color scheme for your camcorder. Whether it’s vibrant and colorful or sleek and professional, selecting a theme will guide your decorating choices.
- Customize with Stickers and Decals: Use stickers, decals, or adhesive decorations to embellish the surface of the cardboard camcorder. You can add patterns, symbols, or even faux buttons to enhance its visual appeal.
- Personalize with Markers or Paint: Express your creativity by drawing and painting directly onto the cardboard surface. Add designs, patterns, or even your name to make the camcorder uniquely yours.
- Incorporate Textures: Consider using textured materials such as fabric, ribbon, or textured paper to add dimension and tactile interest to the camcorder’s exterior. These elements can enhance the overall look and feel of your creation.
- Protective Coating (Optional): If you wish to preserve the decorations and add durability to the camcorder, consider applying a clear protective coating or adhesive laminate to the decorated surface. This will safeguard your creative additions from wear and tear.
By following these steps, you’ll transform your cardboard camcorder into a visually captivating and personalized creation. Whether you opt for a whimsical and playful design or a sleek and professional aesthetic, the decorating process allows you to infuse your unique style into your DIY camcorder. Once adorned with your creative touch, your cardboard camcorder will be a true reflection of your imagination and artistic flair.
Conclusion
Congratulations on completing the exciting journey of creating your very own cardboard camcorder! Through this DIY project, you’ve not only crafted a functional recording device but also unleashed your creativity and technical skills. Your cardboard camcorder is a testament to the power of imagination and resourcefulness, showcasing the endless possibilities that can be achieved with simple materials and a touch of ingenuity.
As you reflect on the process of designing and assembling your cardboard camcorder, you’ve gained valuable hands-on experience in crafting, problem-solving, and technical integration. This project has provided a platform for exploration and learning, allowing you to understand the mechanics of a camcorder while expressing your individuality through the customization process.
Furthermore, your cardboard camcorder serves as a reminder of the boundless potential for creativity in everyday objects. It’s a testament to the fact that innovation and inspiration can be found in the most unexpected places, and that with a dash of imagination, anything is possible.
Whether you choose to use your cardboard camcorder for filming creative projects, capturing memorable moments, or simply as a unique decorative piece, its value lies in the joy and pride that comes from creating something with your own hands. Your DIY camcorder is a symbol of your ability to transform humble materials into a functional work of art, and it stands as a testament to your resourcefulness and creativity.
As you admire your completed cardboard camcorder, remember the journey of exploration and discovery that brought it to life. Embrace the spirit of creativity, and let your cardboard camcorder inspire you to embark on future DIY projects, each one a testament to your unique vision and inventive spirit.


