Introduction
Welcome to the world of acoustic guitar amplification! If you want to take your acoustic guitar playing to the next level and share your music with larger audiences, installing a pickup in your acoustic guitar is a great option. A pickup allows you to amplify the sound of your guitar, making it louder and projecting it through an amplifier or PA system.
Whether you’re a seasoned musician or just starting your musical journey, installing a pickup in an acoustic guitar may seem like a daunting task. But fear not – with the right tools, materials, and a little guidance, you can easily transform your acoustic guitar into an amplified instrument.
In this article, we’ll walk you through the step-by-step process of installing a pickup in your acoustic guitar. We’ll cover everything from choosing the right pickup for your needs to wiring it up and testing it out. By the end, you’ll have the knowledge and confidence to install a pickup and start rocking out with your acoustic guitar in no time.
Before we dive into the process, let’s go over the tools and materials you’ll need for this project.
Tools and Materials Needed
Before getting started, gather the following tools and materials:
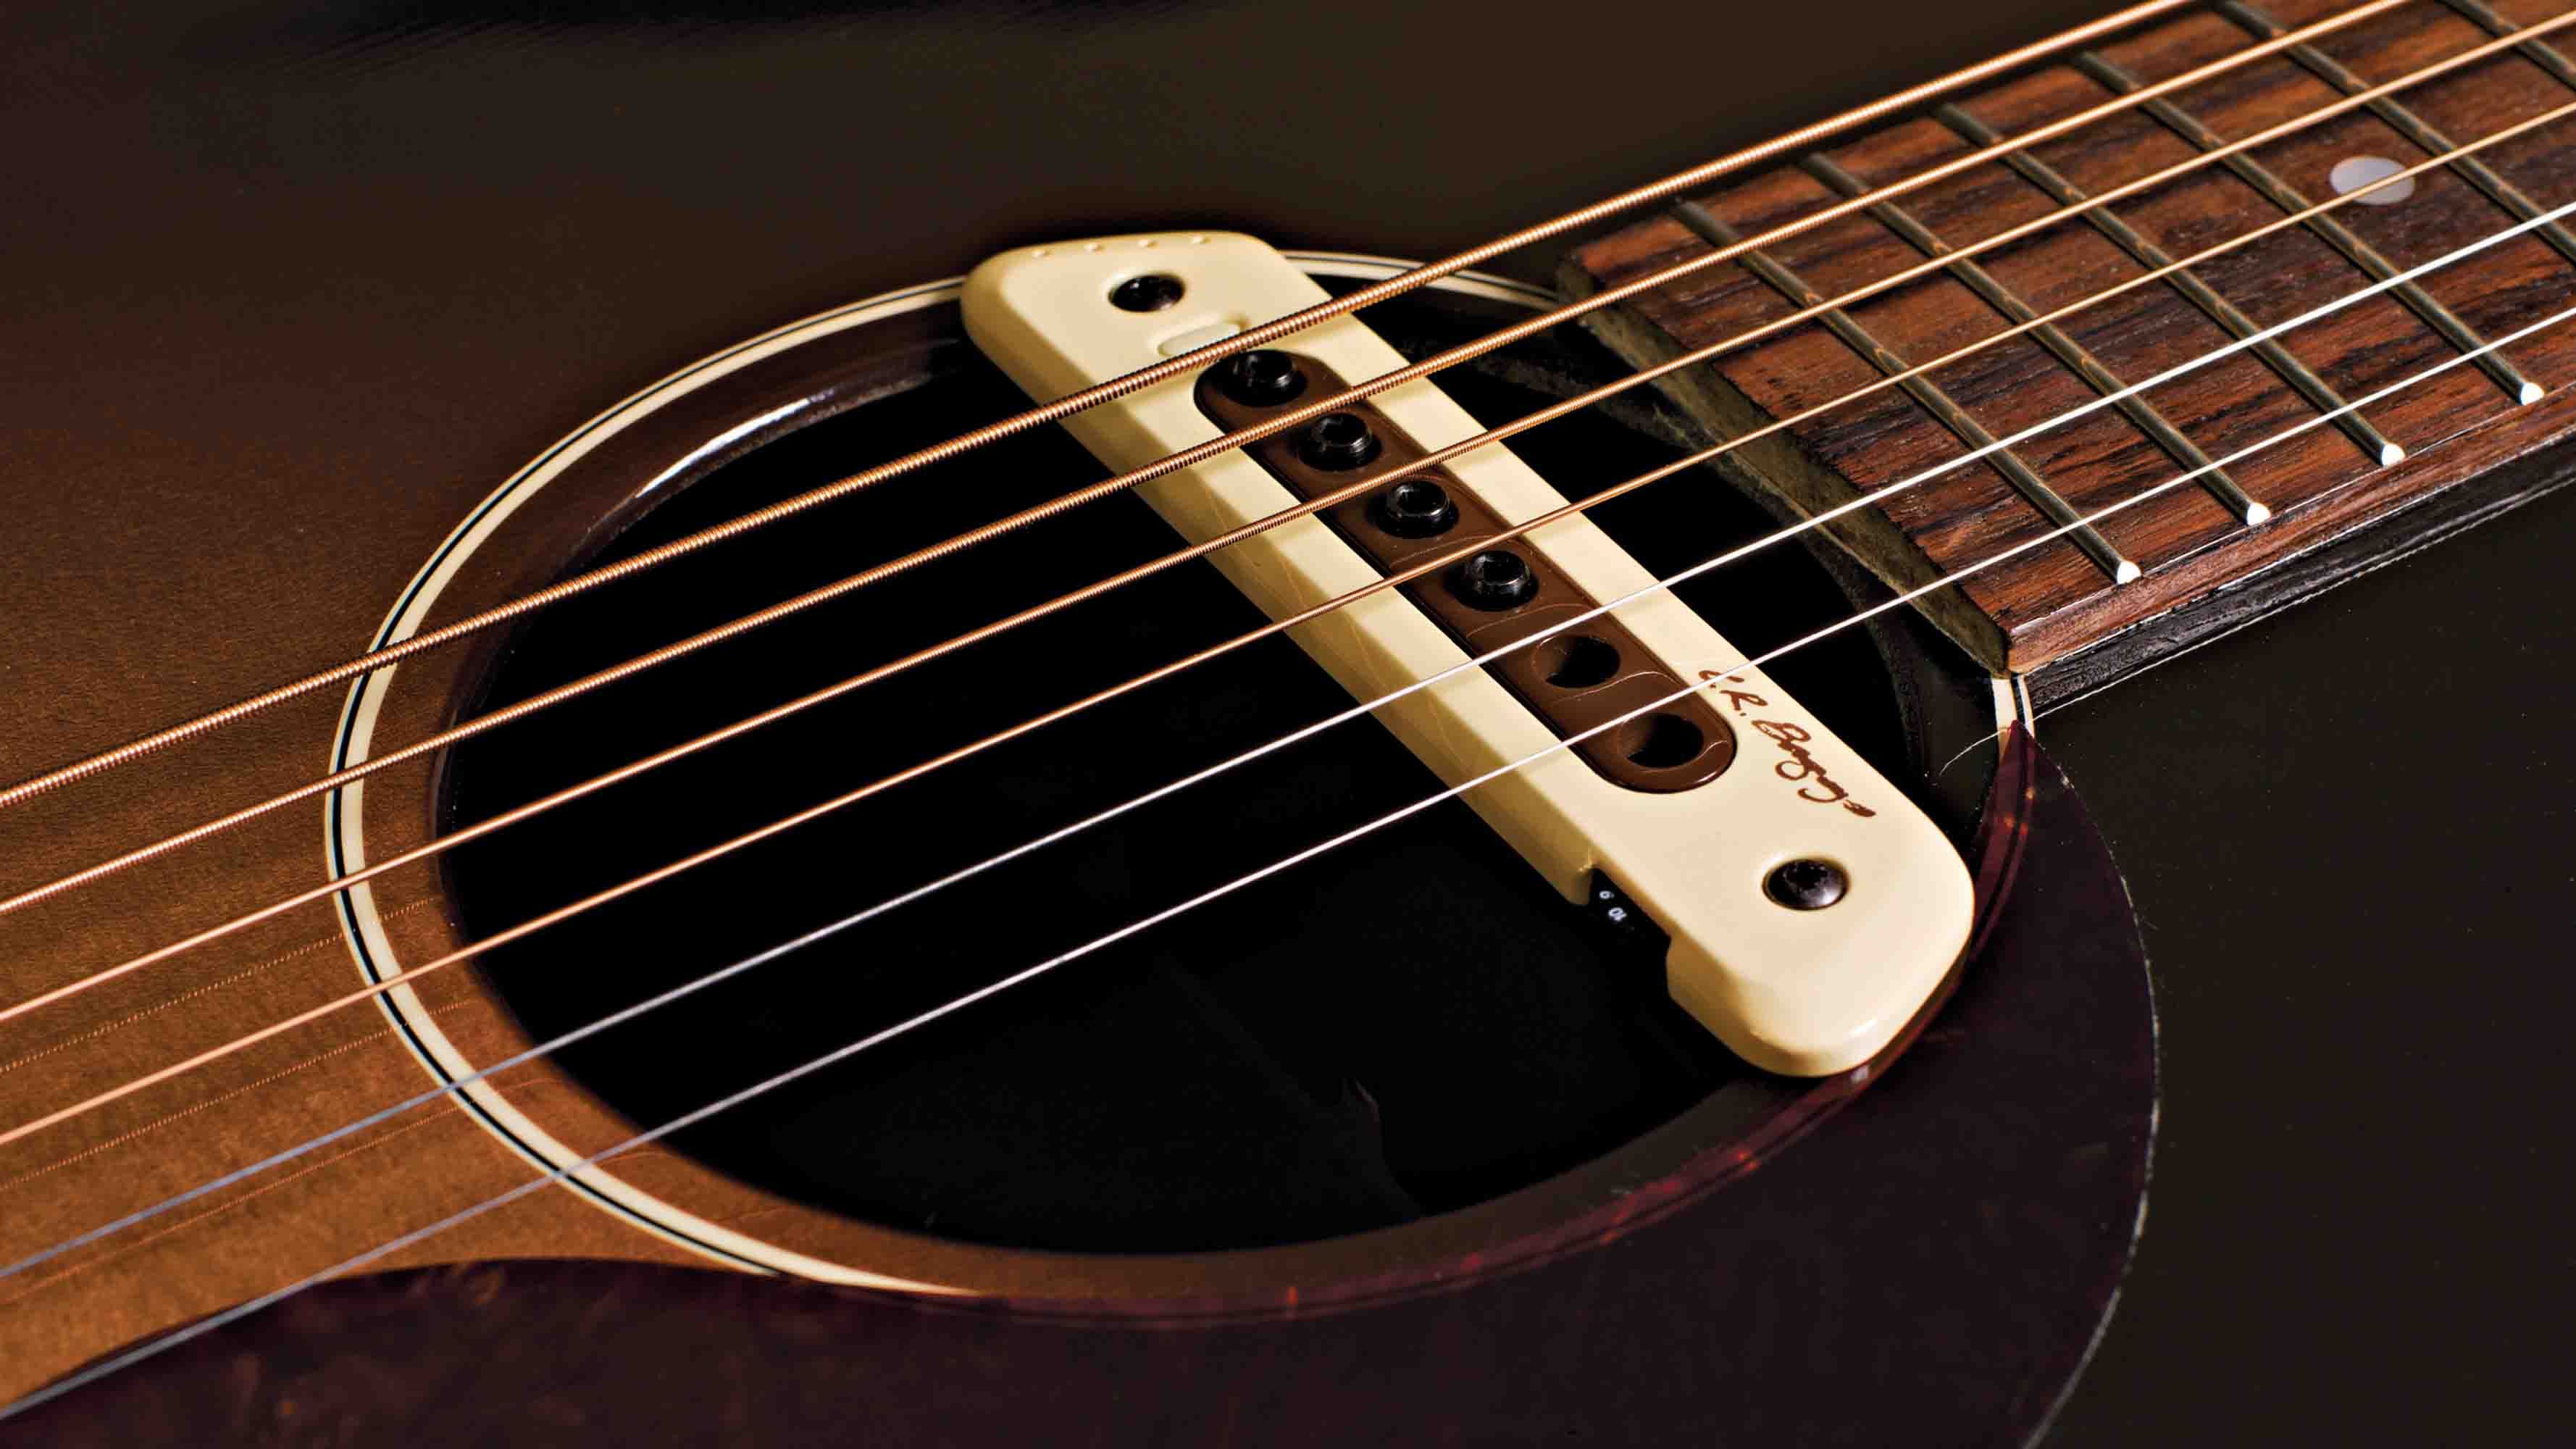
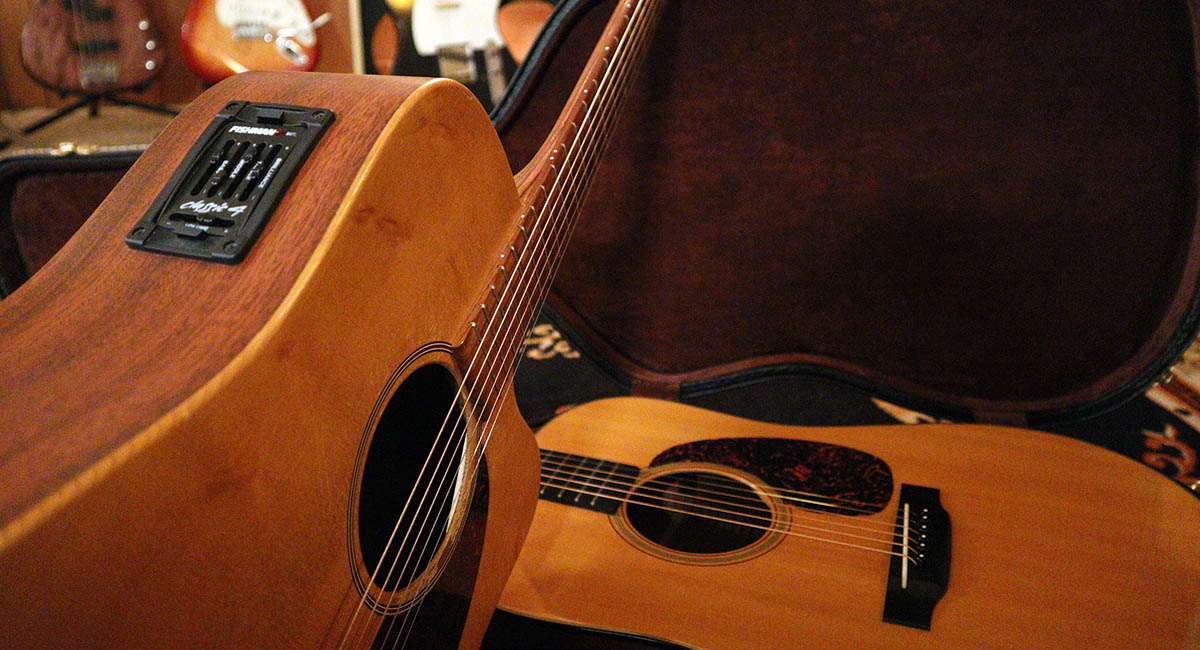
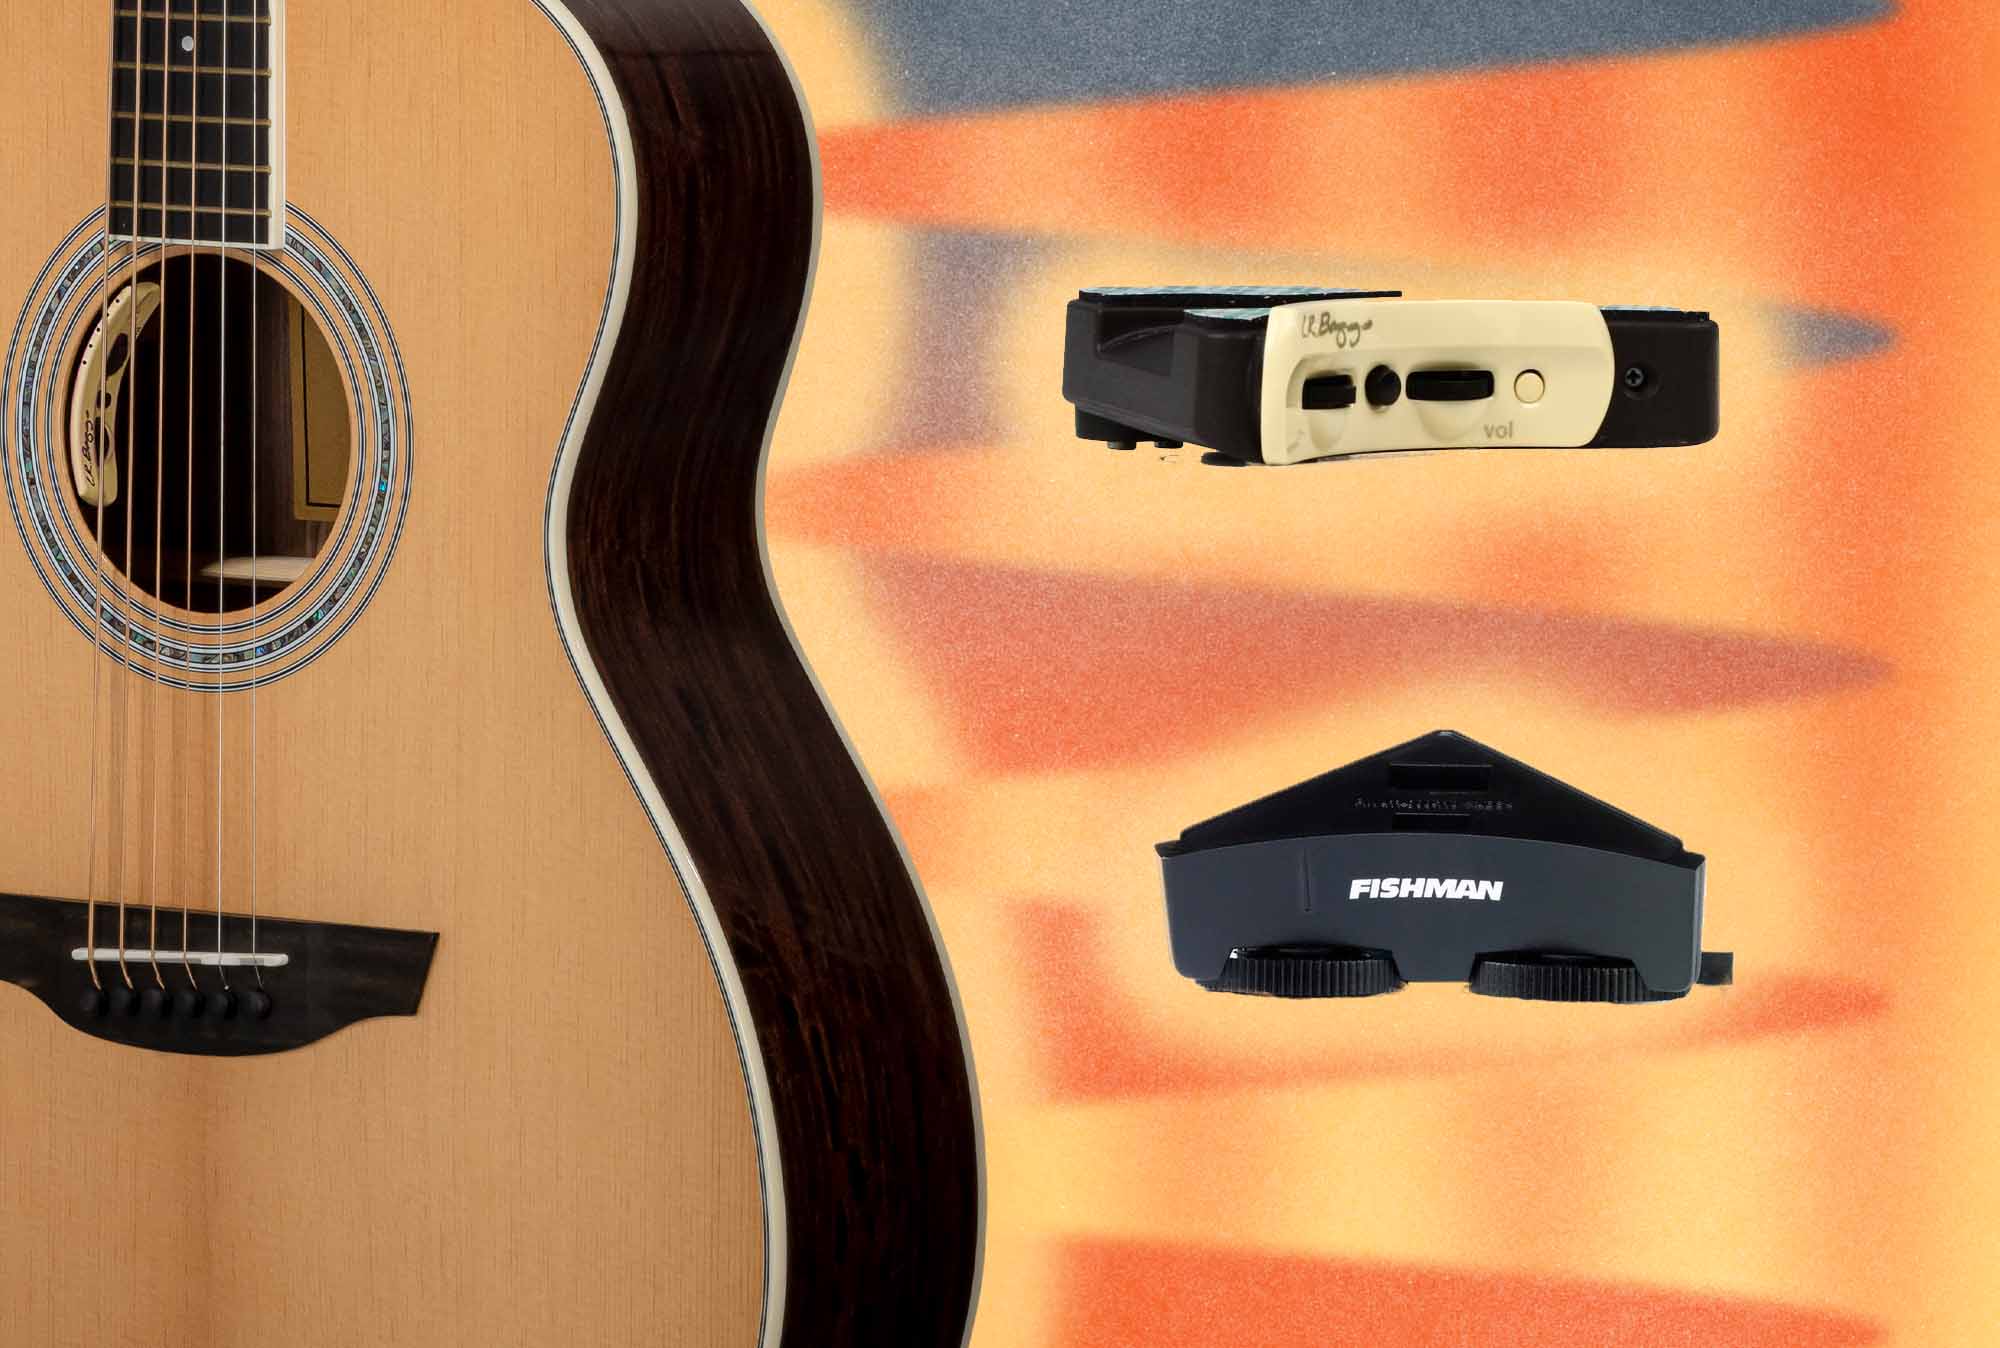
- Acoustic guitar pickup: There are several types of pickups available, including soundhole pickups, undersaddle pickups, and soundboard transducer pickups. Choose the one that best suits your playing style and sound preferences.
- Wire cutters: You’ll need wire cutters to trim and strip the wires during the installation process.
- Soldering iron and solder: These are necessary for soldering the wires and making connections.
- Phillips screwdriver: Most pickups require some screwing or mounting, so have a Phillips screwdriver on hand.
- Masking tape: This will come in handy for marking positions or securing parts of the guitar during the installation.
- Electrical tape: Use this to insulate and secure the connections.
- Pliers: Pliers can be useful for bending, pulling, or maneuvering wires and components.
- Wire stripper: If you don’t have wire cutters with built-in stripping capabilities, a wire stripper will be necessary.
- Small flashlight: A small flashlight can help illuminate tight spaces for better visibility during installation.
- Replacement strings: It’s a good idea to have a set of replacement strings on hand in case any strings get damaged during the process.
Having these tools ready will ensure a smooth and efficient installation process. Once you have everything prepared, we can move on to the first step: choosing the right pickup for your acoustic guitar.
Step 1: Choosing the Right Pickup
When it comes to choosing a pickup for your acoustic guitar, there are a few factors to consider. The pickup you select will greatly impact the sound and performance of your instrument, so take some time to research and find the best option for your needs.
First, decide on the type of pickup you want to use. There are several options available:
- Soundhole pickups: These pickups are mounted in the soundhole of the guitar and are easy to install. They provide a balanced tone and are suitable for various playing styles.
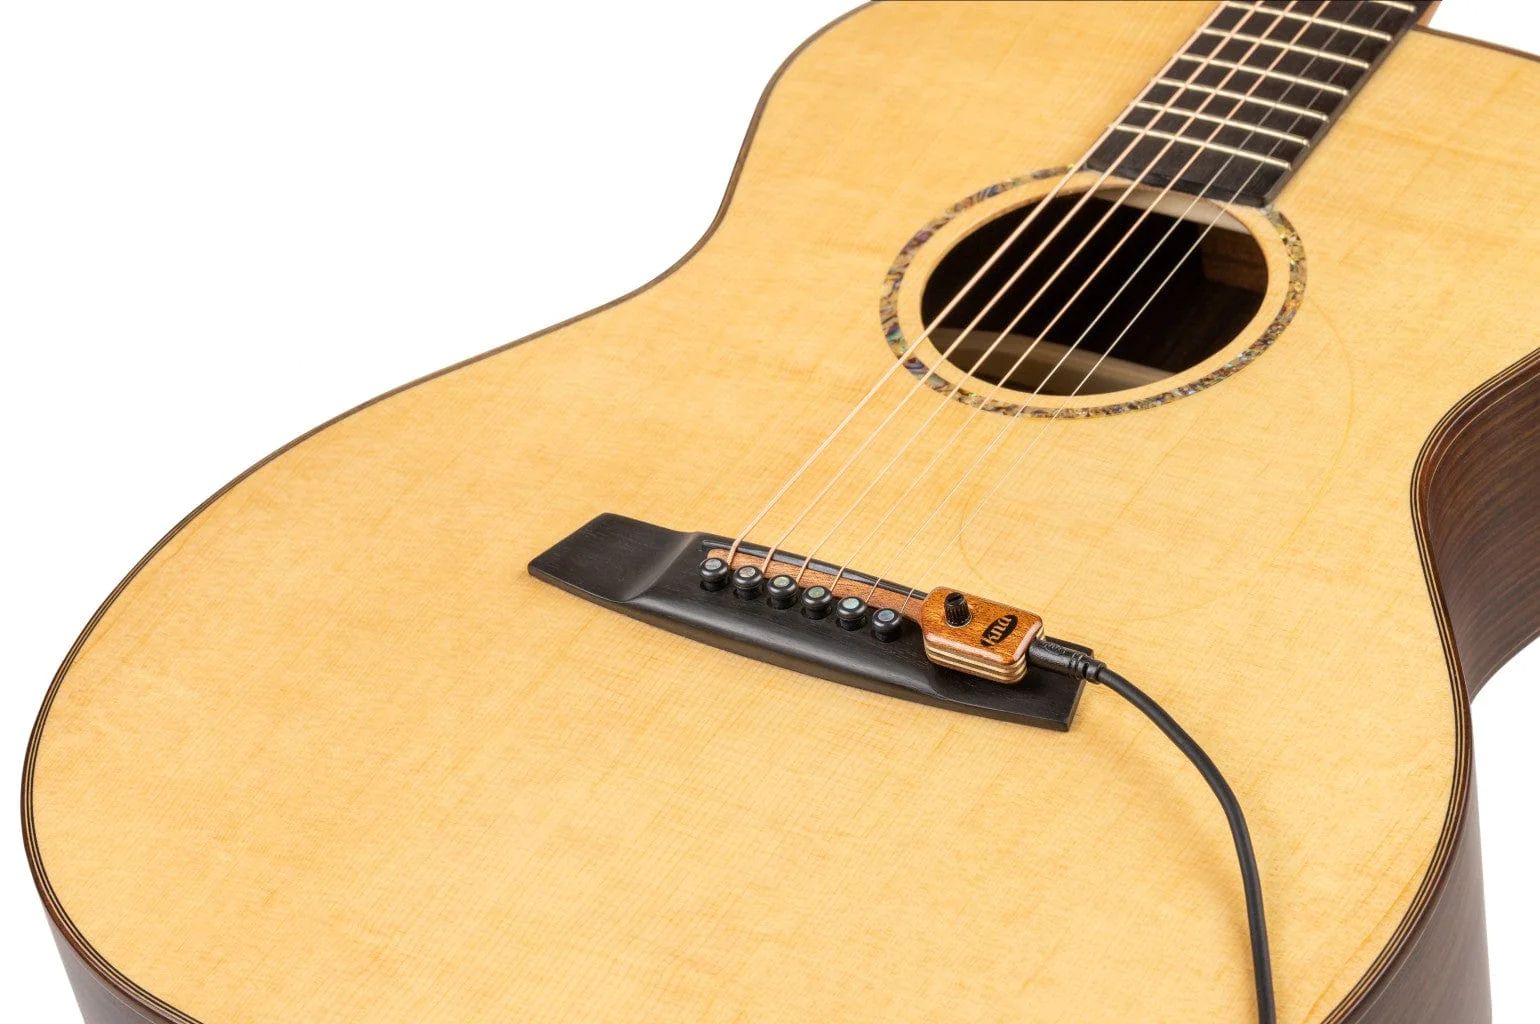
- Undersaddle pickups: These pickups are installed under the saddle of the guitar and provide a clear and natural representation of the guitar’s acoustic sound. They are commonly used in professional settings.
- Soundboard transducer pickups: These pickups are attached to the soundboard of the guitar and capture the vibrations directly, resulting in a rich and dynamic tone.
Consider your playing style and the sound you want to achieve. If you’re primarily playing in a band or amplified setting, undersaddle pickups may be the best choice for their clear and focused sound. If you’re performing solo or in a smaller setting, soundhole pickups or soundboard transducer pickups can offer a more natural and resonant tone.
Additionally, take into account your budget and any specific features you may require. Some pickups offer built-in tone controls or blend options to adjust the sound to your liking. Research different brands and models, read reviews, and consult with guitar experts to make an informed decision.
Once you’ve chosen the right pickup for your acoustic guitar, you’re ready to move on to the next step: removing the strings.
Step 2: Removing the Strings
Before you start the installation process, it’s important to remove the strings from your acoustic guitar. This step will allow for easier access to the guitar’s body and make the pickup installation smoother.
Here’s how to remove the strings:
- Loosen the tension: Begin by loosening the tuning pegs for each string. Turn the pegs counterclockwise to lower the pitch and release the tension.
- Remove the bridge pins: Look for the bridge pins near the bridge of the guitar. Use a bridge pin puller or pliers to gently lift and remove the pins. Be careful not to damage the bridge or the guitar’s top.
- Remove the strings: Once the bridge pins are removed, unwind the strings at the tuning pegs and thread them out from the bridge. You can choose to cut the strings with wire cutters if desired.
Make sure to remove all the strings from the guitar. Once they’re all removed, set them aside for disposal or restringing later.
Removing the strings will give you a clear workspace to continue with the pickup installation. It’s also a good opportunity to clean and inspect your guitar, checking for any loose parts or debris that may interfere with the installation process.
Now that your guitar is string-less and ready to go, we can move on to the next step: prepping the guitar body.
Step 3: Prepping the Guitar Body
Once the strings are removed from your acoustic guitar, it’s time to prepare the guitar body for the pickup installation. This step involves creating space for the pickup and ensuring a secure mounting surface.
Follow these steps to prep the guitar body:
- Clean the guitar body: Use a soft cloth or guitar cleaning solution to wipe down the guitar body, removing any dust, dirt, or oils that may affect the pickup’s adhesive or mounting.
- Position the pickup: Decide on the ideal placement of the pickup on your guitar body. This will depend on the type of pickup you’re installing, as each type has specific placement requirements. Refer to the manufacturer’s instructions for guidance.
- Mark the mounting spot: Once you’ve determined the pickup’s position, use a piece of masking tape to mark the exact spot on the guitar body. This will help ensure accurate placement during the installation process.
- Prepare the mounting surface: If your pickup requires adhesive mounting, lightly sand the area on the guitar body where the pickup will be attached. This will promote a better bond between the pickup and the guitar body.
It’s essential to be precise when marking the pickup’s position and preparing the mounting surface. Proper placement and preparation will contribute to the optimal performance and stability of the pickup.
With the guitar body prepped, you’re ready to move on to the next step: mounting the pickup on your acoustic guitar.
Step 4: Mounting the Pickup
Now that your guitar body is prepped, it’s time to mount the pickup. The mounting process will vary depending on the type of pickup you’ve chosen. Here are the general steps to follow:
- Refer to the manufacturer’s instructions: Before mounting the pickup, carefully read the instructions provided by the pickup’s manufacturer. This will ensure that you follow any specific guidelines or recommendations for a successful installation.
- Attach the pickup: If you’re using a soundhole pickup, simply place it in the soundhole of the guitar, positioning it based on your markings. Make sure the pickup is centered and securely seated in the soundhole.
- Secure with adhesive: For pickups that require adhesive mounting, apply a small amount of adhesive to the back of the pickup. Carefully position it on the prepared mounting spot and press it firmly against the guitar body. Follow the manufacturer’s instructions for drying and curing times.
- Secure with screws or tape: Some pickups may require further securing with screws or tape. If screws are needed, align the screw holes on the pickup with the pre-drilled holes on the guitar body and gently screw them in. If tape is required, carefully apply it to ensure the pickup is held securely in place.
Throughout the mounting process, it’s crucial to handle the pickup with care and avoid placing excessive pressure on its delicate components. Take your time to ensure the pickup is properly positioned and securely attached to the guitar body.
Once the pickup is mounted, you’re ready to move on to the next step: wiring the pickup for optimal functionality and sound.
Step 5: Wiring the Pickup
After successfully mounting the pickup on your acoustic guitar, the next step is to wire it up. This process involves connecting the pickup to the output jack, allowing the amplified sound to be sent to an amplifier or PA system. Here’s how to wire the pickup:
- Prepare the wires: Begin by preparing the pickup wires for connection. Strip off a small portion of insulation from the ends of the wires using a wire stripper.
- Locate the output jack: Locate the output jack on your guitar. This is usually located at the endpin, tailpiece, or side of the guitar body. Unscrew the jack plate and carefully pull out the jack to access the wiring.
- Solder the wires: Identify the connections on the output jack. Typically, you will find a hot lead and a ground lead. Solder the hot lead wire to the hot connection and the ground lead wire to the ground connection. Ensure that the connections are secure and properly soldered.
- Insulate the connections: Once the wires are soldered to the output jack, insulate the connections with electrical tape or heat shrink tubing. This will protect the connections from any accidental damage and ensure a secure and reliable connection.
- Test the connections: Before reassembling the output jack, it’s a good idea to test the connections and make sure the pickup is functioning properly. Plug in your guitar to an amplifier or PA system, strum the strings, and listen for the amplified sound.
Take your time when wiring the pickup and double-check each connection to ensure they are correct and secure. If you’re unsure about the wiring process, it’s always recommended to consult a professional guitar technician or seek guidance from experienced individuals.
With the pickup wired up, you’re almost there! The next step is to test the pickup and make any necessary adjustments for optimal performance.
Step 6: Testing the Pickup
After wiring the pickup in your acoustic guitar, it’s important to test it out and ensure that it’s working as intended. Testing the pickup will help you identify any issues or adjustments that may be needed before finalizing the installation. Follow these steps to test the pickup:
- Plug in your guitar: Connect your guitar to an amplifier or PA system using a guitar cable. Make sure the amplifier is turned on and the volume is set to an appropriate level.
- Strum the strings: Begin by strumming the strings of your guitar. Listen for the amplified sound coming through the amplifier or PA system. Pay attention to the clarity, volume, and overall tone of the sound.
- Adjust pickup height: If you notice any issues with the sound, such as low output or excessive feedback, you may need to adjust the height of the pickup. Use a screwdriver to raise or lower the pickup according to the manufacturer’s instructions.
- Check for balance: Play each string individually and listen for any inconsistencies in volume or tone. Adjust the pickup height or pole pieces if necessary to achieve a balanced sound across all strings.
- Test different settings: If your pickup has built-in tone controls or blending options, experiment with different settings to find the sound that best suits your preferences. Take note of any changes in tone and adjust accordingly.
During the testing process, take your time and listen carefully to ensure that the pickup is performing to your satisfaction. If you encounter any technical issues or are unsure about any adjustments, it’s always advisable to seek guidance from a professional guitar technician.
Once you’re satisfied with the performance of the pickup, it’s time to move on to the final step: re-stringing your acoustic guitar.
Step 7: Re-stringing the Guitar
With the pickup successfully tested and adjusted, it’s time to re-string your acoustic guitar. Re-stringing is an essential step to ensure optimal playability and sound quality. Follow these steps to re-string your guitar:
- Choose the right strings: Select a set of strings that suits your playing style and preferences. Consider factors such as gauge (thickness), material, and brand. Consult the manufacturer’s guidelines or seek recommendations from experienced guitarists.
- Thread the strings: Begin with the thinnest string (usually the high E string) and carefully thread it through the bridge, securing it with the bridge pins. Repeat this process for each string, working your way to the thickest string (usually the low E string).
- Stretch the strings: Once all the strings are threaded and secured, gently pull each string away from the guitar body to stretch them. This helps to minimize tuning instability later on. Tune the strings to their desired pitch.
- Trim excess string length: After tuning, use wire cutters to trim the excess string length near the tuning pegs. Leave a small amount of slack to ensure proper tension and prevent any slipping.
- Tune and adjust: Tune the guitar to its desired tuning and play each string to ensure they are properly set and in tune. Make any necessary adjustments to the tuning or string height to achieve the best playability.
Re-stringing your guitar not only improves its performance but also gives you the opportunity to experiment with different string brands or compositions to find the sound that fits your preferences.
Once you’ve completed the re-stringing process, take a moment to appreciate your newly installed pickup and the enhanced sound and versatility it brings to your acoustic guitar.
Congratulations! You have successfully installed a pickup in your acoustic guitar. Now you can enjoy amplified performance, whether you’re playing solo or with a band.
Conclusion
Installing a pickup in your acoustic guitar opens up a whole new world of possibilities, allowing you to amplify your sound and share your music on a larger scale. With the right tools, materials, and a step-by-step approach, you can achieve a successful pickup installation and enjoy the benefits of amplified acoustic guitar playing.
Throughout this guide, we have walked you through the process, from choosing the right pickup for your needs, to removing the strings, prepping the guitar body, mounting the pickup, wiring it up, testing the sound, and re-stringing the guitar. Each step is crucial in ensuring a seamless and functional installation.
Remember to take your time, follow manufacturer’s instructions, and consult professionals if needed. Installing a pickup may require some technical knowledge, but with a little patience and attention to detail, it is definitely manageable for any guitar enthusiast.
Once you have completed the installation, take the time to enjoy the amplified sound of your acoustic guitar. Experiment with different settings and tones, and discover how the pickup enhances your playing experience. Whether you’re performing on stage, recording in the studio, or simply jamming with friends, your newly installed pickup will add a new level of versatility to your acoustic guitar.
Now that you have the knowledge and confidence to install a pickup in your acoustic guitar, it’s time to start making music and sharing your talent with the world. So go ahead, pick up your guitar, plug in, and let your amplified sound soar!