Introduction
Welcome to our step-by-step guide on how to install a Honeywell Smart Thermostat in place of the Maple Chase Thermostat. Upgrading to a smart thermostat not only provides convenience and energy savings but also adds a touch of modern technology to your home. In this article, we will walk you through the process of replacing your existing thermostat with the Honeywell Smart Thermostat, ensuring a smooth transition and efficient operation.
Smart thermostats are designed to optimize energy usage and allow remote control and monitoring through a smartphone or voice assistants like Amazon Alexa or Google Assistant. By replacing your Maple Chase Thermostat with a Honeywell Smart Thermostat, you’ll be able to take advantage of features like programmable schedules, geofencing, and energy usage reports.
Before we dive into the installation process, it’s essential to gather the necessary tools and equipment. Ensuring you have everything on hand will save time and minimize any disruption to your home’s heating and cooling systems. Let’s take a look at what you’ll need before getting started.
What You Will Need
Before you begin the installation process, gather the following tools and equipment:
- Honeywell Smart Thermostat: Purchase a Honeywell Smart Thermostat model that is compatible with your HVAC system and suits your preferences. Ensure it comes with all the necessary components such as the thermostat unit, baseplate, and wiring connectors.
- Screwdriver Set: Have a set of screwdrivers handy, including both flathead and Phillips-head varieties. This will be used to remove the Maple Chase Thermostat and install the Honeywell Smart Thermostat.
- Wire Labels: It’s beneficial to have wire labels or stickers ready. These will help you keep track of the wires’ original positions during the installation process, making it easier to connect them correctly to the new thermostat.
- Drill and Drill Bits (Optional): Depending on your specific installation requirements, you may need a drill and appropriate drill bits. This will be necessary if you encounter any challenges with mounting the Honeywell Smart Thermostat.
- Level: To ensure that the thermostat is perfectly straight when mounted on the wall, use a level. This will help you achieve a professional and aesthetically pleasing installation.
- Wi-Fi Network Information: For the Honeywell Smart Thermostat to connect to your home’s Wi-Fi network, have your network name (SSID) and password on hand. This will facilitate the setup and enable remote control functionality.
- Mobile Device or Computer: To complete the initial setup and connect the Honeywell Smart Thermostat to your Wi-Fi network, a mobile device with the Honeywell Home app or a computer with internet access will be required.
Having these tools and equipment ready will ensure a smooth and efficient installation process. Once you have everything prepared, you can proceed to the next steps, which involve removing the Maple Chase Thermostat and preparing the Honeywell Smart Thermostat for installation.
Removing the Maple Chase Thermostat
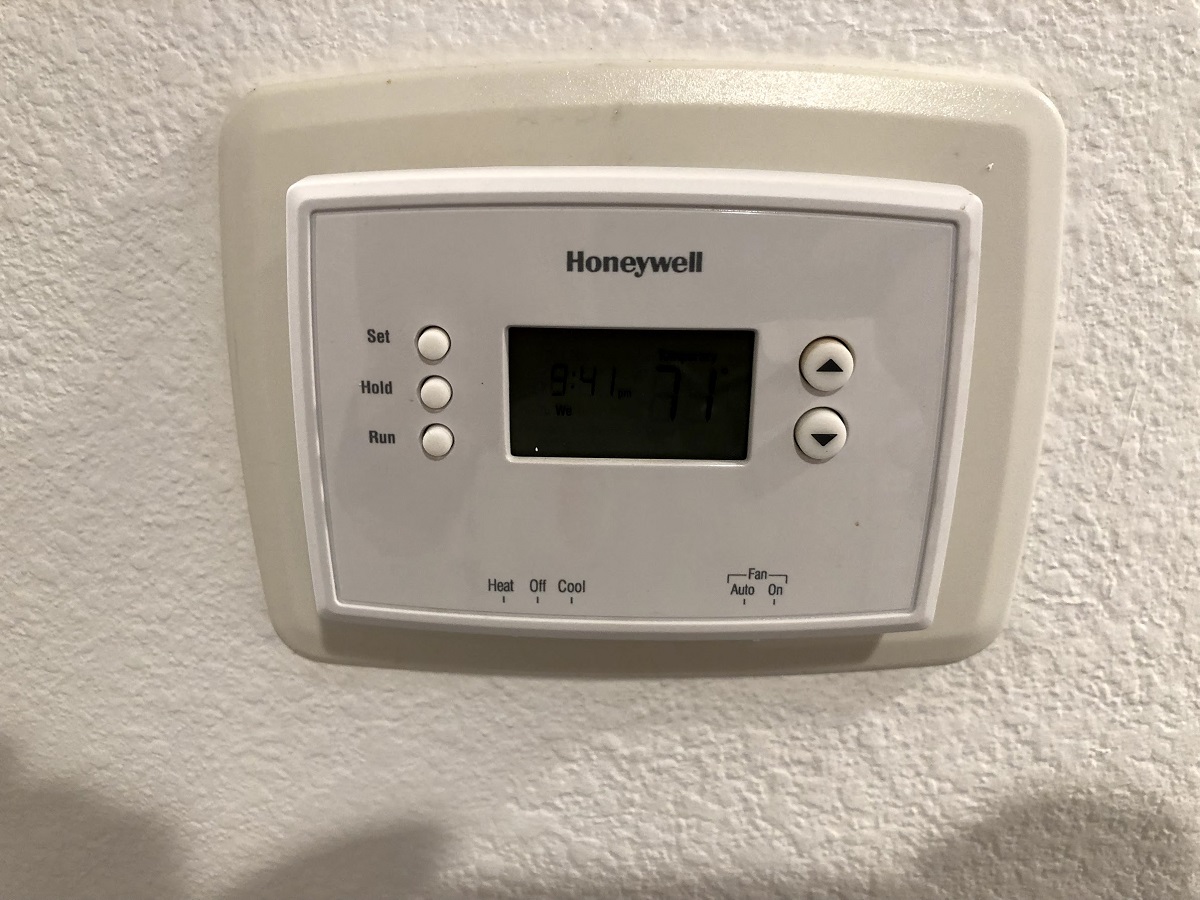
Before you can install the Honeywell Smart Thermostat, you’ll need to remove the existing Maple Chase Thermostat from the wall. Follow these steps to ensure a safe and straightforward removal process:
- Power Off: Start by turning off the power supply to your heating and cooling system. Locate the circuit breaker or fuse box and switch off the corresponding breaker or remove the fuse. This precautionary measure will prevent any electrical mishaps.
- Detach from Wall: Carefully remove the Maple Chase Thermostat from its mounting plate by gently pulling it away from the wall. Most thermostats are connected to the wall plate using clips or screws. Ensure you disconnect any wiring connections by either unscrewing the terminal screws or releasing the wire connectors.
- Take Note of Wiring Connections: Before completely removing the thermostat and its wiring, it is essential to take note of the wire connections. Use wire labels or stickers to identify which wire corresponds to which terminal. This will assist you in correctly connecting the wires to the Honeywell Smart Thermostat later.
- Remove Mounting Plate: Once the thermostat is detached, inspect the wall for any remaining screws or anchors from the mounting plate. Carefully remove these using a screwdriver, taking care not to damage the wall surface.
- Inspect and Clean: With the Maple Chase Thermostat and mounting plate removed, take a moment to inspect the wall and wiring for any signs of damage or wear. Clean the area using a soft cloth to remove any dust or debris that may interfere with the installation of the new thermostat.
By following these steps, you can successfully remove the Maple Chase Thermostat and prepare the wall for the installation of the Honeywell Smart Thermostat. The next section will guide you through the process of preparing the new thermostat for installation.
Preparing the Honeywell Smart Thermostat
Now that you’ve removed the Maple Chase Thermostat, it’s time to prepare the Honeywell Smart Thermostat for installation. Follow these steps to ensure a smooth setup:
- Read the Manual: Before proceeding, read the instruction manual that comes with the Honeywell Smart Thermostat. Familiarize yourself with the features, installation requirements, and any specific instructions provided by the manufacturer.
- Identify Compatibility: Check the compatibility of the Honeywell Smart Thermostat with your HVAC system. Ensure that it supports the specific heating and cooling equipment you have in your home. Refer to the manufacturer’s website or contact their customer support if you have any doubts or questions.
- Verify Power Supply: Connect the Honeywell Smart Thermostat to the mounting plate or baseplate to determine the power supply method. Some models may require batteries, while others may be wired directly to a low-voltage power source. Ensure you have the necessary power source available.
- Install Batteries (if applicable): If your Honeywell Smart Thermostat requires batteries, install them according to the manufacturer’s instructions. Typically, you’ll need to remove a battery compartment cover and insert the batteries, ensuring proper polarity.
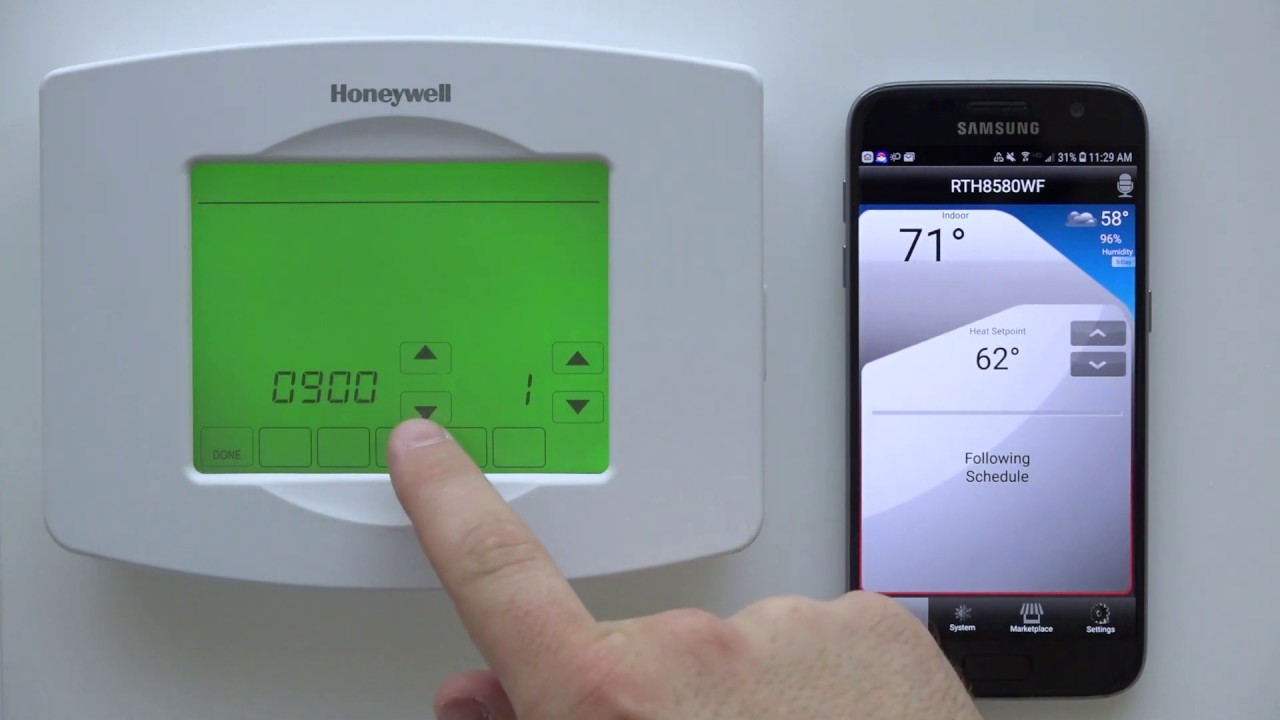
- Connect to Wi-Fi: If you haven’t already done so, download the Honeywell Home app on your mobile device or access it through a computer. Follow the app’s instructions to create an account and connect your Honeywell Smart Thermostat to your Wi-Fi network. Having a stable internet connection will enable remote control and access to advanced features.
- Configure Settings: Once the Honeywell Smart Thermostat is connected to your Wi-Fi network, you can customize various settings through the app. Set your preferred temperature units, establish heating and cooling schedules, and explore additional features tailored to your needs.
By completing these steps, you’ll have effectively prepared the Honeywell Smart Thermostat for installation and ensured that it is compatible with your home’s HVAC system. The next section will cover the process of wiring the new thermostat, transferring the wire connections from the old thermostat, and mounting the Honeywell Smart Thermostat on the wall.
Wiring the Honeywell Smart Thermostat
Now that you have prepared the Honeywell Smart Thermostat, it’s time to wire it properly for installation. Carefully follow these steps to ensure accurate wiring:
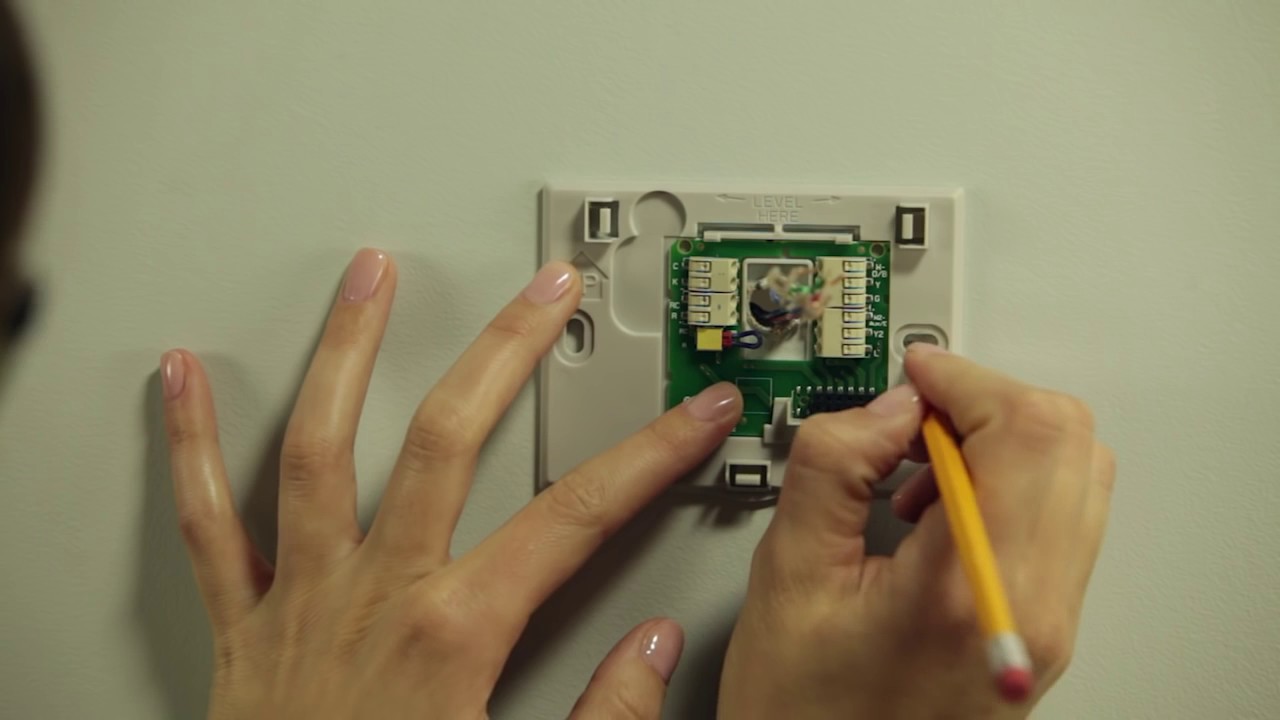
- Refer to the Wiring Diagram: Consult the Honeywell Smart Thermostat’s instruction manual or the provided wiring diagram to identify the correct terminal connections for your specific HVAC system. The color-coding of the wires may differ between models and brands, so refer to the diagram for clarity.
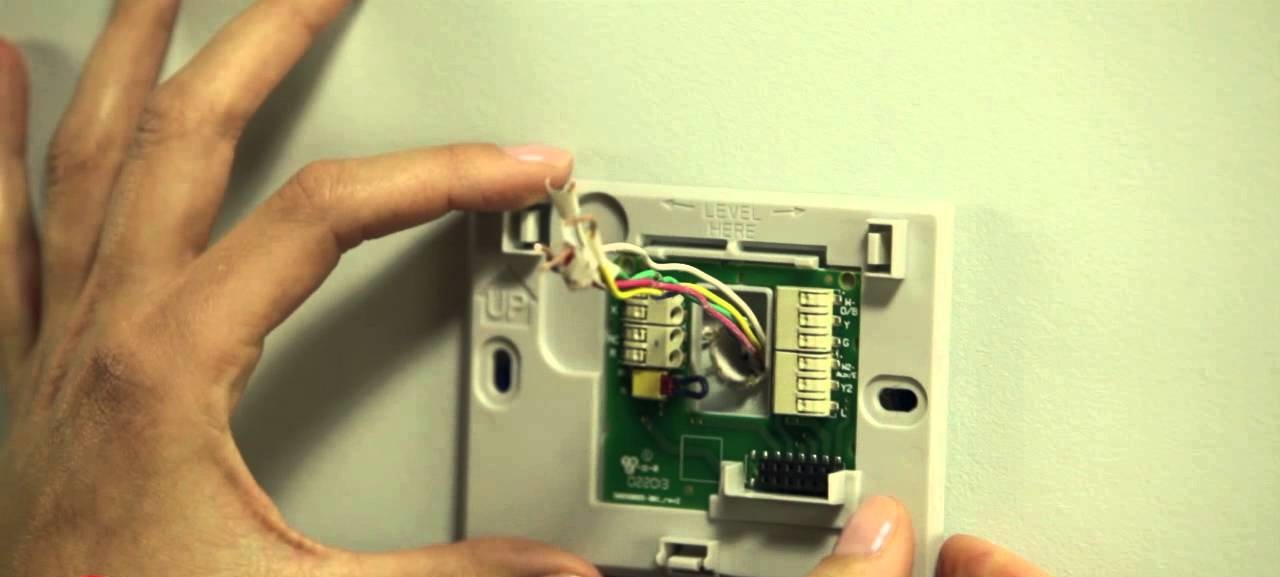
- Transfer Wire Connections: Look at the notes you made during the removal of the Maple Chase Thermostat. Take one wire at a time and detach it from the old thermostat’s terminal. Connect the corresponding wire to the corresponding terminal on the Honeywell Smart Thermostat. Avoid twisting or damaging the wires during this process.
- Tighten Terminal Screws: Once the wires are connected to the appropriate terminals on the Honeywell Smart Thermostat, use a screwdriver to tighten the terminal screws securely. This will ensure a strong and reliable connection.
- Verify Proper Connections: Double-check each wire connection to ensure that they are secure and properly seated in their respective terminals. A loose or incorrect connection can lead to heating or cooling system malfunctions.
- Trim Excess Wire: If you have excess wire protruding from the terminals, use wire cutters to trim the excess. However, ensure that you leave enough length to allow for any future adjustments or changes.
Remember, if you encounter any difficulties or are unsure about the wiring process, consult a professional electrician or HVAC technician for assistance. Once you have successfully connected the wires, you are ready to mount the Honeywell Smart Thermostat on the wall and move on to the next steps of the installation process.
Connecting to Wi-Fi
Connecting your Honeywell Smart Thermostat to your home’s Wi-Fi network is a crucial step to unlock its full potential. Follow these steps to establish a stable and secure connection:
- Access Menu Options: On the Honeywell Smart Thermostat, navigate to the menu options by pressing the appropriate buttons or tapping the touchscreen. Look for the “Network” or “Wi-Fi” option.
- Select Network: From the available Wi-Fi networks displayed on the thermostat’s screen, select your home network. This will prompt you to enter your network password.
- Enter Network Password: Using the thermostat’s interface, enter your Wi-Fi network password. Take care to input the correct characters and pay attention to lowercase and uppercase letters.
- Connect to Network: Once you’ve entered the network password, the Honeywell Smart Thermostat will attempt to connect to your Wi-Fi network. It may take a few moments to establish a connection, so be patient and ensure that you have a strong Wi-Fi signal in the installation area.
- Verify Connection: Once the thermostat successfully connects to your Wi-Fi network, it may display a confirmation message or a Wi-Fi signal icon on the screen. You can also check the connection status through the Honeywell Home app on your mobile device.
It’s important to note that the exact process may vary slightly depending on the model and version of the Honeywell Smart Thermostat you are installing. Always refer to the manufacturer’s instructions for specific guidance.
Connecting the thermostat to your Wi-Fi network enables you to control and monitor it remotely through the Honeywell Home app. This includes adjusting temperature settings, creating schedules, receiving energy usage reports, and accessing other smart features of the thermostat. Enjoy the convenience and flexibility of managing your home’s heating and cooling system from anywhere with an internet connection.
Once you have successfully connected the Honeywell Smart Thermostat to your Wi-Fi network, you’re ready to move on to the final steps of installing the thermostat and testing its functionality.
Installing the Honeywell Smart Thermostat
With the Maple Chase Thermostat removed, the Honeywell Smart Thermostat prepared, and the Wi-Fi connection established, it’s time to securely install the new thermostat on the wall. Follow these steps for a successful installation:
- Mounting Plate Alignment: Align the mounting plate of the Honeywell Smart Thermostat with the existing holes or markings on the wall. Use a level to ensure that the plate is perfectly straight. Make any necessary adjustments before proceeding.
- Secure the Mounting Plate: Once the mounting plate is aligned, use screws and anchors (if provided) to secure it firmly to the wall. Ensure that the plate is securely attached and does not wobble or shift when pressure is applied.
- Attach the Thermostat Unit: Carefully line up the thermostat unit with the mounting plate, aligning the terminals with the corresponding slots on the plate. Gently press the thermostat unit onto the mounting plate until it snaps into place securely.
- Confirm Proper Alignment: Double-check that the thermostat unit is level and properly aligned with the mounting plate. It should sit flush against the wall without any gaps or misalignment.
- Restore Power: Head back to the circuit breaker or fuse box and switch on the power to your heating and cooling system. This will provide the necessary power supply to the newly installed Honeywell Smart Thermostat.
- Configure Initial Settings: Follow the on-screen prompts or instructions from the Honeywell Home app to configure the initial settings of the thermostat. Set the date, time, and any other required preferences as prompted.
Once the installation is complete, take a moment to admire your newly installed Honeywell Smart Thermostat. Ensure that it is functioning properly by testing its basic functionality before moving on to fine-tuning temperature settings and exploring more advanced features.
If you face any challenges during the installation process or encounter unexpected issues with the thermostat’s operation, refer to the instruction manual or reach out to Honeywell’s customer support for assistance. They can provide guidance and troubleshooting tips to help ensure a successful installation and optimal performance of your new smart thermostat.
Testing and Troubleshooting
After the installation of your Honeywell Smart Thermostat, it is essential to test its functionality to ensure everything is working as expected. Follow these steps to conduct a thorough testing process:
- Power On: Confirm that the heating and cooling system has power by checking if the display on the Honeywell Smart Thermostat is illuminated.
- Check Temperature Reading: Verify that the thermostat is accurately displaying the current temperature in your home. Compare it to a reliable thermometer in the same area to ensure accuracy.
- Adjust Temperature Settings: Test the thermostat’s responsiveness by increasing or decreasing the target temperature. Observe whether the heating or cooling system starts operating accordingly.
- Test Programmed Schedules: If you have set up specific schedules or routines, verify that the thermostat follows them correctly. Monitor whether the temperature adjusts as scheduled throughout the day.
- Verify Remote Access: Using the Honeywell Home app or web interface, test the remote access feature. Verify that you can control the thermostat and view its status from your smartphone, computer, or other devices with an internet connection.
If you encounter any issues during testing or experience problems with the thermostat’s functionality, consider the following troubleshooting steps:
- Check Wiring Connections: Ensure that all wiring connections are secure and properly seated in the terminals. Loose or incorrect connections can lead to malfunctions.
- Verify Power Supply: Ensure that the power supply to your heating and cooling system is stable and properly connected. Confirm that the circuit breaker is not tripped and that there are no issues with the electrical connection.
- Reset and Restart: Try performing a factory reset on the thermostat and then restart the setup process. This can help resolve any software or configuration issues.
- Update Firmware: Check for any available firmware updates for your Honeywell Smart Thermostat. Updating the firmware can address known bugs or issues and improve the overall performance of the device.
- Contact Customer Support: If troubleshooting on your own does not resolve the problem, reach out to Honeywell’s customer support for further assistance. They can provide guidance tailored to your specific issue and help troubleshoot more complex problems.
By conducting thorough testing and troubleshooting, you can ensure that your Honeywell Smart Thermostat is functioning correctly and providing the expected comfort and energy-saving benefits. Enjoy the convenience of a smart thermostat and the improved control over your home’s heating and cooling systems.
Conclusion
Congratulations on successfully installing your new Honeywell Smart Thermostat! By following the step-by-step guide in this article, you have replaced the old Maple Chase Thermostat with a modern, feature-rich smart thermostat that offers convenience, energy savings, and advanced controls for your home’s heating and cooling system.
We started by gathering the necessary tools and equipment, ensuring a smooth installation process. Removing the Maple Chase Thermostat and preparing the Honeywell Smart Thermostat for installation were the initial steps. Next, we carefully wired the new thermostat, paying close attention to wire connections to ensure accurate and secure installation.
Connecting to your Wi-Fi network enabled remote control and access to advanced smart features through the Honeywell Home app or web interface. Once connected, you were able to configure settings, create schedules, and take advantage of energy-saving features offered by the thermostat.
The final steps involved securely mounting the Honeywell Smart Thermostat on the wall and conducting thorough testing to ensure proper functionality. We also covered troubleshooting steps to address any issues that may arise during the installation or operation of the thermostat.
By installing a Honeywell Smart Thermostat, you have taken a significant step towards improving the efficiency and comfort of your home. The smart features, remote access, and energy-saving capabilities offered by the thermostat will not only enhance your living experience but also contribute to reducing energy consumption and lowering utility bills.
If you have any further questions or need assistance with your Honeywell Smart Thermostat, refer to the instruction manual or contact Honeywell’s customer support. They are available to provide additional guidance and support.
Enjoy the convenience, control, and energy savings provided by your new Honeywell Smart Thermostat! Sit back, relax, and let it efficiently regulate your home’s temperature for years to come.