Introduction
Performing a reset on your Sony Ericsson Xperia Play can be a beneficial solution for various issues, such as freezing, slow performance, or unresponsive apps. This comprehensive guide will walk you through the step-by-step process of resetting your device, ensuring that you can restore it to optimal functionality.
Whether you're encountering persistent software glitches or preparing to sell or donate your Xperia Play, a reset can help resolve these issues and safeguard your personal data. By following the instructions in this tutorial, you can confidently navigate the reset procedure and safeguard your valuable information.
In the following sections, we will cover the essential steps for performing a reset on your Sony Ericsson Xperia Play. From backing up your data to accessing the reset menu and restoring your information, this guide will provide clear and concise instructions to help you successfully reset your device.
By the end of this tutorial, you will have the knowledge and confidence to perform a reset on your Sony Ericsson Xperia Play, empowering you to address software issues and maintain the optimal performance of your device. Let's dive into the step-by-step process to ensure that you can effectively reset your Xperia Play and restore it to its full potential.
Step 1: Backing Up Your Data
Before initiating the reset process on your Sony Ericsson Xperia Play, it is crucial to safeguard your valuable data by creating a comprehensive backup. This step is essential to ensure that your personal information, including contacts, photos, videos, and app data, is securely preserved and can be restored after the reset. By following these instructions, you can effectively back up your data and minimize the risk of losing important information.
Method 1: Using Google Account
-
Contacts: Ensure that your contacts are synced with your Google account. This can be verified by accessing the "Settings" menu, selecting "Accounts," and confirming that your Google account is set to sync contacts. By doing so, your contacts will be automatically backed up to your Google account.
-
Photos and Videos: Utilize Google Photos to back up your media content. Install the Google Photos app from the Play Store, sign in with your Google account, and enable the backup and sync feature. This will automatically upload your photos and videos to your Google Photos account, ensuring that they are securely stored in the cloud.
-
App Data: Some apps may offer built-in backup options, allowing you to save app-specific data to your Google account. Check the settings of individual apps to determine if they provide backup functionality. Additionally, consider using third-party backup apps from the Play Store to create a comprehensive backup of your app data.
Method 2: Using Xperia Companion
-
Installation: Download and install Xperia Companion on your computer from the official Sony website. Once installed, launch the application and connect your Xperia Play to the computer using a USB cable.
-
Backup Process: Within Xperia Companion, navigate to the "Backup" section and follow the on-screen instructions to initiate the backup process. This will allow you to create a complete backup of your device, including contacts, media files, and app data, which can be restored after the reset.
By following these methods, you can effectively back up your data and ensure that your personal information is securely preserved. This proactive approach will enable you to proceed with the reset process with confidence, knowing that your data is safely backed up and ready for restoration.
Remember, taking the time to back up your data is a proactive measure that can provide peace of mind and ensure that your important information remains intact throughout the reset process. With your data securely backed up, you can proceed to the next step of accessing the reset menu and initiating the reset process on your Sony Ericsson Xperia Play.
Step 2: Accessing the Reset Menu
Accessing the reset menu on your Sony Ericsson Xperia Play is a crucial step in initiating the reset process. By navigating to the reset menu, you can access the necessary options to restore your device to its factory settings, effectively addressing software issues and performance concerns. Here's a detailed guide on how to access the reset menu on your Xperia Play:
Method 1: Using the Settings Menu
- Begin by unlocking your Xperia Play and accessing the home screen.
- Navigate to the "Settings" app, which is represented by a gear icon, and tap to open it.
- Within the Settings menu, scroll down and locate the "Privacy" or "Backup & Reset" option. The specific location of this option may vary based on the Android version installed on your device.
- Tap on "Privacy" or "Backup & Reset" to access additional options related to device reset and data management.
- Look for the "Factory Data Reset" or "Reset Phone" option within the Privacy or Backup & Reset section. This option is typically located at the bottom of the menu.
Method 2: Using Hardware Buttons
- If you are unable to access the Settings menu due to software issues, you can utilize the hardware buttons to access the reset menu.
- Ensure that your Xperia Play is powered off. If the device is unresponsive, press and hold the power button until it shuts down completely.
- Once the device is powered off, press and hold the "Volume Up" button.
- While holding the "Volume Up" button, press and hold the "Power" button simultaneously.
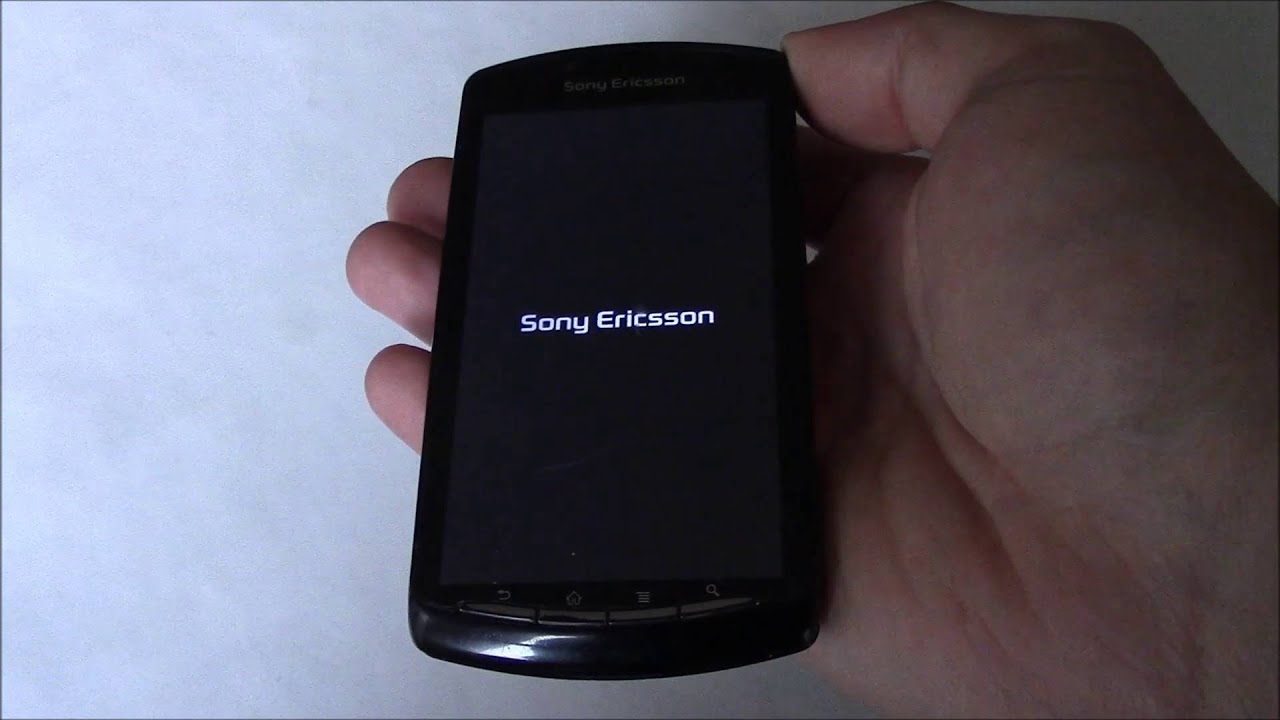
- Continue holding both buttons until the Sony Ericsson logo appears on the screen, indicating that the device is booting into recovery mode.
- Release the buttons when the recovery mode menu appears. You can navigate the options using the volume buttons and select the "Factory Reset" or "Wipe Data/Factory Reset" option using the power button.
By following these methods, you can effectively access the reset menu on your Sony Ericsson Xperia Play, providing you with the necessary options to initiate the reset process. Once you have successfully accessed the reset menu, you can proceed to the next step of performing the reset, as outlined in the following section.
With the reset menu accessible, you are one step closer to restoring your Xperia Play to its factory settings, allowing you to address software issues and optimize the performance of your device. Let's move on to the next step of performing the reset to complete the process.
Step 3: Performing the Reset
Performing the reset on your Sony Ericsson Xperia Play is a critical step in restoring your device to its factory settings and addressing software issues. Whether you are experiencing persistent glitches, slow performance, or unresponsive apps, the reset process can effectively resolve these issues and optimize the functionality of your Xperia Play. Here's a detailed guide on how to perform the reset, ensuring that you can navigate the process with confidence and precision.
Method 1: Using the Settings Menu
- Once you have accessed the reset menu through the Settings app, navigate to the "Factory Data Reset" or "Reset Phone" option within the Privacy or Backup & Reset section.
- Tap on the "Factory Data Reset" option to initiate the reset process.
- You will be prompted to confirm the reset and acknowledge that all data will be erased from the device's internal storage. Review the information displayed on the screen and proceed with the reset confirmation.
- After confirming the reset, the device will begin the reset process, erasing all user data, apps, and settings from the internal storage. The Xperia Play will then reboot to complete the reset.
Method 2: Using Recovery Mode
- If you are utilizing the hardware buttons to access the reset menu, navigate to the "Factory Reset" or "Wipe Data/Factory Reset" option using the volume buttons and select it using the power button.
- Confirm the reset action when prompted, acknowledging that all data will be permanently erased from the device.
- Once the reset confirmation is accepted, the Xperia Play will initiate the reset process, erasing all user data and restoring the device to its factory settings.
- Upon completion of the reset, the device will reboot, signaling the successful restoration to its original state.
By following these methods, you can effectively perform the reset on your Sony Ericsson Xperia Play, addressing software issues and restoring the device to its factory settings. It is important to note that the reset process will erase all user data, apps, and settings from the internal storage of the device. Therefore, it is crucial to ensure that you have backed up your data before proceeding with the reset.
With the reset process successfully completed, your Xperia Play will be restored to its original state, free from software issues and performance concerns. This proactive approach will enable you to optimize the functionality of your device and ensure a seamless user experience. Now that the reset has been performed, you can proceed to the final step of restoring your data to complete the process.
Step 4: Restoring Your Data
After successfully performing the reset on your Sony Ericsson Xperia Play, the next crucial step is to restore your backed-up data to ensure that your personal information, contacts, media files, and app data are seamlessly reintegrated into the device. By following the steps outlined below, you can effectively restore your data and resume using your Xperia Play with all your valuable information intact.
Method 1: Restoring Data Using Google Account
-
Contacts: Upon completing the reset, sign in to your Google account on the Xperia Play. Once signed in, your contacts will be automatically synced and restored to the device, ensuring that your address book is up to date.
-
Photos and Videos: Open the Google Photos app on your Xperia Play and sign in with your Google account. The app will automatically sync with your Google Photos account, allowing you to access and download your backed-up photos and videos to your device.
-
App Data: If you utilized third-party backup apps or specific app backup options, reinstall the relevant apps from the Play Store and follow the prompts to restore app-specific data from your Google account.
Method 2: Restoring Data Using Xperia Companion
-
Installation: Launch the Xperia Companion application on your computer and connect your Xperia Play using a USB cable.
-
Restoration Process: Within Xperia Companion, navigate to the "Restore" section and follow the on-screen instructions to initiate the restoration process. This will allow you to restore your contacts, media files, and app data from the previously created backup.
By following these methods, you can effectively restore your backed-up data to your Sony Ericsson Xperia Play, ensuring that your personal information and media files are seamlessly reintegrated into the device. This proactive approach will enable you to resume using your Xperia Play with all your valuable data intact, providing a seamless transition following the reset process.
With your data successfully restored, your Xperia Play will be fully equipped with your personal information, contacts, media files, and app data, allowing you to continue using the device with confidence and convenience. By taking the time to restore your data, you can ensure that your Xperia Play reflects your preferences and personal content, enhancing your overall user experience.
Now that you have completed the restoration of your data, your Sony Ericsson Xperia Play is ready to be used with all your valuable information securely reinstated. Whether you performed the reset to address software issues or prepare the device for a new user, the restoration process ensures that your Xperia Play is fully equipped and personalized according to your preferences.
Conclusion
In conclusion, the process of performing a reset on your Sony Ericsson Xperia Play is a valuable skill that empowers you to address software issues, optimize device performance, and safeguard your personal data. By following the comprehensive steps outlined in this tutorial, you have gained the knowledge and confidence to navigate the reset process with precision and efficiency.
The initial step of backing up your data served as a proactive measure to ensure that your contacts, media files, and app data were securely preserved before initiating the reset. Whether you utilized Google account syncing or the Xperia Companion application, the backup process provided peace of mind and laid the foundation for a seamless restoration of your valuable information.
Accessing the reset menu, whether through the Settings app or utilizing hardware buttons, allowed you to navigate the necessary options to initiate the reset process. This step provided you with the essential controls to restore your Xperia Play to its factory settings, effectively addressing software issues and performance concerns.
Performing the reset itself was a critical step in erasing all user data, apps, and settings from the internal storage of the device. By following the detailed instructions, you successfully restored your Xperia Play to its original state, free from software glitches and performance concerns, ensuring an optimal user experience.
The final step of restoring your data, whether through Google account syncing or Xperia Companion, allowed you to seamlessly reintegrate your backed-up contacts, media files, and app data into the device. This proactive approach ensured that your Xperia Play reflected your preferences and personal content, enhancing your overall user experience.
By completing the restoration process, your Sony Ericsson Xperia Play is now fully equipped with your valuable information securely reinstated, allowing you to continue using the device with confidence and convenience. Whether you performed the reset to address software issues or prepare the device for a new user, the restoration process ensures that your Xperia Play is fully personalized according to your preferences.
In summary, the knowledge and skills acquired through this tutorial have equipped you to effectively perform a reset on your Sony Ericsson Xperia Play, addressing software issues, optimizing device performance, and safeguarding your personal data. With this newfound expertise, you are well-prepared to maintain the optimal functionality of your Xperia Play and navigate future software challenges with confidence and proficiency.