Introduction
Venmo has become a popular digital payment platform that allows users to send and receive money with ease. However, there may be situations where you find yourself needing to reject a payment on Venmo. Whether it’s due to an error, a change of plans, or simply a personal preference, rejecting a payment can sometimes be necessary. This article will guide you through the process of rejecting a payment on Venmo and provide insight into what happens when you do so.
With Venmo’s user-friendly app and intuitive interface, it’s easy to navigate through various payment options. But when it comes to rejecting a payment, you might find yourself wondering if it’s even possible and how to go about it. We’ll provide you with a step-by-step guide on how to reject a payment on Venmo, ensuring that you have the necessary information to confidently handle any unwanted transactions.
Before we delve into the nuts and bolts of rejecting a payment on Venmo, let’s explore why you might want to reject money in the first place. Understanding the reasons behind rejecting a payment can help clarify when and why you may choose to take this action.
Why would you want to reject money on Venmo?
There are several reasons why you might want to reject a payment on Venmo. It’s important to note that Venmo currently does not have an official feature to directly reject or decline a payment. However, there are situations where you may choose not to accept the money and take alternative actions to handle the transaction.
1. Incorrect payment amount: One common reason for rejecting a payment is if the amount sent to you is incorrect. Whether it’s a simple typing error or a misunderstanding, it’s important to communicate with the sender and request that they resend the payment with the correct amount.
2. Unauthorized transaction: If you notice a payment on Venmo that you did not authorize or that appears fraudulent, it’s crucial to reject the payment. In such cases, it’s recommended to report the issue to Venmo’s support team or your financial institution to ensure the security of your account.
3. Change of plans: Sometimes, circumstances change, and you may no longer need or want the money that was sent to you. Perhaps a friend paid for a dinner that you had agreed to split but decided to cover the cost themselves. In such cases, rejecting the payment can help avoid confusion and ensure accurate records of expenses.
4. Personal preferences: While Venmo is designed to make money transfers simple and convenient, everyone has personal preferences when it comes to handling payments. If you prefer using a different payment method or simply do not wish to use Venmo for a particular transaction, you can choose to reject the payment and suggest an alternative payment method to the sender.
5. Privacy concerns: Some individuals might be cautious about sharing their financial information or prefer to restrict their transactions to trusted sources. If you receive a payment from someone you do not know or do not want to share financial details with, rejecting the payment can help maintain your privacy and ensure that you only transact with trusted individuals.
Remember, while rejecting a payment on Venmo may be necessary in certain situations, it’s important to communicate with the sender and explain the reasons behind your decision. Open and honest communication can help resolve any issues and maintain healthy relationships with friends and acquaintances.
How to reject a payment on Venmo
Although Venmo does not have a direct feature to reject or decline a payment, there are alternative steps you can take to handle the transaction. Follow these steps to reject a payment on Venmo:
Step 1: Open the Venmo app
Launch the Venmo app on your mobile device. Make sure you are logged into your Venmo account.
Step 2: Navigate to the payment
Locate the payment that you want to reject. You can find it in your Venmo feed or by searching for the specific user who sent you the payment.
Step 3: Tap “Reject Payment”
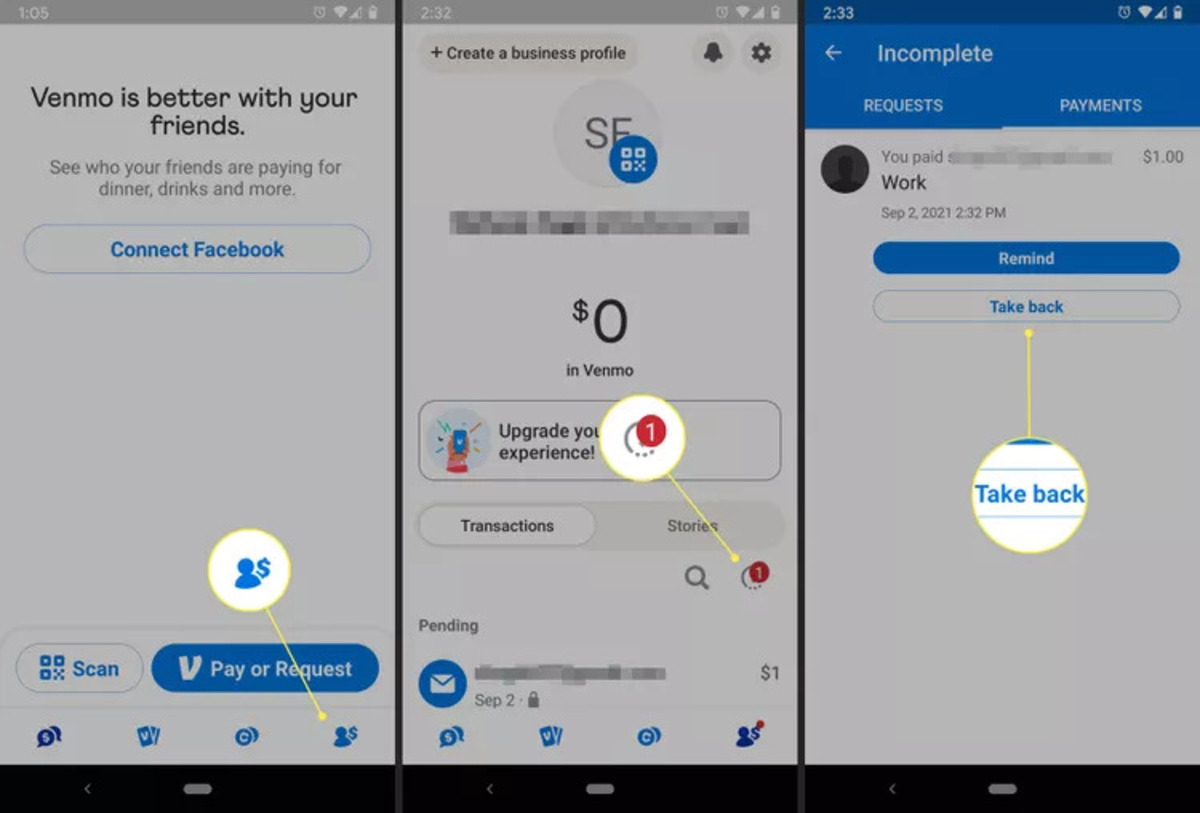
Once you have located the payment, tap on it to open the details. Look for the “…” (three-dot) menu icon at the top right corner of the screen and tap on it. From the options that appear, select “Reject Payment.”
Step 4: Confirm rejection
After selecting “Reject Payment,” a confirmation prompt will appear. Read through the information to ensure that you understand the implications of rejecting the payment. If you still wish to proceed, tap “Confirm” to reject the payment.
It’s important to note that rejecting a payment does not automatically send the money back to the sender. The rejected payment will remain in your Venmo account, but the funds will not be added or deducted from your balance.
If you want to return the funds to the sender, you will need to manually send them back. You can do this by initiating a new payment to the sender for the same amount or by coordinating with them to arrange an alternate method of refund.
Additionally, it is crucial to communicate with the sender and explain why you rejected the payment. Open and honest communication can help resolve any misunderstandings and maintain healthy relationships.
Remember, Venmo is designed to facilitate seamless transactions, but there may be instances where rejecting a payment becomes necessary. By following these steps and effectively communicating with the sender, you can handle rejected payments on Venmo with clarity and professionalism.
Step 1: Open the Venmo app
The first step in rejecting a payment on Venmo is to open the Venmo app on your mobile device. Ensure that you are logged into your Venmo account before proceeding.
To open the Venmo app, locate the Venmo icon on your home screen or in the app drawer of your device. It usually appears as a green icon with the word “Venmo” written in white. Tap on the icon to launch the app.
If you don’t have the Venmo app installed on your device, you can download it from the App Store (for iOS users) or the Google Play Store (for Android users). Simply search for “Venmo” in the respective app store and follow the instructions to download and install the app.
Once you have successfully opened the Venmo app, you will be directed to the app’s main screen, which displays your Venmo feed and recent transactions.
Make sure that you have a stable internet connection to ensure smooth functioning of the app. A strong and reliable internet connection is essential for accessing your Venmo account and performing various actions, including rejecting a payment.
Remember to always use the official Venmo app from trusted sources to ensure the security of your account and personal information. Avoid downloading and using unauthorized third-party apps that claim to offer Venmo functionality, as they may compromise your account security.
With the Venmo app open and your account logged in, you are now ready to proceed to the next step and navigate to the payment that you wish to reject.
Step 2: Navigate to the payment
After opening the Venmo app and logging into your account, the next step is to navigate to the payment that you want to reject. This step involves locating the specific transaction among your Venmo feed or searching for the user who sent you the payment.
On the Venmo app’s main screen, you will find your Venmo feed, which displays a chronological list of your recent transactions. Scroll through the feed to look for the payment you wish to reject. Keep in mind that if you have a large number of transactions, it may take some time to find the specific one.
If you know the user who sent you the payment, you can search for their name using the search bar at the top of the Venmo app. Tap on the search bar and enter the name of the person who sent the payment. As you type, Venmo will suggest matching users based on your contacts and previous transactions. Select the appropriate user from the suggestions to view their transactions.
Once you have found the payment you want to reject, tap on it to open the transaction details. This will allow you to access additional options and proceed with the rejection process.
It’s worth noting that Venmo provides various features to help you organize and manage your transactions. You can use filters such as “Payments,” “Requests,” “Completed,” or “All” to narrow down your search and locate the desired payment more quickly. Additionally, you can utilize the search bar to find specific keywords or amounts associated with the transaction.
Take your time to carefully locate the payment you wish to reject, as it’s essential to ensure that you are acting on the correct transaction. Once you have successfully found the payment, you are ready to proceed to the next step, which involves tapping the “Reject Payment” option.
Step 3: Tap “Reject Payment”
Once you have located the payment that you want to reject on the Venmo app, the next step is to tap on the “Reject Payment” option. This action will initiate the process of rejecting the payment and prompt you for confirmation.
To begin, open the transaction details by tapping on the specific payment in your Venmo feed or in the user’s transaction history. This will bring up the detailed view of the payment, showing information such as the amount, the sender’s name, and any accompanying notes or messages.
At the top right corner of the screen, you will see an icon that consists of three dots arranged vertically. This icon indicates a menu or more options related to the transaction. Tap on this “…” (three-dot) menu icon to reveal a list of available options.
Scroll through the options until you find “Reject Payment.” When you see it, tap on it to proceed with rejecting the payment.
By selecting “Reject Payment,” you are signaling your intent to decline or not accept the money sent to you. It’s important to note that this action does not automatically return the funds to the sender. Instead, it alerts the system that you wish to reject the payment and prompts for confirmation in the next step.
During this step, it’s crucial to double-check and ensure that you are selecting the correct option. Mistakenly choosing “Reject Payment” on the wrong transaction can cause confusion and inconvenience for both parties involved. Take your time to review the information displayed on the screen before proceeding.
Once you have tapped the “Reject Payment” option, you are ready to move on to the next step, which involves confirming the rejection of the payment.
Step 4: Confirm rejection
After tapping on the “Reject Payment” option in the previous step, you will be prompted to confirm the rejection of the payment on Venmo. This final step ensures that you are intentionally rejecting the transaction and allows you to review the implications before proceeding.
Upon selecting “Reject Payment,” a confirmation prompt will appear on your screen. This prompt typically provides additional details about the consequences of rejecting the payment. It is essential to read the information carefully to ensure that you fully understand the implications of your decision.
Review the confirmation prompt and ensure that it aligns with your intentions. Take note of any specific instructions or warnings mentioned, as they may have important implications for the ongoing transaction.
If you are comfortable with rejecting the payment and understand the potential consequences, you can proceed by tapping on the “Confirm” button.
By confirming the rejection, you are formally declining the payment on Venmo. However, it’s important to note that the rejected payment will still appear in your Venmo account, even though the funds are neither added nor deducted from your balance.
To return the funds to the sender, you will need to initiate a separate transaction. You can coordinate with the sender to arrange an alternative refund method or send them a new payment for the same amount through Venmo.
Remember, communication is key. It’s essential to be transparent with the sender, explaining why you are rejecting the payment and any additional steps they need to take to ensure a smooth resolution. Good communication can help avoid any confusion or misunderstandings.
With the rejection of the payment confirmed, you have successfully rejected the transaction on Venmo. Make sure to follow up with appropriate actions, such as refunding the funds or arranging an alternative solution, depending on the circumstances of the rejected payment.
What happens when you reject a payment?
When you reject a payment on Venmo, there are a few important things to note about what happens next. While Venmo does not have an official “reject” feature, there are still consequences and considerations to be aware of:
1. Funds remain in your Venmo account: When you reject a payment, the funds associated with that transaction remain in your Venmo account. However, the money is not added to or deducted from your balance. This is different from a refund, as the rejected payment does not automatically return the funds to the sender.
2. The payment appears as rejected: After rejecting the payment, both you and the sender will see that the transaction has been rejected. The payment will still be visible in your Venmo feed and will be labeled as rejected. This status helps maintain transparency and keeps a record of the rejected transaction.
3. Additional communication may be necessary: Rejecting a payment often requires further communication between you and the sender to resolve the situation. It’s important to reach out to the sender and explain why the payment was rejected and any necessary steps they need to take to ensure a smooth resolution. Open and clear communication can help avoid confusion and maintain a healthy relationship.
4. Manual refund process: If you wish to return the funds to the sender, you will need to initiate a separate transaction through Venmo or arrange an alternative refund method outside of the Venmo platform. This means that you’ll need to coordinate with the sender to ensure the refund is processed correctly.
5. No impact on your Venmo balance: Since the funds associated with the rejected payment were not added or deducted from your Venmo account balance, your balance remains unaffected. Rejected payments do not contribute to your available funds, nor do they create a negative balance.
It’s important to note that Venmo’s policies and procedures may change over time, so it’s always a good idea to refer to the latest updates and guidelines provided by Venmo’s official channels. These guidelines will help ensure that you have the most accurate and up-to-date information about what happens when you reject a payment on the platform.
By understanding what happens when you reject a payment on Venmo, you can effectively manage rejected transactions and communicate the necessary information to the sender, promoting a smooth resolution and maintaining the integrity of your Venmo account.
Can you reject money on Venmo for any reason?
Venmo allows users to reject payments, but it’s important to note that there are certain limitations and guidelines to consider. While Venmo doesn’t explicitly state the reasons for rejecting a payment, there are a few factors to keep in mind:
1. Valid reasons for rejection: Venmo generally allows you to reject a payment if there is a legitimate reason, such as an incorrect payment amount, unauthorized transaction, change of plans, personal preferences, or privacy concerns. These are common scenarios where rejecting a payment might be necessary to ensure accuracy, security, or personal preferences in handling transactions.
2. Open and honest communication: Rejecting a payment is not a decision to be taken lightly, and it’s important to practice open and honest communication with the sender. If you reject a payment, it’s best to explain your reasons clearly and provide alternative solutions or steps the sender can take to address the situation.
3. Consider sender’s perspective: While you have the discretion to reject a payment, it’s important to consider the sender’s point of view. Rejecting a payment may cause inconvenience or confusion for the sender. If possible, try to discuss the situation openly and find a mutually agreeable resolution before outright rejecting the payment.
4. Financial obligations and legal considerations: Keep in mind that there may be financial obligations or legal considerations involved when rejecting a payment. For example, if the payment is for goods or services rendered, you may need to adhere to refund policies and obligations outlined in your agreement with the sender. It’s important to ensure that rejecting the payment does not put you in violation of any legal obligations or agreements.
5. Venmo’s terms of service: It’s important to familiarize yourself with Venmo’s terms of service and guidelines regarding the rejection of payments. Venmo provides guidelines on acceptable use and may have restrictions in place to prevent misuse or abuse of the platform. Familiarize yourself with these guidelines to ensure that your actions align with Venmo’s policies.
Ultimately, while Venmo provides the flexibility to reject payments, it’s essential to exercise good judgment and only reject payments for valid reasons. Clear communication, mutual understanding, and a fair resolution should be the goal when rejecting a payment on Venmo.
If you have any doubts or concerns about whether a payment can be rejected, it’s recommended to reach out to Venmo’s support team for clarification and guidance. They will be able to provide accurate and up-to-date information based on your specific situation.
Conclusion
Rejecting a payment on Venmo may not be a feature explicitly provided by the platform, but there are steps you can take to handle unwanted transactions. Understanding why you might want to reject a payment and how to navigate the process is essential for managing your transactions effectively.
In this article, we explored the reasons why you may want to reject money on Venmo, such as incorrect payment amounts, unauthorized transactions, changes of plans, personal preferences, and privacy concerns. We also provided step-by-step instructions on how to reject a payment, including opening the Venmo app, navigating to the payment, tapping the “Reject Payment” option, and confirming the rejection.
When you reject a payment on Venmo, it’s important to recognize that the funds associated with the rejected transaction remain in your account, and you will need to initiate a separate transaction to return the funds to the sender. Maintaining open communication with the sender is crucial to address any concerns, facilitate a smooth resolution, and avoid misunderstandings.
While Venmo allows you to reject payments, it’s important to act responsibly and consider the reasons behind your decision. Understanding Venmo’s terms of service, adhering to any financial obligations or legal considerations, and practicing transparency in your communication with the sender are key factors in managing rejected payments effectively.
Remember, Venmo’s policies and procedures can change over time, so it’s always a good idea to refer to the latest guidelines provided by Venmo to ensure that you have the most accurate information.
By following the guidelines outlined in this article and considering the implications of rejecting a payment, you can navigate the process with confidence and maintain a positive experience with Venmo while effectively managing your transactions.