Introduction
Verifying your Venmo account is an essential step to ensure the security, reliability, and full functionality of your Venmo experience. Venmo is a widely used peer-to-peer payment platform that allows you to easily send and receive money from friends, family, and businesses. By verifying your account, you can unlock valuable features such as increased transaction limits, faster transfers, and added protection against fraudulent activities.
In this article, we will guide you through the process of verifying your Venmo account step by step. From confirming your email address to providing your social security number and uploading a photo ID, we will cover all the necessary information to help you successfully complete the verification process.
It’s important to note that Venmo takes privacy and security seriously. They use industry-standard encryption and multi-factor authentication to protect your personal and financial information. The verification process is designed to comply with legal requirements and to ensure the safety of the Venmo community.
So, if you’re ready to take the next step towards a fully verified Venmo account, let’s get started and walk you through the process that will give you peace of mind and allow you to make the most out of this popular payment platform.
Why should I verify my Venmo account?
Verifying your Venmo account offers significant benefits that can enhance your overall experience and provide you with added security. While Venmo allows you to use some features without verification, there are limitations and restrictions that can be lifted by completing the verification process. Here are a few reasons why you should consider verifying your Venmo account:
- Increased transaction limits: A verified Venmo account typically has higher transaction limits compared to an unverified account. This means you have the flexibility to send and receive larger amounts of money, allowing you to seamlessly handle transactions of various sizes.
- Faster transfer of funds: With a verified account, you can expect faster transfers of funds between your Venmo account and linked bank account. This means you’ll experience quicker access to your money, making it more convenient for your financial needs.
- Added security: Verifying your Venmo account adds an additional layer of security. By confirming your identity, Venmo can better protect your account from unauthorized access and potential fraudulent activities. This can give you peace of mind while using the platform to carry out transactions with friends, family, or businesses.
- Unlock additional features: Some features and functionalities on Venmo are exclusively available to verified users. By going through the verification process, you can access these features, such as the ability to use Venmo’s instant transfer service, enabling you to move money faster when needed.
- Build trust with other users: Verifying your Venmo account helps to establish trust among other users. When you have a verified account, it signals to others that you have taken the necessary steps to ensure the legitimacy and authenticity of your profile. This can be especially important when transacting with new or unfamiliar individuals.
While it’s true that you can use Venmo without verifying your account, it’s important to consider the benefits that come with completing the verification process. By having a verified account, you’ll have access to increased functionality, heightened security, and a more seamless Venmo experience overall. So, take the step towards verification and unlock the full potential of your Venmo account.
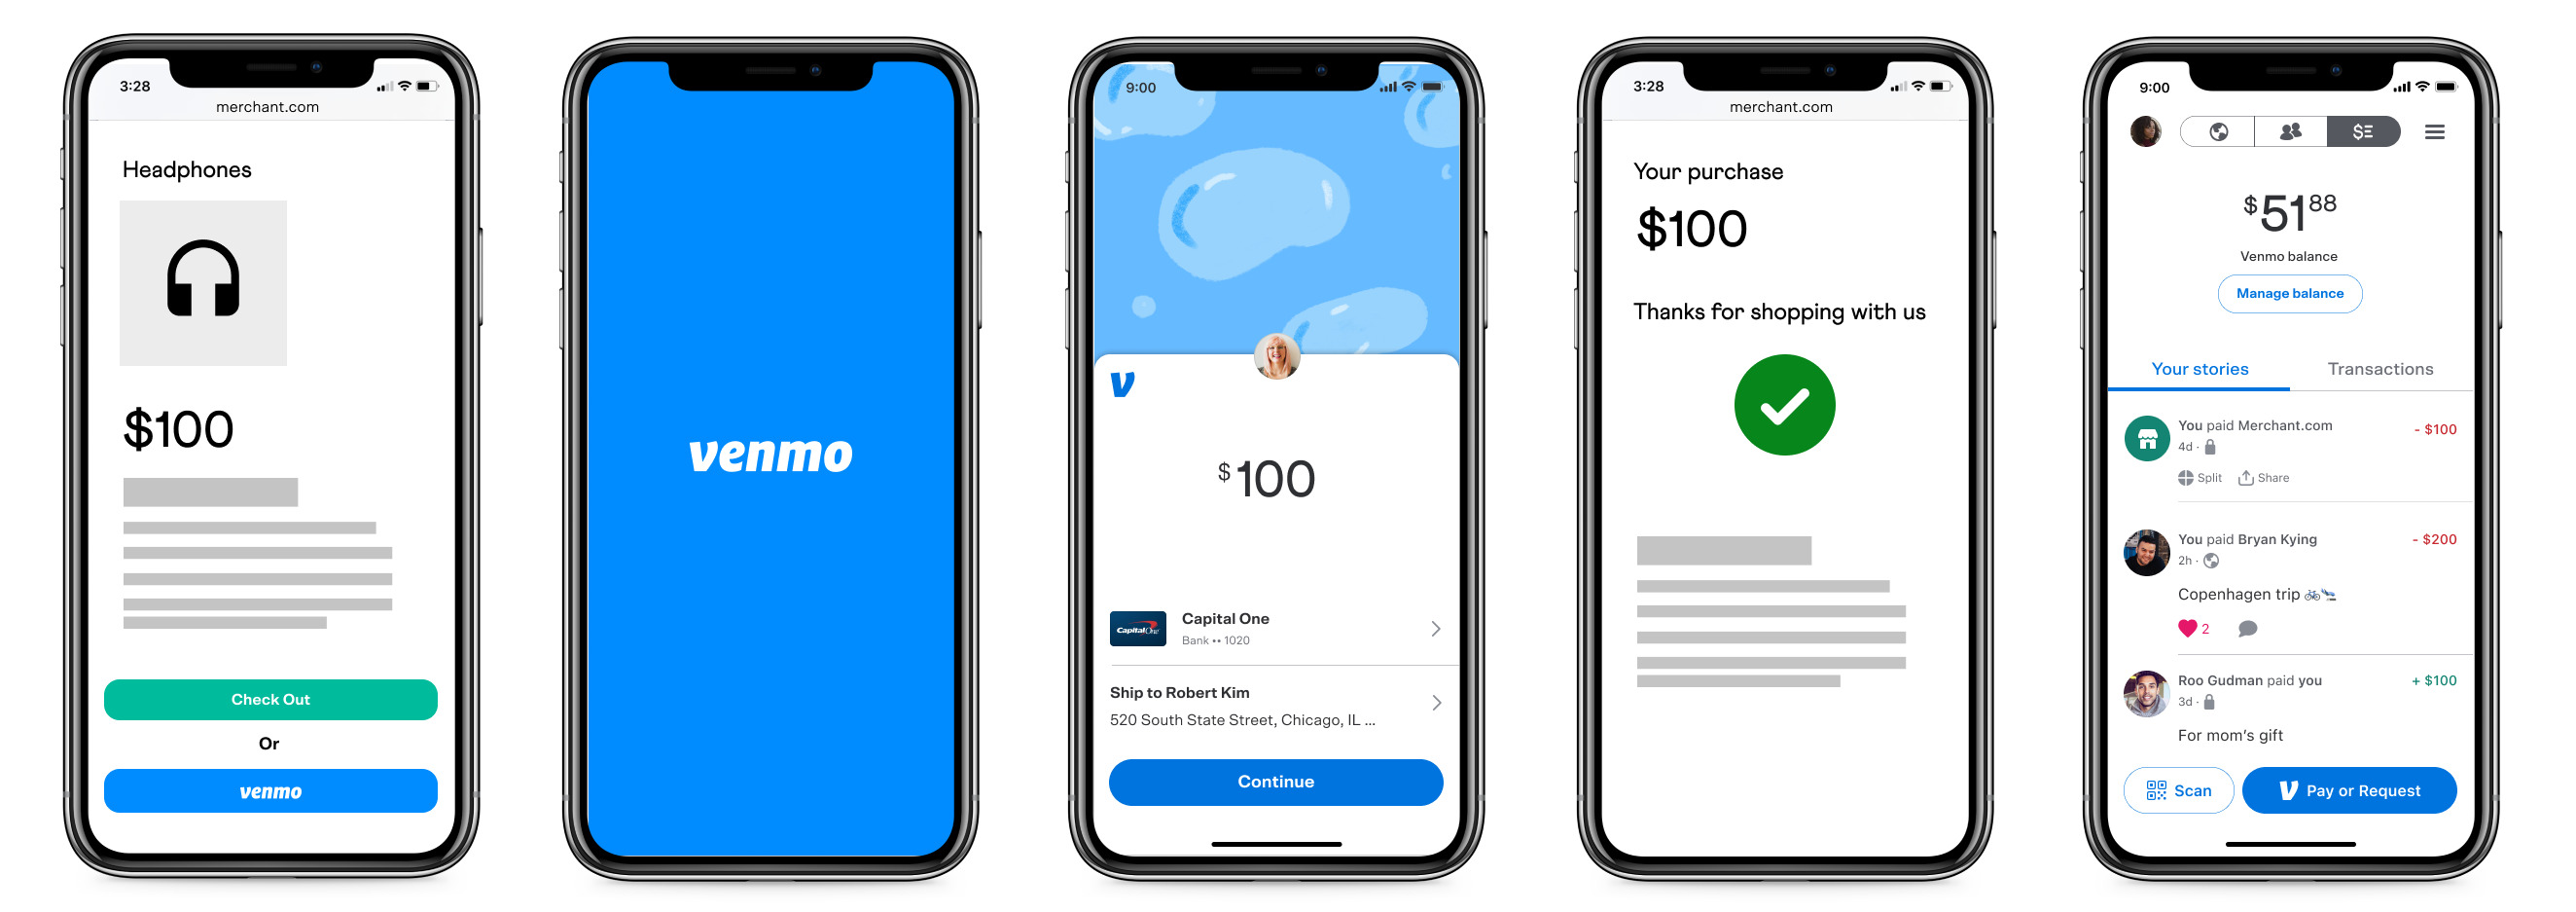
How to start the verification process
Getting started with the verification process on Venmo is quick and straightforward. Follow these steps to begin the verification process:
- Confirm your email address: The first step is to ensure that your email address on Venmo is verified. To do this, log in to your Venmo account and go to your settings. Look for the option to verify your email address and follow the instructions provided. Once your email address is confirmed, you can move on to the next step.
- Link your phone number: Next, you’ll need to link your phone number to your Venmo account. This step adds an additional layer of security and helps Venmo verify your identity. In your Venmo settings, you’ll find an option to add or verify your phone number. Follow the prompts to enter your phone number and complete the verification process.
- Connect your bank account: To further enhance the security and functionality of your Venmo account, you can link your bank account. This allows you to easily transfer funds between your bank account and Venmo. Navigate to your Venmo settings and look for the option to add a bank account. Follow the instructions to connect your bank account securely.
- Provide your social security number: As part of the verification process, Venmo may require you to provide your social security number. This is done to verify your identity and comply with legal requirements. Venmo takes the security of your personal information seriously and uses encryption to protect your sensitive data. To provide your social security number, go to your Venmo settings and look for the option to enter this information.
- Verify your identity with a photo ID: The final step in the verification process is to submit a photo ID to confirm your identity. Venmo accepts various forms of identification, including a driver’s license, passport, or state-issued identification card. Take a clear photo of your ID and follow the instructions in your Venmo account settings to upload it securely.
- Wait for verification: Once you have completed the above steps, Venmo will review your information and documentation to verify your account. The verification process may take some time, so be patient while Venmo ensures the accuracy and authenticity of your details. You will be notified by Venmo once your account has been successfully verified.
By following these steps and providing the necessary information, you will be well on your way to completing the verification process on Venmo. Remember to double-check your details and ensure the accuracy of the information you provide. This will help to streamline the verification process and ensure a hassle-free experience.
Step 1: Confirm your email address
The first step in the verification process is to confirm your email address on Venmo. Verifying your email ensures that you have a valid and active email associated with your account. This step is important as it helps Venmo communicate important account-related information and notifications to you.
To confirm your email address, follow these simple steps:
- Log in to your Venmo account: Visit the Venmo website or open the Venmo app on your mobile device and log in using your credentials. Make sure you enter the correct email address and password associated with your Venmo account.
- Go to your settings: Once logged in, navigate to your account settings. On the website, you can find this option by clicking on your profile picture in the top-right corner and selecting “Settings” from the drop-down menu. In the app, you can access your settings by tapping on the “Settings” icon, usually represented by a gear or three horizontal lines.
- Locate the email verification option: Within your account settings, look for the option to verify your email address. It may be listed as “Email Verification,” “Confirm Email,” or something similar. Click on this option to proceed.
- Check your email: After selecting the email verification option, Venmo will send an email to the address associated with your account. Open your email inbox and look for an email from Venmo. If you don’t see it, check your spam or junk folders as well.
- Click on the verification link: In the email from Venmo, you will find a verification link. Click on this link to confirm your email address. This will redirect you back to Venmo, and you will receive a confirmation message indicating that your email address has been successfully verified.
Confirming your email address is a crucial step in the Venmo verification process. It helps to ensure that your account information is up to date and that you receive important notifications and communications from Venmo. By following these steps, you can easily confirm your email address and move on to the next stage of the verification process.
Step 2: Link your phone number
Linking your phone number to your Venmo account is an important step in the verification process. It adds an extra layer of security and helps Venmo confirm your identity. By linking your phone number, you can enhance the security of your account and receive important account-related notifications via SMS.
To link your phone number to your Venmo account, follow these steps:
- Log in to your Venmo account: Access the Venmo website or open the Venmo app on your mobile device. Enter your login credentials – your email address or mobile number, and password – to sign in to your account.
- Go to your settings: Once logged in, navigate to your account settings. On the website, you can find this option by clicking on your profile picture in the top-right corner and selecting “Settings” from the drop-down menu. In the app, look for the “Settings” icon, usually represented by a gear or three horizontal lines.
- Find the phone number verification option: Within your account settings, locate the option to add or verify your phone number. It may be listed as “Phone Verification” or similar wording. Click on this option to proceed.
- Enter your phone number: Follow the prompts to enter your phone number. Make sure to include the correct country code and ensure that the phone number you provide is active and accessible. Once entered, select the option to verify your phone number.
- Receive and enter the verification code: Venmo will send a verification code to the phone number you provided. Wait to receive the code via SMS and enter it into the provided field. This code confirms that you have access to the phone number and helps Venmo validate your identity.
- Verify your phone number: After entering the verification code, Venmo will confirm the successful link of your phone number to your account. You will receive a notification or message indicating that your phone number has been verified and linked to your Venmo account.
Linking your phone number to your Venmo account enhances the security and reliability of your account. It allows Venmo to verify your identity and provides you with an additional layer of protection against unauthorized access. By following these steps, you can easily link your phone number and proceed with the verification process on Venmo.
Step 3: Connect your bank account
Connecting your bank account to your Venmo account is an essential step in the verification process. By linking your bank account, you can easily transfer funds between your bank and Venmo, enabling seamless transactions and faster access to your money.
To connect your bank account to your Venmo account, follow these steps:
- Log in to your Venmo account: Visit the Venmo website or open the Venmo app on your mobile device. Enter your login credentials – your email address or mobile number, and password – to sign in to your account.
- Go to your settings: Once logged in, navigate to your account settings. On the website, you can find this option by clicking on your profile picture in the top-right corner and selecting “Settings” from the drop-down menu. In the app, look for the “Settings” icon, usually represented by a gear or three horizontal lines.
- Locate the bank account option: Within your account settings, find the option to add or connect your bank account. Look for terms like “Banking” or “Bank Account” and click on this option to proceed.
- Select your bank: Venmo will provide you with a list of banks to choose from. Look for your bank in the provided options and select it. If you can’t find your bank, you can manually search for it using the search bar.
- Enter your bank account details: Follow the prompts to enter your bank account details accurately. This typically includes your account number and routing number, which can be found on your checks or by contacting your bank. Ensure that you provide the correct information to avoid any issues.
- Confirm the connection: Once you’ve entered your bank account details, Venmo may ask you to confirm the connection. This can be done through various methods, such as logging in to your online banking portal or verifying a small transaction amount. Follow the provided instructions to confirm the connection successfully.
- Bank account linked: After confirming the connection, Venmo will notify you that your bank account has been successfully linked to your Venmo account. You can now enjoy the convenience of transferring funds between your bank account and Venmo.
Connecting your bank account to your Venmo account is a crucial step in the verification process. It allows for easy and secure transactions, as well as faster access to your funds. By following these steps, you can seamlessly connect your bank account and take full advantage of Venmo’s payment features.
Step 4: Provide your social security number
As part of Venmo’s verification process, you may be required to provide your social security number (SSN). This step is crucial in confirming your identity and complying with legal requirements. Rest assured that Venmo takes the security of your personal information seriously and uses encryption to protect your sensitive data.
To provide your social security number, follow these steps:
- Log in to your Venmo account: Access the Venmo website or open the Venmo app on your mobile device. Enter your login credentials – your email address or mobile number, and password – to sign in to your account.
- Go to your settings: Once logged in, navigate to your account settings. On the website, you can find this option by clicking on your profile picture in the top-right corner and selecting “Settings” from the drop-down menu. In the app, look for the “Settings” icon, usually represented by a gear or three horizontal lines.
- Find the social security number option: Within your account settings, locate the option to provide your social security number. It may be listed as “SSN Verification” or something similar. Click on this option to proceed.
- Enter your social security number: Follow the prompts to enter your social security number accurately. Ensure that you double-check the digits and enter the correct information. Venmo uses this information to verify your identity and confirm your account.
- Confirm the submission: After entering your social security number, Venmo may ask you to confirm the submission. Take a moment to review the provided details and ensure that everything is accurate. Once you are confident in the information provided, select the option to confirm the submission.
- Waiting for verification: After you have submitted your social security number, Venmo will review the information to verify your account. The verification process may take some time, so be patient while Venmo ensures the accuracy and authenticity of your details.
Providing your social security number is an important step in the Venmo verification process. It allows Venmo to validate your identity and comply with legal regulations. By following these steps and accurately entering your social security number, you can proceed with the verification process and have peace of mind regarding the security of your account.
Step 5: Verify your identity with a photo ID
Verifying your identity with a photo ID is a crucial step in the Venmo verification process. This step ensures that your account is fully authenticated and helps protect against fraud and unauthorized access. Venmo accepts various forms of identification, such as a driver’s license, passport, or state-issued ID card.
To verify your identity with a photo ID, follow these steps:
- Log in to your Venmo account: Access the Venmo website or open the Venmo app on your mobile device. Enter your login credentials – your email address or mobile number, and password – to sign in to your account.
- Go to your settings: Once logged in, navigate to your account settings. On the website, you can find this option by clicking on your profile picture in the top-right corner and selecting “Settings” from the drop-down menu. In the app, look for the “Settings” icon, usually represented by a gear or three horizontal lines.
- Find the identity verification option: Within your account settings, locate the option for identity verification or uploading a photo ID. It may be listed as “ID Verification,” “Identity,” or similar wording. Click on this option to proceed.
- Choose the type of photo ID: Venmo will provide you with options regarding the type of photo ID you wish to submit for verification. This may include a driver’s license, passport, or state-issued ID card. Select the appropriate option based on the ID you have available.
- Upload a clear photo of your ID: Follow the prompts to upload a clear and legible photo of your selected ID. Ensure that the entire ID is visible, and all details are easily readable. Make sure there is adequate lighting and no glare or shadows that could hinder the readability of the ID.
- Submit the photo ID: After uploading the photo of your ID, review it to ensure its clarity and accuracy. Once you are satisfied, select the option to submit the photo ID for verification.
- Waiting for verification: Venmo will review the photo ID you submitted to verify your identity. The verification process may take some time, depending on the volume of submissions. Be patient while Venmo confirms the authenticity and accuracy of your ID.
Verifying your identity with a photo ID is an essential step to ensure the security and legitimacy of your Venmo account. By following these steps and submitting a clear and accurate photo of your ID, you can proceed with confidence, knowing that your account is fully authenticated and secure.
Step 6: Wait for verification
After completing all the necessary steps and providing the required information for verification, you will need to wait for Venmo to review and verify your account. The verification process typically takes time as Venmo ensures the accuracy and authenticity of the provided information. During this waiting period, it’s important to exercise patience and allow Venmo sufficient time to complete the verification process.
While waiting for verification, here are a few things to keep in mind:
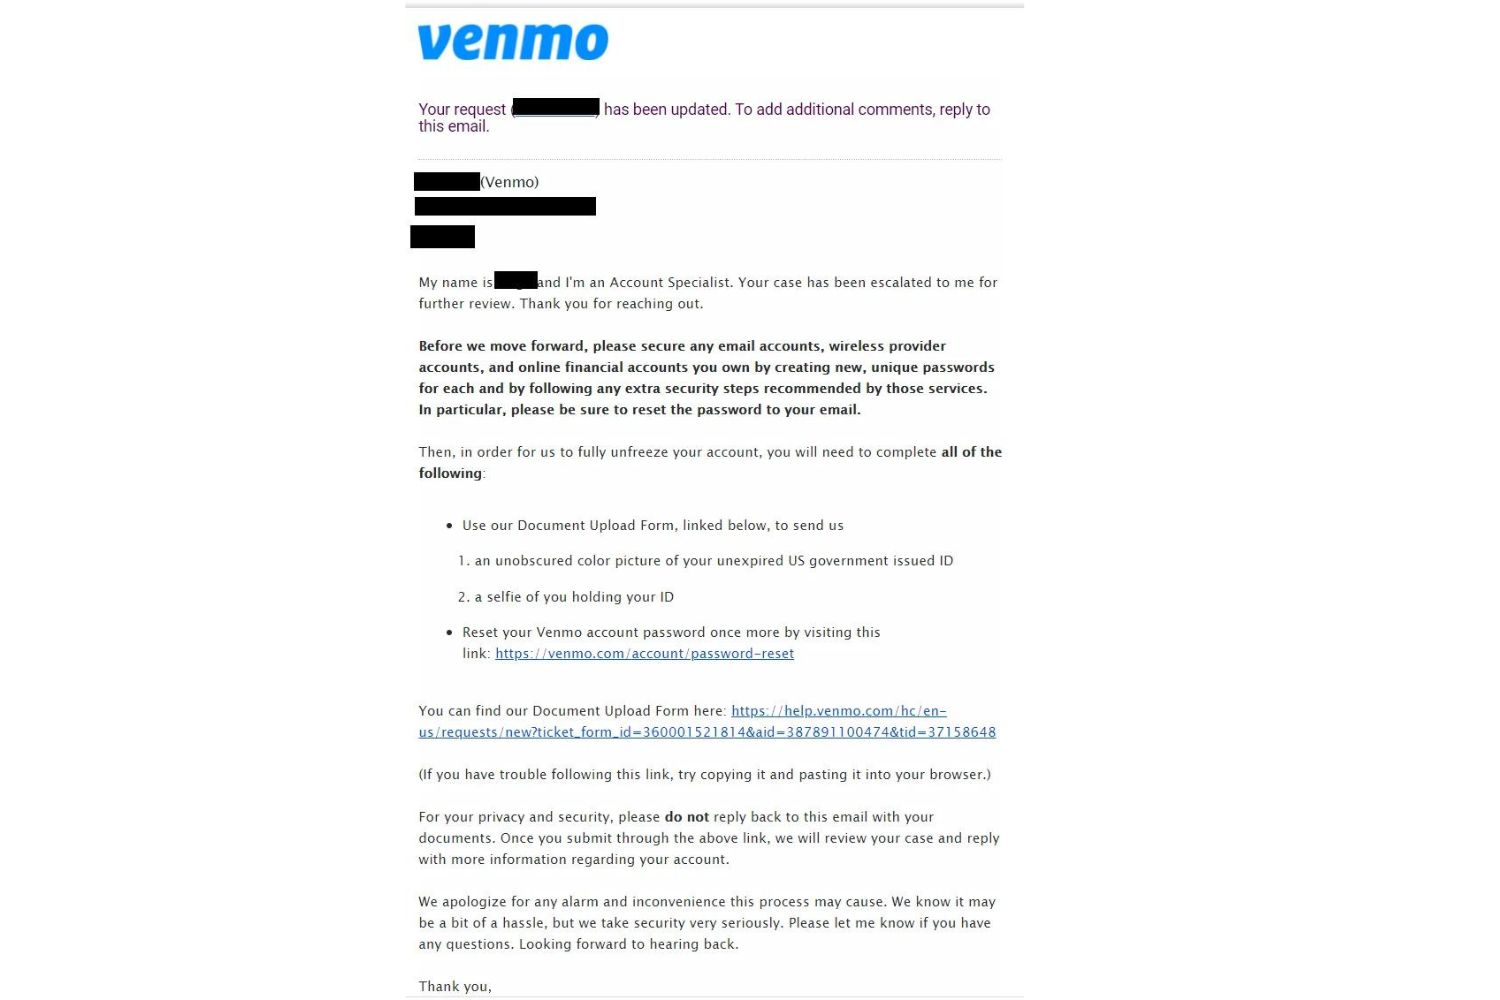
- Check your email and notifications: Venmo may send you updates or requests for additional information during the verification process. Keep an eye on your email inbox and notifications within your Venmo account for any correspondence from Venmo.
- Review your account settings: Take the time to review your account settings and ensure that all the information you provided is accurate. If you notice any discrepancies or need to make changes, you can do so while awaiting verification.
- Be available for support: If Venmo requires further clarification or additional documentation, they may reach out to you for support. Stay accessible and responsive to any requests to expedite the verification process.
- Exercise caution with account activity: While waiting for verification, it’s advisable to exercise caution with your account activity. Avoid making large transfers or engaging in high-risk transactions until your account has been fully verified.
- Keep your documents handy: In case Venmo requests additional documents or proof of identification, keep your identification documents readily available. This way, you can respond promptly and provide any necessary information.
- Follow up if necessary: If an extended period has passed since you submitted your verification documents and you have not received any communication from Venmo, you may consider reaching out to their support team. They can provide updates on the status of your verification and assist you with any questions or concerns.
Remember, the verification process takes time to ensure the security and reliability of your Venmo account. By remaining patient and following the guidelines provided by Venmo, you can help facilitate a smooth verification process and soon enjoy the full benefits of a verified Venmo account.
Tips for a successful verification process
The verification process on Venmo can be straightforward if you follow the necessary steps and provide accurate information. To ensure a smooth and successful verification process, consider the following tips:
- Double-check your information: Before submitting any information or documents, double-check that you have entered the correct details. Accuracy is crucial to avoid unnecessary delays or rejections during the verification process.
- Use clear and high-quality photos: When uploading documents or photos, ensure they are clear and of high quality. Blurry or low-resolution images may lead to difficulties in verifying your identity, and you may be requested to re-submit clear copies.
- Provide valid and up-to-date documents: Make sure that the documents you provide for verification are valid and not expired. If you are using an ID card or passport, check the expiration date and ensure they are still valid at the time of submission.
- Be responsive and prompt: Respond to any requests or inquiries from Venmo promptly. This will help expedite the verification process and prevent unnecessary delays. Regularly check your email inbox and Venmo notifications for any updates.
- Ensure the document matches your Venmo account details: The information on your identification document must match the details you have provided on your Venmo account. Make sure that your name, address, and other personal information are consistent to avoid any discrepancies.
- Stay informed: Familiarize yourself with Venmo’s guidelines and requirements for verification. This will help you understand the process better and ensure that you provide all the necessary information and documentation.
- Keep personal information secure: While it’s important to provide the required information for verification, be cautious about sharing personal details outside of the Venmo platform. Venmo will always maintain the privacy and security of your information.
- Patience is key: The verification process may take some time, depending on the volume of verifications being processed. Be patient and avoid submitting multiple requests or inquiries unless necessary. Venmo strives to verify accounts as efficiently as possible.
By following these tips, you can increase the chances of a successful verification process on Venmo. Remember to provide accurate information, respond promptly to any requests, and maintain patience throughout the verification process. Soon enough, you’ll have a fully verified Venmo account, allowing you to enjoy all the benefits and features that come with it.
Conclusion
Verifying your Venmo account is a necessary step to ensure the security, reliability, and expanded functionality of your Venmo experience. By confirming your email address, linking your phone number, connecting your bank account, providing your social security number, verifying your identity with a photo ID, and patiently waiting for verification, you can successfully complete the verification process on Venmo.
Verifying your Venmo account offers numerous benefits, including increased transaction limits, faster fund transfers, added security measures, access to exclusive features, and enhanced trustworthiness among other users. It’s important to follow the provided steps in a thorough and accurate manner, providing the necessary information and documentation as requested.
Throughout the verification process, remember to exercise caution and protect your personal information. Venmo takes the security and privacy of your data seriously and employs encryption and other safeguards to keep your information safe. Always remember to double-check your details, respond promptly to any requests for information from Venmo, and be patient during the verification process.
Once your Venmo account is verified, you can enjoy a more robust and secure payment experience, with greater flexibility and convenience for your financial transactions. Whether you’re sending money to friends, family, or businesses, a verified Venmo account gives you peace of mind and unlocks the full potential of this popular digital payment platform.