Introduction
Transferring money between online payment platforms has become increasingly common, especially as more people are embracing the convenience of digital transactions. If you have funds in your PayPal account that you want to transfer to your Venmo account, you’ll be pleased to know that the process is fairly straightforward.
In this guide, we will walk you through the steps to transfer money from PayPal to Venmo seamlessly. By following these simple instructions, you can quickly access your funds and use them for various transactions on the Venmo platform.
Before we dive into the steps, it’s important to note that both PayPal and Venmo are popular online payment services that offer similar features. While PayPal is widely used for buying and selling goods, Venmo shines as a peer-to-peer payment app that focuses on splitting bills, paying friends, and transferring funds between individuals.
Now, let’s get started with the process of linking your PayPal account to Venmo.
Step 1: Link your PayPal account to your Venmo account
To initiate the transfer between PayPal and Venmo, you’ll first need to ensure that your PayPal account is linked to your Venmo account. This will allow seamless transactions between the two platforms. Here’s how you can do it:
- Open the Venmo app on your mobile device or visit the Venmo website on your computer.
- Login to your Venmo account using your credentials. If you don’t have an account, you can sign up for one easily.
- Once you’re logged in, navigate to the “Settings” or “Account” section of your Venmo account. This may vary slightly depending on the device you’re using.
- Look for the option to connect/link your PayPal account. It may be labeled as “Link PayPal” or something similar.
- Click on the “Link PayPal” button and follow the prompts to login to your PayPal account.
- After logging into your PayPal account, you’ll see a confirmation screen asking you to authorize the connection between PayPal and Venmo. Read through the details and click “Authorize” or “Agree” to proceed.
Once you’ve completed these steps, your PayPal account will be successfully linked to your Venmo account. This means you’ll be able to transfer funds between the two platforms without any hassle.
It’s crucial to note that linking your PayPal account to Venmo allows you to transfer funds from PayPal to Venmo, but not the other way around. If you want to transfer funds from Venmo to PayPal, you’ll need to explore other options as it’s currently not supported.
Now that your PayPal and Venmo accounts are integrated, you’re ready to move on to verifying your PayPal account, which is a necessary step to complete before you can initiate any transfers.
Step 2: Verify your PayPal account
Before you can transfer money from your PayPal account to Venmo, it’s important to ensure that your PayPal account is verified. Verifying your account adds an extra layer of security and allows you to access all the features and benefits that PayPal has to offer. Here’s how you can verify your PayPal account:
- Login to your PayPal account using your credentials. If you don’t have a PayPal account, you’ll need to sign up for one first.
- Navigate to the “Settings” or “Account” section of your PayPal account. The location of this section may vary slightly depending on the device you’re using.
- Look for the option to “Verify Your Account” or “Confirm Your Information.” This is usually found under the “Account Overview” tab.
- Follow the prompts to complete the verification process. This typically involves linking a bank account or adding a credit/debit card to your PayPal account.
- During the verification process, PayPal may make a small deposit or charge to your linked bank account or card. Check your bank or card statement and note the exact amount.
- Once you’ve verified your PayPal account, you’ll need to confirm the deposited amount or the charged amount in your PayPal account. This step further validates your ownership of the linked bank account or card.
Once you’ve completed these steps and successfully verified your PayPal account, you’ll have increased confidence in using the platform for your financial transactions. Verifying your account also ensures that your transfers to Venmo and other payment platforms are secure and seamless.
Now that your PayPal account is verified, it’s time to move on to the next step – transferring money from PayPal to Venmo.
Step 3: Transfer money from PayPal to Venmo
Now that your PayPal account is linked to your Venmo account and your PayPal account is verified, it’s time to transfer money from PayPal to Venmo. Follow these simple steps to initiate the transfer:
- Login to your Venmo account using your credentials. Ensure that you are on the home screen of the Venmo app or website.
- Look for the “Transfer Money” or “Send Money” option. This is usually represented by a dollar sign icon or a “Pay or Request” button.
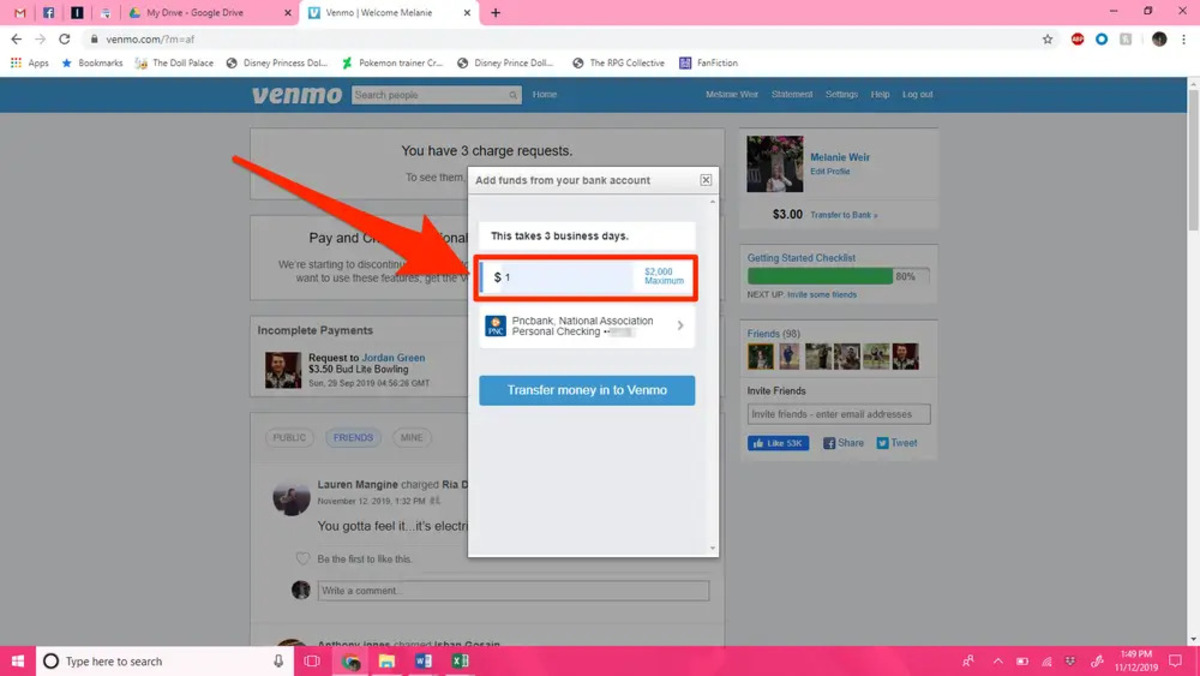
- Select the option to “Transfer from PayPal.” You may need to provide additional details or permissions to access your PayPal account.
- Enter the amount of money you wish to transfer from your PayPal account to Venmo. Double-check the entered amount to avoid any errors.
- Review the transfer details, including any applicable fees or charges. Pay close attention to the estimated transfer time, as this can vary depending on the volume of transfers.
- Confirm the transfer by clicking on the “Transfer” or “Confirm” button. Wait for a confirmation message or notification that the transfer has been initiated.
Once you’ve completed these steps, your money will begin the process of transferring from your PayPal account to your Venmo account. It may take a few minutes or up to a few business days for the transfer to complete, depending on various factors such as the amount and PayPal’s processing time.
It’s important to note that Venmo may charge a fee for instant transfers, which allows you to receive the money in your Venmo account instantly. However, if you choose the standard transfer option, there are usually no fees involved.
Now that you’ve successfully initiated the transfer, it’s time to move on to the next step – confirming the transfer in Venmo.
Step 4: Confirm the transfer in Venmo
After initiating the transfer from PayPal to Venmo, the next step is to confirm the transfer in your Venmo account. This step ensures that the transferred funds are successfully deposited into your Venmo balance. Follow these steps to confirm the transfer:
- Login to your Venmo account using your credentials.
- Once you’re logged in, locate the transaction labeled as the transfer from PayPal. This transaction should be visible in your Venmo activity feed or transaction history.
- Click on the transfer transaction to view the details. Verify that the transfer amount matches your intended amount.
- If the details are correct, click on the “Confirm” or “Accept” button to finalize the transfer. This confirms that you want the funds to be added to your Venmo account balance.
- Wait for a confirmation message or notification stating that the transfer has been completed. Once confirmed, the funds will be available for you to use within your Venmo account.
It’s important to note that the timing of the confirmation step may vary depending on the transfer processing time. In some cases, the confirmation may be required immediately after initiating the transfer, while in others, it may be required once the transfer has been processed by Venmo.
After confirming the transfer, you can start using the transferred funds within your Venmo account. Whether you want to make payments to friends, split bills, or share expenses, you’ll have the flexibility to do so with the available balance in your Venmo account.
Now that the transfer is confirmed and the funds are deposited into Venmo, let’s move on to the final step of the process – completing the transfer.
Step 5: Complete the transfer process
Once the transfer from PayPal to Venmo is confirmed and the funds are deposited into your Venmo account, it’s time to complete the transfer process. This final step ensures that you have successfully received and can utilize the transferred funds within the Venmo platform. Follow these steps to complete the transfer:
- Login to your Venmo account using your credentials.
- Ensure that the transferred amount is now available in your Venmo balance. You can check your Venmo balance on the home screen or account overview page.
- Review the available balance to verify that it matches the amount you transferred from PayPal.
- If the balance is correct, you can now freely use the funds for various transactions within the Venmo app. You can make payments to friends, merchants, or transfer the funds to your linked bank account.
- Keep track of your transactions and monitor your Venmo balance to ensure you have a clear overview of your financial activity.
It’s important to note that Venmo offers additional features and functionality, such as the ability to request money from friends and split bills. You can explore these options within the app to make the most of your Venmo account and the transferred funds.
With the completion of this final step, you have successfully transferred money from your PayPal account to your Venmo account. Now you can enjoy the ease and flexibility of using your funds within the Venmo platform for a range of transactions.
It’s worth mentioning that if you have any issues or questions regarding the transfer process or any other aspect of using PayPal or Venmo, it’s advisable to reach out to their respective customer support teams for assistance and guidance.
Conclusion
Transferring money from PayPal to Venmo provides a convenient way to access your funds and utilize them for various transactions within the Venmo platform. By following the steps outlined in this guide, you can successfully link your PayPal account to Venmo, verify your PayPal account, initiate the transfer, confirm the transfer in Venmo, and complete the transfer process.
Remember to ensure that your PayPal account is verified before initiating any transfers. This adds an extra layer of security and allows you to access all the features and benefits that PayPal has to offer.
It’s important to note that while you can easily transfer money from PayPal to Venmo, the reverse is currently not supported. If you want to transfer funds from your Venmo account back to PayPal, you’ll need to explore alternative options.
Throughout the process, it’s crucial to keep track of your transactions and monitor your Venmo balance to have a clear overview of your financial activity. Additionally, familiarize yourself with the additional features and functionality offered by Venmo, such as splitting bills and requesting money from friends.
If you encounter any issues or have questions regarding the transfer process or any other aspect of using PayPal or Venmo, don’t hesitate to reach out to their respective customer support teams for assistance. They are there to help you resolve any concerns and ensure a smooth and seamless experience.
Now that you have the knowledge and know-how, you can confidently transfer money from PayPal to Venmo and enjoy the convenience and flexibility of managing your funds within the Venmo platform.